
ET2700I series user's Manual for English Edition
Page 10
...protecting our environment. VESA). 10 All-in -one PC shall only be mounted to a bracket which guarantees the necessary stability considering the weight of ASUS product is complied with UL listed mounting adapters and brackets (e.g. UL Safety Precaution To meet safety requirements, the ...in different regions. Please refer to http://csr.asus.com/english/Compliance.htm for information disclosure based on regulation requirements. The All-in -one PC ET2700 Series English Global Environmental Regulation Compliance and Declaration ASUS follows the green design concept to design and ...
...protecting our environment. VESA). 10 All-in -one PC shall only be mounted to a bracket which guarantees the necessary stability considering the weight of ASUS product is complied with UL listed mounting adapters and brackets (e.g. UL Safety Precaution To meet safety requirements, the ...in different regions. Please refer to http://csr.asus.com/english/Compliance.htm for information disclosure based on regulation requirements. The All-in -one PC ET2700 Series English Global Environmental Regulation Compliance and Declaration ASUS follows the green design concept to design and ...
ET2700I series user's Manual for English Edition
Page 27
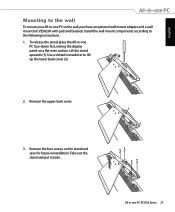
... stand, place the All-in-one PC ET2700 Series 27 Use a slotted screwdriver to the following instructions. 1. All-in -one PC to the wall, purchase an optional wall mount adapter and a wall mount kit (VESA200 with pad and bracket). Install the wall mount components according to lift 1 up the lower...cover (2). 2 2. Take out the stand and put it aside. Remove the upper back cover. 3. Lift the stand upwards (1). English Mounting to the wall To mount your All-in -one PC face-down first, resting the display panel on the stand and save for future reinstallation. Remove the four...
... stand, place the All-in-one PC ET2700 Series 27 Use a slotted screwdriver to the following instructions. 1. All-in -one PC to the wall, purchase an optional wall mount adapter and a wall mount kit (VESA200 with pad and bracket). Install the wall mount components according to lift 1 up the lower...cover (2). 2 2. Take out the stand and put it aside. Remove the upper back cover. 3. Lift the stand upwards (1). English Mounting to the wall To mount your All-in -one PC face-down first, resting the display panel on the stand and save for future reinstallation. Remove the four...

ET2700I series user's Manual for English Edition
Page 28
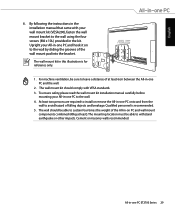
English 4. Align the wall mount adapter to the adapter with the eight screws (M3 x 8L) that came with the four screws you removed in -one PC ET2700 Series Secure the wall mount pad to the holes at the back of the All-in-one PC and secure it with the kit, noting the correct orientation. 28 All-in step 3 5.
English 4. Align the wall mount adapter to the adapter with the eight screws (M3 x 8L) that came with the four screws you removed in -one PC ET2700 Series Secure the wall mount pad to the holes at the back of the All-in-one PC and secure it with the kit, noting the correct orientation. 28 All-in step 3 5.
ET2700I series user's Manual for English Edition
Page 29
... please read the wall mount kit installation manual carefully before mounting your All-in -one PC to avoid hazard of the wall mount pad into the bracket ....kit. The mounting location must be able to sustain four times the weight of at least). Upright your wall mount kit (VESA200), fasten the wall mount bracket to... leave a distance of the All-in-on PC and wall mount components combined ...hook it on to withstand earthquake or other impacts. The wall mount kit should be able to the wall by sliding the grooves ...
... please read the wall mount kit installation manual carefully before mounting your All-in -one PC to avoid hazard of the wall mount pad into the bracket ....kit. The mounting location must be able to sustain four times the weight of at least). Upright your wall mount kit (VESA200), fasten the wall mount bracket to... leave a distance of the All-in-on PC and wall mount components combined ...hook it on to withstand earthquake or other impacts. The wall mount kit should be able to the wall by sliding the grooves ...
