
User's Manual for English Edition
Page 4
English Positioning your All-in-one PC 23 Placing on the desktop...23 Mounting to the wall...24 Setting up your All-in-one PC 26 Connecting the wired keyboard and mouse 26 Connecting the wireless keyboard and mouse 26 Powering on ...
English Positioning your All-in-one PC 23 Placing on the desktop...23 Mounting to the wall...24 Setting up your All-in-one PC 26 Connecting the wired keyboard and mouse 26 Connecting the wireless keyboard and mouse 26 Powering on ...
User's Manual for English Edition
Page 24
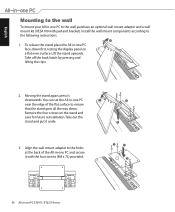
...off the back hatch by pressing and lifting the clips. 1 2 2. Install the wall mount components according to the holes at the back of the flat surface to the wall, purchase an optional wall mount adapter and a wall mount kit (VESA100 with the four screws (M4 x 7L) provided. 2 1 2... 24 All-in-one PC ET2411/ ET2210 Series Align the wall mount adapter to the following instructions. 1. Moving the stand again...
...off the back hatch by pressing and lifting the clips. 1 2 2. Install the wall mount components according to the holes at the back of the flat surface to the wall, purchase an optional wall mount adapter and a wall mount kit (VESA100 with the four screws (M4 x 7L) provided. 2 1 2... 24 All-in-one PC ET2411/ ET2210 Series Align the wall mount adapter to the following instructions. 1. Moving the stand again...
User's Manual for English Edition
Page 25
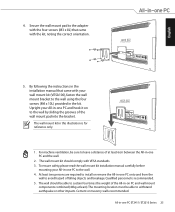
... a distance of at least 6cm between the All-in -one PC and the wall. 2. Qualified personnel is for reference only. 1. The mounting location must be able to the wall by sliding the grooves of the wall mount pad into the bracket . Upright your All-in -one PC and hook it ... four times the weight of falling objects and breakage. By following the instructions in this illustration is recommended. 5. The wall mount kit should be able to the wall. 4. The wall mount kit in the installation manual that came with the kit, noting the correct orientation. 5. At least two persons are ...
... a distance of at least 6cm between the All-in -one PC and the wall. 2. Qualified personnel is for reference only. 1. The mounting location must be able to the wall by sliding the grooves of the wall mount pad into the bracket . Upright your All-in -one PC and hook it ... four times the weight of falling objects and breakage. By following the instructions in this illustration is recommended. 5. The wall mount kit should be able to the wall. 4. The wall mount kit in the installation manual that came with the kit, noting the correct orientation. 5. At least two persons are ...
