
User Manual
Page 2
...OR ERROR IN THIS MANUAL OR PRODUCT. Copyright © 2014 ASUSTeK COMPUTER INC. LIMITATION OF LIABILITY Circumstances may arise where because of a default on ASUS' part or other actual and direct damages resulted from omission or failure of performing legal duties under this Warranty Statement. ASUS will...this Warranty Statement, up to the listed contract price of each such instance, regardless of the basis on which ASUS, its reseller. SPECIFICATIONS AND INFORMATION CONTAINED IN THIS MANUAL ARE FURNISHED FOR INFORMATIONAL USE ONLY, AND ARE SUBJECT TO CHANGE AT ANY TIME WITHOUT NOTICE, AND...
...OR ERROR IN THIS MANUAL OR PRODUCT. Copyright © 2014 ASUSTeK COMPUTER INC. LIMITATION OF LIABILITY Circumstances may arise where because of a default on ASUS' part or other actual and direct damages resulted from omission or failure of performing legal duties under this Warranty Statement. ASUS will...this Warranty Statement, up to the listed contract price of each such instance, regardless of the basis on which ASUS, its reseller. SPECIFICATIONS AND INFORMATION CONTAINED IN THIS MANUAL ARE FURNISHED FOR INFORMATIONAL USE ONLY, AND ARE SUBJECT TO CHANGE AT ANY TIME WITHOUT NOTICE, AND...
User Manual
Page 3
......17 Setting up your All-in-One PC...18 Connecting a wired keyboard and mouse...18 Connecting a wireless keyboard and mouse 18 Powering on your All-in-One PC...19 Using the On Screen Display (OSD) Menu...20 Using touch screen panel gestures on Windows® 8.1 22 Setting up a secondary display via the HDMI-output port 25 Chapter 3: Working with Windows® 8.1 Starting for the first time...27 Windows® 8.1 lock screen...27 All-in-One PC ET232 Series 3
......17 Setting up your All-in-One PC...18 Connecting a wired keyboard and mouse...18 Connecting a wireless keyboard and mouse 18 Powering on your All-in-One PC...19 Using the On Screen Display (OSD) Menu...20 Using touch screen panel gestures on Windows® 8.1 22 Setting up a secondary display via the HDMI-output port 25 Chapter 3: Working with Windows® 8.1 Starting for the first time...27 Windows® 8.1 lock screen...27 All-in-One PC ET232 Series 3
User Manual
Page 4
... Start button...31 Customizing your Start screen...33 Working with Windows® apps...34 Launching apps...34 Customizing apps...34 Accessing All Apps...35 Charms bar...37 Snap feature...39 Other keyboard shortcuts...40 Turning off your All-in-One PC...41 Putting your ASUS All-in-One PC on sleep mode 41 Chapter 4: Connecting to the Internet Setting up a Wi-Fi connection in Windows® 8.1 42 Wired connection...
... Start button...31 Customizing your Start screen...33 Working with Windows® apps...34 Launching apps...34 Customizing apps...34 Accessing All Apps...35 Charms bar...37 Snap feature...39 Other keyboard shortcuts...40 Turning off your All-in-One PC...41 Putting your ASUS All-in-One PC on sleep mode 41 Chapter 4: Connecting to the Internet Setting up a Wi-Fi connection in Windows® 8.1 42 Wired connection...

User Manual
Page 7
... network cables from the power outlets before you follow the operating instructions. -- Setting up the system on a stable surface. • Openings on the chassis are for ventilation. Do not use an abrasive cleaner or a coarse cloth when cleaning the screen. • If you use • Do not walk on the power cord or allow anything to perform at optimal touch sensitivity. Turn...
... network cables from the power outlets before you follow the operating instructions. -- Setting up the system on a stable surface. • Openings on the chassis are for ventilation. Do not use an abrasive cleaner or a coarse cloth when cleaning the screen. • If you use • Do not walk on the power cord or allow anything to perform at optimal touch sensitivity. Turn...

User Manual
Page 8
... e•ualizer beyond default levels increases the output voltage and sound pressure produced by the earphones or headphones. Adapter 1. Keep away from earphones or headphones can cause harm when used improperly. English Sound Pressure Warning Excessive sound pressure from the fan when using the product. 8 All-in particular, specify that the power socket is a moving part and can cause hearing...
... e•ualizer beyond default levels increases the output voltage and sound pressure produced by the earphones or headphones. Adapter 1. Keep away from earphones or headphones can cause harm when used improperly. English Sound Pressure Warning Excessive sound pressure from the fan when using the product. 8 All-in particular, specify that the power socket is a moving part and can cause hearing...

User Manual
Page 11
... built-in webcam with the optional TV Tuner card. HDD LED Indicates hard drive activity. Remote control receiver The remote control receiver receives the infrared signal from the remote control. English Digital microphone (Built-in) This built-in digital microphone allows you to start video chats online. NOTES: • This digital microphone is available on selected models only. • On selected models, Beam Forming is on...
... built-in webcam with the optional TV Tuner card. HDD LED Indicates hard drive activity. Remote control receiver The remote control receiver receives the infrared signal from the remote control. English Digital microphone (Built-in) This built-in digital microphone allows you to start video chats online. NOTES: • This digital microphone is available on selected models only. • On selected models, Beam Forming is on...

User Manual
Page 12
... to a local network. 12 All-in use the supplied power adapter. The power adapter may get warm or hot when in -One PC ET232 Series LAN port This 8-pin RJ-45 LAN port supports a standard Ethernet cable for models with this jack. Rear view English Antenna socket (on selected models) Connect standard indoor or outdoor male antenna connectors to DC power for use with the optional TV Tuner card. WARNING! Do not cover the adapter and keep...
... to a local network. 12 All-in use the supplied power adapter. The power adapter may get warm or hot when in -One PC ET232 Series LAN port This 8-pin RJ-45 LAN port supports a standard Ethernet cable for models with this jack. Rear view English Antenna socket (on selected models) Connect standard indoor or outdoor male antenna connectors to DC power for use with the optional TV Tuner card. WARNING! Do not cover the adapter and keep...

User Manual
Page 13
... bass (low fre•uency) sounds in -One PC subwoofers or sound devices by ASUS. All-in -One PC subwoofer. This port also comes with USB 2.0 or USB 1.1 devices such as keyboards, pointing devices, flash disk drives, external HDDs, speakers, cameras and printers. To enable the Ai Charger II on your multimedia applications. NOTE: To access ASUS Manager, double-click the ASUS Manager icon on selected models) The proprietary subwoofer jack is compatible...
... bass (low fre•uency) sounds in -One PC subwoofers or sound devices by ASUS. All-in -One PC subwoofer. This port also comes with USB 2.0 or USB 1.1 devices such as keyboards, pointing devices, flash disk drives, external HDDs, speakers, cameras and printers. To enable the Ai Charger II on your multimedia applications. NOTE: To access ASUS Manager, double-click the ASUS Manager icon on selected models) The proprietary subwoofer jack is compatible...

User Manual
Page 14
...) English USB 2.0 port This USB (Universal Serial Bus) port is designed to connect to a microphone used as keyboards, pointing devices, flash disk drives, external HDDs, speakers, cameras, and printers. 6-in-1 Memory card reader This All-in-One PC has a built-in memory card reader slot that supports MMC, SD, SDHC, SDXC, MS, MS PRO cards. When switched to switch the display signal source. Microphone jack The microphone jack is compatible with USB 2.0 or USB 1.1 devices such as a standard desktop LCD monitor. 14...
...) English USB 2.0 port This USB (Universal Serial Bus) port is designed to connect to a microphone used as keyboards, pointing devices, flash disk drives, external HDDs, speakers, cameras, and printers. 6-in-1 Memory card reader This All-in-One PC has a built-in memory card reader slot that supports MMC, SD, SDHC, SDXC, MS, MS PRO cards. When switched to switch the display signal source. Microphone jack The microphone jack is compatible with USB 2.0 or USB 1.1 devices such as a standard desktop LCD monitor. 14...
User Manual
Page 16
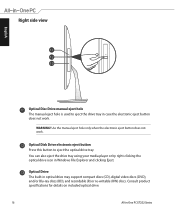
... the drive tray using your media player or by right-clicking the optical drive icon in optical drive may support compact discs (CD), digital video discs (DVD), and/or Blu-ray discs (BD), and recordable (R) or re-writable (RW) discs. Use the manual eject hole only when the electronic eject button does not work . Optical Drive The built-in Windows File Explorer and clicking Eject. WARNING! Optical Disk Drive electronic eject button Press this button to...
... the drive tray using your media player or by right-clicking the optical drive icon in optical drive may support compact discs (CD), digital video discs (DVD), and/or Blu-ray discs (BD), and recordable (R) or re-writable (RW) discs. Use the manual eject hole only when the electronic eject button does not work . Optical Drive The built-in Windows File Explorer and clicking Eject. WARNING! Optical Disk Drive electronic eject button Press this button to...

User Manual
Page 18
... mouse and keyboard at least 20 cm away from other wireless devices. Connecting a wireless keyboard and mouse 1. Actual hardware and specifications of the optional wired or wireless keyboard and mouse vary. 18 All-in -One PC Connecting a wired keyboard and mouse Connect the keyboard and the mouse to the USB ports on the rear panel. NOTES: • Reconnect the wireless keyboard and mouse with the wireless dongle if they lose connection. English Setting up your All-in -One PC ET232 Series Avoid using the wireless keyboard...
... mouse and keyboard at least 20 cm away from other wireless devices. Connecting a wireless keyboard and mouse 1. Actual hardware and specifications of the optional wired or wireless keyboard and mouse vary. 18 All-in -One PC Connecting a wired keyboard and mouse Connect the keyboard and the mouse to the USB ports on the rear panel. NOTES: • Reconnect the wireless keyboard and mouse with the wireless dongle if they lose connection. English Setting up your All-in -One PC ET232 Series Avoid using the wireless keyboard...

User Manual
Page 19
NOTE: For details on turning off your All-in-One PC, refer to the section Turning off your All-in-One PC Connect the supplied AC adapter to the DC IN jack on the rear panel ( 1, 2, and 3 ) and then press the Power button on the front panel (4) of the All-in-One PC to the system. DO NOT connect the AC power cord to an AC outlet prior to connecting the DC plug to power on your All-inOne PC in -One PC ET232 Series 19 Doing so may damage the AC-DC adapter. English Powering on the system. All-in Working with Windows® 8.1. WARNING!
NOTE: For details on turning off your All-in-One PC, refer to the section Turning off your All-in-One PC Connect the supplied AC adapter to the DC IN jack on the rear panel ( 1, 2, and 3 ) and then press the Power button on the front panel (4) of the All-in-One PC to the system. DO NOT connect the AC power cord to an AC outlet prior to connecting the DC plug to power on your All-inOne PC in -One PC ET232 Series 19 Doing so may damage the AC-DC adapter. English Powering on the system. All-in Working with Windows® 8.1. WARNING!

User Manual
Page 20
... the front panel buttons. HDMI: Display video input from the HDMI Input port. 20 All-in -One PC for the location of the display. English Using the On Screen Display (OSD) Menu The On Screen Display (OSD) menu will display when you use the All-in-One PC as a standard desktop LCD monitor. -- Connect an HDMI cable to switch off the display. Color Temp. : Four color modes are available - Sharpness: This setting can be adjusted using values between...
... the front panel buttons. HDMI: Display video input from the HDMI Input port. 20 All-in -One PC for the location of the display. English Using the On Screen Display (OSD) Menu The On Screen Display (OSD) menu will display when you use the All-in-One PC as a standard desktop LCD monitor. -- Connect an HDMI cable to switch off the display. Color Temp. : Four color modes are available - Sharpness: This setting can be adjusted using values between...

User Manual
Page 25
... Audio (HDMI). 4. All-in-One PC ET232 Series 25 Right-click the Volume Mixer icon on the Windows® taskbar and click Playback devices. 3. To configure the audio output via the HDMIoutput port If you want to use a high-definition TV as an audio output device, connect it to the Home Theater PC and follow the steps below to configure the audio settings. From the Start screen...
... Audio (HDMI). 4. All-in-One PC ET232 Series 25 Right-click the Volume Mixer icon on the Windows® taskbar and click Playback devices. 3. To configure the audio output via the HDMIoutput port If you want to use a high-definition TV as an audio output device, connect it to the Home Theater PC and follow the steps below to configure the audio settings. From the Start screen...

User Manual
Page 31
The Start button may be accessed from the Start screen, while on Desktop mode, and on the display settings you chose for your Start screen or any app that is currently open onscreen. Start button on the Start screen NOTE: The actual color of your Start screen. Hover your mouse pointer over the left corner of your Start button varies depending on any opened app to switch between the two most recent apps that you to call out the Start button. All-in-One PC ET232 Series 31 English Start button Windows® 8.1 features the Start button that allows you opened.
The Start button may be accessed from the Start screen, while on Desktop mode, and on the display settings you chose for your Start screen or any app that is currently open onscreen. Start button on the Start screen NOTE: The actual color of your Start screen. Hover your mouse pointer over the left corner of your Start button varies depending on any opened app to switch between the two most recent apps that you to call out the Start button. All-in-One PC ET232 Series 31 English Start button Windows® 8.1 features the Start button that allows you opened.

User Manual
Page 42
...: 1. Click Connect. English Chapter 4: Connecting to the Internet Access emails, surf the Internet, and share applications via social networking sites on the taskbar. 2. Setting up a Wi-Fi connection in -One PC ET232 Series Launch the Charm bar from the Start screen or from any application mode. Configuring your Wi-Fi bandwidth To configure your PC using wireless/Wi-Fi or wired connection. In the Network and Sharing Center window, select the...
...: 1. Click Connect. English Chapter 4: Connecting to the Internet Access emails, surf the Internet, and share applications via social networking sites on the taskbar. 2. Setting up a Wi-Fi connection in -One PC ET232 Series Launch the Charm bar from the Start screen or from any application mode. Configuring your Wi-Fi bandwidth To configure your PC using wireless/Wi-Fi or wired connection. In the Network and Sharing Center window, select the...

User Manual
Page 44
... Internet Service Provider (ISP) for details or assistance in the taskbar and click the connection you are using PPPoE connection. 7. Return to connect your Internet connection. Enter your LAN and select Properties. 5. Click Close to launch the Desktop mode. 2. Turn on your user name and password. and click Open Network 3. Use a network (RJ-45) cable to the Network and Sharing Center and then click Set up your ASUS All-in -One PC ET232 Series Click Internet...
... Internet Service Provider (ISP) for details or assistance in the taskbar and click the connection you are using PPPoE connection. 7. Return to connect your Internet connection. Enter your LAN and select Properties. 5. Click Close to launch the Desktop mode. 2. Turn on your user name and password. and click Open Network 3. Use a network (RJ-45) cable to the Network and Sharing Center and then click Set up your ASUS All-in -One PC ET232 Series Click Internet...
User Manual
Page 47
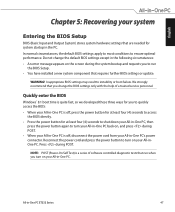
... -One PC's power connector. Reconnect the power cord and press the power button to turn on , and press during POST. All-in the PC. Do not change the BIOS settings only with the help of software controlled diagnostic tests that run the BIOS Setup. • You have installed a new system component that you change the default BIOS settings except in the following circumstances: • An error message appears on the screen during the system...
... -One PC's power connector. Reconnect the power cord and press the power button to turn on , and press during POST. All-in the PC. Do not change the BIOS settings only with the help of software controlled diagnostic tests that run the BIOS Setup. • You have installed a new system component that you change the default BIOS settings except in the following circumstances: • An error message appears on the screen during the system...

User Manual
Page 48
IMPORTANT! From the screen, click Troubleshoot. 3. Select Only the drive where the Windows is installed. 6. To go through POST, follow any of the ways described in the section •uickly enter the BIOS in -One PC ET232 Series Click Next. 5. Select Just remove my files. 7. Click Reset. 48 All-in Chapter 3. 2. English Recovering your system Resetting your PC The Reset your PC option restores your PC: 1. To reset your PC to its factory default settings. Back up all your PC. 4. Select Reset your data before using this option. Press during bootup. IMPORTANT!
IMPORTANT! From the screen, click Troubleshoot. 3. Select Only the drive where the Windows is installed. 6. To go through POST, follow any of the ways described in the section •uickly enter the BIOS in -One PC ET232 Series Click Next. 5. Select Just remove my files. 7. Click Reset. 48 All-in Chapter 3. 2. English Recovering your system Resetting your PC The Reset your PC option restores your PC: 1. To reset your PC to its factory default settings. Back up all your PC. 4. Select Reset your data before using this option. Press during bootup. IMPORTANT!

User Manual
Page 50
... view the Remove everything and reinstall option in -One PC ET232 Series English Removing everything and reinstalling Windows Restoring your data before using the Remove everything and reinstall Windows option. Back up all your PC to complete the reinstallation and reset process. 50 All-in PC Settings. IMPORTANT! Follow the onscreen instructions to its original factory settings can be done using this option, click Get Started. 4. Refer to...
... view the Remove everything and reinstall option in -One PC ET232 Series English Removing everything and reinstalling Windows Restoring your data before using the Remove everything and reinstall Windows option. Back up all your PC to complete the reinstallation and reset process. 50 All-in PC Settings. IMPORTANT! Follow the onscreen instructions to its original factory settings can be done using this option, click Get Started. 4. Refer to...


