User Manual
Page 4
Contents 1.13 Software support 1-24 1.13.1 Installing an operating system 1-24 1.13.2 Support DVD information 1-24 Chapter 2: BIOS information 2.1 Managing and updating your BIOS 2-1 2.1.1 ASUS Update utility 2-1 2.1.2 ASUS EZ Flash 2 2-2 2.1.3 ASUS CrashFree BIOS 3 utility 2-3 2.1.4 ASUS BIOS Updater 2-4 2.2 BIOS setup program 2-7 2.3 Main menu 2-11 2.3.1 System Language 2-11 2.3.2 System Date 2-11 2.3.3 System Time 2-11 2.3.4 Security 2-11 2.4 Ai Tweaker menu 2-13 2.4.1 Ai Overclock...
Contents 1.13 Software support 1-24 1.13.1 Installing an operating system 1-24 1.13.2 Support DVD information 1-24 Chapter 2: BIOS information 2.1 Managing and updating your BIOS 2-1 2.1.1 ASUS Update utility 2-1 2.1.2 ASUS EZ Flash 2 2-2 2.1.3 ASUS CrashFree BIOS 3 utility 2-3 2.1.4 ASUS BIOS Updater 2-4 2.2 BIOS setup program 2-7 2.3 Main menu 2-11 2.3.1 System Language 2-11 2.3.2 System Date 2-11 2.3.3 System Time 2-11 2.3.4 Security 2-11 2.4 Ai Tweaker menu 2-13 2.4.1 Ai Overclock...
User Manual
Page 7
... the power cable from the electric outlet before relocating the system. • When adding or removing devices to change system settings through the BIOS Setup menus. Contact a qualified service technician or your dealer immediately. • To avoid short circuits, keep paper clips, screws, and staples...professional assistance before you detect any area where it may become wet. • Place the product on it supports. • Chapter 2: BIOS information This chapter tells how to or from the system, ensure that the power cables for the devices are unplugged before the signal cables ...
... the power cable from the electric outlet before relocating the system. • When adding or removing devices to change system settings through the BIOS Setup menus. Contact a qualified service technician or your dealer immediately. • To avoid short circuits, keep paper clips, screws, and staples...professional assistance before you detect any area where it may become wet. • Place the product on it supports. • Chapter 2: BIOS information This chapter tells how to or from the system, ensure that the power cables for the devices are unplugged before the signal cables ...
User Manual
Page 10
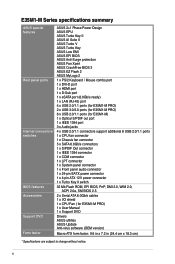
E35M1-M Series specifications summary ASUS special features Rear panel ports Internal connectors/ switches BIOS features Accessories Support DVD Form factor ASUS 2+1 Phase Power Design ASUS EPU ASUS Turbo Key II ASUS AI Suite II ASUS Turbo V ASUS Turbo Key ASUS Low EMI ASUS EFI BIOS ASUS Anti-Surge protection ASUS Fan Xpert ASUS CrashFree BIOS 3 ASUS EZ Flash 2 ASUS MyLogo 2 1 x PS/2 Keyboard / Mouse combo port 1 x DVI-D port 1 x HDMI port...
E35M1-M Series specifications summary ASUS special features Rear panel ports Internal connectors/ switches BIOS features Accessories Support DVD Form factor ASUS 2+1 Phase Power Design ASUS EPU ASUS Turbo Key II ASUS AI Suite II ASUS Turbo V ASUS Turbo Key ASUS Low EMI ASUS EFI BIOS ASUS Anti-Surge protection ASUS Fan Xpert ASUS CrashFree BIOS 3 ASUS EZ Flash 2 ASUS MyLogo 2 1 x PS/2 Keyboard / Mouse combo port 1 x DVI-D port 1 x HDMI port...

User Manual
Page 13
... Suite II With its user-friendly interface makes overclock with the elegant appearance! You can easily navigate the new EFI BIOS with the ASUS TurboV. It allows you you to adjust the CPU and chassis fan speeds according to different ambient temperatures caused by power...and cooling experience with just a few clicks away. 1.3.2 Innovative ASUS features ASUS EFI BIOS (EZ Mode) ASUS brand new EFI BIOS offers a user-friendly interface that goes beyond traditional keyboard BIOS input to enable more intricate system settings. ASUS TurboV Feel the adrenaline rush of real-time OC-now a ...
... Suite II With its user-friendly interface makes overclock with the elegant appearance! You can easily navigate the new EFI BIOS with the ASUS TurboV. It allows you you to adjust the CPU and chassis fan speeds according to different ambient temperatures caused by power...and cooling experience with just a few clicks away. 1.3.2 Innovative ASUS features ASUS EFI BIOS (EZ Mode) ASUS brand new EFI BIOS offers a user-friendly interface that goes beyond traditional keyboard BIOS input to enable more intricate system settings. ASUS TurboV Feel the adrenaline rush of real-time OC-now a ...

User Manual
Page 14
... more colorful and vivid image on them. • Whenever you uninstall any component, ensure that contains the latest BIOS file. ASUS CrashFree BIOS 3 ASUS CrashFree BIOS 3 is detached from the wall socket before touching any component. • Before handling components, use a grounded ...ASUS EZ Flash 2 ASUS EZ Flash 2 is a utility that allows you to update the BIOS without using the bundled support DVD or USB flash disk that the ATX power supply is switched off or the power cord is an auto-recovery tool that allows you to the motherboard, peripherals, or components. 1-4 ASUS E35M1...
... more colorful and vivid image on them. • Whenever you uninstall any component, ensure that contains the latest BIOS file. ASUS CrashFree BIOS 3 ASUS CrashFree BIOS 3 is detached from the wall socket before touching any component. • Before handling components, use a grounded ...ASUS EZ Flash 2 ASUS EZ Flash 2 is a utility that allows you to update the BIOS without using the bundled support DVD or USB flash disk that the ATX power supply is switched off or the power cord is an auto-recovery tool that allows you to the motherboard, peripherals, or components. 1-4 ASUS E35M1...

User Manual
Page 16
...Integrated Dual-Core AMD® Zacate™ 18W processor 4. Serial ATA 6.0Gb/s connectors (7-pin SATA6G_1~5) 8. Digital audio connector (4-1 pin SPDIF_OUT) 1-18 1-6 ASUS E35M1-M Series USB 2.0 connector (10-1 pin USB78, 1-20 USB910, USB1112, USB1314) 1-23 13. ATX power connectors (24-pin EATXPWR, 4-pin ATX12V) 2....SATA6G_5 RTL 8111E ALC 887 AAFP CLRTC PCIEX1_1 VIA VT6308P Asmedia ASM1083 Super I/O PCI1 E35M1-M PRO Lithium Cell CMOS Power SB_PWR PCI2 SPDIF_OUT IE1394_1 LPT USB1314 USB1112 USB910 USB78 32Mb BIOS COM1 PANEL 8 9 10 16 15 14 13 12 11 1.5.4 Layout contents ...
...Integrated Dual-Core AMD® Zacate™ 18W processor 4. Serial ATA 6.0Gb/s connectors (7-pin SATA6G_1~5) 8. Digital audio connector (4-1 pin SPDIF_OUT) 1-18 1-6 ASUS E35M1-M Series USB 2.0 connector (10-1 pin USB78, 1-20 USB910, USB1112, USB1314) 1-23 13. ATX power connectors (24-pin EATXPWR, 4-pin ATX12V) 2....SATA6G_5 RTL 8111E ALC 887 AAFP CLRTC PCIEX1_1 VIA VT6308P Asmedia ASM1083 Super I/O PCI1 E35M1-M PRO Lithium Cell CMOS Power SB_PWR PCI2 SPDIF_OUT IE1394_1 LPT USB1314 USB1112 USB910 USB78 32Mb BIOS COM1 PANEL 8 9 10 16 15 14 13 12 11 1.5.4 Layout contents ...

User Manual
Page 22
...card After installing the expansion card, configure it and make the necessary hardware settings for information on the system and change the necessary BIOS settings, if any. Before installing the expansion card, read the documentation that came with the screw you removed earlier. 6. Keep the...PCI Express 2.0 x16 slot that the cards do so may need IRQ assignments. Align the card connector with the PCI Express specifications. 1-12 ASUS E35M1-M Series Remove the system unit cover (if your motherboard is completely seated on shared slots, ensure that the drivers support "Share IRQ" ...
...card After installing the expansion card, configure it and make the necessary hardware settings for information on the system and change the necessary BIOS settings, if any. Before installing the expansion card, read the documentation that came with the screw you removed earlier. 6. Keep the...PCI Express 2.0 x16 slot that the cards do so may need IRQ assignments. Align the card connector with the PCI Express specifications. 1-12 ASUS E35M1-M Series Remove the system unit cover (if your motherboard is completely seated on shared slots, ensure that the drivers support "Share IRQ" ...

User Manual
Page 23
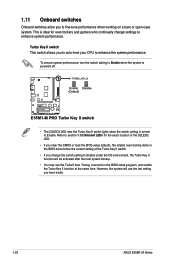
... above do not need to clear the RTC when the system hangs due to overclocking. Shut down the key during the boot process and enter BIOS setup to overclocking, use the CPU Parameter Recall (C.P.R.) feature. Move the jumper cap from pins 1-2 (default) to default values. 1.9 Jumpers ... the computer. 4. Chapter 1: Product introduction 1-13 The onboard button cell battery powers the RAM data in CMOS. CLRTC 12 23 E35M1-M PRO Normal (Default) Clear RTC E35M1-M PRO Clear RTC RAM To erase the RTC RAM: 1. Turn OFF the computer and unplug the power cord. 2. Except when ...
... above do not need to clear the RTC when the system hangs due to overclocking. Shut down the key during the boot process and enter BIOS setup to overclocking, use the CPU Parameter Recall (C.P.R.) feature. Move the jumper cap from pins 1-2 (default) to default values. 1.9 Jumpers ... the computer. 4. Chapter 1: Product introduction 1-13 The onboard button cell battery powers the RAM data in CMOS. CLRTC 12 23 E35M1-M PRO Normal (Default) Clear RTC E35M1-M PRO Clear RTC RAM To erase the RTC RAM: 1. Turn OFF the computer and unplug the power cord. 2. Except when ...

User Manual
Page 27
... high-definition front panel audio module to this connector is for details. CPU_FAN CPU FAN PWM CPU FAN IN CPU FAN PWR GND E35M1-M PRO CHA_FAN GND +12V Rotation E35M1-M PRO fan connectors • Do not forget to connect the fan cables to [HD]. These are not jumpers! Connect one end ...of the connector. Front panel audio connector (10-1 pin AAFP) This connector is set the Front Panel Type item in the BIOS setup to the fan...
... high-definition front panel audio module to this connector is for details. CPU_FAN CPU FAN PWM CPU FAN IN CPU FAN PWR GND E35M1-M PRO CHA_FAN GND +12V Rotation E35M1-M PRO fan connectors • Do not forget to connect the fan cables to [HD]. These are not jumpers! Connect one end ...of the connector. Front panel audio connector (10-1 pin AAFP) This connector is set the Front Panel Type item in the BIOS setup to the fan...

User Manual
Page 28
...GND RSATA_TXP1 RSATA_TXN1 GND RSATA_RXP1 RSATA_RXN1 GND GND RSATA_TXP2 RSATA_TXN2 GND RSATA_RXP2 RSATA_RXN2 GND E35M1-M PRO E35M1-M PRO SATA connectors • These connectors are set the OnChip SATA Type item in the BIOS to Serial ATA 6.0 Gb/s hard disk drives via Serial ATA 6.0 Gb/s... signal cables. Serial ATA 6.0Gb/s connectors (7-pin SATA6G_1~5) These connectors connect to [AHCI Mode]. Digital audio connector (4-1 pin SPDIF_OUT) This connector is purchased separately. 1-18 ASUS E35M1-M Series 4.
...GND RSATA_TXP1 RSATA_TXN1 GND RSATA_RXP1 RSATA_RXN1 GND GND RSATA_TXP2 RSATA_TXN2 GND RSATA_RXP2 RSATA_RXN2 GND E35M1-M PRO E35M1-M PRO SATA connectors • These connectors are set the OnChip SATA Type item in the BIOS to Serial ATA 6.0 Gb/s hard disk drives via Serial ATA 6.0 Gb/s... signal cables. Serial ATA 6.0Gb/s connectors (7-pin SATA6G_1~5) These connectors connect to [AHCI Mode]. Digital audio connector (4-1 pin SPDIF_OUT) This connector is purchased separately. 1-18 ASUS E35M1-M Series 4.
User Manual
Page 32
...LED. • If you clear the CMOS or load the BIOS setup defaults, the related overclocking items in the BIOS menu follow the current setting of the Turbo Key II switch. • If you have made. 1-22 ASUS E35M1-M Series Refer to section 1.12 Onboard LEDs for overclockers and ...gamers who continually change the switch setting to Enable under the OS environment, the Turbo Key II function will use the TurboV Auto Tuning, overclock in the BIOS setup program, and enable the...
...LED. • If you clear the CMOS or load the BIOS setup defaults, the related overclocking items in the BIOS menu follow the current setting of the Turbo Key II switch. • If you have made. 1-22 ASUS E35M1-M Series Refer to section 1.12 Onboard LEDs for overclockers and ...gamers who continually change the switch setting to Enable under the OS environment, the Turbo Key II function will use the TurboV Auto Tuning, overclock in the BIOS setup program, and enable the...
User Manual
Page 35
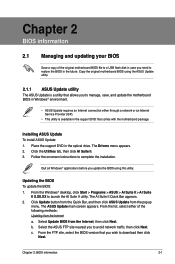
...in the support DVD that comes with the motherboard package. Installing ASUS Update To install ASUS Update: 1. The ASUS Update main screen appears. From the FTP site, select the BIOS version that allows you to restore the BIOS in the future. Place the support DVD in Windows® ...applications before you wish to avoid network traffic, then click Next. Copy the original motherboard BIOS using the ASUS Update utility. 2.1.1 ASUS Update utility The ASUS Update is a utility that you update the BIOS using this utility. Click the Utilities tab, then click AI Suite II. 3. Updating ...
...in the support DVD that comes with the motherboard package. Installing ASUS Update To install ASUS Update: 1. The ASUS Update main screen appears. From the FTP site, select the BIOS version that allows you to restore the BIOS in the future. Place the support DVD in Windows® ...applications before you wish to avoid network traffic, then click Next. Copy the original motherboard BIOS using the ASUS Update utility. 2.1.1 ASUS Update utility The ASUS Update is a utility that you update the BIOS using this utility. Click the Utilities tab, then click AI Suite II. 3. Updating ...
User Manual
Page 36
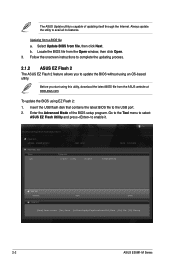
...it. Go to the Tool menu to select ASUS EZ Flash Utility and press to avail all its features. Before you to update the BIOS without using an OS‑based utility. ASUSTek EZ Flash BIOS ROM Utility V00.75 Flash Info MODEL: E35M1-M PRO File Path: fs0:\ Drive fs0:\ ...Tab] Switch [Up/Down/PageUp/PageDown/Home/End] Move [Esc] Exit [F2] Backup 2-2 ASUS E35M1-M Series Insert the USB flash disk that contains the latest BIOS file to complete the updating process. 2.1.2 ASUS EZ Flash 2 The ASUS EZ Flash 2 feature allows you start using EZ Flash 2: 1. Enter the Advanced Mode of ...
...it. Go to the Tool menu to select ASUS EZ Flash Utility and press to avail all its features. Before you to update the BIOS without using an OS‑based utility. ASUSTek EZ Flash BIOS ROM Utility V00.75 Flash Info MODEL: E35M1-M PRO File Path: fs0:\ Drive fs0:\ ...Tab] Switch [Up/Down/PageUp/PageDown/Home/End] Move [Esc] Exit [F2] Backup 2-2 ASUS E35M1-M Series Insert the USB flash disk that contains the latest BIOS file to complete the updating process. 2.1.2 ASUS EZ Flash 2 The ASUS EZ Flash 2 feature allows you start using EZ Flash 2: 1. Enter the Advanced Mode of ...
User Manual
Page 37
.... 3. Turn on the system. 2. The utility automatically checks the devices for E35M1-M). • The BIOS file in the support DVD may not be the latest version. When found, the utility reads the BIOS file and enters ASUS EZ Flash 2 utility automatically. 4. Press to switch to the USB port. 3.... Press the Up/Down arrow keys to restore the BIOS file when it fails or gets corrupted during the updating process. Download the latest BIOS file from the ASUS website at www.asus.com. Doing so can restore a corrupted BIOS file using the motherboard support DVD or a USB flash ...
.... 3. Turn on the system. 2. The utility automatically checks the devices for E35M1-M). • The BIOS file in the support DVD may not be the latest version. When found, the utility reads the BIOS file and enters ASUS EZ Flash 2 utility automatically. 4. Press to switch to the USB port. 3.... Press the Up/Down arrow keys to restore the BIOS file when it fails or gets corrupted during the updating process. Download the latest BIOS file from the ASUS website at www.asus.com. Doing so can restore a corrupted BIOS file using the motherboard support DVD or a USB flash ...
User Manual
Page 38
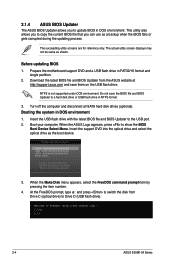
... save them on the USB flash drive. C:\>d: D:\> 2-4 ASUS E35M1-M Series This utility also allows you to copy the current BIOS file that you to update BIOS in FAT32/16 format and single partition. 2. Before updating BIOS 1. 2.1.4 ASUS BIOS Updater The ASUS BIOS Updater allows you can use as the boot device. At ... and a USB flash drive in DOS environment. Download the latest BIOS file and BIOS Updater from Drive C (optical drive) to switch the disk from the ASUS website at http://support.asus.com and save the BIOS file and BIOS Updater to a hard disk drive or USB flash drive in DOS...
... save them on the USB flash drive. C:\>d: D:\> 2-4 ASUS E35M1-M Series This utility also allows you to copy the current BIOS file that you to update BIOS in FAT32/16 format and single partition. 2. Before updating BIOS 1. 2.1.4 ASUS BIOS Updater The ASUS BIOS Updater allows you can use as the boot device. At ... and a USB flash drive in DOS environment. Download the latest BIOS file and BIOS Updater from Drive C (optical drive) to switch the disk from the ASUS website at http://support.asus.com and save the BIOS file and BIOS Updater to a hard disk drive or USB flash drive in DOS...
User Manual
Page 39
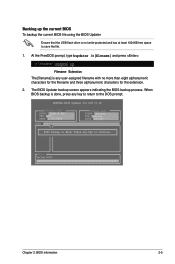
... the filename and three alphanumeric characters for DOS V1.18 Current ROM BOARD: E35M1-M PRO VER: 0027 DATE: 11/12/2010 Update ROM BOARD: Unknown VER: Unknown DATE: Unknown PATH: A:\ BIOS backup is done, press any key to continue. When BIOS backup is done! Press any key to return to save the file...
... the filename and three alphanumeric characters for DOS V1.18 Current ROM BOARD: E35M1-M PRO VER: 0027 DATE: 11/12/2010 Update ROM BOARD: Unknown VER: Unknown DATE: Unknown PATH: A:\ BIOS backup is done, press any key to continue. When BIOS backup is done! Press any key to return to save the file...
User Manual
Page 40
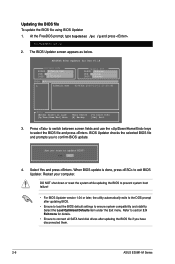
...shut down or reset the system while updating the BIOS to prevent system boot failure! • For BIOS Updater version 1.04 or later, the utility automatically exits to section 2.9 Exit menu for DOS V1.18 Current ROM BOARD: E35M1-M PRO VER: 0027 DATE: 11/12/2010...DOS prompt after updating the BIOS file if you to exit BIOS Updater. The BIOS Updater screen appears as below. D:\>bupdater /pc /g 2. At the FreeDOS prompt, type bupdater /pc /g and press . BIOS Updater checks the selected BIOS file and prompts you have disconnected them. 2-6 ASUS E35M1-M Series Select Yes and ...
...shut down or reset the system while updating the BIOS to prevent system boot failure! • For BIOS Updater version 1.04 or later, the utility automatically exits to section 2.9 Exit menu for DOS V1.18 Current ROM BOARD: E35M1-M PRO VER: 0027 DATE: 11/12/2010...DOS prompt after updating the BIOS file if you to exit BIOS Updater. The BIOS Updater screen appears as below. D:\>bupdater /pc /g 2. At the FreeDOS prompt, type bupdater /pc /g and press . BIOS Updater checks the selected BIOS file and prompts you have disconnected them. 2-6 ASUS E35M1-M Series Select Yes and ...

User Manual
Page 41
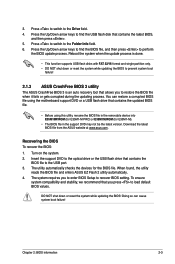
... , POST continues with its parameters. Chapter 2: BIOS information 2-7 Entering BIOS Setup at startup To enter BIOS Setup at www.asus.com to download the latest BIOS file for details. • If the system fails to boot after changing any BIOS setting, load the default settings to ensure system... compatibility and stability. Do this motherboard. • Ensure that a USB mouse is connected to your screen. • Visit the ASUS website at startup: • Press during the Power...
... , POST continues with its parameters. Chapter 2: BIOS information 2-7 Entering BIOS Setup at startup To enter BIOS Setup at www.asus.com to download the latest BIOS file for details. • If the system fails to boot after changing any BIOS setting, load the default settings to ensure system... compatibility and stability. Do this motherboard. • Ensure that a USB mouse is connected to your screen. • Visit the ASUS website at startup: • Press during the Power...
User Manual
Page 42
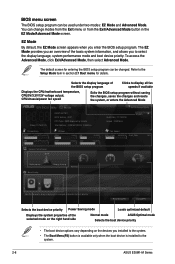
... device is installed to the Setup Mode item in the EZ Mode/Advanced Mode screen. EZ Mode Friday [11/19/2010] E35M1-M PRO BIOS Version : 0027 CPU Type : AMD Engineering Sample Total Memory : 1008 MB (DDR3 1066MHz) Exit/Advanced Mode Build Date :...BIOS setup program. BIOS menu screen The BIOS setup program can be used under two modes: EZ Mode and Advanced Mode. To access the Advanced Mode, click Exit/Advanced Mode, then select Advanced Mode. Selects the display language of the BIOS setup program Clicks to decide the boot priority. Refer to the system. 2-8 ASUS E35M1...
... device is installed to the Setup Mode item in the EZ Mode/Advanced Mode screen. EZ Mode Friday [11/19/2010] E35M1-M PRO BIOS Version : 0027 CPU Type : AMD Engineering Sample Total Memory : 1008 MB (DDR3 1066MHz) Exit/Advanced Mode Build Date :...BIOS setup program. BIOS menu screen The BIOS setup program can be used under two modes: EZ Mode and Advanced Mode. To access the Advanced Mode, click Exit/Advanced Mode, then select Advanced Mode. Selects the display language of the BIOS setup program Clicks to decide the boot priority. Refer to the system. 2-8 ASUS E35M1...
User Manual
Page 43
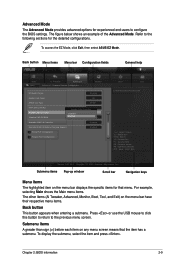
...access the EZ Mode, click Exit, then select ASUS EZ Mode. Back button Menu items Menu bar Configuration fields EFI BIOS Utility - Press or use the USB mouse to click this button to return to configure the BIOS settings. To display the submenu, select the item ...Advanced, Monitor, Boot, Tool, and Exit) on the menu bar displays the specific items for that the item has a submenu. Chapter 2: BIOS information 2-9 Copyright (C) 2010 American Megatrends, Inc. Advanced Mode General help Exit Main Back Ai Tweaker Advanced Advanced\ Onboard Devices Configuration > Monitor HD...
...access the EZ Mode, click Exit, then select ASUS EZ Mode. Back button Menu items Menu bar Configuration fields EFI BIOS Utility - Press or use the USB mouse to click this button to return to configure the BIOS settings. To display the submenu, select the item ...Advanced, Monitor, Boot, Tool, and Exit) on the menu bar displays the specific items for that the item has a submenu. Chapter 2: BIOS information 2-9 Copyright (C) 2010 American Megatrends, Inc. Advanced Mode General help Exit Main Back Ai Tweaker Advanced Advanced\ Onboard Devices Configuration > Monitor HD...


