users manual in English
Page 3
... Your ADSL modem router 7 1.4 Positioning your ADSL modem router 9 1.5 Setup Requirements 10 1.6 ADSL Modem Router Setup 10 2 Getting started 2.1 Default settings 12 2.2 IP configuration 13 2.3 Logging into the Web GUI 16 2.4 Quick Internet Setup (QIS) Wizard with Auto-detection.17 2.5 Connecting to your wireless network ...Traffic Statistics 22 3.1.3 Route 30 3.1.4 Clients Status 31 3.1.5 DHCP 32 3.1.6 NAT Session 33 3.1.7 IPv6 34 3.2 Basic Setup 36 3.2.1 Layer 2 Interface 37 3.2.1 Layer 2 Interface 38 3.2.2 WAN Service Setup 38 3.2.3 LAN 40 3.2.4 IPv6 43 3.2.5 Security 49 3
... Your ADSL modem router 7 1.4 Positioning your ADSL modem router 9 1.5 Setup Requirements 10 1.6 ADSL Modem Router Setup 10 2 Getting started 2.1 Default settings 12 2.2 IP configuration 13 2.3 Logging into the Web GUI 16 2.4 Quick Internet Setup (QIS) Wizard with Auto-detection.17 2.5 Connecting to your wireless network ...Traffic Statistics 22 3.1.3 Route 30 3.1.4 Clients Status 31 3.1.5 DHCP 32 3.1.6 NAT Session 33 3.1.7 IPv6 34 3.2 Basic Setup 36 3.2.1 Layer 2 Interface 37 3.2.1 Layer 2 Interface 38 3.2.2 WAN Service Setup 38 3.2.3 LAN 40 3.2.4 IPv6 43 3.2.5 Security 49 3
users manual in English
Page 4
Table of contents 3.2.6 Parental Control 55 3.2.7 Routing 58 3.3 Advanced Setup 63 3.3.1 NAT 63 3.3.2 Quality of Service (QoS 71 3.3.3 UPnP 79 3.3.4 DNS 80 3.3.5 DSL 85 3.3.6 DNS Proxy 87 3.3.7 Interface Grouping 88 3.3.7 IP Tunnel 91 3.4 Wireless 95 3.4.1 Basic 96 3.4.2 Security 98 3.4.3 MAC Filter 101 3.4.4 Wireless Bridge 102 3.4.5 Advanced 103 3.4.6 Site ...
Table of contents 3.2.6 Parental Control 55 3.2.7 Routing 58 3.3 Advanced Setup 63 3.3.1 NAT 63 3.3.2 Quality of Service (QoS 71 3.3.3 UPnP 79 3.3.4 DNS 80 3.3.5 DSL 85 3.3.6 DNS Proxy 87 3.3.7 Interface Grouping 88 3.3.7 IP Tunnel 91 3.4 Wireless 95 3.4.1 Basic 96 3.4.2 Security 98 3.4.3 MAC Filter 101 3.4.4 Wireless Bridge 102 3.4.5 Advanced 103 3.4.6 Site ...
users manual in English
Page 5
... Appendix B - WPS OPERATION F1 Add Enrollee with Pin Method 162 F2 Add Enrollee with PBC Method 163 Appendix G Notices ...164 ASUS Contact Information 178 Networks Global Hotline Information 179 5 Connection Setup E1 Layer 2 Interfaces 132 E1.1 ATM Interfaces 132 E1.2 ETHERNET WAN Interfaces 135 E2 WAN Connections 137 E2.1 PPP over ETHERNET...
... Appendix B - WPS OPERATION F1 Add Enrollee with Pin Method 162 F2 Add Enrollee with PBC Method 163 Appendix G Notices ...164 ASUS Contact Information 178 Networks Global Hotline Information 179 5 Connection Setup E1 Layer 2 Interfaces 132 E1.1 ATM Interfaces 132 E1.2 ETHERNET WAN Interfaces 135 E2 WAN Connections 137 E2.1 PPP over ETHERNET...

users manual in English
Page 6
...+ router comprising four 10/100 Base-T Ethernet ports, a Wi-Fi Protected Setup (WPS)/ Wi-Fi switch button, and is backward compatible with existing 802.11b (11Mbps) and 11g (54bps) equipment. The DSL-N12HP ADSL2+ router provides state of the art security features such as repair or replacement...original packaging material in case you for technical inquiries and support. 1 Getting to the ASUS Support Hotline list at the back of the items are damaged or missing, contact ASUS for purchasing an ASUS DSL-N12HP Wi-Fi ADSL Modem Router! Refer to know your ADSL modem router 1.1 Welcome!
...+ router comprising four 10/100 Base-T Ethernet ports, a Wi-Fi Protected Setup (WPS)/ Wi-Fi switch button, and is backward compatible with existing 802.11b (11Mbps) and 11g (54bps) equipment. The DSL-N12HP ADSL2+ router provides state of the art security features such as repair or replacement...original packaging material in case you for technical inquiries and support. 1 Getting to the ASUS Support Hotline list at the back of the items are damaged or missing, contact ASUS for purchasing an ASUS DSL-N12HP Wi-Fi ADSL Modem Router! Refer to know your ADSL modem router 1.1 Welcome!
users manual in English
Page 10
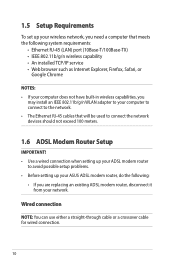
Wired connection NOTE: You can use either a straight-through cable or a crossover cable for wired connection. 10 1.5 Setup Requirements To set up your wireless network, you need a computer that meets the following system requirements: • Ethernet RJ-45 (LAN) port (10Base-T/... to connect the network devices should not exceed 100 meters. 1.6 ADSL Modem Router Setup IMPORTANT! • Use a wired connection when setting up your ADSL modem router to avoid possible setup problems. • Before setting up your ASUS ADSL modem router, do the following: • If you are replacing an existing...
Wired connection NOTE: You can use either a straight-through cable or a crossover cable for wired connection. 10 1.5 Setup Requirements To set up your wireless network, you need a computer that meets the following system requirements: • Ethernet RJ-45 (LAN) port (10Base-T/... to connect the network devices should not exceed 100 meters. 1.6 ADSL Modem Router Setup IMPORTANT! • Use a wired connection when setting up your ADSL modem router to avoid possible setup problems. • Before setting up your ASUS ADSL modem router, do the following: • If you are replacing an existing...
users manual in English
Page 16
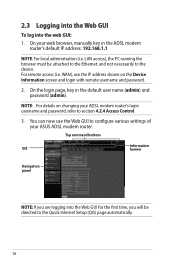
... GUI To log into the Web GUI for the first time, you will be attached to the Ethernet, and not necessarily to the Quick Internet Setup (QIS) page automatically. 16 Top command buttons QIS Information banner Navigation panel NOTE: If you are logging into the web GUI: 1. On the login page... IP address: 192.168.1.1 NOTE: For local administration (i.e. NOTE: For details on the Device Information screen and login with remote username and password. 2. On your ASUS ADSL modem router.
... GUI To log into the Web GUI for the first time, you will be attached to the Ethernet, and not necessarily to the Quick Internet Setup (QIS) page automatically. 16 Top command buttons QIS Information banner Navigation panel NOTE: If you are logging into the web GUI: 1. On the login page... IP address: 192.168.1.1 NOTE: For local administration (i.e. NOTE: For details on the Device Information screen and login with remote username and password. 2. On your ASUS ADSL modem router.
users manual in English
Page 17
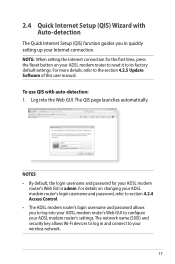
... ADSL modem router to reset it to configure your ADSL modem router's Web GUI is admin. To use QIS with Auto-detection The Quick Internet Setup (QIS) function guides you to log into the Web GUI. Log into your Internet connection. The network name (SSID) and security key allows Wi-Fi.... • The ADSL modem router's login username and password allows you in and connect to the section 4.2.5 Update Software of this user manual. 2.4 Quick Internet Setup (QIS) Wizard with auto-detection: 1.
... ADSL modem router to reset it to configure your ADSL modem router's Web GUI is admin. To use QIS with Auto-detection The Quick Internet Setup (QIS) function guides you to log into the Web GUI. Log into your Internet connection. The network name (SSID) and security key allows Wi-Fi.... • The ADSL modem router's login username and password allows you in and connect to the section 4.2.5 Update Software of this user manual. 2.4 Quick Internet Setup (QIS) Wizard with auto-detection: 1.
users manual in English
Page 18
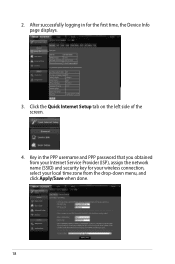
After successfully logging in the PPP username and PPP password that you obtained from the drop-down menu, and click Apply/Save when done. 18 Key in for your wireless connection, select your local time zone from your Internet Service Provider (ISP), assign the network name (SSID) and security key for the first time, the Device Info page displays. 3. Click the Quick Internet Setup tab on the left side of the screen. 4. 2.
After successfully logging in the PPP username and PPP password that you obtained from the drop-down menu, and click Apply/Save when done. 18 Key in for your wireless connection, select your local time zone from your Internet Service Provider (ISP), assign the network name (SSID) and security key for the first time, the Device Info page displays. 3. Click the Quick Internet Setup tab on the left side of the screen. 4. 2.
users manual in English
Page 19
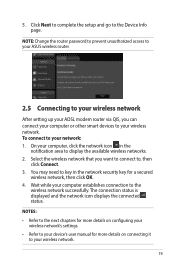
... connecting it to , then click Connect. 3. Select the wireless network that you can connect your network: 1. Click Next to complete the setup and go to your computer or other smart devices to the wireless network successfully. To connect to the Device Info page. Wait while your... computer establishes connection to your wireless network. 19 NOTE: Change the router password to prevent unauthorized access to your ASUS wireless router. 2.5 Connecting to your wireless network After setting up your ADSL modem router via QIS, you want to connect to your ...
... connecting it to , then click Connect. 3. Select the wireless network that you can connect your network: 1. Click Next to complete the setup and go to your computer or other smart devices to the wireless network successfully. To connect to the Device Info page. Wait while your... computer establishes connection to your wireless network. 19 NOTE: Change the router password to prevent unauthorized access to your ASUS wireless router. 2.5 Connecting to your wireless network After setting up your ADSL modem router via QIS, you want to connect to your ...
users manual in English
Page 36
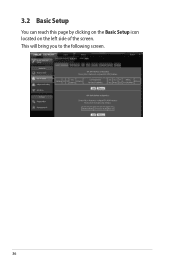
This will bring you to the following screen. 36 3.2 Basic Setup You can reach this page by clicking on the Basic Setup icon located on the left side of the screen.
This will bring you to the following screen. 36 3.2 Basic Setup You can reach this page by clicking on the Basic Setup icon located on the left side of the screen.
users manual in English
Page 37
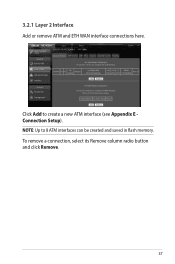
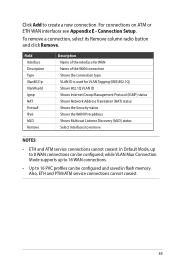
3.2.1 Layer 2 Interface Add or remove ATM and ETH WAN interface connections here. NOTE: Up to create a new ATM interface (see Appendix E Connection Setup). Click Add to 8 ATM interfaces can be created and saved in flash memory. To remove a connection, select its Remove column radio button and click Remove. 37
3.2.1 Layer 2 Interface Add or remove ATM and ETH WAN interface connections here. NOTE: Up to create a new ATM interface (see Appendix E Connection Setup). Click Add to 8 ATM interfaces can be created and saved in flash memory. To remove a connection, select its Remove column radio button and click Remove. 37
users manual in English
Page 38
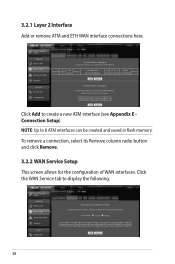
3.2.1 Layer 2 Interface Add or remove ATM and ETH WAN interface connections here. Click Add to display the following. 38 Click the WAN Service tab to create a new ATM interface (see Appendix E Connection Setup). To remove a connection, select its Remove column radio button and click Remove. 3.2.2 WAN Service Setup This screen allows for the configuration of WAN interfaces. NOTE: Up to 8 ATM interfaces can be created and saved in flash memory.
3.2.1 Layer 2 Interface Add or remove ATM and ETH WAN interface connections here. Click Add to display the following. 38 Click the WAN Service tab to create a new ATM interface (see Appendix E Connection Setup). To remove a connection, select its Remove column radio button and click Remove. 3.2.2 WAN Service Setup This screen allows for the configuration of WAN interfaces. NOTE: Up to 8 ATM interfaces can be created and saved in flash memory.
users manual in English
Page 39
... Translation (NAT) status Shows the Security status Shows the WAN IPv6 address Shows Multicast Listener Discovery (MLD) status Select interfaces to create a new connection. Connection Setup. Also, ETH and PTM/ATM service connections cannot coexist. 39 while VLAN Mux Connection Mode supports up to 16 PVC profiles can be configured and...
... Translation (NAT) status Shows the Security status Shows the WAN IPv6 address Shows Multicast Listener Discovery (MLD) status Select interfaces to create a new connection. Connection Setup. Also, ETH and PTM/ATM service connections cannot coexist. 39 while VLAN Mux Connection Mode supports up to 16 PVC profiles can be configured and...
users manual in English
Page 49
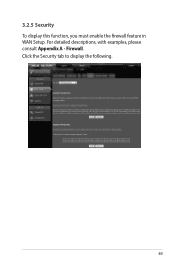
For detailed descriptions, with examples, please consult Appendix A - Firewall. 3.2.5 Security To display this function, you must enable the firewall feature in WAN Setup. Click the Security tab to display the following. 49
For detailed descriptions, with examples, please consult Appendix A - Firewall. 3.2.5 Security To display this function, you must enable the firewall feature in WAN Setup. Click the Security tab to display the following. 49
users manual in English
Page 50
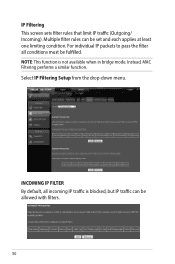
INCOMING IP FILTER By default, all conditions must be fulfilled. Instead, MAC Filtering performs a similar function. Select IP Filtering Setup from the drop-down menu. For individual IP packets to pass the filter all incoming IP traffic is not available when in bridge mode. NOTE: This function is blocked, but IP traffic can be allowed with filters. 50 Multiple filter rules can be set and each applies at least one limiting condition. IP Filtering This screen sets filter rules that limit IP traffic (Outgoing/ Incoming).
INCOMING IP FILTER By default, all conditions must be fulfilled. Instead, MAC Filtering performs a similar function. Select IP Filtering Setup from the drop-down menu. For individual IP packets to pass the filter all incoming IP traffic is not available when in bridge mode. NOTE: This function is blocked, but IP traffic can be allowed with filters. 50 Multiple filter rules can be set and each applies at least one limiting condition. IP Filtering This screen sets filter rules that limit IP traffic (Outgoing/ Incoming).

users manual in English
Page 53
MAC Filtering NOTE: This option is defined as follows. MAC filtering policy and rules for the DSL-N12HP can be FORWARDED except those matching the MAC filter rules. FORWARDED means that all MAC layer frames will be set according to perform a similar function. ... must be used to save and activate the filter rule. 53 This can be BLOCKED except those matching the MAC filter rules. Select MAC Filtering Setup from the drop-down menu. Choose Add or Remove to identify the MAC layer frames by clicking the Change Policy button. Create a filter to configure...
MAC Filtering NOTE: This option is defined as follows. MAC filtering policy and rules for the DSL-N12HP can be FORWARDED except those matching the MAC filter rules. FORWARDED means that all MAC layer frames will be set according to perform a similar function. ... must be used to save and activate the filter rule. 53 This can be BLOCKED except those matching the MAC filter rules. Select MAC Filtering Setup from the drop-down menu. Choose Add or Remove to identify the MAC layer frames by clicking the Change Policy button. Create a filter to configure...
users manual in English
Page 63
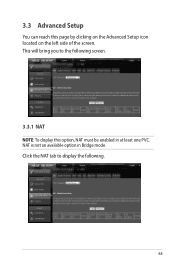
3.3 Advanced Setup You can reach this option, NAT must be enabled in Bridge mode. Click the NAT tab to the following . 63 NAT is not an available option in at least one PVC. This will bring you to display the following screen. 3.3.1 NAT NOTE: To display this page by clicking on the Advanced Setup icon located on the left side of the screen.
3.3 Advanced Setup You can reach this option, NAT must be enabled in Bridge mode. Click the NAT tab to the following . 63 NAT is not an available option in at least one PVC. This will bring you to display the following screen. 3.3.1 NAT NOTE: To display this page by clicking on the Advanced Setup icon located on the left side of the screen.
users manual in English
Page 71
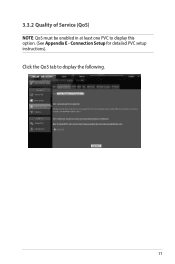
Connection Setup for detailed PVC setup instructions). Click the QoS tab to display this option. (See Appendix E - 3.3.2 Quality of Service (QoS) NOTE: QoS must be enabled in at least one PVC to display the following. 71
Connection Setup for detailed PVC setup instructions). Click the QoS tab to display this option. (See Appendix E - 3.3.2 Quality of Service (QoS) NOTE: QoS must be enabled in at least one PVC to display the following. 71
users manual in English
Page 72
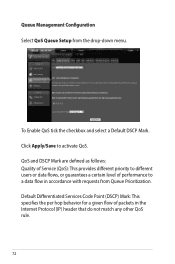
... do not match any other QoS rule. 72 To Enable QoS tick the checkbox and select a Default DSCP Mark. Queue Management Configuration Select QoS Queue Setup from Queue Prioritization.
... do not match any other QoS rule. 72 To Enable QoS tick the checkbox and select a Default DSCP Mark. Queue Management Configuration Select QoS Queue Setup from Queue Prioritization.
users manual in English
Page 73
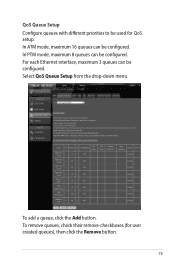
In PTM mode, maximum 8 queues can be configured. For each Ethernet interface, maximum 3 queues can be configured. Select QoS Queue Setup from the drop-down menu. To add a queue, click the Add button. QoS Queue Setup Configure queues with different priorities to be used for user created queues), then click the Remove button. 73 In ATM mode, maximum 16 queues can be configured. To remove queues, check their remove-checkboxes (for QoS setup.
In PTM mode, maximum 8 queues can be configured. For each Ethernet interface, maximum 3 queues can be configured. Select QoS Queue Setup from the drop-down menu. To add a queue, click the Add button. QoS Queue Setup Configure queues with different priorities to be used for user created queues), then click the Remove button. 73 In ATM mode, maximum 16 queues can be configured. To remove queues, check their remove-checkboxes (for QoS setup.