
users manual in English
Page 3
... the wireless security settings 23 Managing your network clients 25 Monitoring your USB device 26 Creating your Guest Network 28 Using the Traffic Manager 29 Managing QoS (Quality of Service) Bandwidth 29 Monitoring Traffic 30 Using USB application 31 Using AiDisk for File Sharing 31 Using the Servers Center 34 Using the Network Place (Samba) Share service 34 Using the FTP Share service 36 Using the Miscellaneous setting 38 Configuring Advanced settings 39 Setting up the DHCP Server 39 Upgrading the firmware 40 Restoring/Saving/Uploading settings...
... the wireless security settings 23 Managing your network clients 25 Monitoring your USB device 26 Creating your Guest Network 28 Using the Traffic Manager 29 Managing QoS (Quality of Service) Bandwidth 29 Monitoring Traffic 30 Using USB application 31 Using AiDisk for File Sharing 31 Using the Servers Center 34 Using the Network Place (Samba) Share service 34 Using the FTP Share service 36 Using the Miscellaneous setting 38 Configuring Advanced settings 39 Setting up the DHCP Server 39 Upgrading the firmware 40 Restoring/Saving/Uploading settings...
users manual in English
Page 5
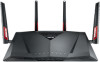
Refer to know your wireless router Package contents ADSL/VDSL WiFi modem router Network cable AC adapter Phone cable Quick Start Guide Warranty card Support CD (User Manual) Splitter (varies with regions) • If any of this user manual. • Keep the original packaging material in case you would need future warranty services such as repair or replacement. 5 1 Getting to the ASUS Support Hotline list at the back of the items is damaged or missing, contact ASUS for technical inquiries and support.
Refer to know your wireless router Package contents ADSL/VDSL WiFi modem router Network cable AC adapter Phone cable Quick Start Guide Warranty card Support CD (User Manual) Splitter (varies with regions) • If any of this user manual. • Keep the original packaging material in case you would need future warranty services such as repair or replacement. 5 1 Getting to the ASUS Support Hotline list at the back of the items is damaged or missing, contact ASUS for technical inquiries and support.
users manual in English
Page 7
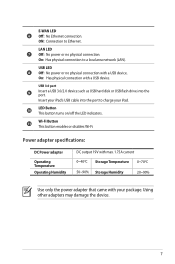
... output 19V with max. 1.75A current 0~40oC Storage Temperature 0~70oC 50~90% Storage Humidity 20~90% Use only the power adapter that came with a USB device. ON: Connection to a local area network (LAN). On: Has physical connection with your iPad's USB cable into the port. Insert your package. LED Button 10 This button turns on/off the LED indicators. 11 Wi-Fi Button This button enables or disables Wi-Fi. E-WAN LED 6 Off: No Ethernet connection...
... output 19V with max. 1.75A current 0~40oC Storage Temperature 0~70oC 50~90% Storage Humidity 20~90% Use only the power adapter that came with a USB device. ON: Connection to a local area network (LAN). On: Has physical connection with your iPad's USB cable into the port. Insert your package. LED Button 10 This button turns on/off the LED indicators. 11 Wi-Fi Button This button enables or disables Wi-Fi. E-WAN LED 6 Off: No Ethernet connection...
users manual in English
Page 8
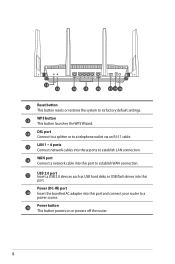
... button This button resets or restores the system to a telephone outlet via an RJ-11 cable. USB 2.0 port 17 Insert a USB 2.0 devices such as USB hard disks or USB flash drives into this port and connect your router to a power source. Power (DC-IN) port 18 Insert the bundled AC adapter into this port to establish LAN connection. WPS button 13 This button launches the WPS Wizard. WAN port 16 Connect a network cable into these ports to establish WAN connection. DSL port 14 Connect to a splitter or to its factory default settings. LAN 1 ~ 4 ports 15 Connect network cables...
... button This button resets or restores the system to a telephone outlet via an RJ-11 cable. USB 2.0 port 17 Insert a USB 2.0 devices such as USB hard disks or USB flash drives into this port and connect your router to a power source. Power (DC-IN) port 18 Insert the bundled AC adapter into this port to establish LAN connection. WPS button 13 This button launches the WPS Wizard. WAN port 16 Connect a network cable into these ports to establish WAN connection. DSL port 14 Connect to a splitter or to its factory default settings. LAN 1 ~ 4 ports 15 Connect network cables...
users manual in English
Page 10
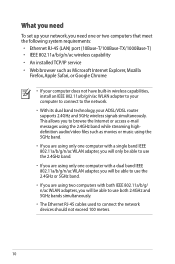
... (LAN) port (10Base-T/100Base-TX/1000Base-T) • IEEE 802.11a/b/g/n/ac wireless capability • An installed TCP/IP service • Web browser such as movies or music using the 5GHz band. • If you are using only one computer with both 2.4GHz and 5GHz bands simultaneously. • The Ethernet RJ-45 cables used to the network. • With its dual band technology, your computer to connect to connect...
... (LAN) port (10Base-T/100Base-TX/1000Base-T) • IEEE 802.11a/b/g/n/ac wireless capability • An installed TCP/IP service • Web browser such as movies or music using the 5GHz band. • If you are using only one computer with both 2.4GHz and 5GHz bands simultaneously. • The Ethernet RJ-45 cables used to the network. • With its dual band technology, your computer to connect to connect...

users manual in English
Page 11
If your modem has a backup battery, remove it from your network. • Disconnect the cables/wires from your computer (recommended). 11 Connecting your devices • Use a wired connection when setting up your wireless router to avoid possible wireless setup issues. • Before setting up your ASUS wireless router, do the following: • If you are replacing an existing router, disconnect it as well. • Reboot your existing modem.
If your modem has a backup battery, remove it from your network. • Disconnect the cables/wires from your computer (recommended). 11 Connecting your devices • Use a wired connection when setting up your wireless router to avoid possible wireless setup issues. • Before setting up your ASUS wireless router, do the following: • If you are replacing an existing router, disconnect it as well. • Reboot your existing modem.
users manual in English
Page 12
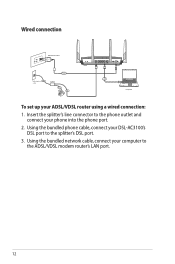
Insert the splitter's line connector to the phone outlet and connect your DSL-AC3100's DSL port to the ADSL/VDSL modem router's LAN port. 12 Using the bundled phone cable, connect your phone into the phone port. 2. Using the bundled network cable, connect your ADSL/VDSL router using a wired connection: 1. Wired connection Wall Power Outlet Wall telephone outlet Power LAN Computer To set up your computer to the splitter's DSL port. 3.
Insert the splitter's line connector to the phone outlet and connect your DSL-AC3100's DSL port to the ADSL/VDSL modem router's LAN port. 12 Using the bundled phone cable, connect your phone into the phone port. 2. Using the bundled network cable, connect your ADSL/VDSL router using a wired connection: 1. Wired connection Wall Power Outlet Wall telephone outlet Power LAN Computer To set up your computer to the splitter's DSL port. 3.
users manual in English
Page 13
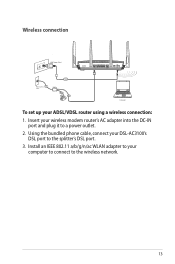
Wireless connection Wall Power Outlet Wall telephone outlet Power Computer To set up your wireless modem router's AC adapter into the DC-IN port and plug it to a power outlet. 2. Insert your ADSL/VDSL router using a wireless connection: 1. Using the bundled phone cable, connect your computer to connect to the splitter's DSL port. 3. Install an IEEE 802.11 a/b/g/n/ac WLAN adapter to your DSL-AC3100's DSL port to the wireless network. 13
Wireless connection Wall Power Outlet Wall telephone outlet Power Computer To set up your wireless modem router's AC adapter into the DC-IN port and plug it to a power outlet. 2. Insert your ADSL/VDSL router using a wireless connection: 1. Using the bundled phone cable, connect your computer to connect to the splitter's DSL port. 3. Install an IEEE 802.11 a/b/g/n/ac WLAN adapter to your DSL-AC3100's DSL port to the wireless network. 13
users manual in English
Page 15
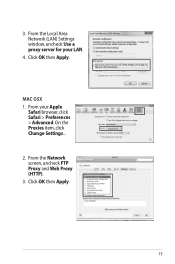
Click OK then Apply. 15 MAC OSX 1. From your LAN. 4. From the Network screen, uncheck FTP Proxy and Web Proxy (HTTP). 3. From the Local Area Network (LAN) Settings window, uncheck Use a proxy server for your Apple Safari browser, click Safari > Preferences > Advanced. On the Proxies item, click Change Settings... 2. 3. Click OK then Apply.
Click OK then Apply. 15 MAC OSX 1. From your LAN. 4. From the Network screen, uncheck FTP Proxy and Web Proxy (HTTP). 3. From the Local Area Network (LAN) Settings window, uncheck Use a proxy server for your Apple Safari browser, click Safari > Preferences > Advanced. On the Proxies item, click Change Settings... 2. 3. Click OK then Apply.
users manual in English
Page 23
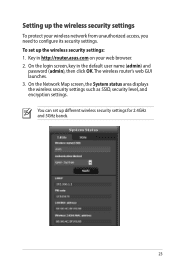
... the login screen, key in http://router.asus.com on your wireless network from unauthorized access, you need to configure its security settings. You can set up the wireless security settings: 1. Setting up different wireless security settings for 2.4GHz and 5GHz bands. 23 Key in the default user name (admin) and password (admin), then click OK.The wireless router's web GUI launches. 3. On the Network Map screen, the System status area displays the wireless security settings such as SSID, security level, and encryption settings. To set up the wireless security settings...
... the login screen, key in http://router.asus.com on your wireless network from unauthorized access, you need to configure its security settings. You can set up the wireless security settings: 1. Setting up different wireless security settings for 2.4GHz and 5GHz bands. 23 Key in the default user name (admin) and password (admin), then click OK.The wireless router's web GUI launches. 3. On the Network Map screen, the System status area displays the wireless security settings such as SSID, security level, and encryption settings. To set up the wireless security settings...
users manual in English
Page 26
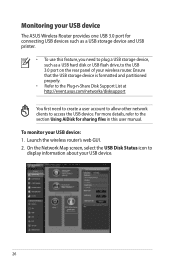
.... • Refer to the Plug-n-Share Disk Support List at http://event.asus.com/networks/disksupport You first need to plug a USB storage device, such as a USB storage device and USB printer. • To use this user manual. To monitor your USB device. 26 Monitoring your USB device The ASUS Wireless Router provides one USB 3.0 port for sharing files in this feature, you need to create a user account to allow other network clients to access the USB device. Launch the wireless router's web GUI. 2.
.... • Refer to the Plug-n-Share Disk Support List at http://event.asus.com/networks/disksupport You first need to plug a USB storage device, such as a USB storage device and USB printer. • To use this user manual. To monitor your USB device. 26 Monitoring your USB device The ASUS Wireless Router provides one USB 3.0 port for sharing files in this feature, you need to create a user account to allow other network clients to access the USB device. Launch the wireless router's web GUI. 2.
users manual in English
Page 33
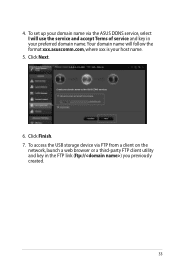
Click Finish. 7. Your domain name will use the service and accept Terms of service and key in the FTP link (ftp://) you previously created. 33 4. To access the USB storage device via the ASUS DDNS service, select I will follow the format xxx.asuscomm.com, where xxx is your domain name via FTP from a client on the network, launch a web browser or a third-party FTP client utility and key in your preferred domain name. Click Next. 6. To set up your host name. 5.
Click Finish. 7. Your domain name will use the service and accept Terms of service and key in the FTP link (ftp://) you previously created. 33 4. To access the USB storage device via the ASUS DDNS service, select I will follow the format xxx.asuscomm.com, where xxx is your domain name via FTP from a client on the network, launch a web browser or a third-party FTP client utility and key in your preferred domain name. Click Next. 6. To set up your host name. 5.
users manual in English
Page 36
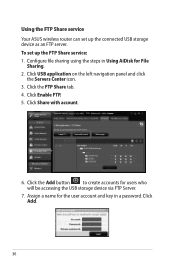
... Share service Your ASUS wireless router can set up the connected USB storage device as an FTP server. Assign a name for File Sharing. 2. Click USB application on the left navigation panel and click the Servers Center icon. 3. Click Add. 36 Configure file sharing using the steps in Using AiDisk for the user account and key in a password. Click Share with account. 6. To set up the FTP Share service: 1. Click the FTP Share tab. 4. Click Enable...
... Share service Your ASUS wireless router can set up the connected USB storage device as an FTP server. Assign a name for File Sharing. 2. Click USB application on the left navigation panel and click the Servers Center icon. 3. Click Add. 36 Configure file sharing using the steps in Using AiDisk for the user account and key in a password. Click Share with account. 6. To set up the FTP Share service: 1. Click the FTP Share tab. 4. Click Enable...
users manual in English
Page 39
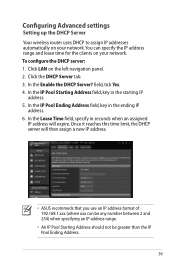
... Address. 39 Configuring Advanced settings Setting up the DHCP Server Your wireless router uses DHCP to assign IP addresses automatically on your network. In the Lease Time field, specify in seconds when an assigned IP address will then assign a new IP address. • ASUS recommeds that you use an IP address format of 192.168.1.xxx (where xxx can specify the IP address range and lease time for the clients on the left navigation panel. 2. To configure the DHCP server: 1. Click LAN...
... Address. 39 Configuring Advanced settings Setting up the DHCP Server Your wireless router uses DHCP to assign IP addresses automatically on your network. In the Lease Time field, specify in seconds when an assigned IP address will then assign a new IP address. • ASUS recommeds that you use an IP address format of 192.168.1.xxx (where xxx can specify the IP address range and lease time for the clients on the left navigation panel. 2. To configure the DHCP server: 1. Click LAN...
users manual in English
Page 43
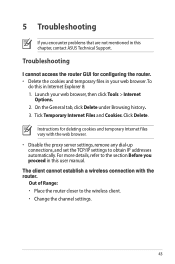
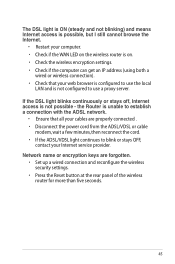
... a wireless connection with the web browser. • Disable the proxy server settings, remove any dial-up connections, and set the TCP/IP settings to the section Before you encounter problems that are not mentioned in this chapter, contact ASUS Technical Support. Troubleshooting I cannot access the router GUI for deleting cookies and temporary Internet files vary with the router. Launch your web browser.To do this in Internet Explorer 8: 1. Instructions for configuring the router...
... a wireless connection with the web browser. • Disable the proxy server settings, remove any dial-up connections, and set the TCP/IP settings to the section Before you encounter problems that are not mentioned in this chapter, contact ASUS Technical Support. Troubleshooting I cannot access the router GUI for deleting cookies and temporary Internet files vary with the router. Launch your web browser.To do this in Internet Explorer 8: 1. Instructions for configuring the router...
users manual in English
Page 44
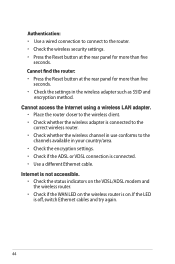
Internet is not accessible. • Check the status indicators on the VDSL/ADSL modem and the wireless router. • Check if the WAN LED on the wireless router is off, switch Ethernet cables and try again. 44 Cannot find the router: • Press the Reset button at the rear panel for more than five seconds. • Check the settings in the wireless adapter such as SSID and encryption method. Authentication: • Use a wired connection to connect to the channels available in...
Internet is not accessible. • Check the status indicators on the VDSL/ADSL modem and the wireless router. • Check if the WAN LED on the wireless router is off, switch Ethernet cables and try again. 44 Cannot find the router: • Press the Reset button at the rear panel for more than five seconds. • Check the settings in the wireless adapter such as SSID and encryption method. Authentication: • Use a wired connection to connect to the channels available in...
users manual in English
Page 45
... WAN LED on the wireless router is on. • Check the wireless encryption settings. • Check if the computer can get an IP address (using both a wired or wireless connection). • Check that all your cables are forgotten. • Set up a wired connection and reconfigure the wireless security settings. • Press the Reset button at the rear panel of the wireless router for more than five seconds. 45 Network name or encryption keys are properly connected . • Disconnect the power...
... WAN LED on the wireless router is on. • Check the wireless encryption settings. • Check if the computer can get an IP address (using both a wired or wireless connection). • Check that all your cables are forgotten. • Set up a wired connection and reconfigure the wireless security settings. • Press the Reset button at the rear panel of the wireless router for more than five seconds. 45 Network name or encryption keys are properly connected . • Disconnect the power...
users manual in English
Page 46
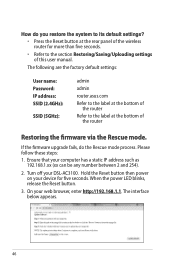
...: Password: IP address: SSID (2.4GHz): SSID (5GHz): admin admin router.asus.com Refer to the label at the bottom of the router Refer to the section Restoring/Saving/Uploading settings of the router Restoring the firmware via the Rescue mode. Ensure that your DSL-AC3100. On your device for more than five seconds. • Refer to the label at the bottom of this user manual. How do the Rescue mode process. Hold the Reset button then power...
...: Password: IP address: SSID (2.4GHz): SSID (5GHz): admin admin router.asus.com Refer to the label at the bottom of the router Refer to the section Restoring/Saving/Uploading settings of the router Restoring the firmware via the Rescue mode. Ensure that your DSL-AC3100. On your device for more than five seconds. • Refer to the label at the bottom of this user manual. How do the Rescue mode process. Hold the Reset button then power...

users manual in English
Page 48
... you have not updated the registered information in using your local service center for the router I still register it? ASUS DDNS Service The ASUS DSL-AC3100 WiFi Modem Router supports the ASUS DDNS service. I did not register the ASUS DDNS for more information. • If there is available, the system registers the hostname automatically. 48 Before registering, click Query to exchange devices at the service center, inform the...
... you have not updated the registered information in using your local service center for the router I still register it? ASUS DDNS Service The ASUS DSL-AC3100 WiFi Modem Router supports the ASUS DDNS service. I did not register the ASUS DDNS for more information. • If there is available, the system registers the hostname automatically. 48 Before registering, click Query to exchange devices at the service center, inform the...
users manual in English
Page 49
... ASUS routers. Internet connection is it has been working properly. 3. The last time you cannot. Is the ASUS DDNS service free, or is available. 2. Check your domain name, contact the service center. 4. You can only register one domain name for updating IP addresses. 6. Different ISPs may have registered a domain name before and it just a trial version? I see a different WAN IP address in MS-DOS and in accessing...
... ASUS routers. Internet connection is it has been working properly. 3. The last time you cannot. Is the ASUS DDNS service free, or is available. 2. Check your domain name, contact the service center. 4. You can only register one domain name for updating IP addresses. 6. Different ISPs may have registered a domain name before and it just a trial version? I see a different WAN IP address in MS-DOS and in accessing...