CUSL2 User Manual
Page 2
...Copyright © 2000 ASUSTeK COMPUTER INC. For previous or updated manuals, BIOS, drivers, or product release information, contact ASUS at http://www.asus.com.tw or through any means, except documentation kept by the digit before... without intent to the owners' benefit, without the express written permission of ASUSTeK COMPUTER INC. ("ASUS"). ASUS ASSUMES NO RESPONSIBILITY OR LIABILITY FOR ANY ERRORS OR INACCURACIES THAT MAY APPEAR IN THIS MANUAL, INCLUDING ...are registered trademarks of Microsoft Corporation. Product Name: ASUS CUSL2 Manual Revision: 1.02 E595 Release Date: August 2000...
...Copyright © 2000 ASUSTeK COMPUTER INC. For previous or updated manuals, BIOS, drivers, or product release information, contact ASUS at http://www.asus.com.tw or through any means, except documentation kept by the digit before... without intent to the owners' benefit, without the express written permission of ASUSTeK COMPUTER INC. ("ASUS"). ASUS ASSUMES NO RESPONSIBILITY OR LIABILITY FOR ANY ERRORS OR INACCURACIES THAT MAY APPEAR IN THIS MANUAL, INCLUDING ...are registered trademarks of Microsoft Corporation. Product Name: ASUS CUSL2 Manual Revision: 1.02 E595 Release Date: August 2000...
CUSL2 User Manual
Page 4
FEATURES 8 2.1 The ASUS CUSL2 8 2.2 CUSL2 Motherboard Components 12 3. HARDWARE SETUP 14 3.1 CUSL2 Motherboard Layout 14 3.2 Layout Contents 15 3.3 Hardware Setup Procedure 17 3.4 Motherboard Settings 17 3.5 System Memory (...4.1.2 Updating BIOS Procedures 46 4.2 BIOS Setup Program 49 4.2.1 BIOS Menu Bar 50 4.2.2 Legend Bar 50 4.3 Main Menu 52 4.3.1 Primary & Secondary Master/Slave 53 4.3.2 Keyboard Features 56 4.4 Advanced Menu 58 4.4.1 Chip Configuration 61 4.4.2 I/O Device Configuration 64 4.4.3 PCI Configuration 66 4.4.4 Shadow Configuration 68 4 ASUS CUSL2 User's Manual...
FEATURES 8 2.1 The ASUS CUSL2 8 2.2 CUSL2 Motherboard Components 12 3. HARDWARE SETUP 14 3.1 CUSL2 Motherboard Layout 14 3.2 Layout Contents 15 3.3 Hardware Setup Procedure 17 3.4 Motherboard Settings 17 3.5 System Memory (...4.1.2 Updating BIOS Procedures 46 4.2 BIOS Setup Program 49 4.2.1 BIOS Menu Bar 50 4.2.2 Legend Bar 50 4.3 Main Menu 52 4.3.1 Primary & Secondary Master/Slave 53 4.3.2 Keyboard Features 56 4.4 Advanced Menu 58 4.4.1 Chip Configuration 61 4.4.2 I/O Device Configuration 64 4.4.3 PCI Configuration 66 4.4.4 Shadow Configuration 68 4 ASUS CUSL2 User's Manual...
CUSL2 User Manual
Page 7
...SETUP 4. APPENDIX Manual information and checklist Production information and specifications Intructions on setting up the motherboard. Intructions on setting up the BIOS Intructions on setting up the included software Reference material for (1) 5.25" and (2) 3.5" floppy disk drives (1) Bag of ...Home PNA CNR card AIMM card LCD controller module TVOUT controller module ASUS iPanel ASUS consumer infrared set ASUS IrDA-compliant infrared module ASUS CUSL2 User's Manual 7 FEATURES 3. Package Contents (1) ASUS Motherboard (1) 40-pin 80-conductor ribbon cable for internal UltraDMA100/66...
...SETUP 4. APPENDIX Manual information and checklist Production information and specifications Intructions on setting up the motherboard. Intructions on setting up the BIOS Intructions on setting up the included software Reference material for (1) 5.25" and (2) 3.5" floppy disk drives (1) Bag of ...Home PNA CNR card AIMM card LCD controller module TVOUT controller module ASUS iPanel ASUS consumer infrared set ASUS IrDA-compliant infrared module ASUS CUSL2 User's Manual 7 FEATURES 3. Package Contents (1) ASUS Motherboard (1) 40-pin 80-conductor ribbon cable for internal UltraDMA100/66...
CUSL2 User Manual
Page 8
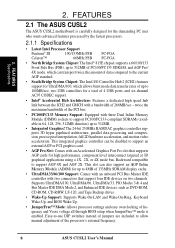
...; AGP Pro Slot: Comes with an Accelerated Graphics Port Pro slot that support four IDE devices on two channels. FEATURES 2.1 The ASUS CUSL2 The ASUS CUSL2 motherboard is enabled. twice the maximum bandwidth of the PCI bus. • PC100/PC133 Memory Support: Equipped with a bandwidth of ...Support: Supports Wake-On-LAN and Wake-On-Ring, Keyboard Wake-Up, and BIOS Wake-Up. • JumperFree™ Mode: Allows processor settings and easy overclocking of the processor's external frequency. 8 ASUS CUSL2 User's Manual Easy-to-use DIP switches instead of 266MB/sec - two USB ...
...; AGP Pro Slot: Comes with an Accelerated Graphics Port Pro slot that support four IDE devices on two channels. FEATURES 2.1 The ASUS CUSL2 The ASUS CUSL2 motherboard is enabled. twice the maximum bandwidth of the PCI bus. • PC100/PC133 Memory Support: Equipped with a bandwidth of ...Support: Supports Wake-On-LAN and Wake-On-Ring, Keyboard Wake-Up, and BIOS Wake-Up. • JumperFree™ Mode: Allows processor settings and easy overclocking of the processor's external frequency. 8 ASUS CUSL2 User's Manual Easy-to-use DIP switches instead of 266MB/sec - two USB ...

CUSL2 User Manual
Page 9
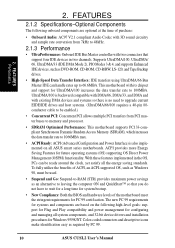
... cards. (PCI supports up when there is used for a hard disk drive. UART2 can log chassis open events into LDCM. ASUS CUSL2 User's Manual 9 2. FEATURES • Around-the-Clock Intrusion Detection: Chassis intrusion circuitry can also be directed from PCI master ...allows multiple PCI transfers from COM2 to the Infrared Module for wireless connections. • Enhanced ACPI & Anti-Boot Virus Protection: Programmable BIOS (Flash EEPROM), offering enhanced ACPI for Windows 98 compatibility, built-in computer platforms by supporting Random Number Generator (RNG). •...
... cards. (PCI supports up when there is used for a hard disk drive. UART2 can log chassis open events into LDCM. ASUS CUSL2 User's Manual 9 2. FEATURES • Around-the-Clock Intrusion Detection: Chassis intrusion circuitry can also be directed from PCI master ...allows multiple PCI transfers from COM2 to the Infrared Module for wireless connections. • Enhanced ACPI & Anti-Boot Virus Protection: Programmable BIOS (Flash EEPROM), offering enhanced ACPI for Windows 98 compatibility, built-in computer platforms by supporting Random Number Generator (RNG). •...
CUSL2 User Manual
Page 10
...also implemented on the following high-level goals: support for Plug and Play compatibility and power management for system bootup. • New Compliancy: Both the BIOS and hardware levels of ACPI, an ACPI-supported OS, such as DVD-ROM, CD-ROM, CD-R/RW, LS-120, and Tape Backup drives. &#...pin 80conductor cable to be used. • Suspend and Go: Suspend-to-RAM (STR) provides maximum power savings as required by PC 99. 10 ASUS CUSL2 User's Manual To fully utilize the benefits of the motherboard meet the stringent requirements for UltraDMA/100 increases the data transfer rate to 66.6MB...
...also implemented on the following high-level goals: support for Plug and Play compatibility and power management for system bootup. • New Compliancy: Both the BIOS and hardware levels of ACPI, an ACPI-supported OS, such as DVD-ROM, CD-ROM, CD-R/RW, LS-120, and Tape Backup drives. &#...pin 80conductor cable to be used. • Suspend and Go: Suspend-to-RAM (STR) provides maximum power savings as required by PC 99. 10 ASUS CUSL2 User's Manual To fully utilize the benefits of the motherboard meet the stringent requirements for UltraDMA/100 increases the data transfer rate to 66.6MB...
CUSL2 User Manual
Page 11
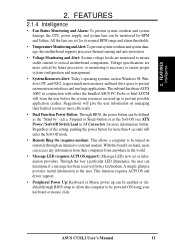
... Today's operating systems, such as Windows 98, Windows NT, and OS/2, require much more efficiently. • Dual Function Power Button: Through BIOS, the power button can be turned on -hand, users can determine if a message has been received from anywhere in 3.8 Connectors for more ... Switch Lead in the world. • Message LED (requires ACPI OS support): Message LEDs now act as the "Stand by" (a.k.a. ASUS CUSL2 User's Manual 11 With this motherboard supports processor thermal sensing and auto-protection. • Voltage Monitoring and Alert: System voltage levels are ...
... Today's operating systems, such as Windows 98, Windows NT, and OS/2, require much more efficiently. • Dual Function Power Button: Through BIOS, the power button can be turned on -hand, users can determine if a message has been received from anywhere in 3.8 Connectors for more ... Switch Lead in the world. • Message LED (requires ACPI OS support): Message LEDs now act as the "Stand by" (a.k.a. ASUS CUSL2 User's Manual 11 With this motherboard supports processor thermal sensing and auto-protection. • Voltage Monitoring and Alert: System voltage levels are ...
CUSL2 User Manual
Page 18
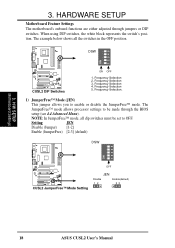
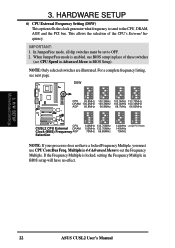
...Selection 4. Frequency Selection 5. H/W SETUP Motherboard Settings 3. HARDWARE SETUP Motherboard Feature Settings The motherboard's onboard functions are either adjusted through the BIOS setup (see 4.4 Advanced Menu). Frequency Selection 2. The example below shows all dip switches must be set to be made through jumpers ... to enable or disable the JumperFree™ mode. Setting JEN Disable (Jumper) [1-2] Enable (JumperFree) [2-3] (default) DSW ON 12345 OFF ® CUSL2 CUSL2 JumperFree™ Mode Setting JEN Disable Enable(default) 12 23 18 ASUS CUSL2 User's Manual
...Selection 4. Frequency Selection 5. H/W SETUP Motherboard Settings 3. HARDWARE SETUP Motherboard Feature Settings The motherboard's onboard functions are either adjusted through the BIOS setup (see 4.4 Advanced Menu). Frequency Selection 2. The example below shows all dip switches must be set to be made through jumpers ... to enable or disable the JumperFree™ mode. Setting JEN Disable (Jumper) [1-2] Enable (JumperFree) [2-3] (default) DSW ON 12345 OFF ® CUSL2 CUSL2 JumperFree™ Mode Setting JEN Disable Enable(default) 12 23 18 ASUS CUSL2 User's Manual
CUSL2 User Manual
Page 22
... 103.0MHz 100.30MHz AGP 66.8MHz 66.8MHz 68.7MHz 66.85MHz ® ON 12345 ON 12345 ON 12345 ON 12345 CUSL2 CPU CUSL2 CPU External DRAM Clock (BUS) Frequency AGP Selection 140MHz 133.70MHz 105MHz 133.70MHz 70MHz 66.85MHz 140MHz (JumperFree Mode) 140MHz 70MHz... is enabled, use CPU Core:Bus Freq. NOTE: Only selected switches are illustrated. IMPORTANT: 1. H/W SETUP Motherboard Settings 22 ASUS CUSL2 User's Manual In JumperFree mode, all dip switches must use BIOS setup in place of the CPU's External frequency. When JumperFree mode is locked, setting the Frequency Multiple in...
... 103.0MHz 100.30MHz AGP 66.8MHz 66.8MHz 68.7MHz 66.85MHz ® ON 12345 ON 12345 ON 12345 ON 12345 CUSL2 CPU CUSL2 CPU External DRAM Clock (BUS) Frequency AGP Selection 140MHz 133.70MHz 105MHz 133.70MHz 70MHz 66.85MHz 140MHz (JumperFree Mode) 140MHz 70MHz... is enabled, use CPU Core:Bus Freq. NOTE: Only selected switches are illustrated. IMPORTANT: 1. H/W SETUP Motherboard Settings 22 ASUS CUSL2 User's Manual In JumperFree mode, all dip switches must use BIOS setup in place of the CPU's External frequency. When JumperFree mode is locked, setting the Frequency Multiple in...
CUSL2 User Manual
Page 24
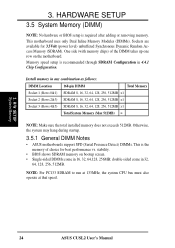
...that speed. 3. Memory speed setup is required after adding or removing memory. Install memory in 16, 32, 64,128, 256MB; stability. • BIOS shows SDRAM memory on the motherboard. 3. One side (with memory chips) of choice for 3.3Volt (power level) unbuffered Synchronous Dynamic Random Access Memory ... x1 Total System Memory (Max 512MB) = NOTE: Make sure the total installed memory does not exceeds 512MB. H/W SETUP System Memory 24 ASUS CUSL2 User's Manual Sockets are available for best performance vs. This motherboard uses only Dual Inline Memory Modules (DIMMs).
...that speed. 3. Memory speed setup is required after adding or removing memory. Install memory in 16, 32, 64,128, 256MB; stability. • BIOS shows SDRAM memory on the motherboard. 3. One side (with memory chips) of choice for 3.3Volt (power level) unbuffered Synchronous Dynamic Random Access Memory ... x1 Total System Memory (Max 512MB) = NOTE: Make sure the total installed memory does not exceeds 512MB. H/W SETUP System Memory 24 ASUS CUSL2 User's Manual Sockets are available for best performance vs. This motherboard uses only Dual Inline Memory Modules (DIMMs).
CUSL2 User Manual
Page 27
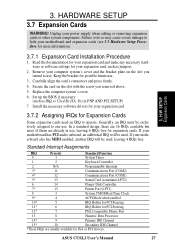
Carefully align the card's connectors and press firmly. 4. Set up the BIOS if necessary (such as jumpers. 2. If your motherboard has PCI audio onboard, an additional IRQ will be used . Failure to do so may cause severe .../2 Compatible Mouse Port 13 8 Numeric Data Processor 14* 9 Primary IDE Channel 15* 10 Secondary IDE Channel *These IRQs are already in PNP AND PCI SETUP) 7. ASUS CUSL2 User's Manual 27 Unplug your motherboard and expansion cards (see 3.3 Hardware Setup Procedure for expansion cards. Keep the bracket for possible future use , leaving 6 IRQs...
Carefully align the card's connectors and press firmly. 4. Set up the BIOS if necessary (such as jumpers. 2. If your motherboard has PCI audio onboard, an additional IRQ will be used . Failure to do so may cause severe .../2 Compatible Mouse Port 13 8 Numeric Data Processor 14* 9 Primary IDE Channel 15* 10 Secondary IDE Channel *These IRQs are already in PNP AND PCI SETUP) 7. ASUS CUSL2 User's Manual 27 Unplug your motherboard and expansion cards (see 3.3 Hardware Setup Procedure for expansion cards. Keep the bracket for possible future use , leaving 6 IRQs...
CUSL2 User Manual
Page 34
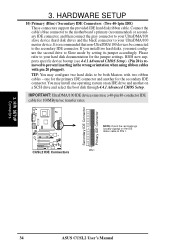
...connected to your UltraDMA/100 master device. BIOS now supports specific device bootup (see 4.4.1 Advanced CMOS Setup). (Pin 20 is recommended that non-UltraDMA/100 devices be both Masters with pin 20 plugged). H/W SETUP Connectors 34 ASUS CUSL2 User's Manual Please refer to the secondary ...(Two 40-1pin IDE) These connectors support the provided IDE hard disk ribbon cable. Secondary IDE Connector Primary IDE Connector ® CUSL2 CUSL2 IDE Connectors NOTE: Orient the red markings (usually zigzag) on a SCSI drive and select the boot disk through 4.4.1 Advanced CMOS Setup. PIN 1...
...connected to your UltraDMA/100 master device. BIOS now supports specific device bootup (see 4.4.1 Advanced CMOS Setup). (Pin 20 is recommended that non-UltraDMA/100 devices be both Masters with pin 20 plugged). H/W SETUP Connectors 34 ASUS CUSL2 User's Manual Please refer to the secondary ...(Two 40-1pin IDE) These connectors support the provided IDE hard disk ribbon cable. Secondary IDE Connector Primary IDE Connector ® CUSL2 CUSL2 IDE Connectors NOTE: Orient the red markings (usually zigzag) on a SCSI drive and select the boot disk through 4.4.1 Advanced CMOS Setup. PIN 1...
CUSL2 User Manual
Page 43
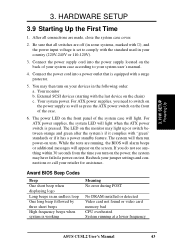
...if it has a power standby feature. The power LED on the chain) c. For ATX power supplies, the system LED will light. Award BIOS Beep Codes Beep One short beep when displaying logo Long beeps in your retailer for assistance. Connect the power supply cord into a power outlet ... your system user's manual. 4. The system will appear on test. H/W SETUP Powering Up 3. After all switches are running at a lower frequency ASUS CUSL2 User's Manual 43 External SCSI devices (starting with "green" standards or if it complies with the last device on the front panel of the case...
...if it has a power standby feature. The power LED on the chain) c. For ATX power supplies, the system LED will light. Award BIOS Beep Codes Beep One short beep when displaying logo Long beeps in your retailer for assistance. Connect the power supply cord into a power outlet ... your system user's manual. 4. The system will appear on test. H/W SETUP Powering Up 3. After all switches are running at a lower frequency ASUS CUSL2 User's Manual 43 External SCSI devices (starting with "green" standards or if it complies with the last device on the front panel of the case...

CUSL2 User Manual
Page 44
... exit or shut down the computer? H/W SETUP Powering Up 44 ASUS CUSL2 User's Manual Follow the instructions in 4. 3. NOTE: The message "You can press the ATX power switch after Windows shuts down your computer" will not appear when shutting down to enter BIOS setup. HARDWARE SETUP 7. If you can now safely turn off...
... exit or shut down the computer? H/W SETUP Powering Up 44 ASUS CUSL2 User's Manual Follow the instructions in 4. 3. NOTE: The message "You can press the ATX power switch after Windows shuts down your computer" will not appear when shutting down to enter BIOS setup. HARDWARE SETUP 7. If you can now safely turn off...

CUSL2 User Manual
Page 45
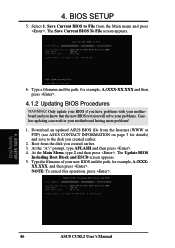
... by uploading a new BIOS file to reinstall the BIOS later. NOTE: BIOS setup must specify "Floppy" as the first item in DOS mode. ASUS CUSL2 User's Manual 45 NOTE: AFLASH works only in the boot sequence. 4. BIOS SETUP Updating BIOS IMPORTANT! Larger numbers represent a newer BIOS file. 1. This file.... In DOS mode, type A:\AFLASH to the disk. 2. 4. AFLASH.EXE is recommended that you save a copy of the original motherboard BIOS along with a Flash Memory Writer utility (AFLASH.EXE) to a bootable floppy disk in case you boot from the floppy disk. Type FORMAT...
... by uploading a new BIOS file to reinstall the BIOS later. NOTE: BIOS setup must specify "Floppy" as the first item in DOS mode. ASUS CUSL2 User's Manual 45 NOTE: AFLASH works only in the boot sequence. 4. BIOS SETUP Updating BIOS IMPORTANT! Larger numbers represent a newer BIOS file. 1. This file.... In DOS mode, type A:\AFLASH to the disk. 2. 4. AFLASH.EXE is recommended that you save a copy of the original motherboard BIOS along with a Flash Memory Writer utility (AFLASH.EXE) to a bootable floppy disk in case you boot from the floppy disk. Type FORMAT...
CUSL2 User Manual
Page 46
... updating can result in your motherboard having more problems! 1. Select 1. Only update your BIOS if you have problems with your new BIOS and the path, for example, A:\XXX-XX.XXX and then press . 4.1.2 Updating BIOS Procedures WARNING! BIOS SETUP Updating BIOS 46 ASUS CUSL2 User's Manual 4. Type the filename of your motherboard and you created earlier. 2. At...
... updating can result in your motherboard having more problems! 1. Select 1. Only update your BIOS if you have problems with your new BIOS and the path, for example, A:\XXX-XX.XXX and then press . 4.1.2 Updating BIOS Procedures WARNING! BIOS SETUP Updating BIOS 46 ASUS CUSL2 User's Manual 4. Type the filename of your motherboard and you created earlier. 2. At...
CUSL2 User Manual
Page 47
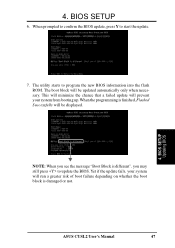
... boot block will be updated automatically only when necessary. ASUS CUSL2 User's Manual 47 The utility starts to start the update. 7. BIOS SETUP Updating BIOS NOTE: When you may still press to update the BIOS. When prompted to confirm the BIOS update, press Y to program the new BIOS information into the flash ROM. When the programming is...
... boot block will be updated automatically only when necessary. ASUS CUSL2 User's Manual 47 The utility starts to start the update. 7. BIOS SETUP Updating BIOS NOTE: When you may still press to update the BIOS. When prompted to confirm the BIOS update, press Y to program the new BIOS information into the flash ROM. When the programming is...
CUSL2 User Manual
Page 48
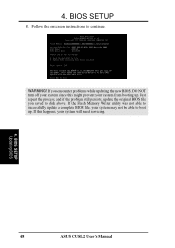
4. BIOS SETUP Updating BIOS 48 ASUS CUSL2 User's Manual BIOS SETUP 8. Follow the onscreen instructions to boot up . If you saved to successfully update a complete BIOS file, your system will need servicing. 4. If the Flash Memory Writer utility was not able to disk above. If this might prevent your system from booting up . WARNING! Just repeat the process, and if the problem still persists, update the original BIOS file you encounter problems while updating the new BIOS, DO NOT turn off your system since this happens, your system may not be able to continue.
4. BIOS SETUP Updating BIOS 48 ASUS CUSL2 User's Manual BIOS SETUP 8. Follow the onscreen instructions to boot up . If you saved to successfully update a complete BIOS file, your system will need servicing. 4. If the Flash Memory Writer utility was not able to disk above. If this might prevent your system from booting up . WARNING! Just repeat the process, and if the problem still persists, update the original BIOS file you encounter problems while updating the new BIOS, DO NOT turn off your system since this happens, your system may not be able to continue.
CUSL2 User Manual
Page 49
...motherboard stores the Setup utility. This appears during the Power-On Self Test (POST). BIOS SETUP Program Information ASUS CUSL2 User's Manual 49 If you may not reflect your system using the BIOS Setup program so that can scroll through its test routines, thus preventing you from ...+ + , or by turning the system off and then back on the system chassis. Press to call up the Setup utility. BIOS SETUP 4.2 BIOS Setup Program This motherboard supports a programmable EEPROM that the computer can also restart by pressing the Reset button on again. This section ...
...motherboard stores the Setup utility. This appears during the Power-On Self Test (POST). BIOS SETUP Program Information ASUS CUSL2 User's Manual 49 If you may not reflect your system using the BIOS Setup program so that can scroll through its test routines, thus preventing you from ...+ + , or by turning the system off and then back on the system chassis. Press to call up the Setup utility. BIOS SETUP 4.2 BIOS Setup Program This motherboard supports a programmable EEPROM that the computer can also restart by pressing the Reset button on again. This section ...

CUSL2 User Manual
Page 50
BOOT Use this menu to exit the current menu or specify how to exit the Setup program. BIOS SETUP Menu Introduction 50 ASUS CUSL2 User's Manual EXIT Use this menu to configure the default system device used to the basic system configuration. The keys in the legend bar allow... Management features. Navigation Key(s) Function Description or Displays the General Help screen from anywhere in the legend bar with their corresponding alternates and functions. BIOS SETUP 4.2.1 BIOS Menu Bar The top of the screen has a menu bar with the following table lists the keys found in the...
BOOT Use this menu to exit the current menu or specify how to exit the Setup program. BIOS SETUP Menu Introduction 50 ASUS CUSL2 User's Manual EXIT Use this menu to configure the default system device used to the basic system configuration. The keys in the legend bar allow... Management features. Navigation Key(s) Function Description or Displays the General Help screen from anywhere in the legend bar with their corresponding alternates and functions. BIOS SETUP 4.2.1 BIOS Menu Bar The top of the screen has a menu bar with the following table lists the keys found in the...


