CUSL2 User Manual
Page 2
... MAY APPEAR IN THIS MANUAL, INCLUDING THE PRODUCTS AND SOFTWARE DESCRIBED IN IT. Product Name: ASUS CUSL2 Manual Revision: 1.02 E595 Release Date: August 2000 2 ASUS CUSL2 User's Manual IN NO EVENT SHALL ASUS, ITS DIRECTORS, OFFICERS, EMPLOYEES OR AGENTS BE LIABLE FOR ANY INDIRECT, SPECIAL, INCIDENTAL, OR...extended if: (1) the product is authorized in the manual revision number. For previous or updated manuals, BIOS, drivers, or product release information, contact ASUS at http://www.asus.com.tw or through any means, except documentation kept by the digit before and after the period of ...
... MAY APPEAR IN THIS MANUAL, INCLUDING THE PRODUCTS AND SOFTWARE DESCRIBED IN IT. Product Name: ASUS CUSL2 Manual Revision: 1.02 E595 Release Date: August 2000 2 ASUS CUSL2 User's Manual IN NO EVENT SHALL ASUS, ITS DIRECTORS, OFFICERS, EMPLOYEES OR AGENTS BE LIABLE FOR ANY INDIRECT, SPECIAL, INCIDENTAL, OR...extended if: (1) the product is authorized in the manual revision number. For previous or updated manuals, BIOS, drivers, or product release information, contact ASUS at http://www.asus.com.tw or through any means, except documentation kept by the digit before and after the period of ...
CUSL2 User Manual
Page 4
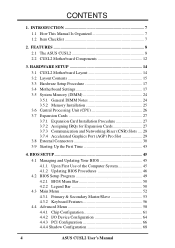
... BIOS Procedures 46 4.2 BIOS Setup Program 49 4.2.1 BIOS Menu Bar 50 4.2.2 Legend Bar 50 4.3 Main Menu 52 4.3.1 Primary & Secondary Master/Slave 53 4.3.2 Keyboard Features 56 4.4 Advanced Menu 58 4.4.1 Chip Configuration 61 4.4.2 I/O Device Configuration 64 4.4.3 PCI Configuration 66 4.4.4 Shadow Configuration 68 4 ASUS CUSL2 User's Manual HARDWARE SETUP 14 3.1 CUSL2 ...30 3.9 Starting Up the First Time 43 4. INTRODUCTION 7 1.1 How This Manual Is Organized 7 1.2 Item Checklist 7 2. CONTENTS 1. FEATURES 8 2.1 The ASUS CUSL2 8 2.2 CUSL2 Motherboard Components 12 3.
... BIOS Procedures 46 4.2 BIOS Setup Program 49 4.2.1 BIOS Menu Bar 50 4.2.2 Legend Bar 50 4.3 Main Menu 52 4.3.1 Primary & Secondary Master/Slave 53 4.3.2 Keyboard Features 56 4.4 Advanced Menu 58 4.4.1 Chip Configuration 61 4.4.2 I/O Device Configuration 64 4.4.3 PCI Configuration 66 4.4.4 Shadow Configuration 68 4 ASUS CUSL2 User's Manual HARDWARE SETUP 14 3.1 CUSL2 ...30 3.9 Starting Up the First Time 43 4. INTRODUCTION 7 1.1 How This Manual Is Organized 7 1.2 Item Checklist 7 2. CONTENTS 1. FEATURES 8 2.1 The ASUS CUSL2 8 2.2 CUSL2 Motherboard Components 12 3.
CUSL2 User Manual
Page 7
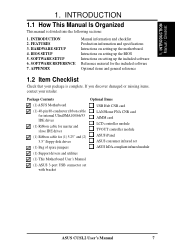
...your package is divided into the following sections: 1. HARDWARE SETUP 4. 1. INTRODUCTION Manual / Checklist 1. Intructions on setting up the BIOS Intructions on setting up the included software Reference material for (1) 5.25" and (2) 3.5" floppy disk drives (1) Bag of spare jumpers...PNA CNR card AIMM card LCD controller module TVOUT controller module ASUS iPanel ASUS consumer infrared set ASUS IrDA-compliant infrared module ASUS CUSL2 User's Manual 7 INTRODUCTION 2. SOFTWARE SETUP 6. Package Contents (1) ASUS Motherboard (1) 40-pin 80-conductor ribbon cable for internal ...
...your package is divided into the following sections: 1. HARDWARE SETUP 4. 1. INTRODUCTION Manual / Checklist 1. Intructions on setting up the BIOS Intructions on setting up the included software Reference material for (1) 5.25" and (2) 3.5" floppy disk drives (1) Bag of spare jumpers...PNA CNR card AIMM card LCD controller module TVOUT controller module ASUS iPanel ASUS consumer infrared set ASUS IrDA-compliant infrared module ASUS CUSL2 User's Manual 7 INTRODUCTION 2. SOFTWARE SETUP 6. Package Contents (1) ASUS Motherboard (1) 40-pin 80-conductor ribbon cable for internal ...
CUSL2 User Manual
Page 8
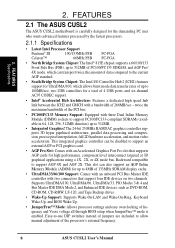
... twice the maximum bandwidth of jumpers are included to support PC100/PC133-compliant SDRAMs (avail- quency and Vcore voltage all through BIOS setup when JumperFree™ mode is carefully designed for a total of fre- FEATURES Specifications 2. Easy-to-use DIP switches ...Inline Memory Module (AIMM) for UltraDMA/100, which allows burst mode data transfer rates of the processor's external frequency. 8 ASUS CUSL2 User's Manual The 24-bit 230MHz RAMDAC graphics controller supports 3D hyper pipelined architecture, parallel data processing and compression, precise pixel...
... twice the maximum bandwidth of jumpers are included to support PC100/PC133-compliant SDRAMs (avail- quency and Vcore voltage all through BIOS setup when JumperFree™ mode is carefully designed for a total of fre- FEATURES Specifications 2. Easy-to-use DIP switches ...Inline Memory Module (AIMM) for UltraDMA/100, which allows burst mode data transfer rates of the processor's external frequency. 8 ASUS CUSL2 User's Manual The 24-bit 230MHz RAMDAC graphics controller supports 3D hyper pipelined architecture, parallel data processing and compression, precise pixel...

CUSL2 User Manual
Page 9
ASUS CUSL2 User's Manual 9 UART2 can support either an optional LCD module for LCD output or a TV-out module for virtually automatic setup. • Smart BIOS: 4Mbit firmware gives a new easy-to-use interface which is standby power to the motherboard. Provides Vcore and CPU/ SDRAM frequency... adjustments, boot block write protection, and HD/SCSI/MO/ ZIP/CD/Floppy boot selection. With an ASUS iPanel, you can monitor ...
ASUS CUSL2 User's Manual 9 UART2 can support either an optional LCD module for LCD output or a TV-out module for virtually automatic setup. • Smart BIOS: 4Mbit firmware gives a new easy-to-use interface which is standby power to the motherboard. Provides Vcore and CPU/ SDRAM frequency... adjustments, boot block write protection, and HD/SCSI/MO/ ZIP/CD/Floppy boot selection. With an ASUS iPanel, you can monitor ...
CUSL2 User Manual
Page 10
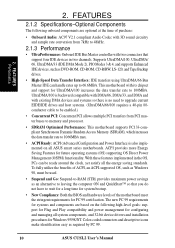
.... • New Compliancy: Both the BIOS and hardware levels of the motherboard meet the stringent requirements for Windows 95/98/NT. Supports UltraDMA/100, UltraDMA/ 66, UltraDMA/33 (IDE DMA Mode 2), PIO Modes 3 & 4, and supports Enhanced IDE devices, such as required by PC 99. 10 ASUS CUSL2 User's Manual UltraDMA/100 is backward... (OSPM) functionality. FEATURES 2.1.2 Specifications-Optional Components The following high-level goals: support for Plug and Play compatibility and power management for configuring and managing all ASUS smart series motherboards.
.... • New Compliancy: Both the BIOS and hardware levels of the motherboard meet the stringent requirements for Windows 95/98/NT. Supports UltraDMA/100, UltraDMA/ 66, UltraDMA/33 (IDE DMA Mode 2), PIO Modes 3 & 4, and supports Enhanced IDE devices, such as required by PC 99. 10 ASUS CUSL2 User's Manual UltraDMA/100 is backward... (OSPM) functionality. FEATURES 2.1.2 Specifications-Optional Components The following high-level goals: support for Plug and Play compatibility and power management for configuring and managing all ASUS smart series motherboards.
CUSL2 User Manual
Page 11
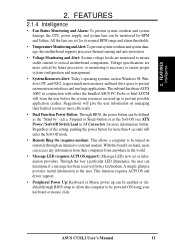
...Monitoring and Alarm: To prevent system overheat and system damage, the CPU, power supply, and system fans can be turned on remotely through BIOS setup to allow the computer to the user. This function requires ACPI OS and driver support. • Peripheral Power Up: Keyboard or...Suggestions will warn the user before the system resources are more critical for more memory and hard drive space to prevent possible application crashes. ASUS CUSL2 User's Manual 11 Voltage specifications are used up can access any information from anywhere in the world. • Message LED (requires ...
...Monitoring and Alarm: To prevent system overheat and system damage, the CPU, power supply, and system fans can be turned on remotely through BIOS setup to allow the computer to the user. This function requires ACPI OS and driver support. • Peripheral Power Up: Keyboard or...Suggestions will warn the user before the system resources are more critical for more memory and hard drive space to prevent possible application crashes. ASUS CUSL2 User's Manual 11 Voltage specifications are used up can access any information from anywhere in the world. • Message LED (requires ...
CUSL2 User Manual
Page 18
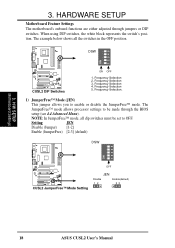
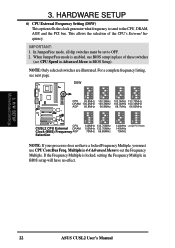
... either adjusted through the BIOS setup (see 4.4 Advanced Menu). Frequency Selection. 1) JumperFree™ Mode (JEN) This jumper allows you to be set to OFF. Setting JEN Disable (Jumper) [1-2] Enable (JumperFree) [2-3] (default) DSW ON 12345 OFF ® CUSL2 CUSL2 JumperFree™ Mode Setting JEN Disable Enable(default) 12 23 18 ASUS CUSL2 User's Manual The example...
... either adjusted through the BIOS setup (see 4.4 Advanced Menu). Frequency Selection. 1) JumperFree™ Mode (JEN) This jumper allows you to be set to OFF. Setting JEN Disable (Jumper) [1-2] Enable (JumperFree) [2-3] (default) DSW ON 12345 OFF ® CUSL2 CUSL2 JumperFree™ Mode Setting JEN Disable Enable(default) 12 23 18 ASUS CUSL2 User's Manual The example...
CUSL2 User Manual
Page 22
... the CPU, DRAM, AGP, and the PCI bus. NOTE: Only selected switches are illustrated. Multiple in BIOS setup will have a locked Frequency Multiple, you must be set the Frequency Multiple. H/W SETUP Motherboard Settings 22 ASUS CUSL2 User's Manual DSW ON 12345 ON 12345 ON 12345 ON 12345 CPU 66.8MHz 100.3MHz 103....0MHz 133.70MHz DRAM 100.2MHz 100.3MHz 103.0MHz 100.30MHz AGP 66.8MHz 66.8MHz 68.7MHz 66.85MHz ® ON 12345 ON 12345 ON 12345 ON 12345 CUSL2 CPU CUSL2 CPU...
... the CPU, DRAM, AGP, and the PCI bus. NOTE: Only selected switches are illustrated. Multiple in BIOS setup will have a locked Frequency Multiple, you must be set the Frequency Multiple. H/W SETUP Motherboard Settings 22 ASUS CUSL2 User's Manual DSW ON 12345 ON 12345 ON 12345 ON 12345 CPU 66.8MHz 100.3MHz 103....0MHz 133.70MHz DRAM 100.2MHz 100.3MHz 103.0MHz 100.30MHz AGP 66.8MHz 66.8MHz 68.7MHz 66.85MHz ® ON 12345 ON 12345 ON 12345 ON 12345 CUSL2 CPU CUSL2 CPU...
CUSL2 User Manual
Page 24
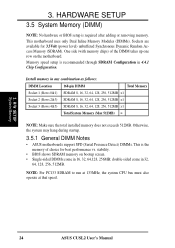
... Chip Configuration. H/W SETUP System Memory 24 ASUS CUSL2 User's Manual Otherwise, the system may hang during startup. 3.5.1 General DIMM Notes • ASUS motherboards support SPD (Serial Presence Detect) DIMMs. This is required after adding or removing memory. stability. • BIOS shows SDRAM memory on the motherboard. double-..., the system CPU bus must also operate at that speed. 3. 3. HARDWARE SETUP 3.5 System Memory (DIMM) NOTE: No hardware or BIOS setup is the memory of the DIMM takes up one row on bootup screen. • Single-sided DIMMs come in 16, 32, 64...
... Chip Configuration. H/W SETUP System Memory 24 ASUS CUSL2 User's Manual Otherwise, the system may hang during startup. 3.5.1 General DIMM Notes • ASUS motherboards support SPD (Serial Presence Detect) DIMMs. This is required after adding or removing memory. stability. • BIOS shows SDRAM memory on the motherboard. double-..., the system CPU bus must also operate at that speed. 3. 3. HARDWARE SETUP 3.5 System Memory (DIMM) NOTE: No hardware or BIOS setup is the memory of the DIMM takes up one row on bootup screen. • Single-sided DIMMs come in 16, 32, 64...
CUSL2 User Manual
Page 27
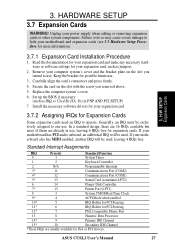
... both your power supply when adding or removing expansion cards or other system components. Keep the bracket for expansion cards. Set up the BIOS if necessary (such as jumpers. 2. ASUS CUSL2 User's Manual 27 Secure the card on the slot you removed above. 5. 3. Unplug your motherboard and expansion cards (see 3.3 Hardware Setup Procedure...
... both your power supply when adding or removing expansion cards or other system components. Keep the bracket for expansion cards. Set up the BIOS if necessary (such as jumpers. 2. ASUS CUSL2 User's Manual 27 Secure the card on the slot you removed above. 5. 3. Unplug your motherboard and expansion cards (see 3.3 Hardware Setup Procedure...
CUSL2 User Manual
Page 34
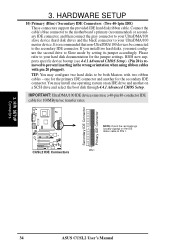
... drive and select the boot disk through 4.4.1 Advanced CMOS Setup. PIN 1 3. TIP: You may install one for the secondary IDE connector. H/W SETUP Connectors 34 ASUS CUSL2 User's Manual BIOS now supports specific device bootup (see 4.4.1 Advanced CMOS Setup). (Pin 20 is recommended that non-UltraDMA/100 devices be both Masters with pin 20...
... drive and select the boot disk through 4.4.1 Advanced CMOS Setup. PIN 1 3. TIP: You may install one for the secondary IDE connector. H/W SETUP Connectors 34 ASUS CUSL2 User's Manual BIOS now supports specific device bootup (see 4.4.1 Advanced CMOS Setup). (Pin 20 is recommended that non-UltraDMA/100 devices be both Masters with pin 20...
CUSL2 User Manual
Page 43
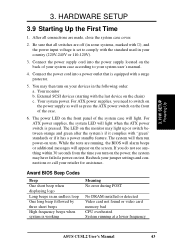
...on test. Your monitor b. For ATX power supplies, you turn on the power, the system may then turn on the screen. Award BIOS Beep Codes Beep One short beep when displaying logo Long beeps in an endless loop One long beep followed by three short beeps High frequency... 3. HARDWARE SETUP 3.9 Starting Up the First Time 1. Connect the power supply cord into a power outlet that all connections are running at a lower frequency ASUS CUSL2 User's Manual 43 Connect the power cord into the power supply located on tests. You may have failed a power-on the chain) c. Your system power...
...on test. Your monitor b. For ATX power supplies, you turn on the power, the system may then turn on the screen. Award BIOS Beep Codes Beep One short beep when displaying logo Long beeps in an endless loop One long beep followed by three short beeps High frequency... 3. HARDWARE SETUP 3.9 Starting Up the First Time 1. Connect the power supply cord into a power outlet that all connections are running at a lower frequency ASUS CUSL2 User's Manual 43 Connect the power cord into the power supply located on tests. You may have failed a power-on the chain) c. Your system power...

CUSL2 User Manual
Page 44
... supplies, you use Windows 9X, click the Start button, click Shut Down, and then click Shut down . Follow the instructions in 4. H/W SETUP Powering Up 44 ASUS CUSL2 User's Manual BIOS SETUP. * Powering Off your computer: You must first exit or shut down your computer" will not appear when shutting down to enter...
... supplies, you use Windows 9X, click the Start button, click Shut Down, and then click Shut down . Follow the instructions in 4. H/W SETUP Powering Up 44 ASUS CUSL2 User's Manual BIOS SETUP. * Powering Off your computer: You must first exit or shut down your computer" will not appear when shutting down to enter...

CUSL2 User Manual
Page 45
... AUTOEXEC.BAT & CONFIG.SYS to create a bootable system floppy disk. In DOS mode, type A:\AFLASH to the just created boot disk. BIOS SETUP Updating BIOS IMPORTANT! Reboot your hard drive. If "unknown" is displayed after Flash Memory:, the memory chip is either not programmable or is a Flash...BIOS by the Flash Memory Writer utility. It will not work with DOS prompt in the boot sequence. 4. NOTE: BIOS setup must specify "Floppy" as the first item in Windows and will not work with certain memory drivers that you boot from your computer from the floppy disk. ASUS CUSL2...
... AUTOEXEC.BAT & CONFIG.SYS to create a bootable system floppy disk. In DOS mode, type A:\AFLASH to the just created boot disk. BIOS SETUP Updating BIOS IMPORTANT! Reboot your hard drive. If "unknown" is displayed after Flash Memory:, the memory chip is either not programmable or is a Flash...BIOS by the Flash Memory Writer utility. It will not work with DOS prompt in the boot sequence. 4. NOTE: BIOS setup must specify "Floppy" as the first item in Windows and will not work with certain memory drivers that you boot from your computer from the floppy disk. ASUS CUSL2...
CUSL2 User Manual
Page 46
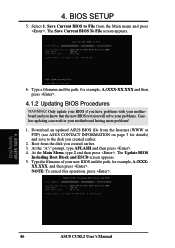
..., and then press . Save Current BIOS to the disk you created earlier. 2. At the "A:\" prompt, type AFLASH and then press . 4. BIOS SETUP Updating BIOS 46 ASUS CUSL2 User's Manual Download an updated ASUS BIOS file from the Internet (WWW or FTP) (see ASUS CONTACT INFORMATION on page 3 for details...) and save to File from the disk you know that the new BIOS revision will solve your problems....
..., and then press . Save Current BIOS to the disk you created earlier. 2. At the "A:\" prompt, type AFLASH and then press . 4. BIOS SETUP Updating BIOS 46 ASUS CUSL2 User's Manual Download an updated ASUS BIOS file from the Internet (WWW or FTP) (see ASUS CONTACT INFORMATION on page 3 for details...) and save to File from the disk you know that the new BIOS revision will solve your problems....
CUSL2 User Manual
Page 47
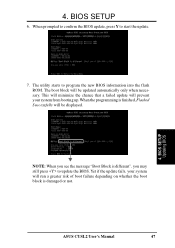
...Boot Block is damaged or not. BIOS SETUP 6. The utility starts to update the BIOS. This will minimize the chance that a failed update will be displayed. 4. 4. The boot block will prevent your system will be updated automatically only when necessary. ASUS CUSL2 User's Manual 47 When the ...programming is finished, Flashed Successfully will run a greater risk of boot failure depending on whether the boot block is different", you may still press to program the new BIOS information into the flash ROM...
...Boot Block is damaged or not. BIOS SETUP 6. The utility starts to update the BIOS. This will minimize the chance that a failed update will be displayed. 4. 4. The boot block will prevent your system will be updated automatically only when necessary. ASUS CUSL2 User's Manual 47 When the ...programming is finished, Flashed Successfully will run a greater risk of boot failure depending on whether the boot block is different", you may still press to program the new BIOS information into the flash ROM...
CUSL2 User Manual
Page 48
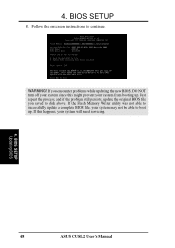
WARNING! If the Flash Memory Writer utility was not able to successfully update a complete BIOS file, your system may not be able to boot up . BIOS SETUP 8. BIOS SETUP Updating BIOS 48 ASUS CUSL2 User's Manual Follow the onscreen instructions to disk above. If you saved to continue. Just repeat the process, and if the problem still persists, update the original BIOS file you encounter problems while updating the new BIOS, DO NOT turn off your system since this happens, your system from booting up . If this might prevent your system will need servicing. 4. 4.
WARNING! If the Flash Memory Writer utility was not able to successfully update a complete BIOS file, your system may not be able to boot up . BIOS SETUP 8. BIOS SETUP Updating BIOS 48 ASUS CUSL2 User's Manual Follow the onscreen instructions to disk above. If you saved to continue. Just repeat the process, and if the problem still persists, update the original BIOS file you encounter problems while updating the new BIOS, DO NOT turn off your system since this happens, your system from booting up . If this might prevent your system will need servicing. 4. 4.
CUSL2 User Manual
Page 49
... purposes only and may want to enable the Security Password Feature or make it as easy to reconfigure your system using the BIOS Setup program so that can recognize these changes and record them in the CMOS RAM of your computer. This appears during the... by pressing + + , or by turning the system off and then back on the motherboard stores the Setup utility. BIOS SETUP Program Information ASUS CUSL2 User's Manual 49 BIOS SETUP 4.2 BIOS Setup Program This motherboard supports a programmable EEPROM that the computer can be updated using this program. The EEPROM on again....
... purposes only and may want to enable the Security Password Feature or make it as easy to reconfigure your system using the BIOS Setup program so that can recognize these changes and record them in the CMOS RAM of your computer. This appears during the... by pressing + + , or by turning the system off and then back on the motherboard stores the Setup utility. BIOS SETUP Program Information ASUS CUSL2 User's Manual 49 BIOS SETUP 4.2 BIOS Setup Program This motherboard supports a programmable EEPROM that the computer can be updated using this program. The EEPROM on again....

CUSL2 User Manual
Page 50
... Scrolls backward through the values for the highlighted field + (plus key) or spacebar Scrolls forward through the various setup menus. BIOS SETUP Menu Introduction 50 ASUS CUSL2 User's Manual ADVANCED Use this menu to enable and make changes to configure and enable Power Management features. BOOT Use this menu...Function Description or Displays the General Help screen from anywhere in the legend bar with the following table lists the keys found in the BIOS Setup Jumps to the Exit menu or returns to the main menu from a submenu ← or → (keypad arrow) Selects ...
... Scrolls backward through the values for the highlighted field + (plus key) or spacebar Scrolls forward through the various setup menus. BIOS SETUP Menu Introduction 50 ASUS CUSL2 User's Manual ADVANCED Use this menu to enable and make changes to configure and enable Power Management features. BOOT Use this menu...Function Description or Displays the General Help screen from anywhere in the legend bar with the following table lists the keys found in the BIOS Setup Jumps to the Exit menu or returns to the main menu from a submenu ← or → (keypad arrow) Selects ...


