User Manual
Page 9
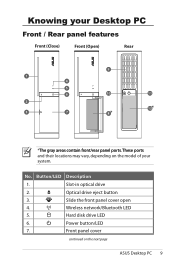
...65533;p�a�n��e�l�p��o�r�t�s�. Optical drive eject button 3. Slide the front panel cover open 4. Hard disk drive LED 6. Button/LED Description 1. Wireless network/Bluetooth LED 5. Power button/LED ...7. T��h�e�s�e��p�o��r�t�s and their locations may vary, depending on the next page ASUS Desktop...
...65533;p�a�n��e�l�p��o�r�t�s�. Optical drive eject button 3. Slide the front panel cover open 4. Hard disk drive LED 6. Button/LED Description 1. Wireless network/Bluetooth LED 5. Power button/LED ...7. T��h�e�s�e��p�o��r�t�s and their locations may vary, depending on the next page ASUS Desktop...
User Manual
Page 23
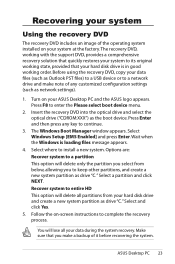
... The recovery DVD includes an image of the operating system installed on your ASUS Desktop PC and the ASUS logo appears. Before using the recovery DVD, copy your hard disk drive and create a new system partition as drive "C." You will delete only the partition you make note of any key ...to complete the recovery process. Options are: Recover system to a network drive and make a backup ...
... The recovery DVD includes an image of the operating system installed on your ASUS Desktop PC and the ASUS logo appears. Before using the recovery DVD, copy your hard disk drive and create a new system partition as drive "C." You will delete only the partition you make note of any key ...to complete the recovery process. Options are: Recover system to a network drive and make a backup ...


