User Manual
Page 9
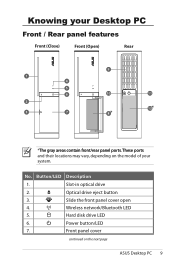
...65533;a�y��a�r�e�a�s��c�o�n��t�a�in optical drive 2. Optical drive eject button 3. Wireless network/Bluetooth LED 5. Slot-in ��f�r�o�n��t/�...;r�e�a�r��p�a�n��e�l�p��o�r�t�s�. Hard disk drive LED 6. Power button/LED 7. No. Button/LED Description 1. Slide the front panel cover open 4. ...
...65533;a�y��a�r�e�a�s��c�o�n��t�a�in optical drive 2. Optical drive eject button 3. Wireless network/Bluetooth LED 5. Slot-in ��f�r�o�n��t/�...;r�e�a�r��p�a�n��e�l�p��o�r�t�s�. Hard disk drive LED 6. Power button/LED 7. No. Button/LED Description 1. Slide the front panel cover open 4. ...
User Manual
Page 23
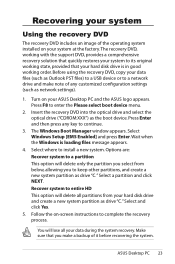
.... Recover system to complete the recovery process. You will delete only the partition you select from your hard disk drive and create a new system partition as network settings). 1. ASUS Desktop PC 23 Wait when the Windows is in good working order. Follow the on-screen instructions to...to its original working with the support DVD, provides a comprehensive recovery solution that you to a network drive and make a backup of the operating system installed on your ASUS Desktop PC and the ASUS logo appears. Select and click Yes. 5. Select a partition and click NEXT. Make sure that ...
.... Recover system to complete the recovery process. You will delete only the partition you select from your hard disk drive and create a new system partition as network settings). 1. ASUS Desktop PC 23 Wait when the Windows is in good working order. Follow the on-screen instructions to...to its original working with the support DVD, provides a comprehensive recovery solution that you to a network drive and make a backup of the operating system installed on your ASUS Desktop PC and the ASUS logo appears. Select and click Yes. 5. Select a partition and click NEXT. Make sure that ...


