User Manual
Page 18
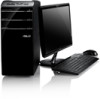
... card. • To connect multiple external monitors to your computer, refer to the HDMI port on the rear panel of your computer comes with an ASUS Graphics Card, the graphics card is set as the primary display device in Chapter 3 of this user manual for details. 16 Chapter 1: Getting started Connect... a VGA monitor to the VGA port, or a DVI-D monitor to the DVI-D port, or an HDMI monitor to Connecting multiple external monitors in the BIOS. To connect an external monitor using the onboard display output ports: 1.
... card. • To connect multiple external monitors to your computer, refer to the HDMI port on the rear panel of your computer comes with an ASUS Graphics Card, the graphics card is set as the primary display device in Chapter 3 of this user manual for details. 16 Chapter 1: Getting started Connect... a VGA monitor to the VGA port, or a DVI-D monitor to the DVI-D port, or an HDMI monitor to Connecting multiple external monitors in the BIOS. To connect an external monitor using the onboard display output ports: 1.

User Manual
Page 51
ASUS CM1831 49 English My Favorites My Favorites allows you to add applications that you frequently use, saving you want to add to My Favorites list. Click ... selected application. Click Add, then locate the application you from searching for the applications throughout your system, motherboard, CPU, BIOS, installed device(s), and memory. Right click on the Information window to the ASUS website, technical support website, download support website, or contact information. You can also double click to launch, delete, or...
ASUS CM1831 49 English My Favorites My Favorites allows you to add applications that you frequently use, saving you want to add to My Favorites list. Click ... selected application. Click Add, then locate the application you from searching for the applications throughout your system, motherboard, CPU, BIOS, installed device(s), and memory. Right click on the Information window to the ASUS website, technical support website, download support website, or contact information. You can also double click to launch, delete, or...
User Manual
Page 56
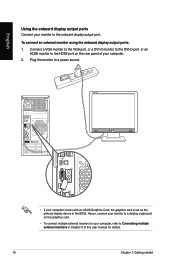
... the updating process. 54 Chapter 26: Using the utilities Installing ASUS Update To install ASUS Update: 1. Updating the BIOS To update the BIOS: 1. c. Locate the BIOS file from a BIOS file a. Click the Utilities tab, then click ASUS Update. 3. Select Update BIOS from a file, then click Next. The ASUS Update utility is available in the support DVD. Place the support...
... the updating process. 54 Chapter 26: Using the utilities Installing ASUS Update To install ASUS Update: 1. Updating the BIOS To update the BIOS: 1. c. Locate the BIOS file from a BIOS file a. Click the Utilities tab, then click ASUS Update. 3. Select Update BIOS from a file, then click Next. The ASUS Update utility is available in the support DVD. Place the support...

User Manual
Page 57
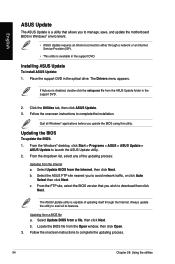
... starts updating the BIOS and loading the new boot logo. 9. Select Update BIOS from file from the drop down menu, then click Next. 5. From the Ratio dropdown list, select your desired size for details. 2. ASUS CM1831 55 Refer to replace system boot logo before flashing BIOS, then click Next.... 4. Select Options from the drop down menu, then click Next. 3. Launch the ASUS Update utility. From the left window pane, locate the image ...
... starts updating the BIOS and loading the new boot logo. 9. Select Update BIOS from file from the drop down menu, then click Next. 5. From the Ratio dropdown list, select your desired size for details. 2. ASUS CM1831 55 Refer to replace system boot logo before flashing BIOS, then click Next.... 4. Select Options from the drop down menu, then click Next. 3. Launch the ASUS Update utility. From the left window pane, locate the image ...
User Manual
Page 58
... is no setting screen for Ai Charger. Double-click the setup.exe file from the Windows® desktop, click Start > All Programs > ASUS > Webstorage. The webstorage quick bar appears in the optical drive. Ai Charger can only be detected if its installation on your computer, the Ai...the Windows® taskbar. • The Ai Charger icon ( ) shows if an Apple device is connected on your ASUS computer's USB 2.0 / USB 3.0 port. • There is no BIOS, hardware, or chipset requirements for Ai Charger. After its Apple USB driver is properly installed in the support DVD. ...
... is no setting screen for Ai Charger. Double-click the setup.exe file from the Windows® desktop, click Start > All Programs > ASUS > Webstorage. The webstorage quick bar appears in the optical drive. Ai Charger can only be detected if its installation on your computer, the Ai...the Windows® taskbar. • The Ai Charger icon ( ) shows if an Apple device is connected on your ASUS computer's USB 2.0 / USB 3.0 port. • There is no BIOS, hardware, or chipset requirements for Ai Charger. After its Apple USB driver is properly installed in the support DVD. ...
User Manual
Page 71
..., refer to its full speed when the computer is normal. Action It is powering on the computer. ASUS CM1831 69 Visit the ASUS Support site at http://support.asus.com to download the latest BIOS versions. Old BIOS version The CPU fan has been replaced. Visit the ASUS Support site at http://support.asus.com for the computer.
..., refer to its full speed when the computer is normal. Action It is powering on the computer. ASUS CM1831 69 Visit the ASUS Support site at http://support.asus.com to download the latest BIOS versions. Old BIOS version The CPU fan has been replaced. Visit the ASUS Support site at http://support.asus.com for the computer.


