User Manual
Page 9
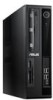
Read the ASUS Warranty Card before setting up your computer Illustrations are encapsulated in a stunningly futuristic and stylish system casing. ASUS BM6660/MD710, BP6260/SD710, BM6360 1-1 Chapter 1 Getting started Welcome! The ASUS Desktop PC provides cutting-edge performance, uncompromised reliability, and user-centric utilities. Getting to know your ASUS Desktop PC. All these values are for purchasing the ASUS Desktop PC! The ports and their locations, and the chassis color vary with different models. Thank you for reference only.
Read the ASUS Warranty Card before setting up your computer Illustrations are encapsulated in a stunningly futuristic and stylish system casing. ASUS BM6660/MD710, BP6260/SD710, BM6360 1-1 Chapter 1 Getting started Welcome! The ASUS Desktop PC provides cutting-edge performance, uncompromised reliability, and user-centric utilities. Getting to know your ASUS Desktop PC. All these values are for purchasing the ASUS Desktop PC! The ports and their locations, and the chassis color vary with different models. Thank you for reference only.
User Manual
Page 11
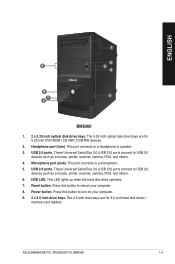
USB 2.0 ports. USB 2.0 ports. The 3.5 inch drive bays are for 3.5 inch hard disk drives / memory card readers. ASUS BM6660/MD710, BP6260/SD710, BM6360 1-3 The 5.25 inch optical disk drive bays are for 5.25 inch DVD-ROM / CD-RW / DVD-RW devices. 2. These Universal Serial Bus 2.0 (USB 2.0) ...
USB 2.0 ports. USB 2.0 ports. The 3.5 inch drive bays are for 3.5 inch hard disk drives / memory card readers. ASUS BM6660/MD710, BP6260/SD710, BM6360 1-3 The 5.25 inch optical disk drive bays are for 5.25 inch DVD-ROM / CD-RW / DVD-RW devices. 2. These Universal Serial Bus 2.0 (USB 2.0) ...
User Manual
Page 13
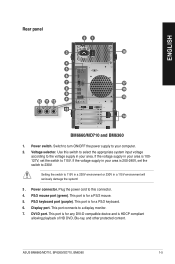
.../2 keyboard port (purple). This port connects to your area. Switch to turn ON/OFF the power supply to a display monitor. 7. DVI-D port. Display port. ASUS BM6660/MD710, BP6260/SD710, BM6360 1-5 PS/2 mouse port (green). If the voltage supply in your area is 100127V, set the switch to 115V. ENGLISH Rear panel 21...
.../2 keyboard port (purple). This port connects to your area. Switch to turn ON/OFF the power supply to a display monitor. 7. DVI-D port. Display port. ASUS BM6660/MD710, BP6260/SD710, BM6360 1-5 PS/2 mouse port (green). If the voltage supply in your area is 100127V, set the switch to 115V. ENGLISH Rear panel 21...
User Manual
Page 15
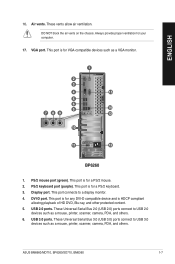
... Universal Serial Bus 3.0 (USB 3.0) ports connect to USB 2.0 devices such as a mouse, printer, scanner, camera, PDA, and others . ASUS BM6660/MD710, BP6260/SD710, BM6360 1-7 This port is for a PS/2 keyboard. 3. This port is HDCP compliant allowing playback of HD DVD, Blu-ray, and...2.0 (USB 2.0) ports connect to USB 3.0 devices such as a VGA monitor. 1 2 3 4 15 5 6 5 14 7 89 13 10 11 12 BP6260 1. Display port. USB 2.0 ports. Always provide proper ventilation for any DVI-D compatible device and is for VGA-compatible devices such as a mouse, printer, scanner...
... Universal Serial Bus 3.0 (USB 3.0) ports connect to USB 2.0 devices such as a mouse, printer, scanner, camera, PDA, and others . ASUS BM6660/MD710, BP6260/SD710, BM6360 1-7 This port is for a PS/2 keyboard. 3. This port is HDCP compliant allowing playback of HD DVD, Blu-ray, and...2.0 (USB 2.0) ports connect to USB 3.0 devices such as a VGA monitor. 1 2 3 4 15 5 6 5 14 7 89 13 10 11 12 BP6260 1. Display port. USB 2.0 ports. Always provide proper ventilation for any DVI-D compatible device and is for VGA-compatible devices such as a mouse, printer, scanner...

User Manual
Page 17
ASUS BM6660/MD710, BP6260/SD710, BM6360 1-9 ENGLISH 14. LAN (RJ-45) port. LAN port LED indications ACT/LINK SPEED LED LED Activity/Link LED Status Description OFF No link ORANGE Linked BLINKING Data activity Speed LED Status OFF ORANGE GREEN Description 10Mbps connection 100Mbps connection 1Gbps connection LAN port 15. VGA port. This port allows Gigabit connection to a Local Area Network (LAN) through a network hub. This port is for VGA-compatible devices such as a VGA monitor.
ASUS BM6660/MD710, BP6260/SD710, BM6360 1-9 ENGLISH 14. LAN (RJ-45) port. LAN port LED indications ACT/LINK SPEED LED LED Activity/Link LED Status Description OFF No link ORANGE Linked BLINKING Data activity Speed LED Status OFF ORANGE GREEN Description 10Mbps connection 100Mbps connection 1Gbps connection LAN port 15. VGA port. This port allows Gigabit connection to a Local Area Network (LAN) through a network hub. This port is for VGA-compatible devices such as a VGA monitor.
User Manual
Page 19
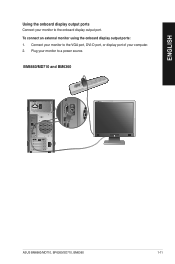
Connect your monitor to the VGA port, DVI-D port, or display port of your monitor to a power source. ENGLISH Using the onboard display output ports Connect your computer. 2. Plug your monitor to the onboard display output port. To connect an external monitor using the onboard display output ports: 1. BM6660/MD710 and BM6360 ASUS BM6660/MD710, BP6260/SD710, BM6360 1-11
Connect your monitor to the VGA port, DVI-D port, or display port of your monitor to a power source. ENGLISH Using the onboard display output ports Connect your computer. 2. Plug your monitor to the onboard display output port. To connect an external monitor using the onboard display output ports: 1. BM6660/MD710 and BM6360 ASUS BM6660/MD710, BP6260/SD710, BM6360 1-11
User Manual
Page 20
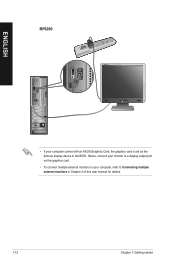
BP6260 ENGLISH • If your computer, refer to Connecting multiple external monitors in the BIOS. Hence, connect your monitor to a display output port on the graphics card. • To connect multiple external monitors to your computer comes with an ASUS Graphics Card, the graphics card is set as the primary display device in Chapter 3 of this user manual for details. 1-12 Chapter 1: Getting started
BP6260 ENGLISH • If your computer, refer to Connecting multiple external monitors in the BIOS. Hence, connect your monitor to a display output port on the graphics card. • To connect multiple external monitors to your computer comes with an ASUS Graphics Card, the graphics card is set as the primary display device in Chapter 3 of this user manual for details. 1-12 Chapter 1: Getting started
User Manual
Page 21
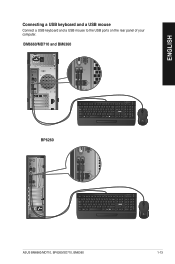
ENGLISH Connecting a USB keyboard and a USB mouse Connect a USB keyboard and a USB mouse to the USB ports on the rear panel of your computer. BM6660/MD710 and BM6360 BP6260 ASUS BM6660/MD710, BP6260/SD710, BM6360 1-13
ENGLISH Connecting a USB keyboard and a USB mouse Connect a USB keyboard and a USB mouse to the USB ports on the rear panel of your computer. BM6660/MD710 and BM6360 BP6260 ASUS BM6660/MD710, BP6260/SD710, BM6360 1-13

User Manual
Page 23
... button Power button BM6360 3. Close all running applications. 2. Turn your computer OFF: 1. Click to turn your computer. Press the power button on your computer ON: 1. BP6260 ASUS BM6660/MD710, BP6260/SD710, BM6360 1-15 Turning your computer ON To turn on the Windows® desktop. 3.
... button Power button BM6360 3. Close all running applications. 2. Turn your computer OFF: 1. Click to turn your computer. Press the power button on your computer ON: 1. BP6260 ASUS BM6660/MD710, BP6260/SD710, BM6360 1-15 Turning your computer ON To turn on the Windows® desktop. 3.

User Manual
Page 25
... skip this step without entering any information. Key in uniques names for the user name and computer name. To skip this chapter. 6. Click Next. 4. ASUS BM6660/MD710, BP6260/SD710, BM6360 2-1 From the dropdown lists, select your language. Carefully read the license terms. Tick I accept the license terms and click Next. 7. Chapter 2 Using...
... skip this step without entering any information. Key in uniques names for the user name and computer name. To skip this chapter. 6. Click Next. 4. ASUS BM6660/MD710, BP6260/SD710, BM6360 2-1 From the dropdown lists, select your language. Carefully read the license terms. Tick I accept the license terms and click Next. 7. Chapter 2 Using...
User Manual
Page 27
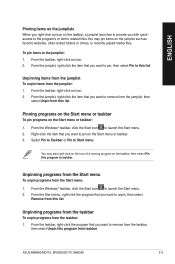
... menu. Select Pin to Taskbar or Pin to the jumplist: 1. From the Windows® taskbar, click the Start icon to launch the Start menu. 2. ASUS BM6660/MD710, BP6260/SD710, BM6360 2-3 Unpinning items from the jumplist To unpin items from the Start menu: 1. From the Windows® taskbar, click the Start icon to...
... menu. Select Pin to Taskbar or Pin to the jumplist: 1. From the Windows® taskbar, click the Start icon to launch the Start menu. 2. ASUS BM6660/MD710, BP6260/SD710, BM6360 2-3 Unpinning items from the jumplist To unpin items from the Start menu: 1. From the Windows® taskbar, click the Start icon to...
User Manual
Page 29
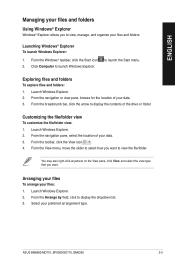
... 2. Launch Windows Explorer. 2. From the View menu, move the slider to select how you want to view the file/folder. Launch Windows Explorer. 2. ASUS BM6660/MD710, BP6260/SD710, BM6360 2-5 Click Computer to launch the Start menu. From the navigation pane, select the location of the drive or folder. Arranging your fi...
... 2. Launch Windows Explorer. 2. From the View menu, move the slider to select how you want to view the file/folder. Launch Windows Explorer. 2. ASUS BM6660/MD710, BP6260/SD710, BM6360 2-5 Click Computer to launch the Start menu. From the navigation pane, select the location of the drive or folder. Arranging your fi...

User Manual
Page 31
...; 7 Action Center: 1. From the Windows® taskbar, click the Start icon to the previous section Customizing icons and notifications in this chapter. ASUS BM6660/MD710, BP6260/SD710, BM6360 2-7 ENGLISH Restoring your system: 1. For more details, refer to launch the Start menu. 2. Select All Programs > Windows Update. 3. It allows you to...
...; 7 Action Center: 1. From the Windows® taskbar, click the Start icon to the previous section Customizing icons and notifications in this chapter. ASUS BM6660/MD710, BP6260/SD710, BM6360 2-7 ENGLISH Restoring your system: 1. For more details, refer to launch the Start menu. 2. Select All Programs > Windows Update. 3. It allows you to...

User Manual
Page 33
... Windows® 7 platform. It is a third-party anti-virus software protecting your computer from virus attacking. You have a 30-day trial period after activating it. ASUS BM6660/MD710, BP6260/SD710, BM6360 2-9
... Windows® 7 platform. It is a third-party anti-virus software protecting your computer from virus attacking. You have a 30-day trial period after activating it. ASUS BM6660/MD710, BP6260/SD710, BM6360 2-9
User Manual
Page 35
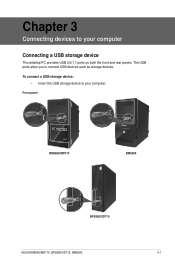
To connect a USB storage device: • Insert the USB storage device to connect USB devices such as storage devices. The USB ports allow you to your computer Connecting a USB storage device This desktop PC provides USB 2.0/1.1 ports on both the front and rear panels. Front panel BM6660/MD710 BM6360 BP6260/SD710 ASUS BM6660/MD710, BP6260/SD710, BM6360 3-1 Chapter 3 Connecting devices to your computer.
To connect a USB storage device: • Insert the USB storage device to connect USB devices such as storage devices. The USB ports allow you to your computer Connecting a USB storage device This desktop PC provides USB 2.0/1.1 ports on both the front and rear panels. Front panel BM6660/MD710 BM6360 BP6260/SD710 ASUS BM6660/MD710, BP6260/SD710, BM6360 3-1 Chapter 3 Connecting devices to your computer.
User Manual
Page 39
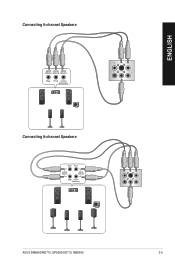
ENGLISH Connecting 6-channel Speakers Connecting 8-channel Speakers ASUS BM6660/MD710, BP6260/SD710, BM6360 3-5
ENGLISH Connecting 6-channel Speakers Connecting 8-channel Speakers ASUS BM6660/MD710, BP6260/SD710, BM6360 3-5
User Manual
Page 41
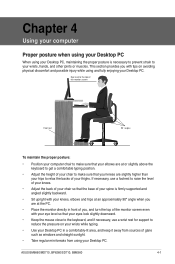
... your Desktop PC in a comfortably-lit area, and keep it away from using and fully enjoying your wrists, hands, and other joints or muscles. ASUS BM6660/MD710, BP6260/SD710, BM6360 4-1 If necessary, use a wrist rest for support to reduce the pressure on avoiding physical discomfort and possible injury while using your thighs...
... your Desktop PC in a comfortably-lit area, and keep it away from using and fully enjoying your wrists, hands, and other joints or muscles. ASUS BM6660/MD710, BP6260/SD710, BM6360 4-1 If necessary, use a wrist rest for support to reduce the pressure on avoiding physical discomfort and possible injury while using your thighs...
User Manual
Page 43
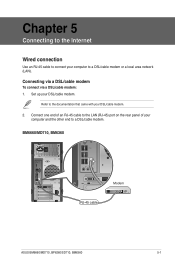
Set up your computer to a DSL/cable modem or a local area network (LAN). BM6660/MD710, BM6360 Modem RJ-45 cable ASUS BM6660/MD710, BP6260/SD710, BM6360 5-1 Chapter 5 Connecting to the Internet Wired connection Use an RJ-45 cable to connect your DSL/cable modem. Connect one end of your DSL/cable modem. 2. Refer to the documentation that came with your computer and the other end to the LAN (RJ-45) port on the rear panel of an RJ-45 cable to a DSL/cable modem. Connecting via a DSL/cable modem To connect via a DSL/cable modem: 1.
Set up your computer to a DSL/cable modem or a local area network (LAN). BM6660/MD710, BM6360 Modem RJ-45 cable ASUS BM6660/MD710, BP6260/SD710, BM6360 5-1 Chapter 5 Connecting to the Internet Wired connection Use an RJ-45 cable to connect your DSL/cable modem. Connect one end of your DSL/cable modem. 2. Refer to the documentation that came with your computer and the other end to the LAN (RJ-45) port on the rear panel of an RJ-45 cable to a DSL/cable modem. Connecting via a DSL/cable modem To connect via a DSL/cable modem: 1.
User Manual
Page 45
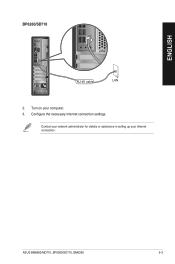
Configure the necessary Internet connection settings. Turn on your Internet connection. ENGLISH BP6260/SD710 RJ-45 cable LAN 2. ASUS BM6660/MD710, BP6260/SD710, BM6360 5-3 Contact your network administrator for details or assistance in setting up your computer. 3.
Configure the necessary Internet connection settings. Turn on your Internet connection. ENGLISH BP6260/SD710 RJ-45 cable LAN 2. ASUS BM6660/MD710, BP6260/SD710, BM6360 5-3 Contact your network administrator for details or assistance in setting up your computer. 3.
User Manual
Page 47
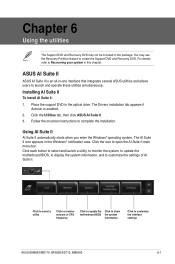
...Click to show motherboard BIOS the system information Click to customize the settings of AI Suite II. Click the Utilities tab, then click ASUS AI Suite II. 3. The Drivers installation tab appears if Autorun is an all-in-one interface that integrates several...utility, to monitor the system, to update the motherboard BIOS, to display the system information, and to customize the interface settings ASUS BM6660/MD710, BP6260/SD710, BM6360 6-1 ASUS AI Suite II ASUS AI Suite II is enabled. 2. Follow the onscreen instructions to open the AI Suite II main menu bar. Installing AI Suite...
...Click to show motherboard BIOS the system information Click to customize the settings of AI Suite II. Click the Utilities tab, then click ASUS AI Suite II. 3. The Drivers installation tab appears if Autorun is an all-in-one interface that integrates several...utility, to monitor the system, to update the motherboard BIOS, to display the system information, and to customize the interface settings ASUS BM6660/MD710, BP6260/SD710, BM6360 6-1 ASUS AI Suite II ASUS AI Suite II is enabled. 2. Follow the onscreen instructions to open the AI Suite II main menu bar. Installing AI Suite...


