AT5IONT-I User's manual
Page 3
Contents Notices...v Safety information vi About this guide vi AT5IONT-I Series specifications summary viii Chapter 1: Product introduction 1.1 Before you proceed 1-1 1.2 Motherboard overview 1-2 1.2.1 Motherboard layout 1-2 1.2.2 Layout contents 1-3 1.3 Central Processing ...Rear panel connectors 1-8 1.7.2 Internal connectors 1-10 1.8 Software support 1-14 1.8.1 Installing an operating system 1-14 1.8.2 Support DVD information 1-14 1.8.3 ASUS VideoSecurity 1-15 1.8.4 ASUS Home Theater Gate 1-17 1.8.5 ASUS @Vibe 1-20 Chapter 2: BIOS information 2.1 Managing and updating your BIOS...
Contents Notices...v Safety information vi About this guide vi AT5IONT-I Series specifications summary viii Chapter 1: Product introduction 1.1 Before you proceed 1-1 1.2 Motherboard overview 1-2 1.2.1 Motherboard layout 1-2 1.2.2 Layout contents 1-3 1.3 Central Processing ...Rear panel connectors 1-8 1.7.2 Internal connectors 1-10 1.8 Software support 1-14 1.8.1 Installing an operating system 1-14 1.8.2 Support DVD information 1-14 1.8.3 ASUS VideoSecurity 1-15 1.8.4 ASUS Home Theater Gate 1-17 1.8.5 ASUS @Vibe 1-20 Chapter 2: BIOS information 2.1 Managing and updating your BIOS...
AT5IONT-I User's manual
Page 10
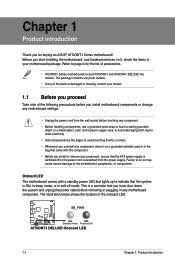
... motherboard package. Failure to do so may cause severe damage to page ix for buying an ASUS® AT5IONT-I Series motherboard! SB_PWR AT5IONT-I DELUXE ON OFF Standby Power Powered Off AT5IONT-I DELUXE Onboard LED 1-1 Chapter 1: Product introduction Before you start installing the motherboard, and hardware...to the motherboard, peripherals, or components. Chapter 1 Product introduction Thank you for the list of accessories. • AT5IONT-I Series motherboards include AT5IONT-I and AT5IONT-I DELUXE two models. The illustration below shows the location of the onboard LED.
... motherboard package. Failure to do so may cause severe damage to page ix for buying an ASUS® AT5IONT-I Series motherboard! SB_PWR AT5IONT-I DELUXE ON OFF Standby Power Powered Off AT5IONT-I DELUXE Onboard LED 1-1 Chapter 1: Product introduction Before you start installing the motherboard, and hardware...to the motherboard, peripherals, or components. Chapter 1 Product introduction Thank you for the list of accessories. • AT5IONT-I Series motherboards include AT5IONT-I and AT5IONT-I DELUXE two models. The illustration below shows the location of the onboard LED.
AT5IONT-I User's manual
Page 11
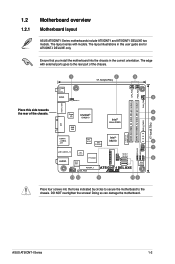
... ALC 887 P17C9X20 USB56 SATA1 SATA2 CLRTC 8 8Mb BIOS AAFP PCIEX4_1 SB_PWR AT5IONT-I DELUXE only. DO NOT overtighten the screws! ASUS AT5IONT-I DELUXE two models. 1.2 1.2.1 Motherboard overview Motherboard layout ASUS AT5IONT-I Series motherboards include AT5IONT-I and AT5IONT-I Series 1-2 Doing so can damage the motherboard. The layout varies with external...-4 Lithium Cell CMOS Power DDR3 SO-DIMM_A1 (64bit, 204-pin module) SPDIFO_HDMI Place this user guide are for AT5IONT-I DELUXE 13 12 11 10 9 Place four screws into the chassis in the correct orientation.
... ALC 887 P17C9X20 USB56 SATA1 SATA2 CLRTC 8 8Mb BIOS AAFP PCIEX4_1 SB_PWR AT5IONT-I DELUXE only. DO NOT overtighten the screws! ASUS AT5IONT-I DELUXE two models. 1.2 1.2.1 Motherboard overview Motherboard layout ASUS AT5IONT-I Series motherboards include AT5IONT-I and AT5IONT-I Series 1-2 Doing so can damage the motherboard. The layout varies with external...-4 Lithium Cell CMOS Power DDR3 SO-DIMM_A1 (64bit, 204-pin module) SPDIFO_HDMI Place this user guide are for AT5IONT-I DELUXE 13 12 11 10 9 Place four screws into the chassis in the correct orientation.
AT5IONT-I User's manual
Page 13
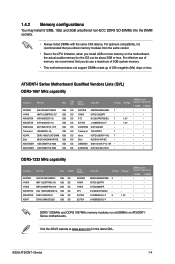
...; • • • • • • • • DDR3 1333MHz and DDR3 1067MHz memory modules run at www.asus.com for the OS can be about 3GB or less. For effective use of memory, we recommend that you obtain memory modules from the same... install 4GB or more memory on AT5IONT-I Series motherboards. J1108BDBG-DJ-F 9 1.5V J1108BDBG-DJ-F - - ASUS AT5IONT-I Series Motherboard Qualified Vendors Lists (QVL) DDR3-1067 MHz capability Vendors Part No. AT5IONT-I Series 1-4 Timing Voltage AM5D5808AEWSBG 9 - Visit the ASUS website at 800MHz on the motherboard...
...; • • • • • • • • DDR3 1333MHz and DDR3 1067MHz memory modules run at www.asus.com for the OS can be about 3GB or less. For effective use of memory, we recommend that you obtain memory modules from the same... install 4GB or more memory on AT5IONT-I Series motherboards. J1108BDBG-DJ-F 9 1.5V J1108BDBG-DJ-F - - ASUS AT5IONT-I Series Motherboard Qualified Vendors Lists (QVL) DDR3-1067 MHz capability Vendors Part No. AT5IONT-I Series 1-4 Timing Voltage AM5D5808AEWSBG 9 - Visit the ASUS website at 800MHz on the motherboard...
AT5IONT-I User's manual
Page 15
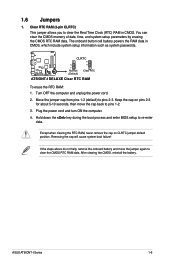
... the Real Time Clock (RTC) RAM in CMOS, which include system setup information such as system passwords. ASUS AT5IONT-I DELUXE Clear RTC RAM To erase the RTC RAM: 1. CLRTC 12 23 AT5IONT-I DELUXE Normal (Default) Clear RTC AT5IONT-I Series 1-6 You can clear the CMOS memory of date, time, and system setup parameters by erasing...
... the Real Time Clock (RTC) RAM in CMOS, which include system setup information such as system passwords. ASUS AT5IONT-I DELUXE Clear RTC RAM To erase the RTC RAM: 1. CLRTC 12 23 AT5IONT-I DELUXE Normal (Default) Clear RTC AT5IONT-I Series 1-6 You can clear the CMOS memory of date, time, and system setup parameters by erasing...
AT5IONT-I User's manual
Page 17
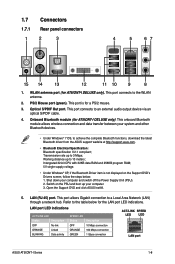
... OS, to 10 meters; Optical S/PDIF Out port. Working distance up to 3 Mbps; WLAN antenna port (for AT5IONT-I DELUXE only). This onboard Bluetooth module allows wireless connection and data transfer between your computer. 3. LAN (RJ-45...) port. Open the Support DVD and click ASUS InstAll. 5. 1.7 Connectors 1.7.1 Rear panel connectors 1 2 3 4 5 67 15 14 13 12 11 10 9 8 1. PS/2 Mouse port (green). Onboard Bluetooth module (for AT5IONT-I DELUXE only). Switch on the Support DVD's ... ACT/LINK SPEED LED LED LAN port ASUS AT5IONT-I Series 1-8
... OS, to 10 meters; Optical S/PDIF Out port. Working distance up to 3 Mbps; WLAN antenna port (for AT5IONT-I DELUXE only). This onboard Bluetooth module allows wireless connection and data transfer between your computer. 3. LAN (RJ-45...) port. Open the Support DVD and click ASUS InstAll. 5. 1.7 Connectors 1.7.1 Rear panel connectors 1 2 3 4 5 67 15 14 13 12 11 10 9 8 1. PS/2 Mouse port (green). Onboard Bluetooth module (for AT5IONT-I DELUXE only). Switch on the Support DVD's ... ACT/LINK SPEED LED LED LAN port ASUS AT5IONT-I Series 1-8
AT5IONT-I User's manual
Page 19
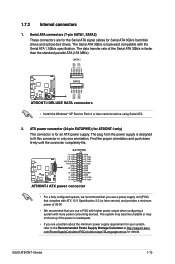
... completely fits. GND RSATA_RXN1 RSATA_RXP1 GND RSATA_TXN1 RSATA_TXP1 GND 1.7.2 Internal connectors 1. The plug from the power supply is for details. ASUS AT5IONT-I DELUXE SATA connectors • Install the Windows® XP Service Pack 2 or later versions before using Serial ATA. 2. Serial...• If you use a PSU with higher power output when configuring a system with the Serial ATA 1.5Gb/s specification. SATA1 SATA2 AT5IONT-I DELUXE AT5IONT-I Series 1-10 The data transfer rate of 90 W. • We recommend that complies with ATX 12 V Specification 2.0 (or later ...
... completely fits. GND RSATA_RXN1 RSATA_RXP1 GND RSATA_TXN1 RSATA_TXP1 GND 1.7.2 Internal connectors 1. The plug from the power supply is for details. ASUS AT5IONT-I DELUXE SATA connectors • Install the Windows® XP Service Pack 2 or later versions before using Serial ATA. 2. Serial...• If you use a PSU with higher power output when configuring a system with the Serial ATA 1.5Gb/s specification. SATA1 SATA2 AT5IONT-I DELUXE AT5IONT-I Series 1-10 The data transfer rate of 90 W. • We recommend that complies with ATX 12 V Specification 2.0 (or later ...
AT5IONT-I User's manual
Page 21
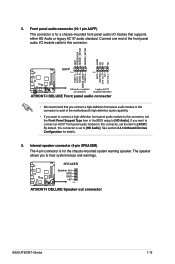
...PIN 1 MIC2 MICPWR Line out_R NC Line out_L PORT1 L PORT1 R PORT2 R SENSE_SEND PORT2 L AT5IONT-I DELUXE HD-audio-compliant Legacy AC'97 pin definition compliant definition AT5IONT-I /O module that you connect a high-definition front panel audio module to this connector to avail... set the item to [HD Audio]. 5. See section 2.4.4 Onboard Devices Configuration for details. 6. SPEAKER AT5IONT-I DELUXE Speaker Out GND GND +5V PIN 1 AT5IONT-I DELUXE Speaker out connector ASUS AT5IONT-I /O module cable to this connector, set to [AC97]. Connect one end of the motherboard's high-...
...PIN 1 MIC2 MICPWR Line out_R NC Line out_L PORT1 L PORT1 R PORT2 R SENSE_SEND PORT2 L AT5IONT-I DELUXE HD-audio-compliant Legacy AC'97 pin definition compliant definition AT5IONT-I /O module that you connect a high-definition front panel audio module to this connector to avail... set the item to [HD Audio]. 5. See section 2.4.4 Onboard Devices Configuration for details. 6. SPEAKER AT5IONT-I DELUXE Speaker Out GND GND +5V PIN 1 AT5IONT-I DELUXE Speaker out connector ASUS AT5IONT-I /O module cable to this connector, set to [AC97]. Connect one end of the motherboard's high-...
AT5IONT-I User's manual
Page 23
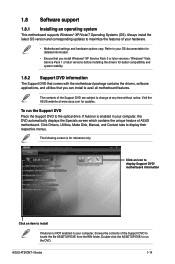
... at www.asus.com for updates. Visit the ASUS website at any time without notice. 1.8 Software support 1.8.1 Installing an operating system This motherboard supports Windows® XP/Vista/7 Operating Systems (OS). The contents of the Support DVD are subject to maximize the features of your computer, browse the contents of ASUS motherboard. ASUS AT5IONT-I Series...
... at www.asus.com for updates. Visit the ASUS website at any time without notice. 1.8 Software support 1.8.1 Installing an operating system This motherboard supports Windows® XP/Vista/7 Operating Systems (OS). The contents of the Support DVD are subject to maximize the features of your computer, browse the contents of ASUS motherboard. ASUS AT5IONT-I Series...
AT5IONT-I User's manual
Page 25
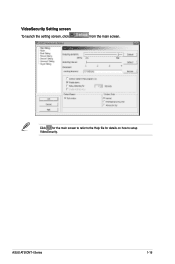
ASUS AT5IONT-I Series 1-16 Click for the main screen to refer to the Help file for details on how to setup VideoSecurity. VideoSecurity Setting screen To launch the setting screen, click from the main screen.
ASUS AT5IONT-I Series 1-16 Click for the main screen to refer to the Help file for details on how to setup VideoSecurity. VideoSecurity Setting screen To launch the setting screen, click from the main screen.
AT5IONT-I User's manual
Page 27
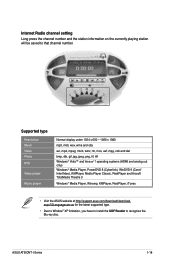
ASUS AT5IONT-I Series 1-18 aspx?SLanguage=en-us for the latest supported type. • Due to Window® XP limitation, you have to install the UDF Reader ...), WinDVD 9 (Corel/ InterVideo), KMPlayer, Media Player Classic, RealPlayer and Arcsoft TotalMedia Theatre 3 Windows® Media Player, Winamp, KMPlayer, RealPlayer, iTunes • Visit the ASUS website at http://support.asus.com/download/download. Internet Radio channel setting Long press the channel number and the station information on the currently playing station will be...
ASUS AT5IONT-I Series 1-18 aspx?SLanguage=en-us for the latest supported type. • Due to Window® XP limitation, you have to install the UDF Reader ...), WinDVD 9 (Corel/ InterVideo), KMPlayer, Media Player Classic, RealPlayer and Arcsoft TotalMedia Theatre 3 Windows® Media Player, Winamp, KMPlayer, RealPlayer, iTunes • Visit the ASUS website at http://support.asus.com/download/download. Internet Radio channel setting Long press the channel number and the station information on the currently playing station will be...

AT5IONT-I User's manual
Page 29
ASUS AT5IONT-I Series 1-20 1.8.5 ASUS @Vibe ASUS @Vibe allows you to enjoy online entertainment contents including Radio, Live TV and Games, etc. • The ASUS @Vibe service contents differ for each territory. • This utility does not work on Windows® 64-bit XP OS. Install ASUS @Vibe from the motherboard support DVD. 2. To launch ASUS @Vibe ,click Start > All Programs > ASUS > ASUS VIBE > ASUS VIBE. Launching ASUS @Vibe 1.
ASUS AT5IONT-I Series 1-20 1.8.5 ASUS @Vibe ASUS @Vibe allows you to enjoy online entertainment contents including Radio, Live TV and Games, etc. • The ASUS @Vibe service contents differ for each territory. • This utility does not work on Windows® 64-bit XP OS. Install ASUS @Vibe from the motherboard support DVD. 2. To launch ASUS @Vibe ,click Start > All Programs > ASUS > ASUS VIBE > ASUS VIBE. Launching ASUS @Vibe 1.
AT5IONT-I User's manual
Page 30
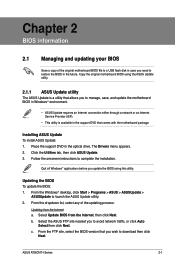
... site, select the BIOS version that comes with the motherboard package. Select Update BIOS from the Internet a. b. Select the ASUS FTP site nearest you wish to avoid network traffic, or click Auto Select then click Next. Place the support DVD in ... you to download then click Next. From the Windows® desktop, click Start > Programs > ASUS > ASUSUpdate > ASUSUpdate to complete the installation. The Drivers menu appears. 2. c. Copy the original motherboard BIOS using this utility. Click the Utilities tab, then click ASUS Update. 3. ASUS AT5IONT-I Series 2-1
... site, select the BIOS version that comes with the motherboard package. Select Update BIOS from the Internet a. b. Select the ASUS FTP site nearest you wish to avoid network traffic, or click Auto Select then click Next. Place the support DVD in ... you to download then click Next. From the Windows® desktop, click Start > Programs > ASUS > ASUSUpdate > ASUSUpdate to complete the installation. The Drivers menu appears. 2. c. Copy the original motherboard BIOS using this utility. Click the Utilities tab, then click ASUS Update. 3. ASUS AT5IONT-I Series 2-1
AT5IONT-I User's manual
Page 32
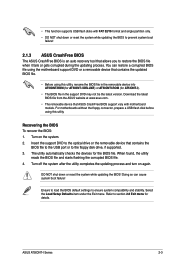
... menu. The utility automatically checks the devices for details. Insert the support DVD to the floppy disk drive, if supported. 3. ASUS AT5IONT-I ). • The BIOS file in the removable device into AT5IONT.ROM (for AT5IONT-I DELUXE) or AT5IONTI.ROM (for AT5IONT-I Series 2-3 You can cause system boot failure! Download the latest BIOS file from the...
... menu. The utility automatically checks the devices for details. Insert the support DVD to the floppy disk drive, if supported. 3. ASUS AT5IONT-I ). • The BIOS file in the removable device into AT5IONT.ROM (for AT5IONT-I DELUXE) or AT5IONTI.ROM (for AT5IONT-I Series 2-3 You can cause system boot failure! Download the latest BIOS file from the...

AT5IONT-I User's manual
Page 34
...] PIO Mode [Auto] Selects the PIO mode. Configuration options: [Auto] SMART Monitoring [Auto] Sets the Smart Monitoring, Analysis, and Reporting Technology. Configuration options: [Disabled] [Enabled] ASUS AT5IONT-I Series 2-5 Select a device item then press to Auto allows automatic selection of the appropriate SATA device type. Type [Auto] Selects the type of SATA devices...
...] PIO Mode [Auto] Selects the PIO mode. Configuration options: [Auto] SMART Monitoring [Auto] Sets the Smart Monitoring, Analysis, and Reporting Technology. Configuration options: [Disabled] [Enabled] ASUS AT5IONT-I Series 2-5 Select a device item then press to Auto allows automatic selection of the appropriate SATA device type. Type [Auto] Selects the type of SATA devices...
AT5IONT-I User's manual
Page 36
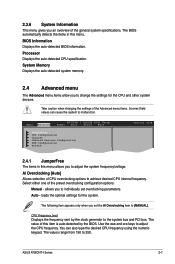
...overclocking parameters. Processor Displays the auto-detected CPU specification. The following item appears only when you to malfunction. Main Advanced AT5IONT-I Series 2-7 CPU Frequency [xxx] Displays the frequency sent by the BIOS. The values range from 150 to the... Ai Overclocking [Auto] Allows selection of CPU overclocking options to adjust the CPU frequency. allows you to [MANUAL]. ASUS AT5IONT-I DELUXE BIOS Setup Power Boot Tools Exit JumperFree CPU Configuration Chipset Onboard Devices Configuration USB Configuration PCIPnP Version 0214 2.4.1 ...
...overclocking parameters. Processor Displays the auto-detected CPU specification. The following item appears only when you to malfunction. Main Advanced AT5IONT-I Series 2-7 CPU Frequency [xxx] Displays the frequency sent by the BIOS. The values range from 150 to the... Ai Overclocking [Auto] Allows selection of CPU overclocking options to adjust the CPU frequency. allows you to [MANUAL]. ASUS AT5IONT-I DELUXE BIOS Setup Power Boot Tools Exit JumperFree CPU Configuration Chipset Onboard Devices Configuration USB Configuration PCIPnP Version 0214 2.4.1 ...
AT5IONT-I User's manual
Page 38
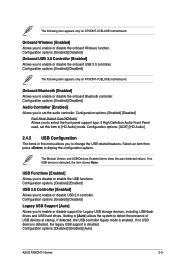
... hard drives. Configuration options: [Enabled] [Disabled] Legacy USB Support [Auto] Allows you to enable or disable the onboard Wireless function. Configuration options: [Disabled] [Enabled] [Auto] ASUS AT5IONT-I DELUXE motherboard. Configuration options: [AC97] [HD Audio] 2.4.5 USB Configuration The items in this item to [HD Audio] mode. USB Functions [Enabled] Allows you to display...
... hard drives. Configuration options: [Enabled] [Disabled] Legacy USB Support [Auto] Allows you to enable or disable the onboard Wireless function. Configuration options: [Disabled] [Enabled] [Auto] ASUS AT5IONT-I DELUXE motherboard. Configuration options: [AC97] [HD Audio] 2.4.5 USB Configuration The items in this item to [HD Audio] mode. USB Functions [Enabled] Allows you to display...
AT5IONT-I User's manual
Page 40
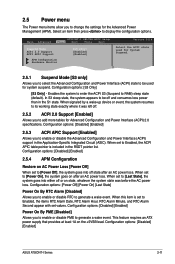
...feature requires an ATX power supply that provides at least 1A on after an AC power loss. Configuration options: [Disabled] [Enabled] ASUS AT5IONT-I DELUXE BIOS Setup Power Boot Tools Exit Suspend Mode [S3 only] ACPI 2.0 Support [Enabled] ACPI APIC Support [Enabled] APM ...Configuration Hardware Monitor Version 0214 Select the ACPI state used for Advanced Configuration and Power Interface (ACPI) 2.0 specifications. Main Advanced AT5IONT-I Series 2-11 Configuration options: [S3 Only] [S3 Only] - 2.5 Power menu The Power menu items allow you to enable or...
...feature requires an ATX power supply that provides at least 1A on after an AC power loss. Configuration options: [Disabled] [Enabled] ASUS AT5IONT-I DELUXE BIOS Setup Power Boot Tools Exit Suspend Mode [S3 only] ACPI 2.0 Support [Enabled] ACPI APIC Support [Enabled] APM ...Configuration Hardware Monitor Version 0214 Select the ACPI state used for Advanced Configuration and Power Interface (ACPI) 2.0 specifications. Main Advanced AT5IONT-I Series 2-11 Configuration options: [S3 Only] [S3 Only] - 2.5 Power menu The Power menu items allow you to enable or...
AT5IONT-I User's manual
Page 42
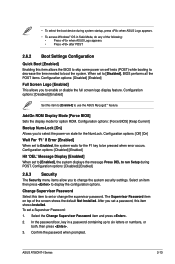
...• To access Windows® OS in a password containing up to boot the system. Select the Change Supervisor Password item and press . 2. ASUS AT5IONT-I Series 2-13 Configuration options: [Off] [On] Wait For 'F1' If Error [Enabled] When set to [Enabled], the system displays the ... this item to [Enabled] to display the configuration options. After you to select the power-on top of the following: • Press when ASUS Logo appears. • Press after POST. 2.6.2 Boot Settings Configuration Quick Boot [Enabled] Enabling this item to [Disabled], BIOS performs all the ...
...• To access Windows® OS in a password containing up to boot the system. Select the Change Supervisor Password item and press . 2. ASUS AT5IONT-I Series 2-13 Configuration options: [Off] [On] Wait For 'F1' If Error [Enabled] When set to [Enabled], the system displays the ... this item to [Enabled] to display the configuration options. After you to select the power-on top of the following: • Press when ASUS Logo appears. • Press after POST. 2.6.2 Boot Settings Configuration Quick Boot [Enabled] Enabling this item to [Disabled], BIOS performs all the ...
AT5IONT-I User's manual
Page 44
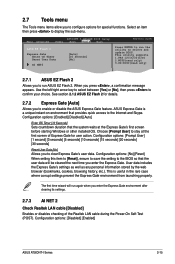
...Express Gate's user data. When you to run the utility to select and update BIOS. Main Advanced AT5IONT-I Series 2-15 See section 2.1.2 ASUS EZ Flash 2 for special functions. Choose [Prompt User] to run ASUS EZ Flash 2. Configuration options: [Prompt User] [1 second] [3 seconds] [5 seconds] [10 seconds... information stored by the web browser (bookmarks, cookies, browsing history, etc.). Configuration options: [Disabled] [Enabled] ASUS AT5IONT-I DELUXE BIOS Setup Power Boot Tools Exit ASUS EZ Flash 2 Express Gate Enter OS Timer Reset User Data AI NET2 [Auto] [10 Seconds] [No] ...
...Express Gate's user data. When you to run the utility to select and update BIOS. Main Advanced AT5IONT-I Series 2-15 See section 2.1.2 ASUS EZ Flash 2 for special functions. Choose [Prompt User] to run ASUS EZ Flash 2. Configuration options: [Prompt User] [1 second] [3 seconds] [5 seconds] [10 seconds... information stored by the web browser (bookmarks, cookies, browsing history, etc.). Configuration options: [Disabled] [Enabled] ASUS AT5IONT-I DELUXE BIOS Setup Power Boot Tools Exit ASUS EZ Flash 2 Express Gate Enter OS Timer Reset User Data AI NET2 [Auto] [10 Seconds] [No] ...


