User's Manual for English Edition
Page 3
... Chapter 2: Using your Notebook PC Getting started 26 Install the battery pack (on selected models 26 Charge your Notebook PC 27 Lift to open the display panel 28 Press the power button 28 Gestures for the touchpad 29 Moving the pointer 29 One-finger gestures 30 Two-finger gestures 32 Three-finger gestures 33 Using the keyboard 34 Function keys 34 Function keys for ASUS Apps 35 Windows®8 keys 35 Multimedia control keys 36...
... Chapter 2: Using your Notebook PC Getting started 26 Install the battery pack (on selected models 26 Charge your Notebook PC 27 Lift to open the display panel 28 Press the power button 28 Gestures for the touchpad 29 Moving the pointer 29 One-finger gestures 30 Two-finger gestures 32 Three-finger gestures 33 Using the keyboard 34 Function keys 34 Function keys for ASUS Apps 35 Windows®8 keys 35 Multimedia control keys 36...

User's Manual for English Edition
Page 4
... Start screen...41 Windows® apps 41 Hotspots...42 Working with Windows® apps 44 Launching apps 44 Customizing apps 44 Closing apps...45 Accessing the Apps screen 46 Charms bar...48 Snap feature...50 Other keyboard shortcuts 52 Connecting to wireless networks 54 Wi-Fi ...54 Bluetooth ...56 Airplane mode 58 Connecting to wired networks 59 Configuring a dynamic IP/PPPoE network connection 59 Configuring a static IP network connection 63 Turning your Notebook...
... Start screen...41 Windows® apps 41 Hotspots...42 Working with Windows® apps 44 Launching apps 44 Customizing apps 44 Closing apps...45 Accessing the Apps screen 46 Charms bar...48 Snap feature...50 Other keyboard shortcuts 52 Connecting to wireless networks 54 Wi-Fi ...54 Bluetooth ...56 Airplane mode 58 Connecting to wired networks 59 Configuring a dynamic IP/PPPoE network connection 59 Configuring a static IP network connection 63 Turning your Notebook...
User's Manual for English Edition
Page 5
... Power-on Self-test (POST 74 Using POST to access BIOS and Troubleshoot 74 BIOS ...74 Accessing BIOS 74 BIOS Settings...75 Troubleshoot...83 Refresh your PC 83 Reset your PC...84 Advanced options 85 Chapter 6: Upgrading your Notebook PC Installing a Random Access Memory (RAM) module 88 Replacing the Hard Disk Drive (HDD 92 Installing a new battery pack 98 Appendices DVD-ROM Drive Information (on selected models 102 Blu-ray ROM Drive Information (on selected models 104 Internal Modem Compliancy 105 Overview...105 Network Compatibility Declaration 105 Network...
... Power-on Self-test (POST 74 Using POST to access BIOS and Troubleshoot 74 BIOS ...74 Accessing BIOS 74 BIOS Settings...75 Troubleshoot...83 Refresh your PC 83 Reset your PC...84 Advanced options 85 Chapter 6: Upgrading your Notebook PC Installing a Random Access Memory (RAM) module 88 Replacing the Hard Disk Drive (HDD 92 Installing a new battery pack 98 Appendices DVD-ROM Drive Information (on selected models 102 Blu-ray ROM Drive Information (on selected models 104 Internal Modem Compliancy 105 Overview...105 Network Compatibility Declaration 105 Network...
User's Manual for English Edition
Page 7
... change the settings of your Notebook PC. Chapter 4: ASUS Apps This chapter features the ASUS apps included with Windows® 8 This chapter provides an overview of using Windows® 8 in your Notebook PC. About this manual This manual provides information about the hardware and software features of your Notebook PC, organized through the process of replacing and upgrading parts of your Notebook PC. Chapter 3: Working with your Notebook PC. Notebook PC E-Manual...
... change the settings of your Notebook PC. Chapter 4: ASUS Apps This chapter features the ASUS apps included with Windows® 8 This chapter provides an overview of using Windows® 8 in your Notebook PC. About this manual This manual provides information about the hardware and software features of your Notebook PC, organized through the process of replacing and upgrading parts of your Notebook PC. Chapter 3: Working with your Notebook PC. Notebook PC E-Manual...

User's Manual for English Edition
Page 10
... expose your Notebook PC. Caring for your Notebook PC Disconnect the AC power and remove the battery pack (if applicable) before cleaning your Notebook PC using a dry cloth. Do not use or expose your Notebook PC to dusty environments. Do not expose your Notebook PC near gas leaks. 10 Notebook PC E-Manual Remove any extra moisture from your Notebook PC. Do not use strong solvents...
... expose your Notebook PC. Caring for your Notebook PC Disconnect the AC power and remove the battery pack (if applicable) before cleaning your Notebook PC using a dry cloth. Do not use or expose your Notebook PC to dusty environments. Do not expose your Notebook PC near gas leaks. 10 Notebook PC E-Manual Remove any extra moisture from your Notebook PC. Do not use strong solvents...
User's Manual for English Edition
Page 16
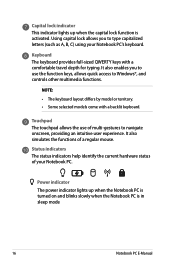
... a regular mouse. Capital lock indicator This indicator lights up when the Notebook PC is turned on and blinks slowly when the Notebook PC is activated. Using capital lock allows you to use of multi-gestures to Windows®, and controls other multimedia functions. NOTE: • The keyboard layout differs by model or territory. • Some selected models come with a comfortable travel depth for typing. Touchpad The touchpad allows the use the function keys, allows quick access to...
... a regular mouse. Capital lock indicator This indicator lights up when the Notebook PC is turned on and blinks slowly when the Notebook PC is activated. Using capital lock allows you to use of multi-gestures to Windows®, and controls other multimedia functions. NOTE: • The keyboard layout differs by model or territory. • Some selected models come with a comfortable travel depth for typing. Touchpad The touchpad allows the use the function keys, allows quick access to...
User's Manual for English Edition
Page 17
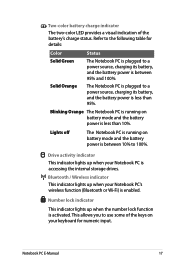
... enabled. Bluetooth / Wireless indicator This indicator lights up when the number lock function is activated. Blinking Orange The Notebook PC is running on battery mode and the battery power is between 95% and 100%. Two-color battery charge indicator The two-color LED provides a visual indication of the keys on your keyboard for details: Color Status Solid Green The Notebook PC is plugged to a power source, charging its battery, and the battery power is less than 10%. Refer to use...
... enabled. Bluetooth / Wireless indicator This indicator lights up when the number lock function is activated. Blinking Orange The Notebook PC is running on battery mode and the battery power is between 95% and 100%. Two-color battery charge indicator The two-color LED provides a visual indication of the keys on your keyboard for details: Color Status Solid Green The Notebook PC is plugged to a power source, charging its battery, and the battery power is less than 10%. Refer to use...
User's Manual for English Edition
Page 19
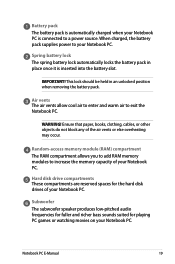
... hard disk drives of the air vents or else overheating may occur. Notebook PC E-Manual 19 This lock should be held in place once it is connected to exit the Notebook PC. Air vents The air vents allow cool air to enter and warm air to a power source. When charged, the battery pack supplies power to increase the memory capacity of your Notebook PC. Random-access memory module (RAM...
... hard disk drives of the air vents or else overheating may occur. Notebook PC E-Manual 19 This lock should be held in place once it is connected to exit the Notebook PC. Air vents The air vents allow cool air to enter and warm air to a power source. When charged, the battery pack supplies power to increase the memory capacity of your Notebook PC. Random-access memory module (RAM...
User's Manual for English Edition
Page 34
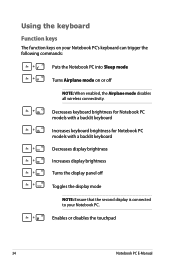
... or disables the touchpad 34 Notebook PC E-Manual Decreases keyboard brightness for Notebook PC models with a backlit keyboard Increases keyboard brightness for Notebook PC models with a backlit keyboard Decreases display brightness Increases display brightness Turns the display panel off Toggles the display mode NOTE: Ensure that the second display is connected to your Notebook PC's keyboard can trigger the following commands: Puts the Notebook PC into Sleep mode Turns Airplane mode on your Notebook PC. Using the keyboard Function keys The function keys on or off NOTE: When enabled, the...
... or disables the touchpad 34 Notebook PC E-Manual Decreases keyboard brightness for Notebook PC models with a backlit keyboard Increases keyboard brightness for Notebook PC models with a backlit keyboard Decreases display brightness Increases display brightness Turns the display panel off Toggles the display mode NOTE: Ensure that the second display is connected to your Notebook PC's keyboard can trigger the following commands: Puts the Notebook PC into Sleep mode Turns Airplane mode on your Notebook PC. Using the keyboard Function keys The function keys on or off NOTE: When enabled, the...
User's Manual for English Edition
Page 35
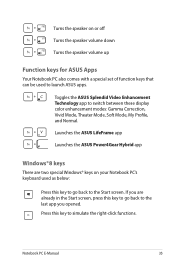
... the Start screen. Turns the speaker on your Notebook PC's keyboard used to launch ASUS apps. If you are two special Windows® keys on or off Turns the speaker volume down Turns the speaker volume up Function keys for ASUS Apps Your Notebook PC also comes with a special set of function keys that can be used as below: Press this key to switch between these display color enhancement modes: Gamma Correction, Vivid Mode, Theater Mode, Soft Mode...
... the Start screen. Turns the speaker on your Notebook PC's keyboard used to launch ASUS apps. If you are two special Windows® keys on or off Turns the speaker volume down Turns the speaker volume up Function keys for ASUS Apps Your Notebook PC also comes with a special set of function keys that can be used as below: Press this key to switch between these display color enhancement modes: Gamma Correction, Vivid Mode, Theater Mode, Soft Mode...
User's Manual for English Edition
Page 40
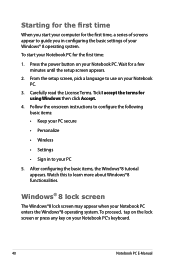
... power button on your Notebook PC's keyboard. 40 Notebook PC E-Manual Starting for the first time When you start your Notebook PC for the first time, a series of screens appear to guide you in to your PC 5. From the setup screen, pick a language to learn more about Windows®8 functionalities. To start your computer for the first time: 1. Watch this to use on your Notebook PC enters the Windows®8 operating system. Windows...
... power button on your Notebook PC's keyboard. 40 Notebook PC E-Manual Starting for the first time When you start your Notebook PC for the first time, a series of screens appear to guide you in to your PC 5. From the setup screen, pick a language to learn more about Windows®8 functionalities. To start your computer for the first time: 1. Watch this to use on your Notebook PC enters the Windows®8 operating system. Windows...
User's Manual for English Edition
Page 69
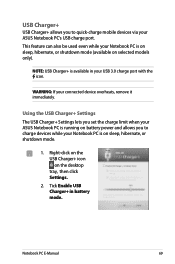
...+ Settings lets you set the charge limit when your ASUS Notebook PC is running on battery power and allows you to charge devices while your Notebook PC is available in battery mode. Right-click on the USB Charger+ icon on sleep, hibernate, or shutdown mode. 1. This feature can also be used even while your connected device overheats, remove it immediately. USB Charger+ USB Charger+ allows you to quick-charge mobile devices via your ASUS Notebook PC's USB charge port...
...+ Settings lets you set the charge limit when your ASUS Notebook PC is running on battery power and allows you to charge devices while your Notebook PC is available in battery mode. Right-click on the USB Charger+ icon on sleep, hibernate, or shutdown mode. 1. This feature can also be used even while your connected device overheats, remove it immediately. USB Charger+ USB Charger+ allows you to quick-charge mobile devices via your ASUS Notebook PC's USB charge port...

User's Manual for English Edition
Page 74
... system startup in the following circumstances: • An error message appears onscreen during POST. 74 Notebook PC E-Manual Using POST to most conditions of a trained service personnel. Do not change the BIOS settings only with the help of your Notebook PC. You may result to run the BIOS Setup. • You have installed a new system component that requires further BIOS settings or updates. The default BIOS settings apply to access BIOS and Troubleshoot...
... system startup in the following circumstances: • An error message appears onscreen during POST. 74 Notebook PC E-Manual Using POST to most conditions of a trained service personnel. Do not change the BIOS settings only with the help of your Notebook PC. You may result to run the BIOS Setup. • You have installed a new system component that requires further BIOS settings or updates. The default BIOS settings apply to access BIOS and Troubleshoot...

User's Manual for English Edition
Page 75
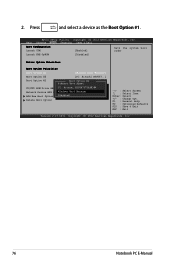
... reference only. Aptio Setup Utility - The actual screens may refer to set your boot priority. 1. Main Advance Boot Security Save & Exit Boot Configuration Launch CSM [Enabled] Sets the system boot order Launch PXE OpROM [Disabled] Driver Option Priorities Boot Option Priorities Boot Option #1 Boot Option #2 Boot Option #3 [Windows Boot Manager] [P1: Hitachi HTS547..] [Atheros Boot Agent] CD/DVD ROM Drive BBS Priorities Network Device BBS Priorities Add New Boot Option Delete Boot Option →← : Select Screen ↑↓ : Select Item Enter: Select +/- : Change Opt.
... reference only. Aptio Setup Utility - The actual screens may refer to set your boot priority. 1. Main Advance Boot Security Save & Exit Boot Configuration Launch CSM [Enabled] Sets the system boot order Launch PXE OpROM [Disabled] Driver Option Priorities Boot Option Priorities Boot Option #1 Boot Option #2 Boot Option #3 [Windows Boot Manager] [P1: Hitachi HTS547..] [Atheros Boot Agent] CD/DVD ROM Drive BBS Priorities Network Device BBS Priorities Add New Boot Option Delete Boot Option →← : Select Screen ↑↓ : Select Item Enter: Select +/- : Change Opt.
User's Manual for English Edition
Page 76
... Advance Boot Security Save & Exit Boot Configuration Launch CSM [Enabled] Sets the system boot order Launch PXE OpROM [Disabled] Driver Option Priorities Boot Option Priorities Boot Option #1 [Windows Boot Manager] Boot Option #2 [P1: Hitachi HTS547..] Boot Option #3 Boot[AOtphteiroons#B1oot Agent] Atheros Boot Agent CD/DVD ROM Drive BBS P1: Hitachi HTS547575A9E384 Network Device BBS PrioWriintdioewss Boot Manager Add New Boot Option Disabled Delete Boot Option →← : Select Screen ↑↓ : Select Item Enter: Select +/- : Change Opt. 2. Aptio Setup Utility...
... Advance Boot Security Save & Exit Boot Configuration Launch CSM [Enabled] Sets the system boot order Launch PXE OpROM [Disabled] Driver Option Priorities Boot Option Priorities Boot Option #1 [Windows Boot Manager] Boot Option #2 [P1: Hitachi HTS547..] Boot Option #3 Boot[AOtphteiroons#B1oot Agent] Atheros Boot Agent CD/DVD ROM Drive BBS P1: Hitachi HTS547575A9E384 Network Device BBS PrioWriintdioewss Boot Manager Add New Boot Option Disabled Delete Boot Option →← : Select Screen ↑↓ : Select Item Enter: Select +/- : Change Opt. 2. Aptio Setup Utility...

User's Manual for English Edition
Page 77
...HDD User Password Status : NOT INSTALLED Set Master Password Set User Password I /O) interface, and USB interface. Administrator Password Status User Password Status NOT INSTALLED NOT INSTALLED Set Administrator Password. The password length must be in a password then press . 3. It also allows you to control the access to your Notebook PC. To set up the administrator and user password of your Notebook PC's hard disk drive, input/output (I /O Interface Security Secure Boot Control [Enabled] →← : Select Screen ↑↓ : Select Item Enter: Select +/- : Change...
...HDD User Password Status : NOT INSTALLED Set Master Password Set User Password I /O) interface, and USB interface. Administrator Password Status User Password Status NOT INSTALLED NOT INSTALLED Set Administrator Password. The password length must be in a password then press . 3. It also allows you to control the access to your Notebook PC. To set up the administrator and user password of your Notebook PC's hard disk drive, input/output (I /O Interface Security Secure Boot Control [Enabled] →← : Select Screen ↑↓ : Select Item Enter: Select +/- : Change...
User's Manual for English Edition
Page 79
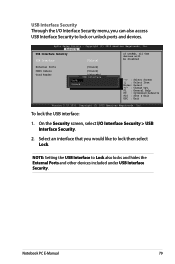
...LOCKED, all USB devices will be disabled External Ports CMOS Camera Card Reader [UnLock] [UnLock] Lock [UNLOCKED] USB Interface UnLock →← : Select Screen ↑↓ : Select Item Enter: Select +/- : Change Opt. NOTE: Setting the USB Interface to lock then select Lock. USB Interface Security Through the I /O Interface Security > USB Interface Security. 2. Notebook PC E-Manual 79 Aptio Setup Utility - To lock the USB interface: 1. Copyright (C) 2012 American Megatrends, Inc. On the Security screen, select I /O Interface Security menu, you would like to Lock...
...LOCKED, all USB devices will be disabled External Ports CMOS Camera Card Reader [UnLock] [UnLock] Lock [UNLOCKED] USB Interface UnLock →← : Select Screen ↑↓ : Select Item Enter: Select +/- : Change Opt. NOTE: Setting the USB Interface to lock then select Lock. USB Interface Security Through the I /O Interface Security > USB Interface Security. 2. Notebook PC E-Manual 79 Aptio Setup Utility - To lock the USB interface: 1. Copyright (C) 2012 American Megatrends, Inc. On the Security screen, select I /O Interface Security menu, you would like to Lock...

User's Manual for English Edition
Page 80
... the Administrator's password is set the HDD password: 1. On the Security screen, select Set Master Password. 2. Re-type to Setup and is a power on password and must be entered to Power Cycle System after Setting Hard Disk Passwords*** Administrator Password Status User Password Status Administrator Password User Password HDD User Pwd Status : Set Master Password Set User Password I/O Interface Security Secure Boot Control NOT INSTALLED NOT INSTALLED NOT INSTALLED [Disabled] →← : Select Screen ↑↓ : Select Item Enter: Select +/- : Change Opt. Copyright...
... the Administrator's password is set the HDD password: 1. On the Security screen, select Set Master Password. 2. Re-type to Setup and is a power on password and must be entered to Power Cycle System after Setting Hard Disk Passwords*** Administrator Password Status User Password Status Administrator Password User Password HDD User Pwd Status : Set Master Password Set User Password I/O Interface Security Secure Boot Control NOT INSTALLED NOT INSTALLED NOT INSTALLED [Disabled] →← : Select Screen ↑↓ : Select Item Enter: Select +/- : Change Opt. Copyright...
User's Manual for English Edition
Page 81
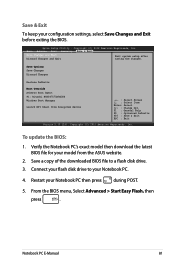
... your configuration settings, select Save Changes and Exit before exiting the BIOS. Copyright (C) 2012 American Megatrends, Inc. F1 : General Help F9 : Optimized Defaults F10 : Save & Exit ESC : Exit Version 2.15.1231. Save Options Save Changes Discard Changes Restore Defaults Boot Override Atheros Boot Agent P1: Hitachi HTS547575A9E384 Windows Boot Manager Launch EFI Shell from the ASUS website. 2. From the BIOS menu, Select Advanced > Start Easy Flash, then press . Connect your flash disk drive to a flash disk drive. 3.
... your configuration settings, select Save Changes and Exit before exiting the BIOS. Copyright (C) 2012 American Megatrends, Inc. F1 : General Help F9 : Optimized Defaults F10 : Save & Exit ESC : Exit Version 2.15.1231. Save Options Save Changes Discard Changes Restore Defaults Boot Override Atheros Boot Agent P1: Hitachi HTS547575A9E384 Windows Boot Manager Launch EFI Shell from the ASUS website. 2. From the BIOS menu, Select Advanced > Start Easy Flash, then press . Connect your flash disk drive to a flash disk drive. 3.
User's Manual for English Edition
Page 82
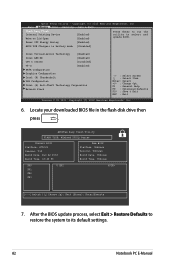
... Device Wake on Lid Open [Enabled] [Enabled] Press Enter to run the utility to its default settings. 82 Notebook PC E-Manual After the BIOS update process, select Exit > Restore Defaults to restore the system to select and update BIOS. Main AdvAAappnttciieoo SSeeBttouuoppt UUttiiSlleiicttuyyri--tyCCooppyySrraiivggehhtt& ((ECCx))it22001121 AAmmeerriiccaann MMeeggaattrreennddss,, IInncc.. Locate your downloaded BIOS file in battery mode [Disabled] Intel Virtualization Technology [Enabled] Intel AES-NI [Enabled] CPU C states [Disabled] VT-d [Enabled] SATA Configuration...
... Device Wake on Lid Open [Enabled] [Enabled] Press Enter to run the utility to its default settings. 82 Notebook PC E-Manual After the BIOS update process, select Exit > Restore Defaults to restore the system to select and update BIOS. Main AdvAAappnttciieoo SSeeBttouuoppt UUttiiSlleiicttuyyri--tyCCooppyySrraiivggehhtt& ((ECCx))it22001121 AAmmeerriiccaann MMeeggaattrreennddss,, IInncc.. Locate your downloaded BIOS file in battery mode [Disabled] Intel Virtualization Technology [Enabled] Intel AES-NI [Enabled] CPU C states [Disabled] VT-d [Enabled] SATA Configuration...


