
A8V-X User's Manual for English Edition
Page 4
... setup 2.1 Managing and updating your BIOS 2-2 2.1.1 Creating a bootable floppy disk 2-2 2.1.2 ASUS EZ Flash utility 2-3 2.1.3 AFUDOS utility 2-4 2.1.4 ASUS CrashFree BIOS 2 utility 2-6 2.1.5 ASUS Update utility 2-8 2.2 BIOS setup program 2-11 2.2.1 BIOS menu screen 2-12 2.2.2 Menu bar 2-12... 2.2.3 Navigation keys 2-12 2.2.4 Menu items 2-13 2.2.5 Sub-menu items 2-13 2.2.6 Configuration fields 2-13 2.2.7 Pop-up window ...
... setup 2.1 Managing and updating your BIOS 2-2 2.1.1 Creating a bootable floppy disk 2-2 2.1.2 ASUS EZ Flash utility 2-3 2.1.3 AFUDOS utility 2-4 2.1.4 ASUS CrashFree BIOS 2 utility 2-6 2.1.5 ASUS Update utility 2-8 2.2 BIOS setup program 2-11 2.2.1 BIOS menu screen 2-12 2.2.2 Menu bar 2-12... 2.2.3 Navigation keys 2-12 2.2.4 Menu items 2-13 2.2.5 Sub-menu items 2-13 2.2.6 Configuration fields 2-13 2.2.7 Pop-up window ...
A8V-X User's Manual for English Edition
Page 25
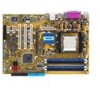
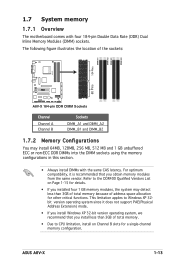
This limitation applies to Windows XP 32bit version operating system since it is recommended that you install less than 3GB of total memory because of total memory. • Due to the DDR400 Qualified Vendors List on Channel B slots for a single-channel memory configuration. ASUS A8V-X 1-13 Refer to CPU limitation...
This limitation applies to Windows XP 32bit version operating system since it is recommended that you install less than 3GB of total memory because of total memory. • Due to the DDR400 Qualified Vendors List on Channel B slots for a single-channel memory configuration. ASUS A8V-X 1-13 Refer to CPU limitation...

A8V-X User's Manual for English Edition
Page 37
...allows up to 300 MB/s data transfer rate, faster than the standard parallel ATA with 133 MB/s (Ultra DMA/133) A8V-X GND RSATA_RXN4 RSATA_RXP4 GND RSATA_TXN4 RSATA_TXP4 GND GND RSATA_RXN2 RSATA_RXP2 GND RSATA_TXN2 RSATA_TXP2 GND SATA4 SATA2 ® GND RSATA_RXN3 RSATA_RXP3 ...signal cables for Serial ATA devices. 3. ASUS A8V-X 1-25 Serial ATA connectors (7-pin SATA1, SATA2, SATA3, SATA4) These connectors are using Windows® 2003 Server/ Windows® XP/Windows® 2000. • Install the Windows® 2000 Service Pack 4 or the Windows® XP Service Pack1 when using Serial...
...allows up to 300 MB/s data transfer rate, faster than the standard parallel ATA with 133 MB/s (Ultra DMA/133) A8V-X GND RSATA_RXN4 RSATA_RXP4 GND RSATA_TXN4 RSATA_TXP4 GND GND RSATA_RXN2 RSATA_RXP2 GND RSATA_TXN2 RSATA_TXP2 GND SATA4 SATA2 ® GND RSATA_RXN3 RSATA_RXP3 ...signal cables for Serial ATA devices. 3. ASUS A8V-X 1-25 Serial ATA connectors (7-pin SATA1, SATA2, SATA3, SATA4) These connectors are using Windows® 2003 Server/ Windows® XP/Windows® 2000. • Install the Windows® 2000 Service Pack 4 or the Windows® XP Service Pack1 when using Serial...

A8V-X User's Manual for English Edition
Page 44
...;eld, then click Start. Click File from the menu, then select Format. Click Start, then select Run. 2-2 Chapter 2: BIOS setup ASUS AFUDOS (Updates the BIOS in the future. Windows® XP environment a. e. Windows® 2000 environment To create a set of the following utilities allow you need to manage and update the motherboard Basic...
...;eld, then click Start. Click File from the menu, then select Format. Click Start, then select Run. 2-2 Chapter 2: BIOS setup ASUS AFUDOS (Updates the BIOS in the future. Windows® XP environment a. e. Windows® 2000 environment To create a set of the following utilities allow you need to manage and update the motherboard Basic...

A8V-X User's Manual for English Edition
Page 50
...updated BIOS file • Update the BIOS directly from the Internet, and • View the BIOS version information. 2.1.5 ASUS Update utility The ASUS Update is a utility that comes with the motherboard package. Place the support CD in the support CD that allows you update the.... 2-8 Chapter 2: BIOS setup See page 3-4 for the Utilities screen menu. 3. The ASUS Update utility allows you to your system. Click the Utilities tab, then click Install ASUS Update VX.XX.XX. Quit all Windows® applications before you to manage, save, and update the motherboard BIOS in...
...updated BIOS file • Update the BIOS directly from the Internet, and • View the BIOS version information. 2.1.5 ASUS Update utility The ASUS Update is a utility that comes with the motherboard package. Place the support CD in the support CD that allows you update the.... 2-8 Chapter 2: BIOS setup See page 3-4 for the Utilities screen menu. 3. The ASUS Update utility allows you to your system. Click the Utilities tab, then click Install ASUS Update VX.XX.XX. Quit all Windows® applications before you to manage, save, and update the motherboard BIOS in...

A8V-X User's Manual for English Edition
Page 51
ASUS A8V-X 2-9 Launch the ASUS Update utility from the drop-down menu, then click Next. 3. Select the ASUS FTP site nearest you to avoid network traffic, or click Auto Select. The ASUS Update main window appears. 2. Click Next. Select Update BIOS from the Internet option from the Windows® desktop by clicking Start > Programs > ASUS > ASUSUpdate > ASUSUpdate. Updating the BIOS through the Internet To update the BIOS through the Internet: 1.
ASUS A8V-X 2-9 Launch the ASUS Update utility from the drop-down menu, then click Next. 3. Select the ASUS FTP site nearest you to avoid network traffic, or click Auto Select. The ASUS Update main window appears. 2. Click Next. Select Update BIOS from the Internet option from the Windows® desktop by clicking Start > Programs > ASUS > ASUSUpdate > ASUSUpdate. Updating the BIOS through the Internet To update the BIOS through the Internet: 1.

A8V-X User's Manual for English Edition
Page 52
... BIOS through the Internet. Follow the screen instructions to complete the update process. 2-10 Chapter 2: BIOS setup The ASUS Update main window appears. 2. The ASUS Update utility is capable of updating itself through a BIOS file: 1. Select Update BIOS from a file option... from the Windows® desktop by clicking Start > Programs > ASUS > ASUSUpdate > ASUSUpdate. Follow the screen instructions to complete the update process. Always update the utility to download. ...
... BIOS through the Internet. Follow the screen instructions to complete the update process. 2-10 Chapter 2: BIOS setup The ASUS Update main window appears. 2. The ASUS Update utility is capable of updating itself through a BIOS file: 1. Select Update BIOS from a file option... from the Windows® desktop by clicking Start > Programs > ASUS > ASUSUpdate > ASUSUpdate. Follow the screen instructions to complete the update process. Always update the utility to download. ...

A8V-X User's Manual for English Edition
Page 55
...the menu screen is not user-configurable. Select Screen Select Item +- Refer to "2.2.7 Pop-up window." 2.2.7 Pop-up window Select a menu item then press to display a pop-up window Scroll bar ASUS A8V-X 2-13 Configure DRAM Timing by SPD Memory Acceleration Mode DRAM Idle Timer DRAm Refresh Rate [Enabled] [Auto... is enclosed in the sections below may cause system to malfunction. Change Option F1 General Help F10 Save and Exit ESC Exit Pop-up window with the configuration options for that do not fit on the screen. 2.2.9 General help At the top right corner of...
...the menu screen is not user-configurable. Select Screen Select Item +- Refer to "2.2.7 Pop-up window." 2.2.7 Pop-up window Select a menu item then press to display a pop-up window Scroll bar ASUS A8V-X 2-13 Configure DRAM Timing by SPD Memory Acceleration Mode DRAM Idle Timer DRAm Refresh Rate [Enabled] [Auto... is enclosed in the sections below may cause system to malfunction. Change Option F1 General Help F10 Save and Exit ESC Exit Pop-up window with the configuration options for that do not fit on the screen. 2.2.9 General help At the top right corner of...

A8V-X User's Manual for English Edition
Page 79
Select Screen PorpetsiosninsgfrhidsomesennuotorimatferloymextihtethleisgemnEFen1dntbeura. After selecting this option, a confirmation window appears. 2.7 Exit menu The Exit menu items allow you to load the optimal or failsafe default values for this operation. Press...exiting. Load Setup Defaults This option allows you made changes to save the changes while exiting. When you press , a confirmation window appears. ASUS A8V-X 2-37 If you to load the default values for a confirmation before saving the values to the CMOS RAM. When you select...
Select Screen PorpetsiosninsgfrhidsomesennuotorimatferloymextihtethleisgemnEFen1dntbeura. After selecting this option, a confirmation window appears. 2.7 Exit menu The Exit menu items allow you to load the optimal or failsafe default values for this operation. Press...exiting. Load Setup Defaults This option allows you made changes to save the changes while exiting. When you press , a confirmation window appears. ASUS A8V-X 2-37 If you to load the default values for a confirmation before saving the values to the CMOS RAM. When you select...

A8V-X User's Manual for English Edition
Page 82
Visit the ASUS website(www.asus.com) for updates. 3.2.1 Running the support CD Place the support CD to run the CD. 3-2 Chapter 3: Software support The CD automatically displays the Drivers menu ... applications, and utilities that you can install to locate the file ASSETUP.EXE from the BIN folder. 3.1 Installing an operating system This motherboard supports Windows® 2000/XP operating systems (OS). Use the setup procedures presented in your computer. Doubleclick the ASSETUP.EXE to the optical drive. Always install the...
Visit the ASUS website(www.asus.com) for updates. 3.2.1 Running the support CD Place the support CD to run the CD. 3-2 Chapter 3: Software support The CD automatically displays the Drivers menu ... applications, and utilities that you can install to locate the file ASSETUP.EXE from the BIN folder. 3.1 Installing an operating system This motherboard supports Windows® 2000/XP operating systems (OS). Use the setup procedures presented in your computer. Doubleclick the ASSETUP.EXE to the optical drive. Always install the...


