
Motherboard DIY Troubleshooting Guide
Page 20
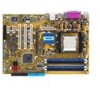
1.5.3 Motherboard-Layout PS/2KBMS T: Mouse B: Keyboard KBPWR ATX12V 21,1cm SPDIF_O CPU_FAN Socket 939 A8V-X DDR DIMM_A1 (64 bit,184-pin module) DDR DIMM_A2 (64 bit,184-pin module) DDR DIMM_B1 (64 bit,184-pin module) DDR DIMM_B2 (64 bit,... VIA K8T800 PRO ATXPWR RTL8201CL AAFP AUX CD AD1986A SPDIF_OUT AGP PCI1 ® PCI2 PCI3 VIA VT8251 SATA4 SATA2 ITE IT8712F-A GAME PCIEX1_1 PCIEX1_2 4Mbit BIOS CR2032 3V Lithium Cell CMOS Power FLOPPY USB56 USBPW5678 CLRTC SATA3 SATA1 CHA_FAN SB_PWR USB78 CHASISS PANEL PRI_IDE 30,5cm SEC_IDE 1-8 Kapitel 1: Produkteinführung
1.5.3 Motherboard-Layout PS/2KBMS T: Mouse B: Keyboard KBPWR ATX12V 21,1cm SPDIF_O CPU_FAN Socket 939 A8V-X DDR DIMM_A1 (64 bit,184-pin module) DDR DIMM_A2 (64 bit,184-pin module) DDR DIMM_B1 (64 bit,184-pin module) DDR DIMM_B2 (64 bit,... VIA K8T800 PRO ATXPWR RTL8201CL AAFP AUX CD AD1986A SPDIF_OUT AGP PCI1 ® PCI2 PCI3 VIA VT8251 SATA4 SATA2 ITE IT8712F-A GAME PCIEX1_1 PCIEX1_2 4Mbit BIOS CR2032 3V Lithium Cell CMOS Power FLOPPY USB56 USBPW5678 CLRTC SATA3 SATA1 CHA_FAN SB_PWR USB78 CHASISS PANEL PRI_IDE 30,5cm SEC_IDE 1-8 Kapitel 1: Produkteinführung

A8V-X User's Manual for English Edition
Page 4
... Jumpers 1-20 Connectors 1-22 1.10.1 Rear panel connectors 1-22 1.10.2 Internal connectors 1-23 Chapter 2: BIOS setup 2.1 Managing and updating your BIOS 2-2 2.1.1 Creating a bootable floppy disk 2-2 2.1.2 ASUS EZ Flash utility 2-3 2.1.3 AFUDOS utility 2-4 2.1.4 ASUS CrashFree BIOS 2 utility 2-6 2.1.5 ASUS Update utility 2-8 2.2 BIOS setup program 2-11 2.2.1 BIOS menu screen 2-12 2.2.2 Menu bar 2-12 2.2.3 Navigation keys 2-12 2.2.4 Menu items 2-13 2.2.5 Sub-menu...
... Jumpers 1-20 Connectors 1-22 1.10.1 Rear panel connectors 1-22 1.10.2 Internal connectors 1-23 Chapter 2: BIOS setup 2.1 Managing and updating your BIOS 2-2 2.1.1 Creating a bootable floppy disk 2-2 2.1.2 ASUS EZ Flash utility 2-3 2.1.3 AFUDOS utility 2-4 2.1.4 ASUS CrashFree BIOS 2 utility 2-6 2.1.5 ASUS Update utility 2-8 2.2 BIOS setup program 2-11 2.2.1 BIOS menu screen 2-12 2.2.2 Menu bar 2-12 2.2.3 Navigation keys 2-12 2.2.4 Menu items 2-13 2.2.5 Sub-menu...
A8V-X User's Manual for English Edition
Page 8
Detailed descriptions of the BIOS parameters are not part of the support CD that comes with the motherboard package. ASUS websites The ASUS website provides updated information on the motherboard. • Chapter 2: BIOS setup This chapter tells how to the following parts: • ...Chapter 1: Product introduction This chapter describes the features of the jumpers and connectors on ASUS hardware and...
Detailed descriptions of the BIOS parameters are not part of the support CD that comes with the motherboard package. ASUS websites The ASUS website provides updated information on the motherboard. • Chapter 2: BIOS setup This chapter tells how to the following parts: • ...Chapter 1: Product introduction This chapter describes the features of the jumpers and connectors on ASUS hardware and...

A8V-X User's Manual for English Edition
Page 10
ASUS JumperFree ASUS CrashFree BIOS 2 ASUS MyLogo SFS (Stepless Frequency Selection): FSB tuning from 200MHz up to 8 USB 2.0 ports ASUS C.P.R. A8V-X specifications summary CPU Chipset System Bus Memory Expansion slots Storage Audio LAN USB Special features Socket 939 for up ... 1 x Coaxial S/PDIF out port Supports Audio Sensing and Enumeration Technology Realtek RTL8201CL 10/100 LAN controller Supports up to 300MHz at 1MHz increment ASUS EZ Flash (continued on the next page) x Technology Northbridge: VIA® K8T800 Pro Southbridge: VIA® VT8251 2000/1600 MT/s Dual-channel...
ASUS JumperFree ASUS CrashFree BIOS 2 ASUS MyLogo SFS (Stepless Frequency Selection): FSB tuning from 200MHz up to 8 USB 2.0 ports ASUS C.P.R. A8V-X specifications summary CPU Chipset System Bus Memory Expansion slots Storage Audio LAN USB Special features Socket 939 for up ... 1 x Coaxial S/PDIF out port Supports Audio Sensing and Enumeration Technology Realtek RTL8201CL 10/100 LAN controller Supports up to 300MHz at 1MHz increment ASUS EZ Flash (continued on the next page) x Technology Northbridge: VIA® K8T800 Pro Southbridge: VIA® VT8251 2000/1600 MT/s Dual-channel...

A8V-X User's Manual for English Edition
Page 11
...A8V-X specifications summary Rear panel BIOS features Internal connectors Power Requirement Form Factor Support CD contents Manageability 1 x Parallel port 1 x LAN (RJ-45) port 4 x USB 2.0 ports 1 x Coaxial S/PDIF out port 1 x Serial (COM) port 1 x PS/2 keyboard port 1 x PS/2 mouse port 6-channel audio ports 4 Mb Flash ROM, AMI BIOS, PnP, DMI2.0, WfM2.0, SM BIOS...) ATX 12 V 2.0 compliant ATX form factor: 12 in x 8.3 in (30.5 cm x 21.0 cm) Device drivers ASUS PC Probe ASUS Live Update Utility Antivirus software (OEM version) Wfm2.0, DMI 2.0, WOL by PME, WOR by PME, PXE, RPL *Specifi...
...A8V-X specifications summary Rear panel BIOS features Internal connectors Power Requirement Form Factor Support CD contents Manageability 1 x Parallel port 1 x LAN (RJ-45) port 4 x USB 2.0 ports 1 x Coaxial S/PDIF out port 1 x Serial (COM) port 1 x PS/2 keyboard port 1 x PS/2 mouse port 6-channel audio ports 4 Mb Flash ROM, AMI BIOS, PnP, DMI2.0, WfM2.0, SM BIOS...) ATX 12 V 2.0 compliant ATX form factor: 12 in x 8.3 in (30.5 cm x 21.0 cm) Device drivers ASUS PC Probe ASUS Live Update Utility Antivirus software (OEM version) Wfm2.0, DMI 2.0, WOL by PME, WOR by PME, PXE, RPL *Specifi...

A8V-X User's Manual for English Edition
Page 17
... to personalize and add style to ensure stable supply of current for critical components. ASUS A8V-X 1-5 The ASIC monitors the voltage levels to your system with customizable boot logos. ASUS MyLogo™ This new feature present in case when the BIOS codes and data are corrupted. See section "2.5.4 Hardware Monitor" on page 2-6. feature of...
... to personalize and add style to ensure stable supply of current for critical components. ASUS A8V-X 1-5 The ASIC monitors the voltage levels to your system with customizable boot logos. ASUS MyLogo™ This new feature present in case when the BIOS codes and data are corrupted. See section "2.5.4 Hardware Monitor" on page 2-6. feature of...

A8V-X User's Manual for English Edition
Page 20
Socket 939 A8V-X DDR DIMM_A1 (64 bit,184-pin module) DDR DIMM_A2 (64 bit,184-pin module) DDR DIMM_B1 (64 bit,184-pin module) DDR DIMM_B2 (64 bit,... VIA K8T800 PRO ATXPWR RTL8201CL AAFP AUX CD AD1986A SPDIF_OUT AGP PCI1 ® PCI2 PCI3 VIA VT8251 SATA4 SATA2 ITE IT8712F-A GAME PCIEX1_1 PCIEX1_2 4Mbit BIOS CR2032 3V Lithium Cell CMOS Power FLOPPY USB56 USBPW5678 CLRTC SATA3 SATA1 CHA_FAN SB_PWR USB78 CHASISS PANEL SEC_IDE 1-8 Chapter 1: Product introduction
Socket 939 A8V-X DDR DIMM_A1 (64 bit,184-pin module) DDR DIMM_A2 (64 bit,184-pin module) DDR DIMM_B1 (64 bit,184-pin module) DDR DIMM_B2 (64 bit,... VIA K8T800 PRO ATXPWR RTL8201CL AAFP AUX CD AD1986A SPDIF_OUT AGP PCI1 ® PCI2 PCI3 VIA VT8251 SATA4 SATA2 ITE IT8712F-A GAME PCIEX1_1 PCIEX1_2 4Mbit BIOS CR2032 3V Lithium Cell CMOS Power FLOPPY USB56 USBPW5678 CLRTC SATA3 SATA1 CHA_FAN SB_PWR USB78 CHASISS PANEL SEC_IDE 1-8 Chapter 1: Product introduction

A8V-X User's Manual for English Edition
Page 29
...cover (if your motherboard is completely seated on the next page. 3. Install the software drivers for information on the system and change the necessary BIOS settings, if any. Remove the bracket opposite the slot that you removed earlier. 6. Keep the screw for the card. 2. Refer to ...software settings. 1. Turn on BIOS setup. 2. The following sub-sections describe the slots and the expansion cards that came with the slot and press firmly until the card is already installed in a chassis). 3. See Chapter 2 for the expansion card. ASUS A8V-X 1-17 Align the card ...
...cover (if your motherboard is completely seated on the next page. 3. Install the software drivers for information on the system and change the necessary BIOS settings, if any. Remove the bracket opposite the slot that you removed earlier. 6. Keep the screw for the card. 2. Refer to ...software settings. 1. Turn on BIOS setup. 2. The following sub-sections describe the slots and the expansion cards that came with the slot and press firmly until the card is already installed in a chassis). 3. See Chapter 2 for the expansion card. ASUS A8V-X 1-17 Align the card ...

A8V-X User's Manual for English Edition
Page 32
...1-2 (default) to re-enter data. Hold down and reboot the system so the BIOS can clear the CMOS memory of date, time, and system setup parameters by erasing the CMOS RTC RAM data. A8V-X ® A8V-X Clear RTC RAM CLRTC 12 23 Normal (Default) Clear CMOS You do not need... 1-2. 4. 1.9 Jumpers 1. Re-install the battery. 5. For system failure due to overclocking. Shut down the key during the boot process and enter BIOS setup to pins 2-3. Keep the cap on CLRTC jumper default position. The onboard button cell battery powers the RAM data in CMOS. Plug the power...
...1-2 (default) to re-enter data. Hold down and reboot the system so the BIOS can clear the CMOS memory of date, time, and system setup parameters by erasing the CMOS RTC RAM data. A8V-X ® A8V-X Clear RTC RAM CLRTC 12 23 Normal (Default) Clear CMOS You do not need... 1-2. 4. 1.9 Jumpers 1. Re-install the battery. 5. For system failure due to overclocking. Shut down the key during the boot process and enter BIOS setup to pins 2-3. Keep the cap on CLRTC jumper default position. The onboard button cell battery powers the RAM data in CMOS. Plug the power...

A8V-X User's Manual for English Edition
Page 33
... least 1A on the keyboard (the default is the Space Bar). Set to +5VSB to CPU, DRAM in slow refresh, power supply in the BIOS. Set this jumper to pins 2-3 (+5VSB) if you wish to enable or disable the keyboard wake-up the computer when you to wake up ...feature. Keyboard power (3-pin KBPWR) This jumper allows you press a key on the +5VSB lead, and a corresponding setting in reduced power mode). A8V-X ® A8V-X USB Device Wake Up USBPW1234 2 1 +5V 3 2 +5VSB (Default) USBPW5678 12 23 +5V +5VSB (Default) • The USB device wake-up from S1 ...
... least 1A on the keyboard (the default is the Space Bar). Set to +5VSB to CPU, DRAM in slow refresh, power supply in the BIOS. Set this jumper to pins 2-3 (+5VSB) if you wish to enable or disable the keyboard wake-up the computer when you to wake up ...feature. Keyboard power (3-pin KBPWR) This jumper allows you press a key on the +5VSB lead, and a corresponding setting in reduced power mode). A8V-X ® A8V-X USB Device Wake Up USBPW1234 2 1 +5V 3 2 +5VSB (Default) USBPW5678 12 23 +5V +5VSB (Default) • The USB device wake-up from S1 ...

A8V-X User's Manual for English Edition
Page 42
A8V-X System Panel Connector The sytem panel connector is for the chassis-mounted system warning speaker. Connect the chassis power LED cable to this connector. The ... (Orange 4-pin SPEAKER) This 4-pin connector is for the system power LED. PLED SPEAKER PLED+ PLED+5V Ground Ground Speaker A8V-X PANEL IDE_LED+ IDE_LED- The speaker allows you turn on the BIOS settings. PWR Ground Reset Ground ® RESET IDE_LED PWRSW * Requires an ATX power supply. The IDE LED lights up when...
A8V-X System Panel Connector The sytem panel connector is for the chassis-mounted system warning speaker. Connect the chassis power LED cable to this connector. The ... (Orange 4-pin SPEAKER) This 4-pin connector is for the system power LED. PLED SPEAKER PLED+ PLED+5V Ground Ground Speaker A8V-X PANEL IDE_LED+ IDE_LED- The speaker allows you turn on the BIOS settings. PWR Ground Reset Ground ® RESET IDE_LED PWRSW * Requires an ATX power supply. The IDE LED lights up when...

A8V-X User's Manual for English Edition
Page 43
Detailed descriptions of the BIOS parameters are also provided. 2 BIOS setup This chapter tells how to change the system settings through the BIOS Setup menus.
Detailed descriptions of the BIOS parameters are also provided. 2 BIOS setup This chapter tells how to change the system settings through the BIOS Setup menus.

A8V-X User's Manual for English Edition
Page 44
...format A:/S then press . Insert a 1.44 MB floppy disk to the corresponding sections for Windows® 2000: a. e. ASUS CrashFree BIOS 2 (Updates the BIOS using a bootable floppy disk.) 2. DOS environment a. Insert a 1.44MB floppy disk into the drive. b. b....174; XP environment a. A Format 3 1/2 Floppy Disk window appears. 2.1 Managing and updating your BIOS The following to create a bootable floppy disk. ASUS EZ Flash (Updates the BIOS using the ASUS Update or AFUDOS utilities. 2.1.1 Creating a bootable floppy disk 1. Do either one of ...
...format A:/S then press . Insert a 1.44 MB floppy disk to the corresponding sections for Windows® 2000: a. e. ASUS CrashFree BIOS 2 (Updates the BIOS using a bootable floppy disk.) 2. DOS environment a. Insert a 1.44MB floppy disk into the drive. b. b....174; XP environment a. A Format 3 1/2 Floppy Disk window appears. 2.1 Managing and updating your BIOS The following to create a bootable floppy disk. ASUS EZ Flash (Updates the BIOS using the ASUS Update or AFUDOS utilities. 2.1.1 Creating a bootable floppy disk 1. Do either one of ...

A8V-X User's Manual for English Edition
Page 45
... same to display the following. Floppy found in the drive. Flashed successfully. error message appears if the correct BIOS file is not found ! ASUS A8V-X 2-3 e. Press + during the Power-On Self Tests (POST). EZFlash starting BIOS update Checking for floppy... 4. Completed. Rebooting. • Do not shutdown or reset the system while updating...
... same to display the following. Floppy found in the drive. Flashed successfully. error message appears if the correct BIOS file is not found ! ASUS A8V-X 2-3 e. Press + during the Power-On Self Tests (POST). EZFlash starting BIOS update Checking for floppy... 4. Completed. Rebooting. • Do not shutdown or reset the system while updating...

A8V-X User's Manual for English Edition
Page 46
... floppy disk. 2-4 Chapter 2: BIOS setup Save the BIOS file to the floppy disk. A:\>afudos /oOLDBIOS1.ROM AMI Firmware Update Utility - Copying the current BIOS To copy the current BIOS file using the AFUDOS utility: 1. A:\>afudos /oOLDBIOS1.ROM Main filename Extension name 3. Visit the ASUS website (www.asus.com) and download the...
... floppy disk. 2-4 Chapter 2: BIOS setup Save the BIOS file to the floppy disk. A:\>afudos /oOLDBIOS1.ROM AMI Firmware Update Utility - Copying the current BIOS To copy the current BIOS file using the AFUDOS utility: 1. A:\>afudos /oOLDBIOS1.ROM Main filename Extension name 3. Visit the ASUS website (www.asus.com) and download the...

A8V-X User's Manual for English Edition
Page 47
...Inc. A:\>afudos /iA8V-X.ROM AMI Firmware Update Utility - All rights reserved. done Writing flash ..... done Please restart your computer ASUS A8V-X 2-5 Write the BIOS filename on the bootable floppy disk. A:\>afudos /iA8V-X.ROM AMI Firmware Update Utility - All rights reserved. Erasing fl...flash .... done Search bootblock version: 0% 100% Do not shut down or reset the system while updating the BIOS to type the exact BIOS filename at the prompt type: afudos /i[filename] where [filename] is completed. The utility verifi...
...Inc. A:\>afudos /iA8V-X.ROM AMI Firmware Update Utility - All rights reserved. done Writing flash ..... done Please restart your computer ASUS A8V-X 2-5 Write the BIOS filename on the bootable floppy disk. A:\>afudos /iA8V-X.ROM AMI Firmware Update Utility - All rights reserved. Erasing fl...flash .... done Search bootblock version: 0% 100% Do not shut down or reset the system while updating the BIOS to type the exact BIOS filename at the prompt type: afudos /i[filename] where [filename] is completed. The utility verifi...

A8V-X User's Manual for English Edition
Page 48
... original or updated BIOS file in the floppy disk to A8V-X.ROM. When found ! Bad BIOS checksum. Reading file "A8V-X.ROM". Recovering the BIOS from a floppy disk To recover the BIOS from a floppy disk: 1. Starting BIOS recovery... Completed. Restart... the system while updating the BIOS! Starting BIOS recovery... Floppy found , the utility reads the BIOS file and starts flashing the corrupted BIOS file. You can cause system boot failure! 4. 2.1.4 ASUS CrashFree BIOS 2 utility The ASUS CrashFree BIOS 2 is an auto recovery ...
... original or updated BIOS file in the floppy disk to A8V-X.ROM. When found ! Bad BIOS checksum. Reading file "A8V-X.ROM". Recovering the BIOS from a floppy disk To recover the BIOS from a floppy disk: 1. Starting BIOS recovery... Completed. Restart... the system while updating the BIOS! Starting BIOS recovery... Floppy found , the utility reads the BIOS file and starts flashing the corrupted BIOS file. You can cause system boot failure! 4. 2.1.4 ASUS CrashFree BIOS 2 utility The ASUS CrashFree BIOS 2 is an auto recovery ...

A8V-X User's Manual for English Edition
Page 49
...;oppy disk from the support CD: 1. Checking for the original or updated BIOS file. Completed. Start flashing... ASUS A8V-X 2-7 Insert the support CD to download the latest BIOS file. When no floppy disk is found ! Starting BIOS recovery... Starting BIOS recovery... CD-ROM found! DO NOT shut down or reset the system...
...;oppy disk from the support CD: 1. Checking for the original or updated BIOS file. Completed. Start flashing... ASUS A8V-X 2-7 Insert the support CD to download the latest BIOS file. When no floppy disk is found ! Starting BIOS recovery... Starting BIOS recovery... CD-ROM found! DO NOT shut down or reset the system...

A8V-X User's Manual for English Edition
Page 50
... tab, then click Install ASUS Update VX.XX.XX. Installing ASUS Update To install ASUS Update: 1. This utility is available in the support CD that allows you to : • Save the current BIOS file • Download the latest BIOS file from the Internet • Update the BIOS from an updated BIOS file • Update...
... tab, then click Install ASUS Update VX.XX.XX. Installing ASUS Update To install ASUS Update: 1. This utility is available in the support CD that allows you to : • Save the current BIOS file • Download the latest BIOS file from the Internet • Update the BIOS from an updated BIOS file • Update...

A8V-X User's Manual for English Edition
Page 51
Select the ASUS FTP site nearest you to avoid network traffic, or click Auto Select. The ASUS Update main window appears. 2. ASUS A8V-X 2-9 Updating the BIOS through the Internet To update the BIOS through the Internet: 1. Select Update BIOS from the Internet option from the Windows® desktop by clicking Start > Programs > ASUS > ASUSUpdate > ASUSUpdate. Launch the ASUS Update utility from the drop-down menu, then click Next. 3. Click Next.
Select the ASUS FTP site nearest you to avoid network traffic, or click Auto Select. The ASUS Update main window appears. 2. ASUS A8V-X 2-9 Updating the BIOS through the Internet To update the BIOS through the Internet: 1. Select Update BIOS from the Internet option from the Windows® desktop by clicking Start > Programs > ASUS > ASUSUpdate > ASUSUpdate. Launch the ASUS Update utility from the drop-down menu, then click Next. 3. Click Next.


