
A88X-PRO User's Manual
Page 38
A88X-PRO CLRTC 12 23 Normal (Default) A88X-PRO Clear RTC RAM Clear RTC To erase the RTC RAM 1. Except when clearing the RTC RAM, never remove the cap on pins 2-3 for about 5-10 seconds, then move the jumper again to pins 1-2. 3. Removing the cap will cause system boot failure! • If... the key during the boot process and enter BIOS setup to overclocking. Turn OFF the computer and unplug the power cord. 2. Move the jumper cap from pins 1-2 (default) to clear the Real Time Clock (RTC) RAM in CMOS, which include system setup information such as system passwords. ...
A88X-PRO CLRTC 12 23 Normal (Default) A88X-PRO Clear RTC RAM Clear RTC To erase the RTC RAM 1. Except when clearing the RTC RAM, never remove the cap on pins 2-3 for about 5-10 seconds, then move the jumper again to pins 1-2. 3. Removing the cap will cause system boot failure! • If... the key during the boot process and enter BIOS setup to overclocking. Turn OFF the computer and unplug the power cord. 2. Move the jumper cap from pins 1-2 (default) to clear the Real Time Clock (RTC) RAM in CMOS, which include system setup information such as system passwords. ...
A88X-PRO User's Manual
Page 52
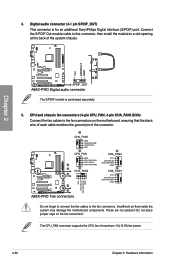
Do not place jumper caps on the motherboard, ensuring that the black wire of each cable ... are not jumpers! The CPU_FAN connector supports the CPU fan of the system chassis. +5V SPDIFOUT GND Chapter 2 A88X-PRO SPDIF_OUT A88X-PRO Digital audio connector The S/PDIF module is for an additional Sony/Philips Digital Interface (S/PDIF) port. CPU and chassis... fan connectors (4-pin CPU_FAN, 4-pin CHA_FAN1/2/3/4) Connect the fan cables to the fan connectors. A88X-PRO 1 CHA_FAN1 GND CHA FAN PWR CHA FAN IN VCC 2 CPU_FAN GND CPU FAN PWR CPU FAN IN 1 CPU FAN...
Do not place jumper caps on the motherboard, ensuring that the black wire of each cable ... are not jumpers! The CPU_FAN connector supports the CPU fan of the system chassis. +5V SPDIFOUT GND Chapter 2 A88X-PRO SPDIF_OUT A88X-PRO Digital audio connector The S/PDIF module is for an additional Sony/Philips Digital Interface (S/PDIF) port. CPU and chassis... fan connectors (4-pin CPU_FAN, 4-pin CHA_FAN1/2/3/4) Connect the fan cables to the fan connectors. A88X-PRO 1 CHA_FAN1 GND CHA FAN PWR CHA FAN IN VCC 2 CPU_FAN GND CPU FAN PWR CPU FAN IN 1 CPU FAN...
A88X-PRO User's Manual
Page 107
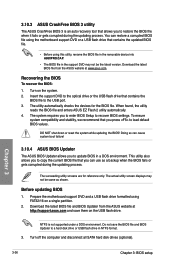
Prepare the motherboard support DVD and a USB flash drive formatted using this utility, rename the BIOS file in the removable device into A88XPRO.CAP. • The BIOS file in a DOS environment. DO NOT shut down or reset the system while updating the BIOS! Do not ...file that contains the BIOS file to restore the BIOS file when it fails or gets corrupted during the updating process. 3.10.3 ASUS CrashFree BIOS 3 utility The ASUS CrashFree BIOS 3 is not supported under a DOS environment. This utility also allows you to recover BIOS settings. Download the latest BIOS...
Prepare the motherboard support DVD and a USB flash drive formatted using this utility, rename the BIOS file in the removable device into A88XPRO.CAP. • The BIOS file in a DOS environment. DO NOT shut down or reset the system while updating the BIOS! Do not ...file that contains the BIOS file to restore the BIOS file when it fails or gets corrupted during the updating process. 3.10.3 ASUS CrashFree BIOS 3 utility The ASUS CrashFree BIOS 3 is not supported under a DOS environment. This utility also allows you to recover BIOS settings. Download the latest BIOS...
A88X-PRO User's Manual
Page 108
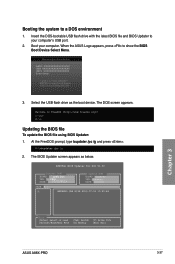
... Updater: 1. At the FreeDOS prompt, type bupdater /pc /g and press . 2. ASUSTek BIOS Updater for DOS V1.30 A88X-PRO 0203 07/12/2013 A88XPRO.CAP 8194 2013-07-12 15:25:48 Chapter 3 ASUS A88X-PRO 3-37 When the ASUS Logo appears, press to a DOS environment 1. The BIOS Updater screen appears as the boot device. Select the...
... Updater: 1. At the FreeDOS prompt, type bupdater /pc /g and press . 2. ASUSTek BIOS Updater for DOS V1.30 A88X-PRO 0203 07/12/2013 A88XPRO.CAP 8194 2013-07-12 15:25:48 Chapter 3 ASUS A88X-PRO 3-37 When the ASUS Logo appears, press to a DOS environment 1. The BIOS Updater screen appears as the boot device. Select the...
