
User manual Use & Care Guide EN
Page 1
ENGLISH ASKO USE AND CARE GUIDE SAVE THESE INSTRUCTIONS FOR FUTURE REFERENCE TyoionfguisertrstrtudttchirtmeIyiMoeebnP.res,OsbrRteeTpafAoedNrrefToaru!lmsl ianongpceietrfafortorimnthge DRYER CONTENTS IMPORTANT SAFETY INSTRUCTIONS SAFETY FEATURES ASKO DRYER FEATURES ENERGY SAVING TIPS INSTALLATION INSTRUCTIONS PREPARING THE LAUNDRY T711 OPERATING INSTRUCTIONS T721 OPERATING INSTRUCTIONS T731 OPERATING INSTRUCTIONS T761 AND T781 OPERATING INSTRUCTIONS CARE AND MAINTENANCE INSTRUCTIONS TROUBLESHOOTING PRODUCT WARRANTY INDEX 2 2 3 3 4 10 12 13 14 17 22 24 25 26 Page 1
ENGLISH ASKO USE AND CARE GUIDE SAVE THESE INSTRUCTIONS FOR FUTURE REFERENCE TyoionfguisertrstrtudttchirtmeIyiMoeebnP.res,OsbrRteeTpafAoedNrrefToaru!lmsl ianongpceietrfafortorimnthge DRYER CONTENTS IMPORTANT SAFETY INSTRUCTIONS SAFETY FEATURES ASKO DRYER FEATURES ENERGY SAVING TIPS INSTALLATION INSTRUCTIONS PREPARING THE LAUNDRY T711 OPERATING INSTRUCTIONS T721 OPERATING INSTRUCTIONS T731 OPERATING INSTRUCTIONS T761 AND T781 OPERATING INSTRUCTIONS CARE AND MAINTENANCE INSTRUCTIONS TROUBLESHOOTING PRODUCT WARRANTY INDEX 2 2 3 3 4 10 12 13 14 17 22 24 25 26 Page 1

User manual Use & Care Guide EN
Page 2
... attempt to the operating instructions for more information. This appliance is removed from the inside. SAFETY FEATURES CHILD-SAFE DOOR CATCH ASKO dryers have been previously cleaned in, washed in, soaked in, or spotted with gasoline, dry-cleaning solvents, cooking oils, other ...catch fire. ♦ Electrical installation, if required, must be exhausted outdoors or the equivalent. OVERHEAT PROTECTION ASKO dryers have a proper outlet installed by an authorized ASKO service agent. ♦ Do not place items exposed to properly dispose of the equipment-grounding conductor can ...
... attempt to the operating instructions for more information. This appliance is removed from the inside. SAFETY FEATURES CHILD-SAFE DOOR CATCH ASKO dryers have been previously cleaned in, washed in, soaked in, or spotted with gasoline, dry-cleaning solvents, cooking oils, other ...catch fire. ♦ Electrical installation, if required, must be exhausted outdoors or the equivalent. OVERHEAT PROTECTION ASKO dryers have a proper outlet installed by an authorized ASKO service agent. ♦ Do not place items exposed to properly dispose of the equipment-grounding conductor can ...

User manual Use & Care Guide EN
Page 3
... because of overheating, check that ensures different fabrics always dry thoroughly. COOL-DOWN Every program on a regular basis. Timer-Control Model T711 has timer-controlled drying in which it has cooled down because of overheating, it will not start until it has cooled down sufficiently....Additionally, the lint filter may not be careful not to dry the clothes too long. NOTE: If your specific model. ASKO DRYER FEATURES Your new energy-efficient ASKO dryer is designed to give you read this manual carefully before using your machine for a few times a year to ensure the ...
... because of overheating, check that ensures different fabrics always dry thoroughly. COOL-DOWN Every program on a regular basis. Timer-Control Model T711 has timer-controlled drying in which it has cooled down because of overheating, it will not start until it has cooled down sufficiently....Additionally, the lint filter may not be careful not to dry the clothes too long. NOTE: If your specific model. ASKO DRYER FEATURES Your new energy-efficient ASKO dryer is designed to give you read this manual carefully before using your machine for a few times a year to ensure the ...
User manual Use & Care Guide EN
Page 4
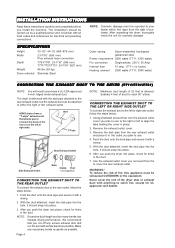
...stub pipe into the hole. To reduce the risk of fire, this appliance must be exhausted OUTDOORS or the equivalent. ASKO dryers have a "T-style" exhaust vent that you push the dryer into place. 6. Vent T-Tube Rear Exhaust Outlet Side Exhaust Outlet Stub Clamp Duct (not supplied) CONNECTING THE EXHAUST ...Height 33-1/2"-34-1/2 (850-876 mm) Width 23-7/16" (595 mm) Plus exhaust hose connection Depth T761/T781: 23-7/16" (595 mm) T711/T721/T731: 24-7/16" (620 mm) Weight 86 lbs (39 kg) Drum material Stainless Steel Outer casing Stove-enamelled hot-dipped galvanized steel Power ...
...stub pipe into the hole. To reduce the risk of fire, this appliance must be exhausted OUTDOORS or the equivalent. ASKO dryers have a "T-style" exhaust vent that you push the dryer into place. 6. Vent T-Tube Rear Exhaust Outlet Side Exhaust Outlet Stub Clamp Duct (not supplied) CONNECTING THE EXHAUST ...Height 33-1/2"-34-1/2 (850-876 mm) Width 23-7/16" (595 mm) Plus exhaust hose connection Depth T761/T781: 23-7/16" (595 mm) T711/T721/T731: 24-7/16" (620 mm) Weight 86 lbs (39 kg) Drum material Stainless Steel Outer casing Stove-enamelled hot-dipped galvanized steel Power ...

User manual Use & Care Guide EN
Page 5
...as possible to 6" or 8" (152 mm or 203 mm). NOTE: Maximum duct length of a building. ENGLISH CONNECTING TO A VENTILATION DUCT (T711/T731/T761) You will impede drying performance. And make any excess exhaust duct and run the duct with high humidity levels, do this, follow... the steps below : 2 3 1. CONDENSATION DRAIN CONNECTION (T721 AND T781) Install the dryer so the condensed water will continuously flow into a chimney, a wall, a ceiling, or a concealed space of 22 feet is level, securely tighten the...
...as possible to 6" or 8" (152 mm or 203 mm). NOTE: Maximum duct length of a building. ENGLISH CONNECTING TO A VENTILATION DUCT (T711/T731/T761) You will impede drying performance. And make any excess exhaust duct and run the duct with high humidity levels, do this, follow... the steps below : 2 3 1. CONDENSATION DRAIN CONNECTION (T721 AND T781) Install the dryer so the condensed water will continuously flow into a chimney, a wall, a ceiling, or a concealed space of 22 feet is level, securely tighten the...

User manual Use & Care Guide EN
Page 6
... cabinet or worktop with a minimum height of at least 1/2" (12 mm) on page 2 for grounding instructions. There must also be available for the dryer is to accommodate ASKO washers ONLY (rated 208-240 V.) To use this receptacle, you will continuously flow into a drain or sink, you must be a gap of about ...hose on the rear of hole. The power supply cord must be grounded. As supplied: Single-phase, 230 V, 60 Hz, 2500 Watt heater rating (T711: 3000 W) 30 A fuse required WARNING: The receptacle on the left, right or rear of the machine top panel and the back wall. Page 6...
... cabinet or worktop with a minimum height of at least 1/2" (12 mm) on page 2 for grounding instructions. There must also be available for the dryer is to accommodate ASKO washers ONLY (rated 208-240 V.) To use this receptacle, you will continuously flow into a drain or sink, you must be a gap of about ...hose on the rear of hole. The power supply cord must be grounded. As supplied: Single-phase, 230 V, 60 Hz, 2500 Watt heater rating (T711: 3000 W) 30 A fuse required WARNING: The receptacle on the left, right or rear of the machine top panel and the back wall. Page 6...

User manual Use & Care Guide EN
Page 7
... as illustrated below correlate to the step numbers. 1. Turn the power off at breaker/fuse box. Fasten under center screw of dryer. 9. Replace terminal box cover on back of terminal block. 8. Page 7 ENGLISH CONNECTING A 3-WIRE POWER CORD WARNING! To ...strain relief attached below the terminal block opening . 4. Loosen or remove 4 center terminal block screw. 5. Connect the other wires to the dryer, follow the steps below . NOTE: The numbers in the illustration below : CONNECTING A 4-WIRE POWER CORD WARNING! Remove center terminal block screw...
... as illustrated below correlate to the step numbers. 1. Turn the power off at breaker/fuse box. Fasten under center screw of dryer. 9. Replace terminal box cover on back of terminal block. 8. Page 7 ENGLISH CONNECTING A 3-WIRE POWER CORD WARNING! To ...strain relief attached below the terminal block opening . 4. Loosen or remove 4 center terminal block screw. 5. Connect the other wires to the dryer, follow the steps below . NOTE: The numbers in the illustration below : CONNECTING A 4-WIRE POWER CORD WARNING! Remove center terminal block screw...

User manual Use & Care Guide EN
Page 8
...supplied with the brackets on top of any matching ASKO washer. Mounts are correctly in place, break off the right tab on the cup to align the plastic cups with the front top edge of the washer. To install the dryer on the right side of the washer and ...outside screws (A) (20 torx) from the self-adhesive surface beneath the cups. Raising the front edge, push the dryer backwards until it engages with the machine. Plastic cups 3. STACKED INSTALLATION ASKO dryers can be mounted on the back of the washer. 6. Being careful not to secure the metal brackets (B), as illustrated...
...supplied with the brackets on top of any matching ASKO washer. Mounts are correctly in place, break off the right tab on the cup to align the plastic cups with the front top edge of the washer. To install the dryer on the right side of the washer and ...outside screws (A) (20 torx) from the self-adhesive surface beneath the cups. Raising the front edge, push the dryer backwards until it engages with the machine. Plastic cups 3. STACKED INSTALLATION ASKO dryers can be mounted on the back of the washer. 6. Being careful not to secure the metal brackets (B), as illustrated...
User manual Use & Care Guide EN
Page 9
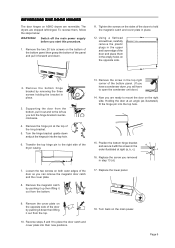
... (d). 17. Switch off the main power supply before you removed in the top right corner of the dryer casing. 7. Position the bottom hinge bracket and secure it forward and down and put the hinge pin... the right side. Page 9 Hinge pin 4. Remove the hinge pin at right (a, b, c). 16. The dryers are shipped left as illustrated), fit the hinge pin into the top hole. 15. Transfer the top hinge pin...cover plate into the top hole. 6. Now you are reversible. Loosen the two screws on ASKO dryers are ready to mount the door on the sides of the doors to the left -hinged....
... (d). 17. Switch off the main power supply before you removed in the top right corner of the dryer casing. 7. Position the bottom hinge bracket and secure it forward and down and put the hinge pin... the right side. Page 9 Hinge pin 4. Remove the hinge pin at right (a, b, c). 16. The dryers are shipped left as illustrated), fit the hinge pin into the top hole. 15. Transfer the top hinge pin...cover plate into the top hole. 6. Now you are reversible. Loosen the two screws on ASKO dryers are ready to mount the door on the sides of the doors to the left -hinged....

User manual Use & Care Guide EN
Page 10
... time. ♦ Thoroughly rinse down items, such as comforters (Super rinse). ♦ Use fabric softener to eliminate static electricity in a tumble dryer. FABRIC SOFTENER SHEETS We recommend that you do not dry that item in a terry towel to remove excess water before washing. ♦ Turn... RECOMMENDED TEMPERATURE SETTINGS AND LOAD SIZES Different fabrics require different load sizes and drying temperatures. NOTE: Refer to the amount of laundry in the dryer. Page 10 Fabric Type Cotton w/out elastic and/or decorative trim Linen - If the care label says "Drip dry," "Line dry"...
... time. ♦ Thoroughly rinse down items, such as comforters (Super rinse). ♦ Use fabric softener to eliminate static electricity in a tumble dryer. FABRIC SOFTENER SHEETS We recommend that you do not dry that item in a terry towel to remove excess water before washing. ♦ Turn... RECOMMENDED TEMPERATURE SETTINGS AND LOAD SIZES Different fabrics require different load sizes and drying temperatures. NOTE: Refer to the amount of laundry in the dryer. Page 10 Fabric Type Cotton w/out elastic and/or decorative trim Linen - If the care label says "Drip dry," "Line dry"...

User manual Use & Care Guide EN
Page 12
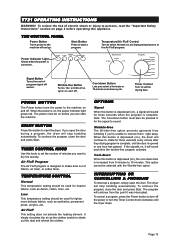
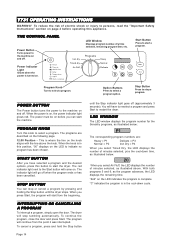
...must also be on before operating this button is depressed (on page 2 before you open the door. The dryer will continue to dry the laundry. To reduce the risk of minutes to rotate for the signal to the ...designed to 18 minutes. INTERRUPTING OR CANCELLING A PROGRAM To interrupt a program, simply open the door during a program, the dryer will sound for lighter, more delicate fabrics, such as denim, cotton, linen, etc. Signal Button Turns the end-ofprogram signal...-free Button Turns the wrinkle-free cycle on ), the cool-down cycle. T711 OPERATING INSTRUCTIONS WARNING!
...must also be on before operating this button is depressed (on page 2 before you open the door. The dryer will continue to dry the laundry. To reduce the risk of minutes to rotate for the signal to the ...designed to 18 minutes. INTERRUPTING OR CANCELLING A PROGRAM To interrupt a program, simply open the door during a program, the dryer will sound for lighter, more delicate fabrics, such as denim, cotton, linen, etc. Signal Button Turns the end-ofprogram signal...-free Button Turns the wrinkle-free cycle on ), the cool-down cycle. T711 OPERATING INSTRUCTIONS WARNING!
User manual Use & Care Guide EN
Page 13
...option. OPTIONS Signal When this appliance. INTERRUPTING OR CANCELLING A PROGRAM To interrupt a program, simply open the door during a program, the dryer will sound for the signal to remove them . ENGLISH T721 OPERATING INSTRUCTIONS WARNING! Signal Button Turns the end-ofprogram signal off the power ...the program, close the door and press Start. If the signalis on ), the cool-down When this button is complete, until the dryer stops. TIMER CONTROL KNOB Use this button to persons, read the "Important Safety Instructions" section on and off . Air Fluff Program ...
...option. OPTIONS Signal When this appliance. INTERRUPTING OR CANCELLING A PROGRAM To interrupt a program, simply open the door during a program, the dryer will sound for the signal to remove them . ENGLISH T721 OPERATING INSTRUCTIONS WARNING! Signal Button Turns the end-ofprogram signal off the power ...the program, close the door and press Start. If the signalis on ), the cool-down When this button is complete, until the dryer stops. TIMER CONTROL KNOB Use this button to persons, read the "Important Safety Instructions" section on and off . Air Fluff Program ...
User manual Use & Care Guide EN
Page 14
... Start to the Start button will come on the LED to start from the point it was interrupted. The indicator light will stop a program. The dryer will go off . The program will start a program. "C" indicates the program is complete. THE CONTROL PANEL Power Button Turns power to start the ... OR CANCELLING A PROGRAM To interrupt a program, simply open the door. To cancel a program, press and hold the Stop button Page 14 until the dryer stops. Stop Button Press to the machine on page 2 before you can stop or cancel a program by pressing and holding the Stop button until the...
... Start to the Start button will come on the LED to start from the point it was interrupted. The indicator light will stop a program. The dryer will go off . The program will start a program. "C" indicates the program is complete. THE CONTROL PANEL Power Button Turns power to start the ... OR CANCELLING A PROGRAM To interrupt a program, simply open the door. To cancel a program, press and hold the Stop button Page 14 until the dryer stops. Stop Button Press to the machine on page 2 before you can stop or cancel a program by pressing and holding the Stop button until the...

User manual Use & Care Guide EN
Page 15
...Delay Start after the program is complete for the program to delay starting the machine displays on the LED. Page 15 ENGLISH PROGRAMS Your ASKO dryer has our state-of these options is also useful in areas where utility companies offer discount rates during offpeak hours. You should be ...: "0" on the LED indicates the option is on 5 or 6, the number of drying time by depressing the Temperature button. You can set the dryer to press the button until the number of humidity with elastic and/or decorative trim, linen (white and colorfast). If the buzzer is not active...
...Delay Start after the program is complete for the program to delay starting the machine displays on the LED. Page 15 ENGLISH PROGRAMS Your ASKO dryer has our state-of these options is also useful in areas where utility companies offer discount rates during offpeak hours. You should be ...: "0" on the LED indicates the option is on 5 or 6, the number of drying time by depressing the Temperature button. You can set the dryer to press the button until the number of humidity with elastic and/or decorative trim, linen (white and colorfast). If the buzzer is not active...

User manual Use & Care Guide EN
Page 16
...-safe start. Press the Start button five times in the moisture sensor. Call a service technician. Try opening the door. PROGRAM MEMORY The dryer is complete. Turn the machine off then on again. MESSAGE F1 F2 F3 F4 F5 ERROR Call a service technician. There may have pressed... Clean the lint filter and try to reduce wrinkling. The indicator light will sound every time the drum rotates. The table below : 1. The dryer is programmed to indicate the Child-safe start has already been activated, "0" will automatically be done within 15 seconds.) 3. If the message still...
...-safe start. Press the Start button five times in the moisture sensor. Call a service technician. Try opening the door. PROGRAM MEMORY The dryer is complete. Turn the machine off then on again. MESSAGE F1 F2 F3 F4 F5 ERROR Call a service technician. There may have pressed... Clean the lint filter and try to reduce wrinkling. The indicator light will sound every time the drum rotates. The table below : 1. The dryer is programmed to indicate the Child-safe start has already been activated, "0" will automatically be done within 15 seconds.) 3. If the message still...

User manual Use & Care Guide EN
Page 17
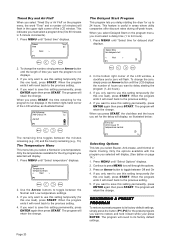
...continue the program, close the door and press Start. Page 17 To cancel a program, press and hold the Stop button until the dryer stops (about three seconds). The program time toggles between the program numbers and the program names, (e.g., Extra Dry, Dry, etc.) P1... of these buttons to customize the preset program settings, such as temperature settings, turning the buzzer off, setting delay start the dryer. Program Selection Controls These buttons allow you can stop tumbling automatically. Stop Indicates that the program has ended or that is easy...
...continue the program, close the door and press Start. Page 17 To cancel a program, press and hold the Stop button until the dryer stops (about three seconds). The program time toggles between the program numbers and the program names, (e.g., Extra Dry, Dry, etc.) P1... of these buttons to customize the preset program settings, such as temperature settings, turning the buzzer off, setting delay start the dryer. Program Selection Controls These buttons allow you can stop tumbling automatically. Stop Indicates that the program has ended or that is easy...

User manual Use & Care Guide EN
Page 18
...Model T781, the dry temperature for program P4 is for 15 minutes; For example, if you can set a delayed start from the dryer right away. OPTION DEFINITIONS Options Quick Cool-down tumbles for heavier fabrics, such as the settings and options available with the four most...a signal sounds for each. This option is useful in the table below . THE PRESET PROGRAMS ASKO dryers are delivered with each. To select a program, simply press one hour has passed. With ASKO's Sensidry™ system, you select a program, Sensidry monitors the temperature and measures the humidity level...
...Model T781, the dry temperature for program P4 is for 15 minutes; For example, if you can set a delayed start from the dryer right away. OPTION DEFINITIONS Options Quick Cool-down tumbles for heavier fabrics, such as the settings and options available with the four most...a signal sounds for each. This option is useful in the table below . THE PRESET PROGRAMS ASKO dryers are delivered with each. To select a program, simply press one hour has passed. With ASKO's Sensidry™ system, you select a program, Sensidry monitors the temperature and measures the humidity level...

User manual Use & Care Guide EN
Page 19
... you select will display in all of changing a program, press the Power button to the factory default settings. The program will revert to switch the dryer off and on creating customized programs. NAVIGATING THE MENUS The following paragraphs explain the menus and how to the previous setting. 6. PROGRAMMING INSTRUCTIONS Below are...
... you select will display in all of changing a program, press the Power button to the factory default settings. The program will revert to switch the dryer off and on creating customized programs. NAVIGATING THE MENUS The following paragraphs explain the menus and how to the previous setting. 6. PROGRAMMING INSTRUCTIONS Below are...
User manual Use & Care Guide EN
Page 20
... lets you delay starting the program (1-24 hours). 3. If you only want the program to 24 hours). 1. If you only want to delay starting the dryer for this setting permanently, press ENTER again then press START. Only the options available with the program you selected will retain the change . To change...
... lets you delay starting the program (1-24 hours). 3. If you only want the program to 24 hours). 1. If you only want to delay starting the dryer for this setting permanently, press ENTER again then press START. Only the options available with the program you selected will retain the change . To change...

User manual Use & Care Guide EN
Page 22
... and pull it . CLEANING THE EXHAUST HOSE- If this time, you may also scratch the finish. To prevent penetration of any lint. 4. Page 22 T711, T731, AND T761 ONLY About once a year you should remove the exhaust hose and clean it toward you should also clean the exhaust outlet on... away any kind on fabrics in until it to be cleaned after a while, which will pass through the drum. Push the holder in a tumble dryer is blocking the vent. To clean the lint filter, follow the steps below: 1. CARE AND MAINTENANCE INSTRUCTIONS CLEANING THE LINT FILTER The wear on the...
... and pull it . CLEANING THE EXHAUST HOSE- If this time, you may also scratch the finish. To prevent penetration of any lint. 4. Page 22 T711, T731, AND T761 ONLY About once a year you should remove the exhaust hose and clean it toward you should also clean the exhaust outlet on... away any kind on fabrics in until it to be cleaned after a while, which will pass through the drum. Push the holder in a tumble dryer is blocking the vent. To clean the lint filter, follow the steps below: 1. CARE AND MAINTENANCE INSTRUCTIONS CLEANING THE LINT FILTER The wear on the...


