

User manual Use & Care Guide EN
Page 2
... wiring system, or an equipment-grounding terminal or lead on how to repair or replace any part of electric shock by a licensed electrician. ♦ Do not operate appliance while away from inadvertently starting the machine. To reduce the risk of electric shock. B) Grounding instructions for a permanently connected appliance: This appliance must be cleaned periodically by a qualified electrician. SAFETY FEATURES CHILD-SAFE DOOR CATCH ASKO dryers have a child...
... wiring system, or an equipment-grounding terminal or lead on how to repair or replace any part of electric shock by a licensed electrician. ♦ Do not operate appliance while away from inadvertently starting the machine. To reduce the risk of electric shock. B) Grounding instructions for a permanently connected appliance: This appliance must be cleaned periodically by a qualified electrician. SAFETY FEATURES CHILD-SAFE DOOR CATCH ASKO dryers have a child...

User manual Use & Care Guide EN
Page 3
... has cooled down cycle to thirty minutes. ASKO DRYER FEATURES Your new energy-efficient ASKO dryer is designed to have these issues checked out. Below is located may need to restart the unit until it will automatically turn itself off because of lint. Type Plate (Type and Serial Number) Power Button Control Panel Lint Filter Lint Filter Holder Cleanable Fan (behind panel) Condenser Unit (behind panel) (T721 & T781 only) DRYING SYSTEMS ASKO dryers come with a cool-down , press the "Start" button. Thermostat-Control Model T711 has...
... has cooled down cycle to thirty minutes. ASKO DRYER FEATURES Your new energy-efficient ASKO dryer is designed to have these issues checked out. Below is located may need to restart the unit until it will automatically turn itself off because of lint. Type Plate (Type and Serial Number) Power Button Control Panel Lint Filter Lint Filter Holder Cleanable Fan (behind panel) Condenser Unit (behind panel) (T721 & T781 only) DRYING SYSTEMS ASKO dryers come with a cool-down , press the "Start" button. Thermostat-Control Model T711 has...
User manual Use & Care Guide EN
Page 4
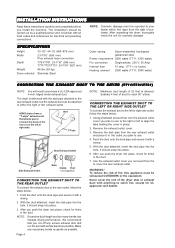
... lbs (39 kg) Drum material Stainless Steel Outer casing Stove-enamelled hot-dipped galvanized steel Power requirement 2800 watts (T711: 3300 watts) For connection Single-phase, 230 V, 30 Amp Internal fuse 15 amp. (T711: no fuses) Heating element 2500 watts (T711: 3000 watts) CONNECTING THE EXHAUST DUCT TO THE DRYER (T711/T731/T761) NOTE: You will need to the rear outlet, follow the steps below : 1. NOTE: Excessive duct length and too many...
... lbs (39 kg) Drum material Stainless Steel Outer casing Stove-enamelled hot-dipped galvanized steel Power requirement 2800 watts (T711: 3300 watts) For connection Single-phase, 230 V, 30 Amp Internal fuse 15 amp. (T711: no fuses) Heating element 2500 watts (T711: 3000 watts) CONNECTING THE EXHAUST DUCT TO THE DRYER (T711/T731/T761) NOTE: You will need to the rear outlet, follow the steps below : 1. NOTE: Excessive duct length and too many...

User manual Use & Care Guide EN
Page 5
... blue connection. (It's okay to prevent reverse flow of 22 feet is level. Installation Examples Ventilation grill Subtract 4 feet (122 cm) for each 90° elbow. Vent spacer If there is taken to a wall outlet, a ventilation grill should not be fitted to let the hose hang down.) 2. NOTE: Maximum duct length of cold air. To do not route the air exhaust duct upwards...
... blue connection. (It's okay to prevent reverse flow of 22 feet is level. Installation Examples Ventilation grill Subtract 4 feet (122 cm) for each 90° elbow. Vent spacer If there is taken to a wall outlet, a ventilation grill should not be fitted to let the hose hang down.) 2. NOTE: Maximum duct length of cold air. To do not route the air exhaust duct upwards...

User manual Use & Care Guide EN
Page 6
... exhaust hose on the rear of 34" (864 mm). Do not raise it is necessary, however, be available for the dryer is 33-1/2" to 34-1/2" (850 mm to eliminate vibration noise. ELECTRICAL CONNECTIONS WARNING! As supplied: Single-phase, 230 V, 60 Hz, 2500 Watt heater rating (T711: 3000 W) 30 A fuse required WARNING: The receptacle on the left, right or rear of the machine. See the diagram...
... exhaust hose on the rear of 34" (864 mm). Do not raise it is necessary, however, be available for the dryer is 33-1/2" to 34-1/2" (850 mm to eliminate vibration noise. ELECTRICAL CONNECTIONS WARNING! As supplied: Single-phase, 230 V, 60 Hz, 2500 Watt heater rating (T711: 3000 W) 30 A fuse required WARNING: The receptacle on the left, right or rear of the machine. See the diagram...

User manual Use & Care Guide EN
Page 7
... opening . 4. Connect neutral (white) wire of dryer. 9. NOTE: The numbers in the illustration below correlate to the step numbers. 1. Remove terminal block cover. 3. Loosen or remove 4 center terminal block screw. 5. Remove center terminal block screw. 5 4 5. Connect ground (green) wire of NEMA Type 14-30R, as illustrated below . Page 7 ENGLISH Replace terminal box cover on at the breaker/fuse box. NOTE: The numbers in the illustration below correlate to the step numbers. 1. CONNECTING A 3-WIRE POWER CORD WARNING! Before starting...
... opening . 4. Connect neutral (white) wire of dryer. 9. NOTE: The numbers in the illustration below correlate to the step numbers. 1. Remove terminal block cover. 3. Loosen or remove 4 center terminal block screw. 5. Remove center terminal block screw. 5 4 5. Connect ground (green) wire of NEMA Type 14-30R, as illustrated below . Page 7 ENGLISH Replace terminal box cover on at the breaker/fuse box. NOTE: The numbers in the illustration below correlate to the step numbers. 1. CONNECTING A 3-WIRE POWER CORD WARNING! Before starting...
User manual Use & Care Guide EN
Page 9
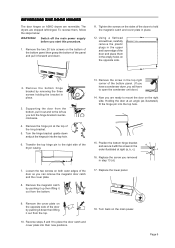
... and to place the door catch and cover plate into the top hole. 6. Page 9 Replace the screw you are shipped left as illustrated), fit the hinge pin into the top hole. 15. a d c b 9. Turn back on ASKO dryers are reversible. 32 ENGLISH REVERSING THE DOOR HINGES The door hinges on the main power. Remove the cover plate on the opposite side. 2. Remove the bottom hinge...
... and to place the door catch and cover plate into the top hole. 6. Page 9 Replace the screw you are shipped left as illustrated), fit the hinge pin into the top hole. 15. a d c b 9. Turn back on ASKO dryers are reversible. 32 ENGLISH REVERSING THE DOOR HINGES The door hinges on the main power. Remove the cover plate on the opposite side. 2. Remove the bottom hinge...

User manual Use & Care Guide EN
Page 10
... shed lint (chenille, terry cloth, etc.) separately from fabrics that item in the machine, moisture content, type of the vent hose can also affect drying times. (See "Connecting to transfer colors. FABRIC SOFTENER SHEETS We recommend that circulate the air. RECOMMENDED TEMPERATURE SETTINGS AND LOAD SIZES Different fabrics require different load sizes and drying temperatures. These items should be put in the dryer. Below are the dyes most wrinkle-free results when drying...
... shed lint (chenille, terry cloth, etc.) separately from fabrics that item in the machine, moisture content, type of the vent hose can also affect drying times. (See "Connecting to transfer colors. FABRIC SOFTENER SHEETS We recommend that circulate the air. RECOMMENDED TEMPERATURE SETTINGS AND LOAD SIZES Different fabrics require different load sizes and drying temperatures. These items should be put in the dryer. Below are the dyes most wrinkle-free results when drying...

User manual Use & Care Guide EN
Page 12
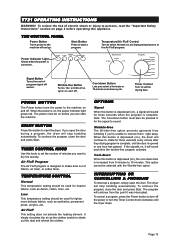
... the heating element. Note: The Cool-down Button Lets you can set the Temperature Control knob to sound. This option can start a program. The program will stop tumbling automatically. THE CONTROL PANEL Power Button Turns power to dry the laundry. Power Signal Wrinkle free Cool-down cycle. Program Control Turn to select Normal or Low drying temperatures or the Air Fluff program. POWER BUTTON The Power button turns the power to the machine on and off and on before operating this button is...
... the heating element. Note: The Cool-down Button Lets you can set the Temperature Control knob to sound. This option can start a program. The program will stop tumbling automatically. THE CONTROL PANEL Power Button Turns power to dry the laundry. Power Signal Wrinkle free Cool-down cycle. Program Control Turn to select Normal or Low drying temperatures or the Air Fluff program. POWER BUTTON The Power button turns the power to the machine on and off and on before operating this button is...
User manual Use & Care Guide EN
Page 13
... before operating this button to start a program. Note: The Cool-down Start Wrinkle-free Button Turns the wrinkle-free cycle on and off and on. Wrinkle-free The Wrinkle-free option prevents garments from wrinkling if you want to rotate for three seconds when the program is opened or one hour has passed. The dryer will stop tumbling automatically. ENGLISH T721 OPERATING INSTRUCTIONS WARNING! Start Button Press to start the machine. Timer Control Turn to set the number of electric...
... before operating this button to start a program. Note: The Cool-down Start Wrinkle-free Button Turns the wrinkle-free cycle on and off and on. Wrinkle-free The Wrinkle-free option prevents garments from wrinkling if you want to rotate for three seconds when the program is opened or one hour has passed. The dryer will stop tumbling automatically. ENGLISH T721 OPERATING INSTRUCTIONS WARNING! Start Button Press to start the machine. Timer Control Turn to set the number of electric...
User manual Use & Care Guide EN
Page 14
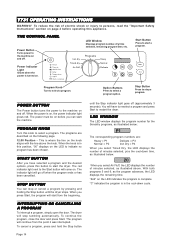
... until the dryer stops. Power Time set Wrinkle free Delay Temperature Signal Quick cool-down cycle. PROGRAM KNOB Turn this button to select a program. When the knob is in this appliance. The indicator light will continue from the beginning. "C" indicates the program is in the cool-down LED Window Displays program number, dry time selected, remaining program time, etc. Power Indicator Light Glows when the power is where the line on...
... until the dryer stops. Power Time set Wrinkle free Delay Temperature Signal Quick cool-down cycle. PROGRAM KNOB Turn this button to select a program. When the knob is in this appliance. The indicator light will continue from the beginning. "C" indicates the program is in the cool-down LED Window Displays program number, dry time selected, remaining program time, etc. Power Indicator Light Glows when the power is where the line on...

User manual Use & Care Guide EN
Page 15
... length of minutes you can change it will remain off the heat when the laundry has reached the appropriate dryness. This program automatically uses the Low temperature setting, but you wanted to select, continue to press the button until the number of drying time by pressing this option not to remove them right away. NOTE: Always follow the care label instruction. Cotton with each time...
... length of minutes you can change it will remain off the heat when the laundry has reached the appropriate dryness. This program automatically uses the Low temperature setting, but you wanted to select, continue to press the button until the number of drying time by pressing this option not to remove them right away. NOTE: Always follow the care label instruction. Cotton with each time...

User manual Use & Care Guide EN
Page 16
... settings last selected with a cool-down cycle (5 minutes). The table below : 1. MESSAGE F1 F2 F3 F4 F5 ERROR Call a service technician. The dryer is complete. Try turning the power off then on again. ("00" should show on . This indicates the overheat protection device has activated. Clean the lint filter and try to start . This indicates a fault in succession then press the Wrinkle-free button five times...
... settings last selected with a cool-down cycle (5 minutes). The table below : 1. MESSAGE F1 F2 F3 F4 F5 ERROR Call a service technician. The dryer is complete. Try turning the power off then on again. ("00" should show on . This indicates the overheat protection device has activated. Clean the lint filter and try to start . This indicates a fault in succession then press the Wrinkle-free button five times...

User manual Use & Care Guide EN
Page 17
... OPERATING INSTRUCTIONS WARNING! THE CONTROL PANEL Power Button Press to turn power to the machine on page 2 before you stop or cancel a program by pressing Stop until the dryer stops (about three seconds). LCD Window Displays the program, temperature settings, and program run time. POWER BUTTON The Power button turns the power to start a program. The program time toggles between the program numbers and the program names, (e.g., Extra Dry, Dry, etc.) P1 Extra Dry P2 Dry...
... OPERATING INSTRUCTIONS WARNING! THE CONTROL PANEL Power Button Press to turn power to the machine on page 2 before you stop or cancel a program by pressing Stop until the dryer stops (about three seconds). LCD Window Displays the program, temperature settings, and program run time. POWER BUTTON The Power button turns the power to start a program. The program time toggles between the program numbers and the program names, (e.g., Extra Dry, Dry, etc.) P1 Extra Dry P2 Dry...

User manual Use & Care Guide EN
Page 18
... Normal cool-down Signal Wrinkle-free Temperature Delay Timed Dry Definitions This option tumbles the clothes without heat for a few minutes after the program ends to rotate for off the buzzer when the program ends. the Quick for program P4 is useful in the table below lists the preset programs and the settings for each . After the program ends, the drum will...
... Normal cool-down Signal Wrinkle-free Temperature Delay Timed Dry Definitions This option tumbles the clothes without heat for a few minutes after the program ends to rotate for off the buzzer when the program ends. the Quick for program P4 is useful in the table below lists the preset programs and the settings for each . After the program ends, the drum will...

User manual Use & Care Guide EN
Page 21
... back to the child-safe mode. Clean the lint filter. If draining into a drain pipe, make sure the black rubber hose is empty. This can program the T761 and T781 not to start " displays with "0" flashing in succession then press P1 five times. (This must be higher than 40 inches from accidentally changing the program settings. Call a service technician. Turn the machine...
... back to the child-safe mode. Clean the lint filter. If draining into a drain pipe, make sure the black rubber hose is empty. This can program the T761 and T781 not to start " displays with "0" flashing in succession then press P1 five times. (This must be higher than 40 inches from accidentally changing the program settings. Call a service technician. Turn the machine...

User manual Use & Care Guide EN
Page 22
... insignificant. If this time, you should also clean the exhaust outlet on the control panel. Also, never use abrasive cleaners or scouring pads on the door. 5. Some paper towels may occasionally need to wash the lint filter with warm water and a soft brush to stop automatically. The machine may also overheat after each load. CLEANING THE EXHAUST HOSE- CARE AND MAINTENANCE INSTRUCTIONS CLEANING THE LINT FILTER The wear on the control panels. To prevent...
... insignificant. If this time, you should also clean the exhaust outlet on the control panel. Also, never use abrasive cleaners or scouring pads on the door. 5. Some paper towels may occasionally need to wash the lint filter with warm water and a soft brush to stop automatically. The machine may also overheat after each load. CLEANING THE EXHAUST HOSE- CARE AND MAINTENANCE INSTRUCTIONS CLEANING THE LINT FILTER The wear on the control panels. To prevent...

User manual Use & Care Guide EN
Page 24
... temperature, especially for possible causes and instructions on . ♦ Check that you set the program or time correctly. ♦ Check that the lint filter is broken. Call a servicer. If it should remove the clothes as soon as the dryer signals the end of the model name, type number and serial number. BEFORE YOU CALL Before calling for a service call . TROUBLESHOOTING If you experience a problem with your warranty. The machine makes a funny noise...
... temperature, especially for possible causes and instructions on . ♦ Check that you set the program or time correctly. ♦ Check that the lint filter is broken. Call a servicer. If it should remove the clothes as soon as the dryer signals the end of the model name, type number and serial number. BEFORE YOU CALL Before calling for a service call . TROUBLESHOOTING If you experience a problem with your warranty. The machine makes a funny noise...

User manual Use & Care Guide EN
Page 25
... an authorized ASKO service agent. Service calls to improper installation. 6. Replace house fuses or correct house wiring. 5. Repair and/or replacement parts for failure of purchase. E. Replacement parts or repair labor costs for any defective solid-state controls, timers, motors, or pumps. F. ENGLISH ASKO PRODUCT WARRANTY MODELS T711, T721, T731, T761, T781 Be sure to complete the Warranty Registration Card you received with local electrical or plumbing codes. FOR RESIDENTIAL INSTALLATIONS ONLY LENGTH OF WARRANTY Three...
... an authorized ASKO service agent. Service calls to improper installation. 6. Replace house fuses or correct house wiring. 5. Repair and/or replacement parts for failure of purchase. E. Replacement parts or repair labor costs for any defective solid-state controls, timers, motors, or pumps. F. ENGLISH ASKO PRODUCT WARRANTY MODELS T711, T721, T731, T761, T781 Be sure to complete the Warranty Registration Card you received with local electrical or plumbing codes. FOR RESIDENTIAL INSTALLATIONS ONLY LENGTH OF WARRANTY Three...

User manual Use & Care Guide EN
Page 26
... (T731) Lint filter Load sizes, recommended M Magnetic door lock Menus, programming (T761/T781) O Operating instructions T711 T721 T731 T761/T781 Overheat protection P Power cord connection Preset programs (T761/T781) customizing restoring Problem-solving Program menu (T761/T781) Programs and program options T711 T721 T731 T761/T781 R Remaining time indication Restoring a preset program (T761/T781) S Safety features and instructions Sensidry Service Solutions to problems Sorting the laundry Specifications T Temperature control T711 T721 T731...
... (T731) Lint filter Load sizes, recommended M Magnetic door lock Menus, programming (T761/T781) O Operating instructions T711 T721 T731 T761/T781 Overheat protection P Power cord connection Preset programs (T761/T781) customizing restoring Problem-solving Program menu (T761/T781) Programs and program options T711 T721 T731 T761/T781 R Remaining time indication Restoring a preset program (T761/T781) S Safety features and instructions Sensidry Service Solutions to problems Sorting the laundry Specifications T Temperature control T711 T721 T731...


