
User Guide
Page 7
... the Wireless Controller 262 Attaching the Lens Hood 266 Using the Power Kits (Sold Separately 267 Using an Externally Mounted Flash (Sold Separately) . . 270 Replacing the Date Battery 278 Camera Care and Maintenance 280 Specifications 281 Index 291 Addendum 295 Changing the Image Type 295 Functions Available in Each Shooting Mode 300
... the Wireless Controller 262 Attaching the Lens Hood 266 Using the Power Kits (Sold Separately 267 Using an Externally Mounted Flash (Sold Separately) . . 270 Replacing the Date Battery 278 Camera Care and Maintenance 280 Specifications 281 Index 291 Addendum 295 Changing the Image Type 295 Functions Available in Each Shooting Mode 300
User Guide
Page 52
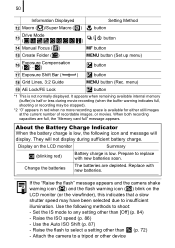
.... Use the Auto ISO Shift (p. 87) - Attach the camera to shoot: - When both recording capacities are depleted. They will display. Replace with new batteries soon. If the "Raise the flash" message appears and the camera shake warning icon ( ) and the flash warning icon ( .... Raise the ISO speed (p. 86) - menu) s AE Lock/FE Lock button *1 This is half or less during sufficient battery charge. Raise the flash to replace with new batteries. 50 Information Displayed Setting Method l Macro ( )/Super Macro ( ) button m Drive ( Mode ) / button n Manual Focus ( ) MF ...
.... Use the Auto ISO Shift (p. 87) - Attach the camera to shoot: - When both recording capacities are depleted. They will display. Replace with new batteries soon. If the "Raise the flash" message appears and the camera shake warning icon ( ) and the flash warning icon ( .... Raise the ISO speed (p. 86) - menu) s AE Lock/FE Lock button *1 This is half or less during sufficient battery charge. Raise the flash to replace with new batteries. 50 Information Displayed Setting Method l Macro ( )/Super Macro ( ) button m Drive ( Mode ) / button n Manual Focus ( ) MF ...

User Guide
Page 183
Portions of the new image move horizontally, then the image expands to display the full image. 181 Transition Effects You can select the transition effect used when one image is replaced by holding the FUNC./SET button while you can start a slide show from the bottom. The new image gradually brightens as it moves upward from the current image displayed by another. The new image first appears in a cross shape and gradually expands to display the full image. No transition effect. Playback/Erasing In single image playback mode, you press the button.
Portions of the new image move horizontally, then the image expands to display the full image. 181 Transition Effects You can select the transition effect used when one image is replaced by holding the FUNC./SET button while you can start a slide show from the bottom. The new image gradually brightens as it moves upward from the current image displayed by another. The new image first appears in a cross shape and gradually expands to display the full image. No transition effect. Playback/Erasing In single image playback mode, you press the button.

User Guide
Page 239
... Compact Power Adapter CAPS700 (sold separately) (pp. 34, 269). batteries or Canon AA-size NiMH batteries (p. 10). z Replace the camera batteries with a direct print compatible printer (p. 247) Camera Troubleshooting Camera will not operate ("Change the batteries" message displays). Battery charge is not turned...unused or fully charged batteries (p. 10). Poor contact between camera and battery terminals. z Poor contact between camera and battery terminals. z Reload the batteries several times. Power is low and the camera will not operate. direction (p. 10). Batteries are not ...
... Compact Power Adapter CAPS700 (sold separately) (pp. 34, 269). batteries or Canon AA-size NiMH batteries (p. 10). z Replace the camera batteries with a direct print compatible printer (p. 247) Camera Troubleshooting Camera will not operate ("Change the batteries" message displays). Battery charge is not turned...unused or fully charged batteries (p. 10). Poor contact between camera and battery terminals. z Poor contact between camera and battery terminals. z Reload the batteries several times. Power is low and the camera will not operate. direction (p. 10). Batteries are not ...

User Guide
Page 240
...they were lost (p. 14). z The date and time settings need to [Display Off]. The camera's orientation was removed. The Date/Time menu appears. This is operating. "Write protect". z The camera orientation detection mechanism is not a malfunction. When the power is set to be that of ...SD memory card's or z When recording to, erasing from the camera interior. z Press any button other than the power button or change the camera orientation to write protect tab upward (p. 259). The lithium date battery z Replace the lithium date battery charge is set to turn the LCD ...
...they were lost (p. 14). z The date and time settings need to [Display Off]. The camera's orientation was removed. The Date/Time menu appears. This is operating. "Write protect". z The camera orientation detection mechanism is not a malfunction. When the power is set to be that of ...SD memory card's or z When recording to, erasing from the camera interior. z Press any button other than the power button or change the camera orientation to write protect tab upward (p. 259). The lithium date battery z Replace the lithium date battery charge is set to turn the LCD ...

User Guide
Page 248
z Replace four batteries with a dry cloth before using only a stereo video cable. Incorrect video system setting. Shooting in a different shooting mode (p. 108). Shooting while connected z Images ... on a TV in your TV (p. 60). z If shooting in a cold location, warm the batteries such as by placing them in Stitch Assist mode. If using Canon AA-size NiMH batteries As the batteries have not z Their charging performance should been used for your pocket before use. when connected via HDMI cable...
z Replace four batteries with a dry cloth before using only a stereo video cable. Incorrect video system setting. Shooting in a different shooting mode (p. 108). Shooting while connected z Images ... on a TV in your TV (p. 60). z If shooting in a cold location, warm the batteries such as by placing them in Stitch Assist mode. If using Canon AA-size NiMH batteries As the batteries have not z Their charging performance should been used for your pocket before use. when connected via HDMI cable...

User Guide
Page 251
...-size alkaline batteries or fully charged Canon AA-size NiMH batteries. Change the batteries. Also refer to magnify an image recorded in a different camera or data type, an image edited with a computer, etc.). You attempted to Battery (p. 258). Cannot magnify! 249 Naming error! List of RAW image. Replace the batteries immediately with a large...
...-size alkaline batteries or fully charged Canon AA-size NiMH batteries. Change the batteries. Also refer to magnify an image recorded in a different camera or data type, an image edited with a computer, etc.). You attempted to Battery (p. 258). Cannot magnify! 249 Naming error! List of RAW image. Replace the batteries immediately with a large...

User Guide
Page 264
... in the direction of the arrow while placing another fingertip on (a) and press it in the battery holder with the positive terminal (+) facing up. Then replace the battery holder into the Wireless Controller WL-DC300 before use. Be particularly careful to keep the batteries out of the reach of children.
... in the direction of the arrow while placing another fingertip on (a) and press it in the battery holder with the positive terminal (+) facing up. Then replace the battery holder into the Wireless Controller WL-DC300 before use. Be particularly careful to keep the batteries out of the reach of children.

User Guide
Page 270
... capacity. If you are purchasing new batteries, look for more than 1 year, fully charge them once a year and deplete them in the camera before storing them at room temperature (0 to 30 °C/32 to 90 °F) in low humidity. z Leaving batteries in the... the batteries" message. When not in use batteries for Canon AA-size NiMH batteries. If this happens, after long periods of time (about 1 year), it is depleted. Repeatedly recharging batteries before charging) - Storing them with oil from battery leakage. Replace them in a fully charged condition can shorten their lifespan or...
... capacity. If you are purchasing new batteries, look for more than 1 year, fully charge them once a year and deplete them in the camera before storing them at room temperature (0 to 30 °C/32 to 90 °F) in low humidity. z Leaving batteries in the... the batteries" message. When not in use batteries for Canon AA-size NiMH batteries. If this happens, after long periods of time (about 1 year), it is depleted. Repeatedly recharging batteries before charging) - Storing them with oil from battery leakage. Replace them in a fully charged condition can shorten their lifespan or...

User Guide
Page 280
...holder edge. Seek medical assistance immediately if a child swallows a battery since corrosive battery fluids could damage the stomach or intestinal wall. 1 Confirm that the camera is turned off. 2 Slide the battery cover lock and open the cover. 3 Remove the AA-size batteries, then pull out the battery holder by ...as follows. The date battery is low and the date and time setting have been lost. 278 Replacing the Date Battery If the Date/Time in the Set up menu appears when the camera power is turned on, the date battery charge is preinstalled at the factory and may therefore expire...
...holder edge. Seek medical assistance immediately if a child swallows a battery since corrosive battery fluids could damage the stomach or intestinal wall. 1 Confirm that the camera is turned off. 2 Slide the battery cover lock and open the cover. 3 Remove the AA-size batteries, then pull out the battery holder by ...as follows. The date battery is low and the date and time setting have been lost. 278 Replacing the Date Battery If the Date/Time in the Set up menu appears when the camera power is turned on, the date battery charge is preinstalled at the factory and may therefore expire...

User Guide
Page 281
After purchasing the camera and turning on the power for the first time, although the Date/Time menu will appear, you do not need to replace the date battery. 279 4 Remove the battery by pulling it up in the direction indicated by the (+) side arrow. 5 Insert a new battery with the (+) side facing up. 6 Replace the battery holder and close the battery cover. 7 When the Date/Time menu appears, set the date and time (p. 14). Appendix
After purchasing the camera and turning on the power for the first time, although the Date/Time menu will appear, you do not need to replace the date battery. 279 4 Remove the battery by pulling it up in the direction indicated by the (+) side arrow. 5 Insert a new battery with the (+) side facing up. 6 Replace the battery holder and close the battery cover. 7 When the Date/Time menu appears, set the date and time (p. 14). Appendix

MAC User Guide
Page 44
...: Type Duration in Seconds 11.025 kHz 8.000 kHz Start-Up Sound 1.0 sec. My Camera Settings registered in the camera. After selecting a My Camera Settings file from the left-hand list, select a My Camera Settings file to replace in the right-hand list and click this button, then click [Set to... Camera] to register it in the camera. HINT Creating My Camera Settings Use the following specifications to values approximating those in image editing ...
...: Type Duration in Seconds 11.025 kHz 8.000 kHz Start-Up Sound 1.0 sec. My Camera Settings registered in the camera. After selecting a My Camera Settings file from the left-hand list, select a My Camera Settings file to replace in the right-hand list and click this button, then click [Set to... Camera] to register it in the camera. HINT Creating My Camera Settings Use the following specifications to values approximating those in image editing ...

Software User Guide
Page 43
... sec. or less 1.3 sec. or less 8 bits (11.025 kHz or 8.000 kHz. My Camera Settings registered in the computer. After selecting a My Camera Settings file from the left-hand list, select a My Camera Settings file to replace in the right-hand list and click this button to register it is too loud... when replayed on the computer, please use the volume controls for the computer or speakers. If you think the volume is registered to the camera. Use the following ...
... sec. or less 1.3 sec. or less 8 bits (11.025 kHz or 8.000 kHz. My Camera Settings registered in the computer. After selecting a My Camera Settings file from the left-hand list, select a My Camera Settings file to replace in the right-hand list and click this button to register it is too loud... when replayed on the computer, please use the volume controls for the computer or speakers. If you think the volume is registered to the camera. Use the following ...