User Guide
Page 5
...the Flash 72 Shooting Close-ups (Macro/Super Macro 73 Using the Self-Timer 75 Changing the Aspect Ratio 80 Changing the Recording Pixels (Still Images 81 Changing the Compression (Still Images 83 Setting the Image Stabilizer Function 84 Adjusting the ISO Speed 86 Reducing Camera Shake...the Shutter Speed and Aperture . . 106 Shooting Panoramic Images (Stitch Assist 108 Various Shooting Methods 110 Continuous Shooting 110 Setting the Flash 112 Checking the Focus and People's Expressions 115 Switching between Focus Settings 119 Selecting an AF Frame Mode 120 Selecting a Subject to ...
...the Flash 72 Shooting Close-ups (Macro/Super Macro 73 Using the Self-Timer 75 Changing the Aspect Ratio 80 Changing the Recording Pixels (Still Images 81 Changing the Compression (Still Images 83 Setting the Image Stabilizer Function 84 Adjusting the ISO Speed 86 Reducing Camera Shake...the Shutter Speed and Aperture . . 106 Shooting Panoramic Images (Stitch Assist 108 Various Shooting Methods 110 Continuous Shooting 110 Setting the Flash 112 Checking the Focus and People's Expressions 115 Switching between Focus Settings 119 Selecting an AF Frame Mode 120 Selecting a Subject to ...

User Guide
Page 7
... Using the Wireless Controller 262 Attaching the Lens Hood 266 Using the Power Kits (Sold Separately 267 Using an Externally Mounted Flash (Sold Separately) . . 270 Replacing the Date Battery 278 Camera Care and Maintenance 280 Specifications 281 Index 291 Addendum 295 Changing the Image Type 295 Functions Available in Each Shooting Mode...
... Using the Wireless Controller 262 Attaching the Lens Hood 266 Using the Power Kits (Sold Separately 267 Using an Externally Mounted Flash (Sold Separately) . . 270 Replacing the Date Battery 278 Camera Care and Maintenance 280 Specifications 281 Index 291 Addendum 295 Changing the Image Type 295 Functions Available in Each Shooting Mode...

User Guide
Page 8
... used in all modes. : This mark denotes issues that may affect the camera's operation. : This mark denotes additional topics that effect, the function may differ from the actual camera. Explanations in this guide are collectively referred to that complement the basic operating ...procedures. 6 About this Guide About this Guide Symbol Conventions in this Guide 72 Using the Flash Mode: Available Shooting Modes p. 300 Shooting ( )/ 1 Raise the flash ll Playback (...
... used in all modes. : This mark denotes issues that may affect the camera's operation. : This mark denotes additional topics that effect, the function may differ from the actual camera. Explanations in this guide are collectively referred to that complement the basic operating ...procedures. 6 About this Guide About this Guide Symbol Conventions in this Guide 72 Using the Flash Mode: Available Shooting Modes p. 300 Shooting ( )/ 1 Raise the flash ll Playback (...

User Guide
Page 19
...the mode dial to focus. • When the camera focuses, it beeps twice. • If blinks red, we recommend shooting with a flash (p. 72) (the message "Raise the flash" also appears in the LCD monitor. Recordable Shots 4. Avoiding Camera Shake Keep your arms tight against your body while ...holding the camera firmly by the sides. Indicator • The start-up...
...the mode dial to focus. • When the camera focuses, it beeps twice. • If blinks red, we recommend shooting with a flash (p. 72) (the message "Raise the flash" also appears in the LCD monitor. Recordable Shots 4. Avoiding Camera Shake Keep your arms tight against your body while ...holding the camera firmly by the sides. Indicator • The start-up...

User Guide
Page 38
...taking or playing back large numbers of four rechargeable AA-size NiMH batteries separately. Recommended to power a camera for Canon EOS models. Some accessories are not sold separately. Flash • EX-Series Speedlites Speedlites for an extended period of time or when connecting to charge the... camera batteries.) • Battery and Charger Kit CBK4-300 This dedicated battery charger kit includes both a charger unit ...
...taking or playing back large numbers of four rechargeable AA-size NiMH batteries separately. Recommended to power a camera for Canon EOS models. Some accessories are not sold separately. Flash • EX-Series Speedlites Speedlites for an extended period of time or when connecting to charge the... camera batteries.) • Battery and Charger Kit CBK4-300 This dedicated battery charger kit includes both a charger unit ...

User Guide
Page 42
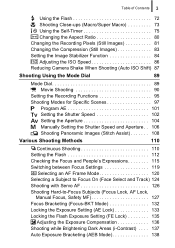
.... 67, 158) Shooting: (Wide Angle)/ (Telephoto) Playback: (Index)/ (Magnify) b Shutter Button (p. 17) c Strap Mount (p. 13) d Power Button/Power Lamp (pp. 17, 24) e Remote Sensor (p. 263) f Flash (p. 72) g Microphone (pp. 24, 196, 197) h Speaker i Lamp (AF Assist Beam: p. 55, Red-Eye Reduction Lamp: p. 113, Self-Timer Lamp: p. 75) j Lens Hood Mount* k Lens...
.... 67, 158) Shooting: (Wide Angle)/ (Telephoto) Playback: (Index)/ (Magnify) b Shutter Button (p. 17) c Strap Mount (p. 13) d Power Button/Power Lamp (pp. 17, 24) e Remote Sensor (p. 263) f Flash (p. 72) g Microphone (pp. 24, 196, 197) h Speaker i Lamp (AF Assist Beam: p. 55, Red-Eye Reduction Lamp: p. 113, Self-Timer Lamp: p. 75) j Lens Hood Mount* k Lens...
User Guide
Page 44
42 „ Controls a (Print/Share) Button (pp. 21, 31, 154) b (Flash)/ (Microphone) Button (pp. 72, 196, 197) c (Aspect Ratio) Button (p. 80) d Diopter Adjustment Dial (p. 63) e Hot Shoe (p. 270) f Movie Button (pp. 24, 90) g Mode Dial (pp. ...
42 „ Controls a (Print/Share) Button (pp. 21, 31, 154) b (Flash)/ (Microphone) Button (pp. 72, 196, 197) c (Aspect Ratio) Button (p. 80) d Diopter Adjustment Dial (p. 63) e Hot Shoe (p. 270) f Movie Button (pp. 24, 90) g Mode Dial (pp. ...

User Guide
Page 51
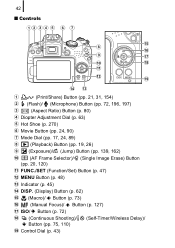
... dial h i-Contrast ( ) MENU button (Rec. menu), Zoom Lever d Camera Shake ( ) MENU button (Rec. menu) k ISO ( Speed ) button ( in 16:9 mode)/Digital Zoom Factor/Safety Zoom ( ) MENU button (Rec. or Recording FUNC./SET button (FUNC. menu) i Flash ( ) button, raise/lower the flash j Red-Eye Corr. ( ) MENU button ([Flash Control] menu in the Rec. 49 Basic Operations...
... dial h i-Contrast ( ) MENU button (Rec. menu), Zoom Lever d Camera Shake ( ) MENU button (Rec. menu) k ISO ( Speed ) button ( in 16:9 mode)/Digital Zoom Factor/Safety Zoom ( ) MENU button (Rec. or Recording FUNC./SET button (FUNC. menu) i Flash ( ) button, raise/lower the flash j Red-Eye Corr. ( ) MENU button ([Flash Control] menu in the Rec. 49 Basic Operations...
User Guide
Page 52
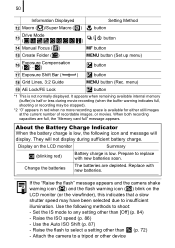
... for either still images at the current number of recordable images, or movies. Use the Auto ISO Shift (p. 87) - Raise the flash to shoot: - Use the following icon and message will not display during movie recording (when the buffer warning indicates full, shooting or...card full" message appears. Raise the ISO speed (p. 86) - Replace with new batteries soon. If the "Raise the flash" message appears and the camera shake warning icon ( ) and the flash warning icon ( ) blink on the LCD monitor Summary (blinking red) Battery charge is low, the following methods to ...
... for either still images at the current number of recordable images, or movies. Use the Auto ISO Shift (p. 87) - Raise the flash to shoot: - Use the following icon and message will not display during movie recording (when the buffer warning indicates full, shooting or...card full" message appears. Raise the ISO speed (p. 86) - Replace with new batteries soon. If the "Raise the flash" message appears and the camera shake warning icon ( ) and the flash warning icon ( ) blink on the LCD monitor Summary (blinking red) Battery charge is low, the following methods to ...
User Guide
Page 55
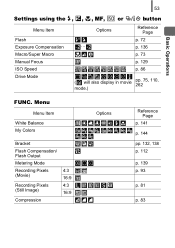
Reference Page p. 72 p. 136 p. 73 p. 129 p. 86 ( will also display in movie pp. 75, 110, 262 mode.) FUNC. Menu Menu Item White Balance My Colors Bracket Flash Compensation/ Flash Output Metering Mode Recording Pixels 4:3 (Movie) 16:9 Recording Pixels 4:3 (Still Image) 16:9 Compression Options Reference Page p. 141 p. 144 pp. 132, 138 p. 112 p. 139 p. 93 p. 81 p. 83 Basic Operations 53 Settings using the Menu Item Flash Exposure Compensation Macro/Super Macro Manual Focus ISO Speed Drive Mode , , , MF, or / button Options ...
Reference Page p. 72 p. 136 p. 73 p. 129 p. 86 ( will also display in movie pp. 75, 110, 262 mode.) FUNC. Menu Menu Item White Balance My Colors Bracket Flash Compensation/ Flash Output Metering Mode Recording Pixels 4:3 (Movie) 16:9 Recording Pixels 4:3 (Still Image) 16:9 Compression Options Reference Page p. 141 p. 144 pp. 132, 138 p. 112 p. 139 p. 93 p. 81 p. 83 Basic Operations 53 Settings using the Menu Item Flash Exposure Compensation Macro/Super Macro Manual Focus ISO Speed Drive Mode , , , MF, or / button Options ...

User Guide
Page 56
... Spot AE Point Center*/AF Point p. 140 Safety Shift On/Off* p. 103 Auto ISO Shift On/Off* p. 87 Comp -2 to 0* to +2 Flash Output Minimum*/Medium/Maximum Shutter Sync. 1st-curtain*/2nd-curtain p. 112 Slow Synchro On/Off* Red-Eye Corr. 54 Rec. Menu * Default setting Menu ...-Point Zoom On/Off* p. 115 Servo AF On/Off* p. 126 AF Mode Continuous*/Single p. 119 Digital Zoom 4:3 Standard*/Off/2.3x p. 68 16:9 Standard*/Off/2.0x Flash Control Flash Mode Auto*/Manual Flash Exp. On/Off* Red-Eye Lamp On*/Off Safety FE On*/Off i-Contrast Off*/Auto p. 137 Drive...
... Spot AE Point Center*/AF Point p. 140 Safety Shift On/Off* p. 103 Auto ISO Shift On/Off* p. 87 Comp -2 to 0* to +2 Flash Output Minimum*/Medium/Maximum Shutter Sync. 1st-curtain*/2nd-curtain p. 112 Slow Synchro On/Off* Red-Eye Corr. 54 Rec. Menu * Default setting Menu ...-Point Zoom On/Off* p. 115 Servo AF On/Off* p. 126 AF Mode Continuous*/Single p. 119 Digital Zoom 4:3 Standard*/Off/2.3x p. 68 16:9 Standard*/Off/2.0x Flash Control Flash Mode Auto*/Manual Flash Exp. On/Off* Red-Eye Lamp On*/Off Safety FE On*/Off i-Contrast Off*/Auto p. 137 Drive...
User Guide
Page 74
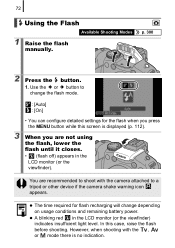
... button to a tripod or other device if the camera shake warning icon appears. However, when shooting with the camera attached to change depending on usage conditions and remaining battery power. In this screen is no indication. z The time required for flash recharging will change the flash mode. : [Auto] : [On] • You can configure detailed...
... button to a tripod or other device if the camera shake warning icon appears. However, when shooting with the camera attached to change depending on usage conditions and remaining battery power. In this screen is no indication. z The time required for flash recharging will change the flash mode. : [Auto] : [On] • You can configure detailed...

User Guide
Page 76
... subject as possible Zoom level Focusing distance When shooting as close to the subject as possible Image area Distance between end of the built-in flash when using the flash in Macro mode may cause image edges to avoid damaging the lens when shooting in Super Macro mode.
... subject as possible Zoom level Focusing distance When shooting as close to the subject as possible Image area Distance between end of the built-in flash when using the flash in Macro mode may cause image edges to avoid damaging the lens when shooting in Super Macro mode.

User Guide
Page 78
... fully, the self-timer lamp will blink.* * When [Red-Eye Lamp] is displayed will display the [Drive Settings] screen in [Flash Control] (p. 112), the lamp will light 2 seconds before the flash fires. Use the or button to select [Self-Timer]. 2. Press the MENU button. 2. Use the or button to set to select...
... fully, the self-timer lamp will blink.* * When [Red-Eye Lamp] is displayed will display the [Drive Settings] screen in [Flash Control] (p. 112), the lamp will light 2 seconds before the flash fires. Use the or button to select [Self-Timer]. 2. Press the MENU button. 2. Use the or button to set to select...

User Guide
Page 79
Commonly Used Shooting Functions 77 Changing the Delay Time and Number of the camera fills. - Press the MENU button. If the [Shots] option is used, the interval between shots may lengthen when the built-in memory of Shots ( ) 1 Select [...Drive Settings]. 1. The exposure and white balance are locked at the settings selected for the first shot. - If the flash is set to select . 2. Use the or to select [Self-Timer], and the or button to 2 or more shots, the following occurs. - Press the button...
Commonly Used Shooting Functions 77 Changing the Delay Time and Number of the camera fills. - Press the MENU button. If the [Shots] option is used, the interval between shots may lengthen when the built-in memory of Shots ( ) 1 Select [...Drive Settings]. 1. The exposure and white balance are locked at the settings selected for the first shot. - If the flash is set to select . 2. Use the or to select [Self-Timer], and the or button to 2 or more shots, the following occurs. - Press the button...

User Guide
Page 86
... 84 Setting the Image Stabilizer Function Available Shooting Modes p. 300 The lens-shift type image stabilizer function allows you to minimize the camera shake effect (blurred images) when you shoot distant subjects that may occur depending on the subjects. Options Display on subjects. In Shoot ...Continuous You can be taken without concern for shooting objects moving horizontally. * The same icons are displayed in dark conditions without a flash. Panning This option only stabilizes the effect of the IS mode on image blur on the LCD monitor (or the viewfinder). In ...
... 84 Setting the Image Stabilizer Function Available Shooting Modes p. 300 The lens-shift type image stabilizer function allows you to minimize the camera shake effect (blurred images) when you shoot distant subjects that may occur depending on the subjects. Options Display on subjects. In Shoot ...Continuous You can be taken without concern for shooting objects moving horizontally. * The same icons are displayed in dark conditions without a flash. Panning This option only stabilizes the effect of the IS mode on image blur on the LCD monitor (or the viewfinder). In ...

User Guide
Page 88
... Shooting Modes p. 300 Raise the ISO speed to use the or button to change the setting. • When you wish to reduce the effects of camera shake or avoid blurry subjects, or to (p. 100). As the ISO speed will be displayed when pressing the shutter button halfway or in a dark area.... • Select to put priority on image quality. • When you shoot at or , the ISO speed automatically set the ISO speed to turn the flash off when shooting in playback information. Press the ISO button, and use a fast shutter speed when you select (Auto) or (High ISO Auto), the...
... Shooting Modes p. 300 Raise the ISO speed to use the or button to change the setting. • When you wish to reduce the effects of camera shake or avoid blurry subjects, or to (p. 100). As the ISO speed will be displayed when pressing the shutter button halfway or in a dark area.... • Select to put priority on image quality. • When you shoot at or , the ISO speed automatically set the ISO speed to turn the flash off when shooting in playback information. Press the ISO button, and use a fast shutter speed when you select (Auto) or (High ISO Auto), the...

User Guide
Page 89
Press the MENU button. Commonly Used Shooting Functions 87 Reducing Camera Shake When Shooting (Auto ISO Shift) Available Shooting Modes p. 300 When the camera shake warning icon ( ) appears during shooting, this function allows you to increase ISO speed and to select [Auto ISO Shift]. 2 Make... shoot at a shutter speed which minimizes the effects of camera shake by pressing the button. z Depending on shooting conditions, the camera shake warning icon ( ) may continue to select [On]. 2. z In , or mode, it will not function when the flash fires. Press the MENU button. 2. Use the or...
Press the MENU button. Commonly Used Shooting Functions 87 Reducing Camera Shake When Shooting (Auto ISO Shift) Available Shooting Modes p. 300 When the camera shake warning icon ( ) appears during shooting, this function allows you to increase ISO speed and to select [Auto ISO Shift]. 2 Make... shoot at a shutter speed which minimizes the effects of camera shake by pressing the button. z Depending on shooting conditions, the camera shake warning icon ( ) may continue to select [On]. 2. z In , or mode, it will not function when the flash fires. Press the MENU button. 2. Use the or...

User Guide
Page 96
z The flash will be fixed to [Auto]. Because the shutter sound of the still image being taken is also recorded, the sound of still images is in .... z Continuous shooting of that moment in (Large, Fine). 1 While shooting a movie, press the shutter button halfway to focus. • Press the shutter halfway so the camera can shoot a high quality still image* while shooting a movie. * The recording pixels and compression will disappear momentarily and then return to shoot the image. •...
z The flash will be fixed to [Auto]. Because the shutter sound of the still image being taken is also recorded, the sound of still images is in .... z Continuous shooting of that moment in (Large, Fine). 1 While shooting a movie, press the shutter button halfway to focus. • Press the shutter halfway so the camera can shoot a high quality still image* while shooting a movie. * The recording pixels and compression will disappear momentarily and then return to shoot the image. •...

User Guide
Page 100
... backgrounds by reducing the effects of an evening sky or night scene. Be sure to shoot sunsets in vivid colors. Indoor Prevents camera shake and maintains the subject's true color when shooting under fluorescent or tungsten lighting. 98 Night Snapshot Allows you to take snapshots ...of people against the backdrop of camera shake when firmly holding the camera, even without using a tripod. Sunset Allows you to raise the flash before shooting. such as new growth, autumn leaves or blossoms - in vivid colors. Sports...
... backgrounds by reducing the effects of an evening sky or night scene. Be sure to shoot sunsets in vivid colors. Indoor Prevents camera shake and maintains the subject's true color when shooting under fluorescent or tungsten lighting. 98 Night Snapshot Allows you to take snapshots ...of people against the backdrop of camera shake when firmly holding the camera, even without using a tripod. Sunset Allows you to raise the flash before shooting. such as new growth, autumn leaves or blossoms - in vivid colors. Sports...