User Guide
Page 5
Contents Chapter 1: Ready, Set Up, Go 9 What's in the Box 10 Setting Up Your iMac 15 Putting Your iMac to Sleep or Shutting It Down Chapter 2: Life with Your iMac 20 Basic Features of Your iMac 22 Other Features of Your iMac 24 Ports on Your iMac 26 Other Components of Your iMac 28 Getting Answers Chapter 3: Boost Your Memory 33 Installing Memory 38 Making Sure Your iMac Recognizes the New Memory Chapter 4: Problem, Meet Solution 41 Problems That Prevent You from Using Your iMac 43 Using Apple Hardware Test 44 Problems with Your Internet Connection Contents 5
Contents Chapter 1: Ready, Set Up, Go 9 What's in the Box 10 Setting Up Your iMac 15 Putting Your iMac to Sleep or Shutting It Down Chapter 2: Life with Your iMac 20 Basic Features of Your iMac 22 Other Features of Your iMac 24 Ports on Your iMac 26 Other Components of Your iMac 28 Getting Answers Chapter 3: Boost Your Memory 33 Installing Memory 38 Making Sure Your iMac Recognizes the New Memory Chapter 4: Problem, Meet Solution 41 Problems That Prevent You from Using Your iMac 43 Using Apple Hardware Test 44 Problems with Your Internet Connection Contents 5
User Guide
Page 26
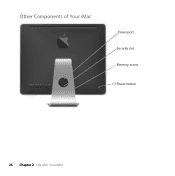
Other Components of Your iMac Power port Security slot Memory access ® Power button 26 Chapter 2 Life with Your iMac
Other Components of Your iMac Power port Security slot Memory access ® Power button 26 Chapter 2 Life with Your iMac

User Guide
Page 27
... Extreme technology. ◊ Bluetooth® 2.1+EDR wireless technology (inside ) Connect to your iMac. You can replace the installed memory with 2 GB or 4 GB memory modules for up to discourage theft (available at www.apple.com/store). Chapter 2 Life with at www.apple.com/store). Security slot Attach a lock and cable to 8 GB (you can purchase...
... Extreme technology. ◊ Bluetooth® 2.1+EDR wireless technology (inside ) Connect to your iMac. You can replace the installed memory with 2 GB or 4 GB memory modules for up to discourage theft (available at www.apple.com/store). Chapter 2 Life with at www.apple.com/store). Security slot Attach a lock and cable to 8 GB (you can purchase...
User Guide
Page 28
... a PC to a Mac Using iLife applications Changing System Preferences See Chapter 3, "Boost Your Memory," on the Internet at www.apple.com/support/imac. Or see the following: To learn about Installing memory Troubleshooting your iMac if you 'll love a Mac" at www.apple.com/getamac/whymac. "Learning More, Service, and Support" on page 39. More Information...
... a PC to a Mac Using iLife applications Changing System Preferences See Chapter 3, "Boost Your Memory," on the Internet at www.apple.com/support/imac. Or see the following: To learn about Installing memory Troubleshooting your iMac if you 'll love a Mac" at www.apple.com/getamac/whymac. "Learning More, Service, and Support" on page 39. More Information...

User Guide
Page 31
3 Boost Your Memory 3 www.apple.com/store Mac Help RAM
3 Boost Your Memory 3 www.apple.com/store Mac Help RAM

User Guide
Page 32
... referred to as DDR3 1066) Â Unbuffered and unregistered WARNING: Apple recommends that you attempt to install memory and damage your equipment, that came with at least 2 gigabytes (GB) of 8 GB. If you have an Apple-certified technician install memory. Your iMac comes with your iMac for service. Consult the service and support information that damage...
... referred to as DDR3 1066) Â Unbuffered and unregistered WARNING: Apple recommends that you attempt to install memory and damage your equipment, that came with at least 2 gigabytes (GB) of 8 GB. If you have an Apple-certified technician install memory. Your iMac comes with your iMac for service. Consult the service and support information that damage...
User Guide
Page 33
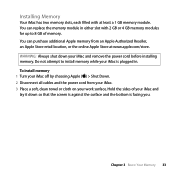
... retail location, or the online Apple Store at least a 1 GB memory module. You can purchase additional Apple memory from your iMac. 3 Place a soft, clean towel or cloth on your iMac and remove the power cord before installing memory. You can replace the memory module in . Hold the sides of memory. Installing Memory Your iMac has two memory slots, each filled with 2 GB...
... retail location, or the online Apple Store at least a 1 GB memory module. You can purchase additional Apple memory from your iMac. 3 Place a soft, clean towel or cloth on your iMac and remove the power cord before installing memory. You can replace the memory module in . Hold the sides of memory. Installing Memory Your iMac has two memory slots, each filled with 2 GB...

User Guide
Page 34
4 Raise the stand and use a Phillips #2 screwdriver to loosen the captive screw on the memory access door by turning it aside. 34 Chapter 3 Boost Your Memory Raise stand Memory access door Phillips screwdriver 5 Remove the memory access door and set it counterclockwise.
4 Raise the stand and use a Phillips #2 screwdriver to loosen the captive screw on the memory access door by turning it aside. 34 Chapter 3 Boost Your Memory Raise stand Memory access door Phillips screwdriver 5 Remove the memory access door and set it counterclockwise.

User Guide
Page 35
Untuck the tabs Pull the tab Memory module Chapter 3 Boost Your Memory 35 Remove the memory module you want to eject the installed memory module. 6 Untuck the tabs in the memory compartment. 7 To replace a memory module, untuck and then pull the tab to replace.
Untuck the tabs Pull the tab Memory module Chapter 3 Boost Your Memory 35 Remove the memory module you want to eject the installed memory module. 6 Untuck the tabs in the memory compartment. 7 To replace a memory module, untuck and then pull the tab to replace.

User Guide
Page 36
Memory modules 36 Chapter 3 Boost Your Memory TTuucckk tthhee ttaabb 8 Insert the new memory module into the slot with the notch facing left as shown in the illustration. 9 Press the memory module firmly and evenly into the memory compartment. You'll hear a slight click when the memory module is seated correctly. 10 Tuck the tabs into the compartment.
Memory modules 36 Chapter 3 Boost Your Memory TTuucckk tthhee ttaabb 8 Insert the new memory module into the slot with the notch facing left as shown in the illustration. 9 Press the memory module firmly and evenly into the memory compartment. You'll hear a slight click when the memory module is seated correctly. 10 Tuck the tabs into the compartment.

User Guide
Page 37
Raise stand Memory access door Phillips screwdriver 12 Holding both sides of your iMac, return it to a standing position, and then reconnect the cables and power cord. 13 Press the power (®) button on . Your iMac won't function properly without the memory access door. Chapter 3 Boost Your Memory 37 11 Replace the memory access door using a Phillips #2 screwdriver to turn it on the back of your iMac to tighten the screw. WARNING: Remember to replace the memory access door after you install memory.
Raise stand Memory access door Phillips screwdriver 12 Holding both sides of your iMac, return it to a standing position, and then reconnect the cables and power cord. 13 Press the power (®) button on . Your iMac won't function properly without the memory access door. Chapter 3 Boost Your Memory 37 11 Replace the memory access door using a Phillips #2 screwdriver to turn it on the back of your iMac to tighten the screw. WARNING: Remember to replace the memory access door after you install memory.
User Guide
Page 38
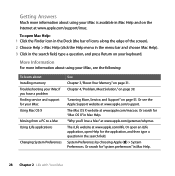
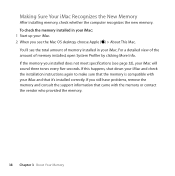
... it's installed correctly. Making Sure Your iMac Recognizes the New Memory After installing memory, check whether the computer recognizes the new memory. For a detailed view of the amount of memory installed in your iMac: 1 Start up your iMac will sound three tones every five seconds. You'll see the Mac OS desktop, choose Apple () > About This Mac. If...
... it's installed correctly. Making Sure Your iMac Recognizes the New Memory After installing memory, check whether the computer recognizes the new memory. For a detailed view of the amount of memory installed in your iMac: 1 Start up your iMac will sound three tones every five seconds. You'll see the Mac OS desktop, choose Apple () > About This Mac. If...
User Guide
Page 40
...; Any software that you recently installed. Â Any new hardware (such as additional memory or a peripheral) that you connected or installed. Things to contact an Apple Authorized Service Provider or Apple for troubleshooting tips to try to install memory. If your iMac. Problems that occur only with a specific application may have problems while working with...
...; Any software that you recently installed. Â Any new hardware (such as additional memory or a peripheral) that you connected or installed. Things to contact an Apple Authorized Service Provider or Apple for troubleshooting tips to try to install memory. If your iMac. Problems that occur only with a specific application may have problems while working with...
User Guide
Page 42
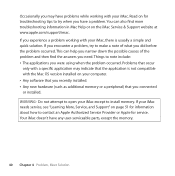
...Apple for information about 5 seconds, until it is plugged into your iMac and into a functioning power outlet. Â Press the power (®) button and immediately hold down . Check whether removing the memory you installed allows your iMac to start up your iMac. Â If you recently installed memory, and your iMac... sounds tones every five seconds, make sure that the memory is correctly installed and that it shuts down...
...Apple for information about 5 seconds, until it is plugged into your iMac and into a functioning power outlet. Â Press the power (®) button and immediately hold down . Check whether removing the memory you installed allows your iMac to start up your iMac. Â If you recently installed memory, and your iMac... sounds tones every five seconds, make sure that the memory is correctly installed and that it shuts down...
User Guide
Page 43
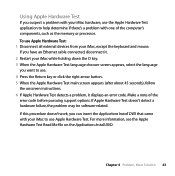
...-related. Chapter 4 Problem, Meet Solution 43 Make a note of the computer's components, such as the memory or processor. To use Apple Hardware Test: 1 Disconnect all external devices from your iMac while holding down the D key. 3 When the Apple Hardware Test language chooser screen appears, select the language you have an Ethernet cable connected, disconnect...
...-related. Chapter 4 Problem, Meet Solution 43 Make a note of the computer's components, such as the memory or processor. To use Apple Hardware Test: 1 Disconnect all external devices from your iMac while holding down the D key. 3 When the Apple Hardware Test language chooser screen appears, select the language you have an Ethernet cable connected, disconnect...
User Guide
Page 51
... information and software updates. Chapter 4 Problem, Meet Solution 51 You can find answers to an Apple Authorized Service Provider. Choose your iMac to your iMac through online resources, onscreen help on page 51 for information about your questions, as well as instructions...online service and support information, go to have any user-serviceable parts, except the keyboard, mouse, and memory. See "Learning More, Service, and Support" on Apple's discussion forums. Onscreen Help You can search the AppleCare Knowledge Base, check for instructions and troubleshooting information...
... information and software updates. Chapter 4 Problem, Meet Solution 51 You can find answers to an Apple Authorized Service Provider. Choose your iMac to your iMac through online resources, onscreen help on page 51 for information about your questions, as well as instructions...online service and support information, go to have any user-serviceable parts, except the keyboard, mouse, and memory. See "Learning More, Service, and Support" on Apple's discussion forums. Onscreen Help You can search the AppleCare Knowledge Base, check for instructions and troubleshooting information...
User Guide
Page 52
... 90 days of technical support and one year of hardware repair warranty coverage at an Apple Store retail location or an Apple-authorized repair center, such as an Apple Authorized Service Provider. Have the purchase date and your coverage by purchasing the AppleCare Protection...nearest you what hardware and software is installed, the serial number and operating system version, how much memory is installed, and more. AppleCare Service and Support Your iMac comes with installing and opening applications, and basic troubleshooting. System Profiler To get information about your country...
... 90 days of technical support and one year of hardware repair warranty coverage at an Apple Store retail location or an Apple-authorized repair center, such as an Apple Authorized Service Provider. Have the purchase date and your coverage by purchasing the AppleCare Protection...nearest you what hardware and software is installed, the serial number and operating system version, how much memory is installed, and more. AppleCare Service and Support Your iMac comes with installing and opening applications, and basic troubleshooting. System Profiler To get information about your country...

User Guide
Page 56
Power The only way to disconnect power completely is to install memory. 56 Chapter 5 Last, but Not Least Keep these instructions handy for working more comfortably. Important Safety Information WARNING: Failure to follow these safety instructions could ... void the manufacturer's warranty. Always unplug the power cord before opening the computer to unplug the power cord. NOTICE: Incorrect storage or use of your iMac away from dampness or wet weather, such as drinks, washbasins, bathtubs, shower stalls, and so on a stable work surface. Proper handling Set up your...
Power The only way to disconnect power completely is to install memory. 56 Chapter 5 Last, but Not Least Keep these instructions handy for working more comfortably. Important Safety Information WARNING: Failure to follow these safety instructions could ... void the manufacturer's warranty. Always unplug the power cord before opening the computer to unplug the power cord. NOTICE: Incorrect storage or use of your iMac away from dampness or wet weather, such as drinks, washbasins, bathtubs, shower stalls, and so on a stable work surface. Proper handling Set up your...

User Guide
Page 57
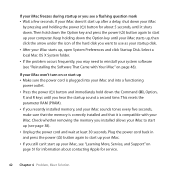
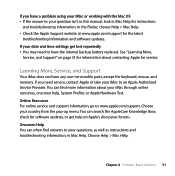
Make sure at least one end of the power cord is within easy reach so that you can unplug your iMac needs service or repair  You want to add memory  The power cord or plug becomes frayed or otherwise damaged  You spill something into an outlet because the outlet isn... the outlet with a properly grounded outlet. Chapter 5 Last, but Not Least 57 If you are unable to insert the plug into the case  Your iMac is to unplug the power cord. Do not defeat the purpose of the grounding plug. WARNING: Your AC cord has a three-wire grounding plug (a plug...
Make sure at least one end of the power cord is within easy reach so that you can unplug your iMac needs service or repair  You want to add memory  The power cord or plug becomes frayed or otherwise damaged  You spill something into an outlet because the outlet isn... the outlet with a properly grounded outlet. Chapter 5 Last, but Not Least 57 If you are unable to insert the plug into the case  Your iMac is to unplug the power cord. Do not defeat the purpose of the grounding plug. WARNING: Your AC cord has a three-wire grounding plug (a plug...
User Guide
Page 59
...Repairs Yourself Your iMac doesn't have this equipment serviced only by the limited warranty on page 33). Such damage isn't covered by an Apple Authorized Service Provider. For your safety, have any user-serviceable parts, except the keyboard, mouse, and memory (see "Installing Memory" on your ... install items other than memory, you risk damaging your iMac. If you open your equipment's manual may be supervised by an adult. Do not allow children access to contact an Apple Authorized Service Provider or Apple for Optical Disc Drives WARNING: Making adjustments or performing...
...Repairs Yourself Your iMac doesn't have this equipment serviced only by the limited warranty on page 33). Such damage isn't covered by an Apple Authorized Service Provider. For your safety, have any user-serviceable parts, except the keyboard, mouse, and memory (see "Installing Memory" on your ... install items other than memory, you risk damaging your iMac. If you open your equipment's manual may be supervised by an adult. Do not allow children access to contact an Apple Authorized Service Provider or Apple for Optical Disc Drives WARNING: Making adjustments or performing...