Setup Guide
Page 3
...Your Computer On? 22 What's Next? 22 Turning the Computer Off 23 Securing the Computer 24 2 Working Inside the Computer 25 About Memory 26 DRAM Configurations 27 About Internal Storage Options 27 About the Computer's Installed Drive and Additional Drives 29 About PCI Expansion ...Cards 30 Expansion Card Power Requirements 31 About the Computer's Battery 31 Installing Memory, an Internal Storage Device, or a PCI Expansion Card, or Replacing the Battery 32 Opening the Computer 32 3
...Your Computer On? 22 What's Next? 22 Turning the Computer Off 23 Securing the Computer 24 2 Working Inside the Computer 25 About Memory 26 DRAM Configurations 27 About Internal Storage Options 27 About the Computer's Installed Drive and Additional Drives 29 About PCI Expansion ...Cards 30 Expansion Card Power Requirements 31 About the Computer's Battery 31 Installing Memory, an Internal Storage Device, or a PCI Expansion Card, or Replacing the Battery 32 Opening the Computer 32 3

Setup Guide
Page 7
... stable, flat surface near a grounded wall outlet. If you plan to use your computer as a server or if you want to install additional drives, memory, or PCI cards inside the computer before you set up, turn on your computer, you can place it . (The monitor you purchased may be hazardous... on page 25. Position the computer so that m the CD-ROM, DVD-ROM, or DVD-RAM drive tray has space to open in front m the power cord connector does not press against a wall or other object m nothing obstructs air flow to the fan in the electronic documentation included with your...
... stable, flat surface near a grounded wall outlet. If you plan to use your computer as a server or if you want to install additional drives, memory, or PCI cards inside the computer before you set up, turn on your computer, you can place it . (The monitor you purchased may be hazardous... on page 25. Position the computer so that m the CD-ROM, DVD-ROM, or DVD-RAM drive tray has space to open in front m the power cord connector does not press against a wall or other object m nothing obstructs air flow to the fan in the electronic documentation included with your...
Setup Guide
Page 22
... anything on your screen or you think your computer did not start up . (For more information about installing additional drives, memory, or PCI cards, or changing the computer's battery, see the green power-on light on the front panel of the monitor.) m Is the brightness control on the computer, see the electronic...
... anything on your screen or you think your computer did not start up . (For more information about installing additional drives, memory, or PCI cards, or changing the computer's battery, see the green power-on light on the front panel of the monitor.) m Is the brightness control on the computer, see the electronic...
Setup Guide
Page 24
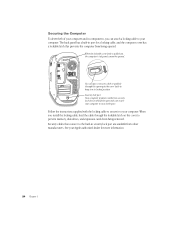
When you can attach a locking cable to the built-in the cover latch to keep it to prevent memory, disk drives, and expansion cards from being opened . Security lock port Your computer products retailer has security lock devices that fit this opening in ...from other manufacturers. When the lockable cover latch is pulled out, the computer's side panel cannot be opened . You can secure your computer to your Apple-authorized dealer for a locking cable, and the computer cover has a lockable latch that connect to your computer. Securing the Computer To deter theft of your...
When you can attach a locking cable to the built-in the cover latch to keep it to prevent memory, disk drives, and expansion cards from being opened . Security lock port Your computer products retailer has security lock devices that fit this opening in ...from other manufacturers. When the lockable cover latch is pulled out, the computer's side panel cannot be opened . You can secure your computer to your Apple-authorized dealer for a locking cable, and the computer cover has a lockable latch that connect to your computer. Securing the Computer To deter theft of your...
Setup Guide
Page 25
...support information that you have an Apple-certified technician install memory, PCI expansion cards, and internal storage devices. See an Apple-authorized dealer or service provider for additional information about peripheral component interconnect (PCI) expansion cards, memory, internal storage devices, and the...is not covered by the limited warranty on your computer for instructions on the drive carrier m closing the computer Warning Apple Computer recommends that came with your computer. CHAPTER 2 Working Inside the Computer 2 This chapter provides information about this chapter...
...support information that you have an Apple-certified technician install memory, PCI expansion cards, and internal storage devices. See an Apple-authorized dealer or service provider for additional information about peripheral component interconnect (PCI) expansion cards, memory, internal storage devices, and the...is not covered by the limited warranty on your computer for instructions on the drive carrier m closing the computer Warning Apple Computer recommends that came with your computer. CHAPTER 2 Working Inside the Computer 2 This chapter provides information about this chapter...

Setup Guide
Page 26
....) 26 Chapter 2 Standard Macintosh models come with a minimum of 16 megabytes (MB) of DRAM and VRAM installed in packages called Dual Inline Memory Modules (DIMMs). See the sections that follow for standard Macintosh models is supplied by synchronous DRAM (SDRAM) soldered onto the 66 MHz graphics card... that supplies the computer's monitor port. About Memory Your computer can use the Apple System Profiler to check the amount of SDRAM video memory. PCI slots 2-4: 33 MHz PCI slots (3) PCI slot 1: 66 MHz PCI slot (graphics card ...
....) 26 Chapter 2 Standard Macintosh models come with a minimum of 16 megabytes (MB) of DRAM and VRAM installed in packages called Dual Inline Memory Modules (DIMMs). See the sections that follow for standard Macintosh models is supplied by synchronous DRAM (SDRAM) soldered onto the 66 MHz graphics card... that supplies the computer's monitor port. About Memory Your computer can use the Apple System Profiler to check the amount of SDRAM video memory. PCI slots 2-4: 33 MHz PCI slots (3) PCI slot 1: 66 MHz PCI slot (graphics card ...

Setup Guide
Page 27
... carrier by adding DIMMs to the maximum of 1024 MB, fill all four slots with at : http://store.apple.com/ All Power Macintosh G4 computers come with 256 MB DIMMs. Any 256 MB DIMMs you purchased. Do not use registered or buffered Synchronous DRAM ...(SDRAM), or ECC type SDRAM m Height must fit these specifications: m "PC-100" compliant Synchronous DRAM (SDRAM) m 3.3 volt ( V ) m 64-bit wide, 168-pin module m Maximum number of 16 memory...
... carrier by adding DIMMs to the maximum of 1024 MB, fill all four slots with at : http://store.apple.com/ All Power Macintosh G4 computers come with 256 MB DIMMs. Any 256 MB DIMMs you purchased. Do not use registered or buffered Synchronous DRAM ...(SDRAM), or ECC type SDRAM m Height must fit these specifications: m "PC-100" compliant Synchronous DRAM (SDRAM) m 3.3 volt ( V ) m 64-bit wide, 168-pin module m Maximum number of 16 memory...
Setup Guide
Page 32
...choosing Shut Down from the computer except the power cord. 32 Chapter 2 Important Before installing any of these items, carefully read "About Memory," "About Internal Storage Options," "About PCI ... its internal components. Then wait 5 minutes to allow the computer's internal components to install memory, an internal storage device, a PCI expansion card, or a replacement battery. These instructions ...3 Unplug all the cables from the Special menu. Warning The power supply in this chapter. Warning Turn off . Installing Memory, an Internal Storage Device, or a PCI Expansion Card, or...
...choosing Shut Down from the computer except the power cord. 32 Chapter 2 Important Before installing any of these items, carefully read "About Memory," "About Internal Storage Options," "About PCI ... its internal components. Then wait 5 minutes to allow the computer's internal components to install memory, an internal storage device, a PCI expansion card, or a replacement battery. These instructions ...3 Unplug all the cables from the Special menu. Warning The power supply in this chapter. Warning Turn off . Installing Memory, an Internal Storage Device, or a PCI Expansion Card, or...

Setup Guide
Page 33
Touch the metal portion of the computer. 4 If you have completed the installation of the expansion card, memory, or internal storage device and closed the computer. 6 Unplug the power cord. Important Always do not walk around the room until you have never plugged in . 5 Touch the metal PCI ... will be connecting the computer. (See the table "Voltage Switch Settings for Different Locations," in Chapter 1, "Setting Up.") m Connect the computer's power cord and plug it in your computer: m Make sure the voltage switch is set correctly for the voltage system to which you touch any parts...
Touch the metal portion of the computer. 4 If you have completed the installation of the expansion card, memory, or internal storage device and closed the computer. 6 Unplug the power cord. Important Always do not walk around the room until you have never plugged in . 5 Touch the metal PCI ... will be connecting the computer. (See the table "Voltage Switch Settings for Different Locations," in Chapter 1, "Setting Up.") m Connect the computer's power cord and plug it in your computer: m Make sure the voltage switch is set correctly for the voltage system to which you touch any parts...

Setup Guide
Page 36
... middle of this chapter and follow the steps in "Opening the Computer." 1 Make sure the ejectors on page 52 Installing DRAM Important Before installing memory, read "About Memory" at the beginning of the main logic board. If your computer has an internal modem, be careful not to apply pressure to the section...
... middle of this chapter and follow the steps in "Opening the Computer." 1 Make sure the ejectors on page 52 Installing DRAM Important Before installing memory, read "About Memory" at the beginning of the main logic board. If your computer has an internal modem, be careful not to apply pressure to the section...