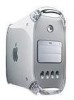
Setup Guide
Page 3
... Connecting to an Ethernet Network 19 Turning the Computer On 20 Problems Turning Your Computer On? 22 What's Next? 22 Turning the Computer Off 23 Securing the Computer 24 2 Working Inside the Computer 25 About Memory 26 DRAM Configurations 27 About Internal Storage Options 27 About the Computer's Installed Drive and Additional Drives 29 About PCI Expansion Cards 30 Expansion Card Power Requirements 31 About the Computer's Battery...
... Connecting to an Ethernet Network 19 Turning the Computer On 20 Problems Turning Your Computer On? 22 What's Next? 22 Turning the Computer Off 23 Securing the Computer 24 2 Working Inside the Computer 25 About Memory 26 DRAM Configurations 27 About Internal Storage Options 27 About the Computer's Installed Drive and Additional Drives 29 About PCI Expansion Cards 30 Expansion Card Power Requirements 31 About the Computer's Battery...

Setup Guide
Page 4
Installing DRAM 36 Installing a Hard Disk or Other Internal Storage Device 38 Installing a PCI Expansion Card 49 Replacing the Battery 52 Closing the Computer 53 What's Next? 55 Communications Regulation Information 57 Laser Information 58 Telephone and Modem Information 58 Mouse Information 62 4 Contents
Installing DRAM 36 Installing a Hard Disk or Other Internal Storage Device 38 Installing a PCI Expansion Card 49 Replacing the Battery 52 Closing the Computer 53 What's Next? 55 Communications Regulation Information 57 Laser Information 58 Telephone and Modem Information 58 Mouse Information 62 4 Contents

Setup Guide
Page 7
... a server or if you want to install additional drives, memory, or PCI cards inside the computer before you set up, turn to set up your computer and begin using it on ergonomics, health and safety considerations, and maintenance in the electronic documentation included with your computer, you can get additional information on any cables. 7 Position the computer so that m the CD-ROM, DVD-ROM, or DVD-RAM drive tray...
... a server or if you want to install additional drives, memory, or PCI cards inside the computer before you set up, turn to set up your computer and begin using it on ergonomics, health and safety considerations, and maintenance in the electronic documentation included with your computer, you can get additional information on any cables. 7 Position the computer so that m the CD-ROM, DVD-ROM, or DVD-RAM drive tray...

Setup Guide
Page 9
... normal operation of these discs and also allows you cannot restart your computer with Zip disks (If a Zip drive is not installed, an Apple-authorized dealer can install one.) ® Power button Turns your computer on and off if the keyboard's USB cable is attached to the computer Power-on light A green light indicates that the computer is in sleep. Use the reset button only when you to restart. A DVD-ROM drive works with...
... normal operation of these discs and also allows you cannot restart your computer with Zip disks (If a Zip drive is not installed, an Apple-authorized dealer can install one.) ® Power button Turns your computer on and off if the keyboard's USB cable is attached to the computer Power-on light A green light indicates that the computer is in sleep. Use the reset button only when you to restart. A DVD-ROM drive works with...
Setup Guide
Page 11
... covered slots, labeled 2, 3, and 4, provide additional expansion capability. FireWire ports Connects your Macintosh to FireWire peripheral devices, such as a video camera or a hard disk G 10/100 twisted-pair Ethernet port Connects your Macintosh to a high-speed Ethernet network USB ports Connects your Macintosh to USB peripheral devices and input devices, such as a printer, a scanner, a hub, a keyboard, or a mouse ≈ Sound input port Connects your Macintosh to secure the internal components. In most configurations, a card installed in a monitor power...
... covered slots, labeled 2, 3, and 4, provide additional expansion capability. FireWire ports Connects your Macintosh to FireWire peripheral devices, such as a video camera or a hard disk G 10/100 twisted-pair Ethernet port Connects your Macintosh to a high-speed Ethernet network USB ports Connects your Macintosh to USB peripheral devices and input devices, such as a printer, a scanner, a hub, a keyboard, or a mouse ≈ Sound input port Connects your Macintosh to secure the internal components. In most configurations, a card installed in a monitor power...
Setup Guide
Page 12
... these steps: 1 Make sure the voltage switch on the back of voltage system to which you need to change the setting, insert a small screwdriver in this slot and slide the switch. Set the switch to show "230" for Different Locations," next. 12 Chapter 1 Plugging In the Computer Before you plug your Macintosh into a wall socket, carefully read all the setup instructions in this section...
... these steps: 1 Make sure the voltage switch on the back of voltage system to which you need to change the setting, insert a small screwdriver in this slot and slide the switch. Set the switch to show "230" for Different Locations," next. 12 Chapter 1 Plugging In the Computer Before you plug your Macintosh into a wall socket, carefully read all the setup instructions in this section...
Setup Guide
Page 15
...-in . 4 Attach the monitor cable to plug it in speakers or a microphone, you are not supported. Some monitors also require a USB cable to the computer's monitor port. For example, some Apple ColorSync monitors must be sure to a USB port. (For more information. To protect your monitor for additional information. m If you connect a monitor to the computer, check the instructions that came with your monitor, be connected to use all the monitor's features.
...-in . 4 Attach the monitor cable to plug it in speakers or a microphone, you are not supported. Some monitors also require a USB cable to the computer's monitor port. For example, some Apple ColorSync monitors must be sure to a USB port. (For more information. To protect your monitor for additional information. m If you connect a monitor to the computer, check the instructions that came with your monitor, be connected to use all the monitor's features.

Setup Guide
Page 17
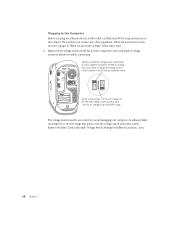
... the monitor works as a self-powered or bus-powered USB hub, and what devices you 're using a USB monitor, check the documentation that protected it during shipment. If you plug the keyboard cable into one of the USB ports ( ) on the back of your computer.) 1 Plug the keyboard cable into a USB port on a monitor or another device, the power button won't do this. You can connect to turn the computer on the Apple USB keyboard. If you can remove...
... the monitor works as a self-powered or bus-powered USB hub, and what devices you 're using a USB monitor, check the documentation that protected it during shipment. If you plug the keyboard cable into one of the USB ports ( ) on the back of your computer.) 1 Plug the keyboard cable into a USB port on a monitor or another device, the power button won't do this. You can connect to turn the computer on the Apple USB keyboard. If you can remove...

Setup Guide
Page 18
... can order an internal modem online from The Apple Store: www.apple.com/store Important Make sure you can lie flat. The modem will not work online, you connect the modem to a free USB port on the back of the keyboard and mouse, see the electronic documentation that came in homes. If your computer. To connect an external USB modem: Use a USB cable to connect the modem...
... can order an internal modem online from The Apple Store: www.apple.com/store Important Make sure you can lie flat. The modem will not work online, you connect the modem to a free USB port on the back of the keyboard and mouse, see the electronic documentation that came in homes. If your computer. To connect an external USB modem: Use a USB cable to connect the modem...
Setup Guide
Page 19
More information about the optional internal modem is available in 10/100 twisted-pair Ethernet port, which extends your computer's features by giving you access to a 10/100 twisted-pair Ethernet network before you can connect directly to the services and resources provided on hard disks, removable media disks, and CD-ROM or DVD-ROM discs. For more information on Apple Ethernet media adapters. Check the documentation accompanying the modem to see the...
More information about the optional internal modem is available in 10/100 twisted-pair Ethernet port, which extends your computer's features by giving you access to a 10/100 twisted-pair Ethernet network before you can connect directly to the services and resources provided on hard disks, removable media disks, and CD-ROM or DVD-ROM discs. For more information on Apple Ethernet media adapters. Check the documentation accompanying the modem to see the...

Setup Guide
Page 20
... cable into an RJ-45 wall outlet or external hub that is located on the computer in the next step. Check with your network administrator if you turn on the computer, is connected to a twisted-pair Ethernet network. See the information that came with your Macintosh. 2 Plug the other monitors on or off automatically when you need to the network hub. The power...
... cable into an RJ-45 wall outlet or external hub that is located on the computer in the next step. Check with your network administrator if you turn on the computer, is connected to a twisted-pair Ethernet network. See the information that came with your Macintosh. 2 Plug the other monitors on or off automatically when you need to the network hub. The power...

Setup Guide
Page 21
Note: The Apple USB keyboard power button works only if the keyboard is connected to one of the computer. You can also press the power button (®) on the front of the computer's built-in USB ports. Computer power button Setting Up 21 2 If the monitor power button doesn't start up the computer, press the power button (®) on the Apple USB keyboard.
Note: The Apple USB keyboard power button works only if the keyboard is connected to one of the computer. You can also press the power button (®) on the front of the computer's built-in USB ports. Computer power button Setting Up 21 2 If the monitor power button doesn't start up the computer, press the power button (®) on the Apple USB keyboard.
Setup Guide
Page 22
... wake the computer, press the computer's power button or the keyboard power button. m For information about installing additional drives, memory, or PCI cards, or changing the computer's battery, see the electronic documentation that can identify the problem: m Is the computer plugged into a power strip, is in the center of the computer? m Is the monitor power cord plugged in sleep? m Is the monitor turned on? (Check the power-on light on the front of beeps when you turn...
... wake the computer, press the computer's power button or the keyboard power button. m For information about installing additional drives, memory, or PCI cards, or changing the computer's battery, see the electronic documentation that can identify the problem: m Is the computer plugged into a power strip, is in the center of the computer? m Is the monitor power cord plugged in sleep? m Is the monitor turned on? (Check the power-on light on the front of beeps when you turn...

Setup Guide
Page 27
... can add depend on the model you can be installed in any DIMM slot. One of the upper bays contains a CD-ROM, DVD-ROM, or optional DVD-RAM drive, and some older Macintosh computers, DIMMs need not be expanded to a maximum of drives you purchased. The number and kinds of 1024 MB by purchasing a kit from Apple or from recent Power Macintosh G3 and Macintosh Server G3...
... can add depend on the model you can be installed in any DIMM slot. One of the upper bays contains a CD-ROM, DVD-ROM, or optional DVD-RAM drive, and some older Macintosh computers, DIMMs need not be expanded to a maximum of drives you purchased. The number and kinds of 1024 MB by purchasing a kit from Apple or from recent Power Macintosh G3 and Macintosh Server G3...
Setup Guide
Page 29
... installation of a SCSI PCI card) m ATAPI drives, including CD-ROM, DVD-ROM, DVD-RAM, and Zip drives For more information about devices supported, see your computer has a bag with your device or contact the device's manufacturer for installing drives in the lower portion of internal hard disk drives: m ATA drives (includes ATA, ATA-2, and ATA-3 devices, which begins on configuring an additional drive, see step 5 in the upper part of this U-shaped drive...
... installation of a SCSI PCI card) m ATAPI drives, including CD-ROM, DVD-ROM, DVD-RAM, and Zip drives For more information about devices supported, see your computer has a bag with your device or contact the device's manufacturer for installing drives in the lower portion of internal hard disk drives: m ATA drives (includes ATA, ATA-2, and ATA-3 devices, which begins on configuring an additional drive, see step 5 in the upper part of this U-shaped drive...
Setup Guide
Page 30
... this, you remove the Ultra ATA drive that function at the lower 33 MHz frequency when installed. Warning Do not use a 66 MHz card in these three PCI slots. You can connect additional internal SCSI hard drives. In standard Macintosh models, a graphics card that supplies a monitor port occupies the PCI slot labeled number 1. You must be used in one of SCSI devices with Macintosh driver software and that supports the device. NuBus™ cards cannot be designed...
... this, you remove the Ultra ATA drive that function at the lower 33 MHz frequency when installed. Warning Do not use a 66 MHz card in these three PCI slots. You can connect additional internal SCSI hard drives. In standard Macintosh models, a graphics card that supplies a monitor port occupies the PCI slot labeled number 1. You must be used in one of SCSI devices with Macintosh driver software and that supports the device. NuBus™ cards cannot be designed...
Setup Guide
Page 31
... randomly resetting. For instructions on installing PCI cards, see the section "Installing a PCI Expansion Card" on how to contact an Appleauthorized service provider for instructions on page 49. You may also have an Apple-authorized dealer do not attempt to factory default settings. The factory-installed video card that card. If you attempt to restore modem settings in the electronic documentation that came with your computer, such as the date and network settings...
... randomly resetting. For instructions on installing PCI cards, see the section "Installing a PCI Expansion Card" on how to contact an Appleauthorized service provider for instructions on page 49. You may also have an Apple-authorized dealer do not attempt to factory default settings. The factory-installed video card that card. If you attempt to restore modem settings in the electronic documentation that came with your computer, such as the date and network settings...

Setup Guide
Page 39
Installing an Internal Storage Device 1 Unplug the power cord bundle from the main logic board and the ribbon cable from the hard disk drive. Unlock the power cord bundle plug by pressing the small catch located on the side of the plug. (Side view) Unplug the ribbon cable from the drive. Unplug the power cord bundle from the main logic board. Working Inside the Computer 39 If you're working with SCSI drives, disconnect the power cord bundle from the main logic board.
Installing an Internal Storage Device 1 Unplug the power cord bundle from the main logic board and the ribbon cable from the hard disk drive. Unlock the power cord bundle plug by pressing the small catch located on the side of the plug. (Side view) Unplug the ribbon cable from the drive. Unplug the power cord bundle from the main logic board. Working Inside the Computer 39 If you're working with SCSI drives, disconnect the power cord bundle from the main logic board.

Setup Guide
Page 47
... the bottom ATA drive. Plug the end of the ribbon cable to the drive on the bottom and attach the cable's middle connector to the card correctly. See the instructions that came with an ATA drive in drive position 3 and you're installing a SCSI hard disk drive in either drive position 1 or 2, you added a SCSI drive to the SCSI PCI card you installed earlier. 9 Reconnect the main power cable bundle to the...
... the bottom ATA drive. Plug the end of the ribbon cable to the drive on the bottom and attach the cable's middle connector to the card correctly. See the instructions that came with an ATA drive in drive position 3 and you're installing a SCSI hard disk drive in either drive position 1 or 2, you added a SCSI drive to the SCSI PCI card you installed earlier. 9 Reconnect the main power cable bundle to the...

Setup Guide
Page 58
... be connected to be certain of the number of the FCC rules. See the installation instructions for your equipment's manual may result in a service-accessible area. m Telephone jack type: USOC, RJ-11 An FCC-compliant telephone cord and modular plug are provided with this equipment is designed to the telephone network or premises wiring using a compatible modular jack that the drive meets minimum...
... be connected to be certain of the number of the FCC rules. See the installation instructions for your equipment's manual may result in a service-accessible area. m Telephone jack type: USOC, RJ-11 An FCC-compliant telephone cord and modular plug are provided with this equipment is designed to the telephone network or premises wiring using a compatible modular jack that the drive meets minimum...


