Service Source
Page 10
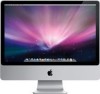
... 2.0) are recommended for the take apart procedures for the 15-inch, the 17-inch, and the 20-inch iMac (USB 2.0) computers. New Procedures The following Take Apart sections were updated: • 20-inch model: Display panel, inverter, back cover, and the neck assembly...-inch panel Tools The following tools are listed below. General Information Overview: November 2003 This Take Apart chapter includes take apart procedures. • The service stand (076-0898) • Thermal paste (922-4757) • Torque driver, 17" LB (076-0899) • 1.5 mm hex driver (for LCD bezel screws) • ...
... 2.0) are recommended for the take apart procedures for the 15-inch, the 17-inch, and the 20-inch iMac (USB 2.0) computers. New Procedures The following Take Apart sections were updated: • 20-inch model: Display panel, inverter, back cover, and the neck assembly...-inch panel Tools The following tools are listed below. General Information Overview: November 2003 This Take Apart chapter includes take apart procedures. • The service stand (076-0898) • Thermal paste (922-4757) • Torque driver, 17" LB (076-0899) • 1.5 mm hex driver (for LCD bezel screws) • ...
Service Source
Page 11
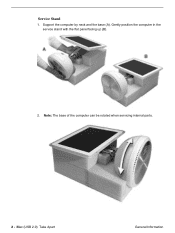
Note: The base of the computer can be rotated when servicing internal parts. 2 - iMac (USB 2.0) Take Apart General Information Gently position the computer in the service stand with the flat panel facing up (B). 2. Service Stand 1. Support the computer by neck and the base (A).
Note: The base of the computer can be rotated when servicing internal parts. 2 - iMac (USB 2.0) Take Apart General Information Gently position the computer in the service stand with the flat panel facing up (B). 2. Service Stand 1. Support the computer by neck and the base (A).

Service Source
Page 12
User Access Plate Tools This procedure requires the following tools: • Phillips #0 screwdriver Part Location Preliminary Steps Before you begin, do the following: • Position the computer in the service stand. User Access Plate iMac (USB 2.0) Take Apart - 3
User Access Plate Tools This procedure requires the following tools: • Phillips #0 screwdriver Part Location Preliminary Steps Before you begin, do the following: • Position the computer in the service stand. User Access Plate iMac (USB 2.0) Take Apart - 3

Service Source
Page 14
Part Location Preliminary Steps Before you begin, do the following: • Position the computer in the service stand. • Remove the user access plate. AirPort Extreme Card Tools This procedure requires no tools. AirPort Extreme Card iMac (USB 2.0) Take Apart - 5
Part Location Preliminary Steps Before you begin, do the following: • Position the computer in the service stand. • Remove the user access plate. AirPort Extreme Card Tools This procedure requires no tools. AirPort Extreme Card iMac (USB 2.0) Take Apart - 5

Service Source
Page 16
Memory, SO-DIMM (userinstallable) Tools No tools are required for this slot should be a low-profile PC2700 (DDR333) SO-DIMM. Part Location Preliminary Steps Before you begin, do the following: • Position the computer in this procedure. Memory, SO-DIMM (user-installable) iMac (USB 2.0) Take Apart - 7 Note: DIMMs used in the service stand. • Remove the user access plate. Only the SO-DIMM slot is accessible by the user.
Memory, SO-DIMM (userinstallable) Tools No tools are required for this slot should be a low-profile PC2700 (DDR333) SO-DIMM. Part Location Preliminary Steps Before you begin, do the following: • Position the computer in this procedure. Memory, SO-DIMM (user-installable) iMac (USB 2.0) Take Apart - 7 Note: DIMMs used in the service stand. • Remove the user access plate. Only the SO-DIMM slot is accessible by the user.

Service Source
Page 19
Bottom Housing Tools This procedure requires the following tools: • Torx-15 screwdriver Part Location Preliminary Steps Before you begin, do the following: • Position the computer in the service stand. • Remove the user access plate. 10 - iMac (USB 2.0) Take Apart Bottom Housing
Bottom Housing Tools This procedure requires the following tools: • Torx-15 screwdriver Part Location Preliminary Steps Before you begin, do the following: • Position the computer in the service stand. • Remove the user access plate. 10 - iMac (USB 2.0) Take Apart Bottom Housing

Service Source
Page 27
RJ-11 Modem Filter Board Tools This procedure requires the following tools: • Torx-6 screwdriver Part Location Preliminary Steps Before you begin, do the following: • Position the computer in the service stand. • Remove the user access plate. • Remove the bottom housing. 18 - iMac (USB 2.0) Take Apart RJ-11 Modem Filter Board
RJ-11 Modem Filter Board Tools This procedure requires the following tools: • Torx-6 screwdriver Part Location Preliminary Steps Before you begin, do the following: • Position the computer in the service stand. • Remove the user access plate. • Remove the bottom housing. 18 - iMac (USB 2.0) Take Apart RJ-11 Modem Filter Board

Service Source
Page 29
Modem Tools This procedure requires the following tools: • Torx-8 screwdriver Part Location Preliminary Steps Before you begin, do the following: • Position the computer in the service stand. • Remove the user access plate. • Remove the bottom housing. 20 - iMac (USB 2.0) Take Apart Modem
Modem Tools This procedure requires the following tools: • Torx-8 screwdriver Part Location Preliminary Steps Before you begin, do the following: • Position the computer in the service stand. • Remove the user access plate. • Remove the bottom housing. 20 - iMac (USB 2.0) Take Apart Modem

Service Source
Page 31
iMac (USB 2.0) Take Apart Memory (factory-installed) Memory (factory-installed) Tools This procedure requires the following tools: • No tools are required Part Location Preliminary Steps Before you begin, do the following: • Position the computer in the service stand. • Remove the user access plate. • Remove the bottom housing. 22 -
iMac (USB 2.0) Take Apart Memory (factory-installed) Memory (factory-installed) Tools This procedure requires the following tools: • No tools are required Part Location Preliminary Steps Before you begin, do the following: • Position the computer in the service stand. • Remove the user access plate. • Remove the bottom housing. 22 -

Service Source
Page 33
Battery Tools This procedure requires the following tools: • No tools are required Part Location Preliminary Steps Before you begin, do the following: • Position the computer in the service stand. • Remove the user access plate. • Remove the bottom housing. 24 - iMac (USB 2.0) Take Apart Battery
Battery Tools This procedure requires the following tools: • No tools are required Part Location Preliminary Steps Before you begin, do the following: • Position the computer in the service stand. • Remove the user access plate. • Remove the bottom housing. 24 - iMac (USB 2.0) Take Apart Battery

Service Source
Page 35
Logic Board Tools This procedure requires the following : • Position the computer in the service stand. • Remove the user access plate. • Remove the bottom housing. • Remove the RJ-11 board. 26 - iMac (USB 2.0) Take Apart Logic Board Preliminary Steps Before you begin, do the following tools: • Phillips #2 screwdriver (for... bottom of the logic board), Bluetooth board and the Bluetooth extension cable need to be removed from the logic board before returning the board to Apple for service.
Logic Board Tools This procedure requires the following : • Position the computer in the service stand. • Remove the user access plate. • Remove the bottom housing. • Remove the RJ-11 board. 26 - iMac (USB 2.0) Take Apart Logic Board Preliminary Steps Before you begin, do the following tools: • Phillips #2 screwdriver (for... bottom of the logic board), Bluetooth board and the Bluetooth extension cable need to be removed from the logic board before returning the board to Apple for service.
Service Source
Page 38
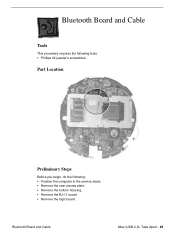
Bluetooth Board and Cable iMac (USB 2.0) Take Apart - 29 Bluetooth Board and Cable Tools This procedure requires the following tools: • Phillips #2 jeweler's screwdriver Part Location Preliminary Steps Before you begin, do the following: • Position the computer in the service stand. • Remove the user access plate. • Remove the bottom housing. • Remove the RJ-11 board. • Remove the logic board.
Bluetooth Board and Cable iMac (USB 2.0) Take Apart - 29 Bluetooth Board and Cable Tools This procedure requires the following tools: • Phillips #2 jeweler's screwdriver Part Location Preliminary Steps Before you begin, do the following: • Position the computer in the service stand. • Remove the user access plate. • Remove the bottom housing. • Remove the RJ-11 board. • Remove the logic board.
Service Source
Page 41
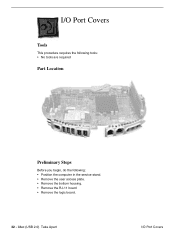
I /O Port Covers iMac (USB 2.0) Take Apart I /O Port Covers Tools This procedure requires the following tools: • No tools are required Part Location Preliminary Steps Before you begin, do the following: • Position the computer in the service stand. • Remove the user access plate. • Remove the bottom housing. • Remove the RJ-11 board • Remove the logic board. 32 -
I /O Port Covers iMac (USB 2.0) Take Apart I /O Port Covers Tools This procedure requires the following tools: • No tools are required Part Location Preliminary Steps Before you begin, do the following: • Position the computer in the service stand. • Remove the user access plate. • Remove the bottom housing. • Remove the RJ-11 board • Remove the logic board. 32 -

Service Source
Page 43
iMac (USB 2.0) Take Apart AirPort Antenna Extension Cable AirPort Antenna Extension Cable Tools This procedure requires the following tools: • No tools are required Part Location Preliminary Steps Before you begin, do the following: • Position the computer in the service stand. • Remove the user access plate. • Remove the bottom housing. • Remove the RJ-11 board • Remove the logic board. 34 -
iMac (USB 2.0) Take Apart AirPort Antenna Extension Cable AirPort Antenna Extension Cable Tools This procedure requires the following tools: • No tools are required Part Location Preliminary Steps Before you begin, do the following: • Position the computer in the service stand. • Remove the user access plate. • Remove the bottom housing. • Remove the RJ-11 board • Remove the logic board. 34 -
Service Source
Page 47
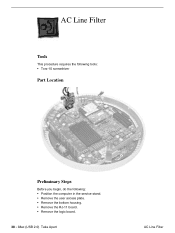
AC Line Filter Tools This procedure requires the following tools: • Torx-10 screwdriver Part Location Preliminary Steps Before you begin, do the following: • Position the computer in the service stand. • Remove the user access plate. • Remove the bottom housing. • Remove the RJ-11 board. • Remove the logic board. 38 - iMac (USB 2.0) Take Apart AC Line Filter
AC Line Filter Tools This procedure requires the following tools: • Torx-10 screwdriver Part Location Preliminary Steps Before you begin, do the following: • Position the computer in the service stand. • Remove the user access plate. • Remove the bottom housing. • Remove the RJ-11 board. • Remove the logic board. 38 - iMac (USB 2.0) Take Apart AC Line Filter
Service Source
Page 50
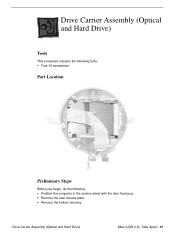
Drive Carrier Assembly (Optical and Hard Drive) Tools This procedure requires the following tools: • Torx-10 screwdriver Part Location Preliminary Steps Before you begin, do the following: • Position the computer in the service stand with the door facing up. • Remove the user access plate. • Remove the bottom housing. Drive Carrier Assembly (Optical and Hard Drive) iMac (USB 2.0) Take Apart - 41
Drive Carrier Assembly (Optical and Hard Drive) Tools This procedure requires the following tools: • Torx-10 screwdriver Part Location Preliminary Steps Before you begin, do the following: • Position the computer in the service stand with the door facing up. • Remove the user access plate. • Remove the bottom housing. Drive Carrier Assembly (Optical and Hard Drive) iMac (USB 2.0) Take Apart - 41
Service Source
Page 56
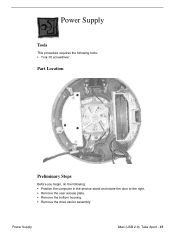
Power Supply Tools This procedure requires the following tools: • Torx-10 screwdriver Part Location Preliminary Steps Before you begin, do the following: • Position the computer in the service stand and rotate the door to the right. • Remove the user access plate. • Remove the bottom housing. • Remove the drive carrier assembly. Power Supply iMac (USB 2.0) Take Apart - 47
Power Supply Tools This procedure requires the following tools: • Torx-10 screwdriver Part Location Preliminary Steps Before you begin, do the following: • Position the computer in the service stand and rotate the door to the right. • Remove the user access plate. • Remove the bottom housing. • Remove the drive carrier assembly. Power Supply iMac (USB 2.0) Take Apart - 47
Service Source
Page 61
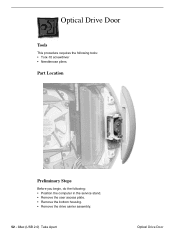
iMac (USB 2.0) Take Apart Optical Drive Door Optical Drive Door Tools This procedure requires the following tools: • Torx-10 screwdriver • Needlenose pliers Part Location Preliminary Steps Before you begin, do the following: • Position the computer in the service stand. • Remove the user access plate. • Remove the bottom housing. • Remove the drive carrier assembly. 52 -
iMac (USB 2.0) Take Apart Optical Drive Door Optical Drive Door Tools This procedure requires the following tools: • Torx-10 screwdriver • Needlenose pliers Part Location Preliminary Steps Before you begin, do the following: • Position the computer in the service stand. • Remove the user access plate. • Remove the bottom housing. • Remove the drive carrier assembly. 52 -

Service Source
Page 66
Speaker, Internal iMac (USB 2.0) Take Apart - 57 Speaker, Internal Tools This procedure requires the following tools: • Torx-10 screwdriver Part Location Preliminary Steps Before you begin, do the following: • Position the computer in the service stand. • Remove the user access plate. • Remove the bottom housing. • Remove the drive carrier assembly.
Speaker, Internal iMac (USB 2.0) Take Apart - 57 Speaker, Internal Tools This procedure requires the following tools: • Torx-10 screwdriver Part Location Preliminary Steps Before you begin, do the following: • Position the computer in the service stand. • Remove the user access plate. • Remove the bottom housing. • Remove the drive carrier assembly.
Service Source
Page 68
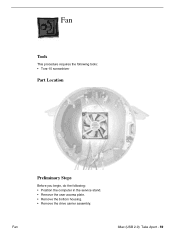
Fan iMac (USB 2.0) Take Apart - 59 Fan Tools This procedure requires the following tools: • Torx-15 screwdriver Part Location Preliminary Steps Before you begin, do the following: • Position the computer in the service stand. • Remove the user access plate. • Remove the bottom housing. • Remove the drive carrier assembly.
Fan iMac (USB 2.0) Take Apart - 59 Fan Tools This procedure requires the following tools: • Torx-15 screwdriver Part Location Preliminary Steps Before you begin, do the following: • Position the computer in the service stand. • Remove the user access plate. • Remove the bottom housing. • Remove the drive carrier assembly.
