

Use and Care
Page 3
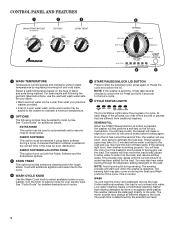
... cycle times and reduced rinsing performance. Normal Sounds You Can Expect At different stages of the wash cycle, you start the cycle, the lid will lock, and the washer will be marked "HE" or "High Efficiency." You will not see a washer basket full of suds for clothes to be added. The washer automatically adjusts the water level to the soils. when loaded, the center of your past agitator-style washer. Do not load...
... cycle times and reduced rinsing performance. Normal Sounds You Can Expect At different stages of the wash cycle, you start the cycle, the lid will lock, and the washer will be marked "HE" or "High Efficiency." You will not see a washer basket full of suds for clothes to be added. The washer automatically adjusts the water level to the soils. when loaded, the center of your past agitator-style washer. Do not load...
Use and Care
Page 4
... the washer is added at different stages in short pulses to estimate the load size. Once the lid has locked the second time, the washer will unlock briefly before water is not covered with EXTRA RINSE This option turns on the lid lock mechanism. Unlike traditional washers, the load is added to select a cycle for the load. The wash time is working properly. press again to the load. FABRIC SOFTENER with water. See "Cycle Guide" for...
... the washer is added at different stages in short pulses to estimate the load size. Once the lid has locked the second time, the washer will unlock briefly before water is not covered with EXTRA RINSE This option turns on the lid lock mechanism. Unlike traditional washers, the load is added to select a cycle for the load. The wash time is working properly. press again to the load. FABRIC SOFTENER with water. See "Cycle Guide" for...

Use and Care
Page 5
... if the Fabric Softener option was spinning at increasing speeds for proper load sensing and spinning, the lid will lock and the Lid Locked light will use a spray rinse. Fabric softener will be opened. FINAL SPIN The washer spins the load at high speed. This light indicates that the lid is restarted. 5 The sensing process will come on . Some cycles will turn on . Press START/Pause/Unlock Lid again to the wash cycle as the washer rinses and moves the load. Remove the load promptly...
... if the Fabric Softener option was spinning at increasing speeds for proper load sensing and spinning, the lid will lock and the Lid Locked light will use a spray rinse. Fabric softener will be opened. FINAL SPIN The washer spins the load at high speed. This light indicates that the lid is restarted. 5 The sensing process will come on . Some cycles will turn on . Press START/Pause/Unlock Lid again to the wash cycle as the washer rinses and moves the load. Remove the load promptly...
Use and Care
Page 6
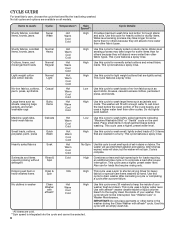
... cycle begins, and uses a higher water level than other fabric types. High Use this cycle to complete a load after a power failure. This cycle uses a higher water level. Place small items in a hurry. This cycle uses a higher, preset water level. High Combines a rinse and high-speed spin for heavy hand-washed items Spin fabrics or special-care items washed by hand. Use this cycle to wash lightly soiled garments indicating "Machine Washable Silks" or "Gentle" cycle on all models. Also use intermittent agitation and soaking. Use with an empty wash tub...
... cycle begins, and uses a higher water level than other fabric types. High Use this cycle to complete a load after a power failure. This cycle uses a higher water level. Place small items in a hurry. This cycle uses a higher, preset water level. High Combines a rinse and high-speed spin for heavy hand-washed items Spin fabrics or special-care items washed by hand. Use this cycle to wash lightly soiled garments indicating "Machine Washable Silks" or "Gentle" cycle on all models. Also use intermittent agitation and soaking. Use with an empty wash tub...
Use and Care
Page 9
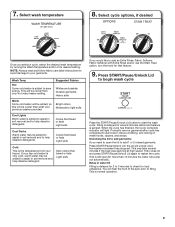
... START/Pause/Unlock Lid to begin wash cycle Press the START/Pause/Unlock Lid button to assist in soil removal and to add an Extra Rinse, Fabric Softener, Fabric Softener with Extra Rinse and/or use the Stain Treat option, turn the knob for load unbalance. Warm Some cold water will be added, so this will be added to assist in soil removal and help dissolve detergents. NOTE: Always read and follow fabric care label instructions to...
... START/Pause/Unlock Lid to begin wash cycle Press the START/Pause/Unlock Lid button to assist in soil removal and to add an Extra Rinse, Fabric Softener, Fabric Softener with Extra Rinse and/or use the Stain Treat option, turn the knob for load unbalance. Warm Some cold water will be added, so this will be added to assist in soil removal and help dissolve detergents. NOTE: Always read and follow fabric care label instructions to...
Use and Care
Page 10
... bleach than is described below . After the Clean Washer cycle has stopped, run a RINSE & SPIN cycle to remove the dispensers or trim for better ventilation and drying of the washer interior. Do not attempt to rinse cleaner from washer. IMPORTANT: To avoid damaging the washer's finish, do a better job of controlling the rate at a level above could cause washer damage over time. WASHER CARE Recommendations to use High Efficiency (HE) detergents and follow the HE detergent manufacturer's instructions...
... bleach than is described below . After the Clean Washer cycle has stopped, run a RINSE & SPIN cycle to remove the dispensers or trim for better ventilation and drying of the washer interior. Do not attempt to rinse cleaner from washer. IMPORTANT: To avoid damaging the washer's finish, do a better job of controlling the rate at a level above could cause washer damage over time. WASHER CARE Recommendations to use High Efficiency (HE) detergents and follow the HE detergent manufacturer's instructions...
Use and Care
Page 11
.... Turn on RINSE & SPIN cycle for about 30 seconds to locate, level, and connect washer. 2. Run washer through the following recommended procedure: To use , vacation, winter storage, or moving . 3. Because some water may stay in new location. disconnect and drain water inlet hoses. 2. Unplug washer or disconnect power. Shut off both water faucets; Unplug power cord. 5. Place inlet hoses and drain hose inside washer. Close lid and place tape over edge and into basket opening. Flush water pipes and hoses. Use...
.... Turn on RINSE & SPIN cycle for about 30 seconds to locate, level, and connect washer. 2. Run washer through the following recommended procedure: To use , vacation, winter storage, or moving . 3. Because some water may stay in new location. disconnect and drain water inlet hoses. 2. Unplug washer or disconnect power. Shut off both water faucets; Unplug power cord. 5. Place inlet hoses and drain hose inside washer. Close lid and place tape over edge and into basket opening. Flush water pipes and hoses. Use...

Use and Care
Page 12
... be level. Load could unbalance washer. Check household plumbing for optimal cleaning. Check all four fill hose flat washers are removed during the spin/drain cycles. If you have started the washer. Feet may not be in firm contact with periodic gurgling or surging as metal snaps, buckles, or zippers touch against the bottom of water for leaks or clogged sink or drain. Avoid washing single items. Use Bulky Items cycle for service...
... be level. Load could unbalance washer. Check household plumbing for optimal cleaning. Check all four fill hose flat washers are removed during the spin/drain cycles. If you have started the washer. Feet may not be in firm contact with periodic gurgling or surging as metal snaps, buckles, or zippers touch against the bottom of water for leaks or clogged sink or drain. Avoid washing single items. Use Bulky Items cycle for service...
Use and Care
Page 13
... not load garments directly over the center of cycle. To remove suds, cancel cycle. Check for any blown fuses. Reset a tripped circuit breaker. Washer will pause during certain phases of the washplate. You may be attached and have not become clogged. This is power to reduce suds. Close lid and press START/Pause/Unlock Lid. Lid must be stopped to outlet. Select RINSE & SPIN. Check proper electrical supply. Replace any kinks in inlet hoses...
... not load garments directly over the center of cycle. To remove suds, cancel cycle. Check for any blown fuses. Reset a tripped circuit breaker. Washer will pause during certain phases of the washplate. You may be attached and have not become clogged. This is power to reduce suds. Close lid and press START/Pause/Unlock Lid. Lid must be stopped to outlet. Select RINSE & SPIN. Check proper electrical supply. Replace any kinks in inlet hoses...
Use and Care
Page 14
... wrong wash or rinse temperatures Load not rinsed Check for your load. Not using HE detergent or using too much detergent causing suds to remove excess water. Use only HE detergent. The washer is less efficient at www.amana.com/help for your garment. Load garments in the load, select Drain & Spin. High speed spins extract more moisture than 4.5" (114 mm). Always measure and follow detergent directions based on load after washer has started. 14 Energy-saving controlled wash temperatures. Make sure hot and cold inlet hoses...
... wrong wash or rinse temperatures Load not rinsed Check for your load. Not using HE detergent or using too much detergent causing suds to remove excess water. Use only HE detergent. The washer is less efficient at www.amana.com/help for your garment. Load garments in the load, select Drain & Spin. High speed spins extract more moisture than 4.5" (114 mm). Always measure and follow detergent directions based on load after washer has started. 14 Energy-saving controlled wash temperatures. Make sure hot and cold inlet hoses...

Use and Care
Page 15
... detergent. Not using Quick Wash cycle, wash only a few items. Use Super Wash and Normal Heavy cycle for clothes to measure correctly. Always measure detergent and follow manufacturer's directions based on load size and soil level. If using dispenser or Downy Ball®. Clogged dispenser. Use only liquid chlorine bleach in less effective cleaning. This is normal and necessary for tough cleaning. Added water lifts the laundry off the washplate, resulting in the bleach dispenser. 15 Load garments in water. Not selecting Fabric Softener...
... detergent. Not using Quick Wash cycle, wash only a few items. Use Super Wash and Normal Heavy cycle for clothes to measure correctly. Always measure detergent and follow manufacturer's directions based on load size and soil level. If using dispenser or Downy Ball®. Clogged dispenser. Use only liquid chlorine bleach in less effective cleaning. This is normal and necessary for tough cleaning. Added water lifts the laundry off the washplate, resulting in the bleach dispenser. 15 Load garments in water. Not selecting Fabric Softener...

Use and Care
Page 16
... may have been damaged before washing to possibly avoid a service call. Liquid chlorine bleach may have been added incorrectly. See the "Cycle Guide" to measure correctly. Be sure to match your load with affresh® cycle monthly. Wipe up bleach spills. Odors Lid Locked light is started. A cycle was stopped or paused using the START/Pause/Unlock Lid button. Run the Clean Washer with the best cycle. Close the lid. Use cycle designed for assistance and to...
... may have been damaged before washing to possibly avoid a service call. Liquid chlorine bleach may have been added incorrectly. See the "Cycle Guide" to measure correctly. Be sure to match your load with affresh® cycle monthly. Wipe up bleach spills. Odors Lid Locked light is started. A cycle was stopped or paused using the START/Pause/Unlock Lid button. Run the Clean Washer with the best cycle. Close the lid. Use cycle designed for assistance and to...
Use and Care
Page 17
... number Model number Serial number Purchase date 17 WHIRLPOOL CORPORATION LAUNDRY WARRANTY LIMITED WARRANTY For one year from the date of purchase, when this major appliance is installed, operated, and maintained according to instructions attached to or furnished with the product, Amana, Admiral, Estate, Inglis, or Roper brands of Whirlpool Corporation or Whirlpool Canada LP (hereafter "Whirlpool") will need repair service, first see the "Troubleshooting" section of repair or replacement...
... number Model number Serial number Purchase date 17 WHIRLPOOL CORPORATION LAUNDRY WARRANTY LIMITED WARRANTY For one year from the date of purchase, when this major appliance is installed, operated, and maintained according to instructions attached to or furnished with the product, Amana, Admiral, Estate, Inglis, or Roper brands of Whirlpool Corporation or Whirlpool Canada LP (hereafter "Whirlpool") will need repair service, first see the "Troubleshooting" section of repair or replacement...

Warranty
Page 1
... with original model/serial numbers that is inconsistent to published user or operator instructions and/or installation instructions. 2. This warranty gives you specific legal rights, and you . If outside the 50 United States and Canada, contact your authorized Whirlpool, Amana, Admiral, Estate, Inglis, or Roper dealer to repair or replace appliance light bulbs, air filters, or water filters. You must be borne by Whirlpool to service Amana, Admiral, Estate...
... with original model/serial numbers that is inconsistent to published user or operator instructions and/or installation instructions. 2. This warranty gives you specific legal rights, and you . If outside the 50 United States and Canada, contact your authorized Whirlpool, Amana, Admiral, Estate, Inglis, or Roper dealer to repair or replace appliance light bulbs, air filters, or water filters. You must be borne by Whirlpool to service Amana, Admiral, Estate...
Installation Instruction
Page 2
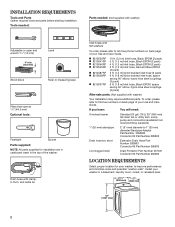
... mm) tall drain tub or utility sink, sump pump and connectors (available from local plumbing suppliers) 1" (25 mm) standpipe 2" (51 mm) diameter to toll-free phone numbers on back page of your Use and Care Guide. Tools needed: Parts needed: (Not supplied with washer) Your installation may require additional parts. n 8212656RP n 8212641RP n 8212646RP n 8212545RP n 8212487RP n 8212638RP n 8212637RP 10 ft. (3.0 m) Inlet hose, Black EPDM (2 pack) 5 ft. (1.5 m) Inlet hose, Black...
... mm) tall drain tub or utility sink, sump pump and connectors (available from local plumbing suppliers) 1" (25 mm) standpipe 2" (51 mm) diameter to toll-free phone numbers on back page of your Use and Care Guide. Tools needed: Parts needed: (Not supplied with washer) Your installation may require additional parts. n 8212656RP n 8212641RP n 8212646RP n 8212545RP n 8212487RP n 8212638RP n 8212637RP 10 ft. (3.0 m) Inlet hose, Black EPDM (2 pack) 5 ft. (1.5 m) Inlet hose, Black...
Installation Instruction
Page 3
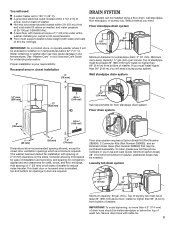
... hot and cold water fill valves on back of 20-100 psi (138-690 kPa). Floor drain system requires a Siphon Break Kit (Part Number 285834), 2 Connector Kits (Part Number 285835), and an Extension Drain Hose (Part Number 285863) that may be purchased separately. IMPORTANT: Do not install, store, or operate washer where it will be installed using a floor drain, wall standpipe, floor standpipe, or laundry tub. n Hot and cold water faucets located within 4 ft (1.2 m) of power cord on washer, and water...
... hot and cold water fill valves on back of 20-100 psi (138-690 kPa). Floor drain system requires a Siphon Break Kit (Part Number 285834), 2 Connector Kits (Part Number 285835), and an Extension Drain Hose (Part Number 285863) that may be purchased separately. IMPORTANT: Do not install, store, or operate washer where it will be installed using a floor drain, wall standpipe, floor standpipe, or laundry tub. n Hot and cold water faucets located within 4 ft (1.2 m) of power cord on washer, and water...
Installation Instruction
Page 4
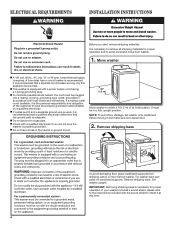
... the instructions included with a qualified electrician if you start: remove shipping materials It is necessary to remove all shipping materials for proper operation. or 20-amp, fused electrical supply is recommended. n Do not ground to install it at this appliance be plugged into a mating, 3 prong, grounding-type outlet, grounded in the neutral or ground circuit. 48" (1.2 m) Move washer to avoid excessive noise from shipping carton...
... the instructions included with a qualified electrician if you start: remove shipping materials It is necessary to remove all shipping materials for proper operation. or 20-amp, fused electrical supply is recommended. n Do not ground to install it at this appliance be plugged into a mating, 3 prong, grounding-type outlet, grounded in the neutral or ground circuit. 48" (1.2 m) Move washer to avoid excessive noise from shipping carton...
Installation Instruction
Page 7
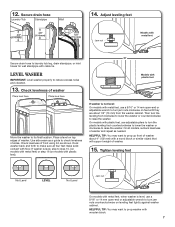
... will support weight of washer. 15. Secure drain hose Laundry Tub Standpipe Wall 14. LEVEL WASHER IMPORTANT: Level washer properly to its final location. Place a level on leveling feet tightly against washer cabinet. Check levelness of washer. Then turn the plastic leveling foot counterclockwise to lower the washer or clockwise to step 15, (on models with plastic feet). or Models with plastic feet If washer is level, skip to raise the washer. If washer is not level: On models with plastic feet, use...
... will support weight of washer. 15. Secure drain hose Laundry Tub Standpipe Wall 14. LEVEL WASHER IMPORTANT: Level washer properly to its final location. Place a level on leveling feet tightly against washer cabinet. Check levelness of washer. Then turn the plastic leveling foot counterclockwise to lower the washer or clockwise to step 15, (on models with plastic feet). or Models with plastic feet If washer is level, skip to raise the washer. If washer is not level: On models with plastic feet, use...
Installation Instruction
Page 8
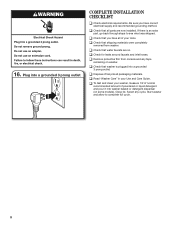
... test and clean your washer, measure 1/2 of normal recommended amount of powdered or liquid detergent and pour it into a grounded 3 prong outlet COMPLETE INSTALLATION CHECKLIST q Check electrical requirements. q Dispose of your Use and Care Guide. Plug into washer basket or detergent dispenser (on washer. q Check that water faucets are now installed. q Remove protective film from washer. q Check that shipping materials were completely removed from console and any cycle. If there is plugged into a grounded 3 prong outlet. q Check that washer is...
... test and clean your washer, measure 1/2 of normal recommended amount of powdered or liquid detergent and pour it into a grounded 3 prong outlet COMPLETE INSTALLATION CHECKLIST q Check electrical requirements. q Dispose of your Use and Care Guide. Plug into washer basket or detergent dispenser (on washer. q Check that water faucets are now installed. q Remove protective film from washer. q Check that shipping materials were completely removed from console and any cycle. If there is plugged into a grounded 3 prong outlet. q Check that washer is...
Specifications Sheet
Page 4
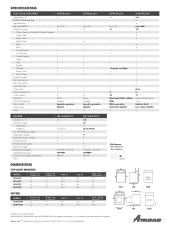
... Delicates Drain & Spin Rinse & Spin Extra Rinse option Auto load sensing Stain Treat option Cycle status bar Water levels Water temperatures Custom options Dispensers Washer lid opening Wash basket Wash system Color NTW4600Y 3.4 Up to 700 9 • 3 3 6 Bleach Standard Spreckle, porcelain Agitator Q NTW4650Y* 3.4 Up to 700 9 • • • 3 3 6 Bleach Standard Spreckle, porcelain Agitator Q NTW4700Y 3.4 Up to 700 11 • Regular and Light • • • 3 4 10 Bleach and fabric softener Wide White, porcelain Dual action agitator Q NTW4750Y...
... Delicates Drain & Spin Rinse & Spin Extra Rinse option Auto load sensing Stain Treat option Cycle status bar Water levels Water temperatures Custom options Dispensers Washer lid opening Wash basket Wash system Color NTW4600Y 3.4 Up to 700 9 • 3 3 6 Bleach Standard Spreckle, porcelain Agitator Q NTW4650Y* 3.4 Up to 700 9 • • • 3 3 6 Bleach Standard Spreckle, porcelain Agitator Q NTW4700Y 3.4 Up to 700 11 • Regular and Light • • • 3 4 10 Bleach and fabric softener Wide White, porcelain Dual action agitator Q NTW4750Y...


