Amana NTW4800XQ Support and Manuals
Get Help and Manuals for this Amana item

View All Support Options Below
Free Amana NTW4800XQ manuals!
Problems with Amana NTW4800XQ?
Ask a Question
Free Amana NTW4800XQ manuals!
Problems with Amana NTW4800XQ?
Ask a Question
Most Recent Amana NTW4800XQ Questions

I Have An Amana Washer #ntw4600vqo Trying To Stop The Violent Spin Cycle,help
Ever since we have had this washer we havn't been able to stop the violent spin cycle. Tried to leve...
Ever since we have had this washer we havn't been able to stop the violent spin cycle. Tried to leve...
(Posted by rojoinc4165 11 years ago)
Popular Amana NTW4800XQ Manual Pages
Use and Care - Page 2

...800-807-6777 or visit us at www.whirlpoolappliances.ca
Part Number
1903WH 8212526 31682
Accessory
Laundry supply storage cart Washer drip tray, fits under all 2011 energy standards.
As...and energy compared to older traditional washers. ACCESSORIES
Using Less Water and Energy
Enhance your washer with all All purpose appliance cleaner
This washer is designed to use less ...
Use and Care - Page 3

...settings.
4 Fabric Softener (on some models, the wash temperature is determined by pushing the Cycle Control knob in Cool wash, some warm water is let into washer to move freely. See "Cycle Guide" for your previous washer...more details.
3 Not all models. For best results, follow the garment label instructions, using fabric softener, set to ON to ensure proper dispensing of fabric and...
Use and Care - Page 4
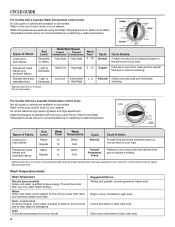
...Types of your load. This will be cooler than what your hot water heater setting. Cold This is selected with a separate Wash Temperature control knob: Not all cycles... spin.
Refer to save energy. Types of your washer. Refer to the cycle control knob on some models, warm water is added to the Wash Temperature Guide below for recommendations on your faucet.
4
Suggested Fabrics...
Use and Care - Page 5

...chlorine bleach dispenser (on some models):
■■ Let the washer fill and begin agitating the load.
■■ Add bleach 5 minutes into the washer and is added automaticallyLidquuriidngchthloerifnineal rinse cycle....
4. Damage may appear several washings later as well.
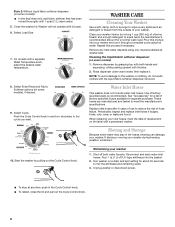
2. STARTING YOUR WASHER
WASHER USE
IMPORTANT: When washing any fabric it touches.
Take care not to pour...
Use and Care - Page 6
... Size.
7. On models with a permanent marker. Push the Cycle Control knob in and turn clockwise to meet the manufacturer's specifications. WASHER CARE
Cleaning Your Washer
Use a soft, damp cloth or sponge to reduce the risk of hose failure.
Clean your washer. Pour this process if necessary. Rinse dispenser under warm water, then replace it . Water Inlet...
Use and Care - Page 7
... (due to a water pressure surge) while you put powdered color-safe bleach into the dispensers.
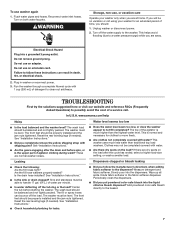
The washer must be level. See "Installation Instructions."
■■ Are the gears engaging after the cycle has ended, select a higher load-size setting, or wash a smaller load. Center the tub before spin, or is normal and necessary for...
Use and Care - Page 9

...
problem after checking "Troubleshooting," additional help can be provided by Amana.
5. Pick up and delivery. Some states and provinces do not allow limitations on major appliances with original model/serial numbers that have other damage to the finish of your major appliance, to instruct you need repair service, first see the "Troubleshooting" section of the Use & Care Guide. LIMITATION...
Warranty - Page 1

...when the major appliance is inconsistent to Amana within 30 days from defects in accordance with original model/serial numbers that vary from warranty coverage.
4.
Service calls to determine if another warranty applies. Consumable parts are unable to resolve the
problem after checking "Troubleshooting," additional help can be repaired in which it is installed in an inaccessible...
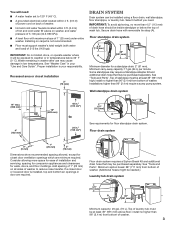
Dimension Guide - Page 1
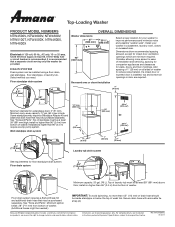
..." (2.4 m) from bottom of washer. (Additional hoses might be needed.)
IMPORTANT: To avoid siphoning, no higher than 96" (2.4 m) from bottom of standpipe must be provided.
See "Tools and Parts". Installations higher than 4.5" (113 mm) of drain hose should be inside standpipe or below the top of installation and servicing, spacing for companion appliances and clearances for a standpipe...
Energy Guide - Page 1

Clothes Washer Capacity: Standard
Maytag Model: NTW4800X* Cat.
U.S. V11Y2KTU(3B)
Estimated Yearly Operating Cost
(when used with an electric water heater)
$31 ▼
$10
$71
Cost Range of Similar Models
290kWh
Estimated ... on your utility rates and use.
• Cost range based only on standard capacity models. • Estimated operating cost based on eight wash loads a week and a 2007
...
Installation Instruction - Page 3
... that may be purchased separately.
Minimum siphon break: 28" (711 mm) from bottom of washer.
3 install no higher than 96" (2.4 m) from bottom of washer.
IMPORTANT: To avoid siphoning, no more space for ease of installation and servicing, spacing for companion appliances and clearances for floor standpipe drain system. Some standpipes may require a Standpipe Adapter Kit and...
Installation Instruction - Page 4
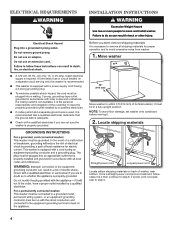
...fully upright position. NOTE: To avoid floor damage, set washer onto cardboard before moving it is recommended that a ...installed by a qualified electrician.
■■ If codes permit and a separate ground wire is used, it .
2. Move washer
■■ A 120 volt, 60 Hz., AC only, 15- ELECTRICAL REQUIREMENTS
INSTALLATION INSTRUCTIONS
Before you are not sure the washer...
Installation Instruction - Page 6
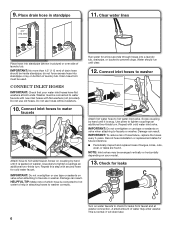
... replace the hoses every 5 years. Connect Inlet Hoses
IMPORTANT: Check that your model.
13. Do not use old hoses.
Connect inlet hoses to washer
...washer. Check for leaks
Turn on your water inlet hoses have flat washers at washer connection. Washer must be arranged vertically or horizontally depending on water faucets to prevent clogs. Record hose installation or replacement...
Installation Instruction - Page 7

...
Not Level
Screw feet into place. 14. This will support weight of foot base. Level Washer
IMPORTANT: Leveling your washer properly reduces excess noise and vibration.
15. Rock washer back and forth to install leveling feet
18. Secure drain hose
Laundry Tub
Standpipe
Wall
17. Gently lower washer to laundry tub leg, drain standpipe, or inlet...
Installation Instruction - Page 8

... materials.
■■ Read "Washer Use" in your "Use and Care Guide".
■■ To test and clean your tools.
■■ Check that yellow shipping materials were completely removed from back of washer.
■■ Check that both water faucets are now installed. Select any tape remaining on some models). Be sure you have...
Amana NTW4800XQ Reviews
We have not received any reviews for Amana yet.