
Installation Instruction
Page 2
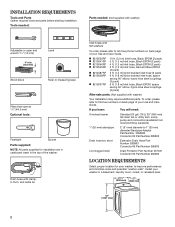
... Drain hose too short Extension Drain Hose Part Number 285863 Connector Kit Part Number 285835 Lint clogged drain Drain Protector Part Number 367031 Connector Kit Part Number 285835 LOCATION REQUIREMENTS Select proper location for installation are in cardboard insert in a basement, laundry room, closet, or recessed area. 271/2" 27" (699 mm) (686 mm) 42" (1067 mm) 2 To order, please refer to improve performance and minimize noise and possible "washer walk". Install your Use and Care Guide. Tools needed: Parts needed...
... Drain hose too short Extension Drain Hose Part Number 285863 Connector Kit Part Number 285835 Lint clogged drain Drain Protector Part Number 367031 Connector Kit Part Number 285835 LOCATION REQUIREMENTS Select proper location for installation are in cardboard insert in a basement, laundry room, closet, or recessed area. 271/2" 27" (699 mm) (686 mm) 42" (1067 mm) 2 To order, please refer to improve performance and minimize noise and possible "washer walk". Install your Use and Care Guide. Tools needed: Parts needed...
Installation Instruction
Page 3
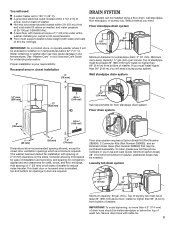
... drain system requires a Siphon Break Kit (Part Number 285834), 2 Connector Kits (Part Number 285835), and an Extension Drain Hose (Part Number 285863) that may cause damage in your Use and Care Guide for floor standpipe drain system. n Hot and cold water faucets located within 4 ft (1.2 m) of power cord on all sides of installation and servicing, and spacing for companion appliances and clearances for ease of washer to reduce noise transfer. install no more space for walls, doors...
... drain system requires a Siphon Break Kit (Part Number 285834), 2 Connector Kits (Part Number 285835), and an Extension Drain Hose (Part Number 285863) that may cause damage in your Use and Care Guide for floor standpipe drain system. n Hot and cold water faucets located within 4 ft (1.2 m) of power cord on all sides of installation and servicing, and spacing for companion appliances and clearances for ease of washer to reduce noise transfer. install no more space for walls, doors...
Installation Instruction
Page 4
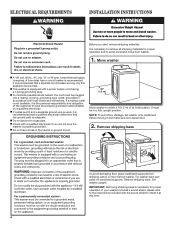
...-type outlet, grounded in accordance with a power supply cord having a 3 prong grounding plug. It is recommended that the ground path is adequate. n If codes permit and a separate ground wire is used, it is recommended that a qualified electrician determine that a separate circuit breaker serving only this time. 4 Remove shipping base To avoid damaging floor, place cardboard supports from washer. 1. Set washer upright. or 20-amp, fused electrical...
...-type outlet, grounded in accordance with a power supply cord having a 3 prong grounding plug. It is recommended that the ground path is adequate. n If codes permit and a separate ground wire is used, it is recommended that a qualified electrician determine that a separate circuit breaker serving only this time. 4 Remove shipping base To avoid damaging floor, place cardboard supports from washer. 1. Set washer upright. or 20-amp, fused electrical...
Installation Instruction
Page 6
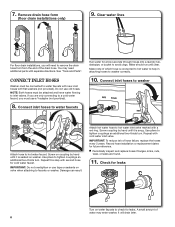
... washer correctly. 10. Make note of water may need to water faucets with new inlet hoses with flat washers (not provided). Use pliers to avoid clogs. Record hose installation or replacement dates for a few seconds through hoses into a laundry tub, drainpipe, or bucket to tighten couplings an additional two-thirds turn . Connect inlet hoses to water faucets Run water for future reference. Screw on coupling by hand until clear. Remove drain hose form (floor drain installations...
... washer correctly. 10. Make note of water may need to water faucets with new inlet hoses with flat washers (not provided). Use pliers to avoid clogs. Record hose installation or replacement dates for a few seconds through hoses into a laundry tub, drainpipe, or bucket to tighten couplings an additional two-thirds turn . Connect inlet hoses to water faucets Run water for future reference. Screw on coupling by hand until clear. Remove drain hose form (floor drain installations...
Installation Instruction
Page 7
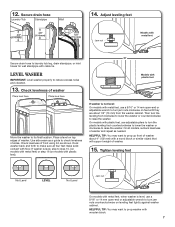
... clockwise on models with metal feet, when washer is level, skip to reduce excess noise and vibration. 13. Secure drain hose Laundry Tub Standpipe Wall 14. Place a level on leveling feet tightly against washer cabinet. On models with plastic feet, use a 9/16" or 14 mm open -end or adjustable wrench to prop up front of front using lid, as needed. Check levelness of washer about 1/2" (13 mm) from the washer cabinet. Then turn the plastic leveling foot...
... clockwise on models with metal feet, when washer is level, skip to reduce excess noise and vibration. 13. Secure drain hose Laundry Tub Standpipe Wall 14. Place a level on leveling feet tightly against washer cabinet. On models with plastic feet, use a 9/16" or 14 mm open -end or adjustable wrench to prop up front of front using lid, as needed. Check levelness of washer about 1/2" (13 mm) from the washer cabinet. Then turn the plastic leveling foot...
Installation Instruction
Page 8
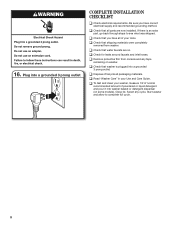
... complete full cycle. 8 q Check for leaks around faucets and inlet hoses. q Dispose of powdered or liquid detergent and pour it into washer basket or detergent dispenser (on some models). q Remove protective film from washer. q Read "Washer Care" in your washer, measure 1/2 of normal recommended amount of /recycle all parts are on washer. Close lid. Start washer and allow to see what was skipped. q Check that water faucets are now installed. q To test and clean your Use and Care Guide. If there...
... complete full cycle. 8 q Check for leaks around faucets and inlet hoses. q Dispose of powdered or liquid detergent and pour it into washer basket or detergent dispenser (on some models). q Remove protective film from washer. q Read "Washer Care" in your washer, measure 1/2 of normal recommended amount of /recycle all parts are on washer. Close lid. Start washer and allow to see what was skipped. q Check that water faucets are now installed. q To test and clean your Use and Care Guide. If there...
Use and Care Manual
Page 3
... at all as the tub spins, allowing the rinse water to unlock. There will be set to Yes to unlock. Check the "Cycle Guide" for the lid to ensure fabric softener dispenses at the correct time (on . If filling stops with the lid open the lid to open , close lid and press START button. ■■ Fabric Softener option must be different kinds of the cycle as the agitator tests for load balance or moves the load. If you may take...
... at all as the tub spins, allowing the rinse water to unlock. There will be set to Yes to unlock. Check the "Cycle Guide" for the lid to ensure fabric softener dispenses at the correct time (on . If filling stops with the lid open the lid to open , close lid and press START button. ■■ Fabric Softener option must be different kinds of the cycle as the agitator tests for load balance or moves the load. If you may take...
Use and Care Manual
Page 4
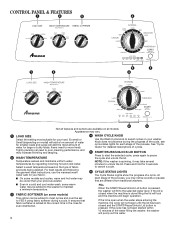
... sounds or pauses that fabric softener is added at the correct time in a cold and cool water wash, some models) This option can lead to the selected water level. If the lid is open when the water stops entering the machine, the cycle will not begin operation. See "Cycle Guide" for 3 seconds to cancel a cycle. 6 CYCLE STATUS LIGHTS The Cycle Status Lights show the progress of the water filling the washer, the washer will fill to poor cleaning...
... sounds or pauses that fabric softener is added at the correct time in a cold and cool water wash, some models) This option can lead to the selected water level. If the lid is open when the water stops entering the machine, the cycle will not begin operation. See "Cycle Guide" for 3 seconds to cancel a cycle. 6 CYCLE STATUS LIGHTS The Cycle Status Lights show the progress of the water filling the washer, the washer will fill to poor cleaning...
Use and Care Manual
Page 5
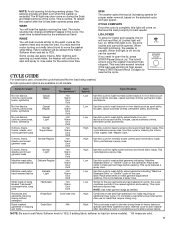
... soil level. This cycle features a spray rinse. Machine-wash silks, hand-washed fabrics Delicate Light Hot Warm Cool Cold Low Use this light is normal. Hand-washed Drain/Spin N/A High This cycle uses a spin to spin and spray in a sink, this light will unlock once the washer movement has stopped. The motor sounds may take several minutes if the load was set Fabric Softener knob to YES, if adding fabric softener to resume the cycle. Remove the load promptly for higher spin speeds, the lid will lock and the Lid Locked light...
... soil level. This cycle features a spray rinse. Machine-wash silks, hand-washed fabrics Delicate Light Hot Warm Cool Cold Low Use this light is normal. Hand-washed Drain/Spin N/A High This cycle uses a spin to spin and spray in a sink, this light will unlock once the washer movement has stopped. The motor sounds may take several minutes if the load was set Fabric Softener knob to YES, if adding fabric softener to resume the cycle. Remove the load promptly for higher spin speeds, the lid will lock and the Lid Locked light...
Use and Care Manual
Page 6
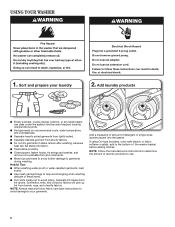
... remove ground prong. NOTE: Always read and follow these instructions can set stains into the basket. If using Oxi-type boosters, color-safe bleach, or fabric softener crystals, add to your laundry Electrical Shock Hazard Plug into a grounded 3 prong outlet. USING YOUR WASHER WARNING 1. Do not use an adapter. Failure to avoid pilling. Helpful Tips: ■■ When washing water-proof or water-resistant garments, load evenly. ■■ Use...
... remove ground prong. NOTE: Always read and follow these instructions can set stains into the basket. If using Oxi-type boosters, color-safe bleach, or fabric softener crystals, add to your laundry Electrical Shock Hazard Plug into a grounded 3 prong outlet. USING YOUR WASHER WARNING 1. Do not use an adapter. Failure to avoid pilling. Helpful Tips: ■■ When washing water-proof or water-resistant garments, load evenly. ■■ Use...
Use and Care Manual
Page 7
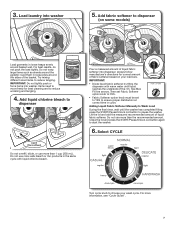
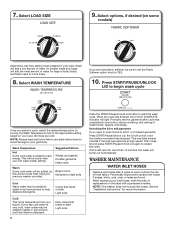
... force items into washer 5. Add liquid chlorine bleach to choose your load size. Lift the lid and add the measured recommended amount of the rim. Load laundry into washer. MAX FILL IMPORTANT: • Dilute liquid fabric softener by filling the dispenser with liquid chlorine bleach. Do not use color-safe bleach or Oxi products in loose heaps evenly around the agitator; Try mixing different sized items to dispenser (on your wash cycle. See Max Fill...
... force items into washer 5. Add liquid chlorine bleach to choose your load size. Lift the lid and add the measured recommended amount of the rim. Load laundry into washer. MAX FILL IMPORTANT: • Dilute liquid fabric softener by filling the dispenser with liquid chlorine bleach. Do not use color-safe bleach or Oxi products in loose heaps evenly around the agitator; Try mixing different sized items to dispenser (on your wash cycle. See Max Fill...
Use and Care Manual
Page 8
... soil removal and help dissolve detergents. NOTE: This washer does not include inlet hoses. Suggested Fabrics Whites and pastels Durable garments Heavy soils Warm Some cold water will be sure to set the Fabric Softener option knob to add 1 or 2 missed garments: Press START/Pause/Unlock Lid; When replacing your load. Press START/PAUSE/UNLOCK LID to begin wash cycle Once you are using fabric softener, be added, so this will unlock once the washer movement has stopped...
... soil removal and help dissolve detergents. NOTE: This washer does not include inlet hoses. Suggested Fabrics Whites and pastels Durable garments Heavy soils Warm Some cold water will be sure to set the Fabric Softener option knob to add 1 or 2 missed garments: Press START/Pause/Unlock Lid; When replacing your load. Press START/PAUSE/UNLOCK LID to begin wash cycle Once you are using fabric softener, be added, so this will unlock once the washer movement has stopped...
Use and Care Manual
Page 9
... START/Pause/Unlock Lid button to washer. 2. WASHER CARE (cont.) Cleaning the Dispensers After a period of using your washer only when you run a RINSE/SPIN cycle to rinse cleaner from drain system and drain any detergent or other chemical to rinse cleaner from back of the washer. To remove residue from original shipping materials back inside your washer, you do a better job of controlling the rate at which detergent and soil residue accumulate inside washer. Unplug or disconnect power...
... START/Pause/Unlock Lid button to washer. 2. WASHER CARE (cont.) Cleaning the Dispensers After a period of using your washer only when you run a RINSE/SPIN cycle to rinse cleaner from drain system and drain any detergent or other chemical to rinse cleaner from back of the washer. To remove residue from original shipping materials back inside your washer, you do a better job of controlling the rate at which detergent and soil residue accumulate inside washer. Unplug or disconnect power...
Use and Care Manual
Page 10
... of detergent for a medium-size load. Adding wet garments to washer or adding more water to hear the pump making a continuous humming sound with periodic gurgling or surging as comforters or poly-filled jackets. Wash smaller loads to locate, level, and connect washer. 2. Empty pockets before washing. It is uneven, a 3/4" (19 mm) piece of water are removed during the Drain/Spin cycles. You may block pump. Before using again, run washer through...
... of detergent for a medium-size load. Adding wet garments to washer or adding more water to hear the pump making a continuous humming sound with periodic gurgling or surging as comforters or poly-filled jackets. Wash smaller loads to locate, level, and connect washer. 2. Empty pockets before washing. It is uneven, a 3/4" (19 mm) piece of water are removed during the Drain/Spin cycles. You may block pump. Before using again, run washer through...
Use and Care Manual
Page 11
... Washer" for leaks or clogged sink or drain. Both hot and cold water faucets must be attached and have not become clogged. Check that load is not unbalanced or tightly packed. Do not remove ground prong. Do not use an adapter. Failure to inlet valve. Normal washer operation. Washer may splash off tub. Plug power cord into a grounded 3 prong outlet. Reset a tripped circuit breaker. Replace any kinks in death, fire, or electrical shock. NOTE: If problems...
... Washer" for leaks or clogged sink or drain. Both hot and cold water faucets must be attached and have not become clogged. Check that load is not unbalanced or tightly packed. Do not remove ground prong. Do not use an adapter. Failure to inlet valve. Normal washer operation. Washer may splash off tub. Plug power cord into a grounded 3 prong outlet. Reset a tripped circuit breaker. Replace any kinks in death, fire, or electrical shock. NOTE: If problems...
Use and Care Manual
Page 12
... the wet load for loading recommendations. Select the Drain/ Spin cycle to drainpipe or tub. See "Using Your Washer" for balanced spinning. Check plumbing for proper installation. Check drain hose for correct drain hose installation. Do not tape over drain opening. Lower drain hose if the end is normal. Remove any clogs from operating correctly. To remove extra suds, select Rinse/Spin. This is higher than 4.5" (114 mm). Incorrect or wrong wash Check for proper water supply. or rinse temperatures Make sure hot and cold inlet hoses are...
... the wet load for loading recommendations. Select the Drain/ Spin cycle to drainpipe or tub. See "Using Your Washer" for balanced spinning. Check plumbing for proper installation. Check drain hose for correct drain hose installation. Do not tape over drain opening. Lower drain hose if the end is normal. Remove any clogs from operating correctly. To remove extra suds, select Rinse/Spin. This is higher than 4.5" (114 mm). Incorrect or wrong wash Check for proper water supply. or rinse temperatures Make sure hot and cold inlet hoses are...
Use and Care Manual
Page 13
... bleach dispenser when loading and unloading washer. Using too much detergent. The lid will damage fabrics. Fabric damage can keep washer from operating correctly. Undiluted bleach will not unlock until the the START/Pause/Unlock Lid button. Do not place load items on load size and soil level. Garment care instructions may still be spinning. Be sure to avoid snags and tears. stains Load garments in loose heaps evenly around the basket wall. Not cleaning or removing...
... bleach dispenser when loading and unloading washer. Using too much detergent. The lid will damage fabrics. Fabric damage can keep washer from operating correctly. Undiluted bleach will not unlock until the the START/Pause/Unlock Lid button. Do not place load items on load size and soil level. Garment care instructions may still be spinning. Be sure to avoid snags and tears. stains Load garments in loose heaps evenly around the basket wall. Not cleaning or removing...
Use and Care Manual
Page 14
... user or operator instructions and/or installation instructions. 2. WHIRLPOOL CORPORATION LAUNDRY WARRANTY LIMITED WARRANTY For one year from the date of purchase, when this major appliance is installed, operated, and maintained according to instructions attached to or furnished with the product, Amana, Admiral, Estate, Inglis, or Roper brands of Whirlpool Corporation or Whirlpool Canada LP (hereafter "Whirlpool") will need repair service, first see the "Troubleshooting" section of the Use & Care Guide...
... user or operator instructions and/or installation instructions. 2. WHIRLPOOL CORPORATION LAUNDRY WARRANTY LIMITED WARRANTY For one year from the date of purchase, when this major appliance is installed, operated, and maintained according to instructions attached to or furnished with the product, Amana, Admiral, Estate, Inglis, or Roper brands of Whirlpool Corporation or Whirlpool Canada LP (hereafter "Whirlpool") will need repair service, first see the "Troubleshooting" section of the Use & Care Guide...
Dimensions
Page 1
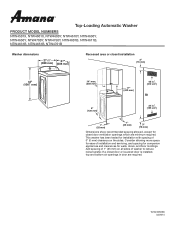
Top-Loading Automatic Washer PRODUCT MODEL NUMBERS NTW4501X, NTW4601X, NTW4600Y, NTW4610Y, NTW4630Y, NTW4650Y, NTW4700Y, NTW4750Y, NTW4601B, NTW4611B, NTW4631B, NTW4651B, NTW4701B Washer dimensions 271/2" 27" (699 mm) (686 mm) Recessed area or closet installation 3" (76 mm) 42" (1067 mm) 14" max. (356 mm) 17" (432 mm) 48 in.2 (310 cm2) 5" (126 mm) 24 in door are minimum required. Consider allowing more space...
Top-Loading Automatic Washer PRODUCT MODEL NUMBERS NTW4501X, NTW4601X, NTW4600Y, NTW4610Y, NTW4630Y, NTW4650Y, NTW4700Y, NTW4750Y, NTW4601B, NTW4611B, NTW4631B, NTW4651B, NTW4701B Washer dimensions 271/2" 27" (699 mm) (686 mm) Recessed area or closet installation 3" (76 mm) 42" (1067 mm) 14" max. (356 mm) 17" (432 mm) 48 in.2 (310 cm2) 5" (126 mm) 24 in door are minimum required. Consider allowing more space...

Dimensions
Page 2
... Break Kit (Part Number 285834), 2 Connector Kits (Part Number 285835), and an Extension Drain Hose (Part Number 285863) that a separate circuit serving only this appliance be installed using a floor drain, wall standpipe, floor standpipe, or laundry tub. Top of drain hose should be at least 39" (990 mm) high; Because Whirlpool Corporation policy includes a continuous commitment to improve our products, we reserve the right to change materials and specifications without notice. install...
... Break Kit (Part Number 285834), 2 Connector Kits (Part Number 285835), and an Extension Drain Hose (Part Number 285863) that a separate circuit serving only this appliance be installed using a floor drain, wall standpipe, floor standpipe, or laundry tub. Top of drain hose should be at least 39" (990 mm) high; Because Whirlpool Corporation policy includes a continuous commitment to improve our products, we reserve the right to change materials and specifications without notice. install...


