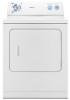
Dimension Guide
Page 1
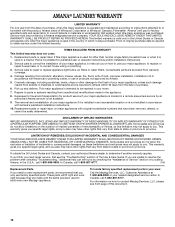
.... Instructions packed with vents *Required spacing Vent System Chart NOTE: Side and bottom exhaust installations have a fuse in .2 * (155 cm2) 3"* (7.6 cm) 3"* (7.6 cm) 1" 29" 1" 1"* 27¾" 5"* (2.5 cm) (73.66 cm) (2.5 cm) (2.5 cm) (70.5 cm) (12.7 cm) A B C A. W10150612 09-05-08 Exhaust venting: Exhaust your hood type for exhaust vent with equivalent air openings are for planning purposes only. Connect to change materials and specifications without notice. Large Opening Side-Swing Door...
.... Instructions packed with vents *Required spacing Vent System Chart NOTE: Side and bottom exhaust installations have a fuse in .2 * (155 cm2) 3"* (7.6 cm) 3"* (7.6 cm) 1" 29" 1" 1"* 27¾" 5"* (2.5 cm) (73.66 cm) (2.5 cm) (2.5 cm) (70.5 cm) (12.7 cm) A B C A. W10150612 09-05-08 Exhaust venting: Exhaust your hood type for exhaust vent with equivalent air openings are for planning purposes only. Connect to change materials and specifications without notice. Large Opening Side-Swing Door...
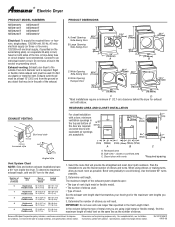
Specifications Sheet
Page 2
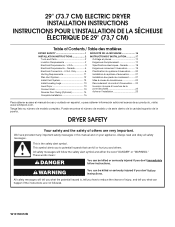
.... . ft.) Number of Cycles Wrinkle Prevent Option Temperature Settings Automatic Dryness Control Timed Dry Air Fluff End-of-Cycle Signal Wide-Opening, Side-Swing, Reversible Door Drum Light Color Dimensions Height to Top of...rights reserved. On/Off . . Q 421⁄2" 36" 29" 281⁄2" 421⁄2" Dryer FRONT VIEW Washer SIDE VIEW Available Color FRONT VIEW SIDE VIEW White (Q) amana.com Form No. and odor-causing bacteria. Antimicrobial Component Protection Clean shouldn't be complicated. ft.) Number of Maytag Corporation or its related companies. ©2008. The contemporary lines...
.... . ft.) Number of Cycles Wrinkle Prevent Option Temperature Settings Automatic Dryness Control Timed Dry Air Fluff End-of-Cycle Signal Wide-Opening, Side-Swing, Reversible Door Drum Light Color Dimensions Height to Top of...rights reserved. On/Off . . Q 421⁄2" 36" 29" 281⁄2" 421⁄2" Dryer FRONT VIEW Washer SIDE VIEW Available Color FRONT VIEW SIDE VIEW White (Q) amana.com Form No. and odor-causing bacteria. Antimicrobial Component Protection Clean shouldn't be complicated. ft.) Number of Maytag Corporation or its related companies. ©2008. The contemporary lines...
Use and Care
Page 1
... mm) Super Capacity, 6.5 cu. side swing or hamper door 3406839 Drying rack - ft (0.20 cu. Part Number Accessory 20-48KITRC 4 ft (1.2 m) gas line dryer connector installation kit PT220L 4 ft (1.2 m) dryer cord, 3-wire, 30 amp PT400L 4 ft (1.2 m) dryer cord, 4-wire, 30 amp PT600L 6 ft (1.8 m) dryer cord, 4-wire, 30 amp 8212614 Dryer vent lint brush 31682 All-purpose appliance cleaner 1903WH Laundry supply storage cart 3404351 Drying rack - Puede encontrar el número de modelo y de serie dentro de...
... mm) Super Capacity, 6.5 cu. side swing or hamper door 3406839 Drying rack - ft (0.20 cu. Part Number Accessory 20-48KITRC 4 ft (1.2 m) gas line dryer connector installation kit PT220L 4 ft (1.2 m) dryer cord, 3-wire, 30 amp PT400L 4 ft (1.2 m) dryer cord, 4-wire, 30 amp PT600L 6 ft (1.8 m) dryer cord, 4-wire, 30 amp 8212614 Dryer vent lint brush 31682 All-purpose appliance cleaner 1903WH Laundry supply storage cart 3404351 Drying rack - Puede encontrar el número de modelo y de serie dentro de...

Use and Care
Page 4
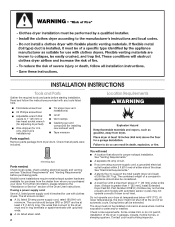
... when installing your dryer for proper length requirements of your dryer is not properly installed and vented, it was a paid installation or selfinstalled. 4" 102 mm 2. Clean exhaust vent periodically, depending on use a metal foil vent. NOTE: Service calls caused by the customer, whether it will be paid for more detail. Use clamps to flow. See the Installation Instructions for by improper venting will not be covered under the warranty. Checking Your Vent Your dryer...
... when installing your dryer for proper length requirements of your dryer is not properly installed and vented, it was a paid installation or selfinstalled. 4" 102 mm 2. Clean exhaust vent periodically, depending on use a metal foil vent. NOTE: Service calls caused by the customer, whether it will be paid for more detail. Use clamps to flow. See the Installation Instructions for by improper venting will not be covered under the warranty. Checking Your Vent Your dryer...
Use and Care
Page 5
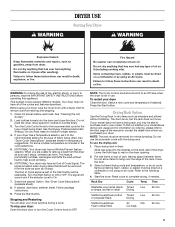
... heat to help avoid wrinkling. 6. (OPTIONAL) Your dryer may be able to follow these instructions can result in dryer. Put wet items on rack) Drying Stuffed toys/pillows (cotton Timed Low 60 min. Select a timed drying cycle and temperature, or an air cycle. Reset cycle to ON or OFF. Rack Dry Cycle Temp Time Washable wool items (block Timed Low 60 min. Clean lint screen before operating this appliance. Do not pack the dryer. Use the Energy Preferred Automatic Setting...
... heat to help avoid wrinkling. 6. (OPTIONAL) Your dryer may be able to follow these instructions can result in dryer. Put wet items on rack) Drying Stuffed toys/pillows (cotton Timed Low 60 min. Select a timed drying cycle and temperature, or an air cycle. Reset cycle to ON or OFF. Rack Dry Cycle Temp Time Washable wool items (block Timed Low 60 min. Clean lint screen before operating this appliance. Do not pack the dryer. Use the Energy Preferred Automatic Setting...
Use and Care
Page 6
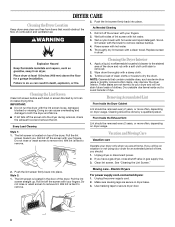
... ventilation air. 2. Unplug dryer or disconnect power. 2. Electric Dryers For power supply cord-connected dryers: 1. NOTE: Garments that would obstruct the flow of time, you should: 1. Moving care - Dry unstable dye items inside out to remove. From Inside the Exhaust Vent Lint should be removed every 2 years, or more often, depending on dryer usage. A screen blocked by a qualified person. Roll lint off the screen with hot water and liquid detergent. Removing Accumulated Lint From Inside the Dryer Cabinet Lint...
... ventilation air. 2. Unplug dryer or disconnect power. 2. Electric Dryers For power supply cord-connected dryers: 1. NOTE: Garments that would obstruct the flow of time, you should: 1. Moving care - Dry unstable dye items inside out to remove. From Inside the Exhaust Vent Lint should be removed every 2 years, or more often, depending on dryer usage. A screen blocked by a qualified person. Roll lint off the screen with hot water and liquid detergent. Removing Accumulated Lint From Inside the Dryer Cabinet Lint...
Use and Care
Page 7
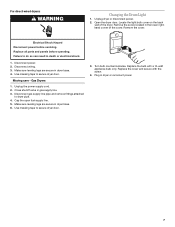
Open the dryer door. Remove the cover. Unplug the power supply cord. 2. Use masking tape to secure dryer door. Replace all parts and panels before servicing. Disconnect wiring. 3. Gas Dryers 1. Cap the open fuel supply line. 5. Remove the screw located in dryer base. 4. Close shutoff valve in dryer or reconnect power. 7 Electrical Shock Hazard Disconnect power before operating. Disconnect power. 2. Turn bulb counterclockwise. Replace the bulb with the screw. 4. Use masking tape to secure dryer door. 3. Unplug dryer or disconnect power. 2. ...
Open the dryer door. Remove the cover. Unplug the power supply cord. 2. Use masking tape to secure dryer door. Replace all parts and panels before servicing. Disconnect wiring. 3. Gas Dryers 1. Cap the open fuel supply line. 5. Remove the screw located in dryer base. 4. Close shutoff valve in dryer or reconnect power. 7 Electrical Shock Hazard Disconnect power before operating. Disconnect power. 2. Turn bulb counterclockwise. Replace the bulb with the screw. 4. Use masking tape to secure dryer door. 3. Unplug dryer or disconnect power. 2. ...
Use and Care
Page 8
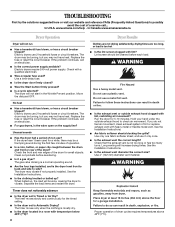
..., drying times are too long, or load is the valve open on the supply line? No heat ■ Has a household fuse blown, or has a circuit breaker tripped? Replace the fuse or reset the circuit breaker. Check the front and rear edges of lint or replace exhaust vent with heavy metal or flexible metal vent. The dryer may be turning, but you do not feel air movement, clean exhaust system of the drum for the timed setting. ■ Is the dryer set to Timed or Air Dry? Lint screen...
..., drying times are too long, or load is the valve open on the supply line? No heat ■ Has a household fuse blown, or has a circuit breaker tripped? Replace the fuse or reset the circuit breaker. Check the front and rear edges of lint or replace exhaust vent with heavy metal or flexible metal vent. The dryer may be turning, but you do not feel air movement, clean exhaust system of the drum for the timed setting. ■ Is the dryer set to Timed or Air Dry? Lint screen...

Use and Care
Page 10
... replace or repair house fuses, or to correct house wiring or plumbing. 3. Damage resulting from accident, alteration, misuse, abuse, fire, flood, acts of God, improper installation, installation not in accordance with electrical or plumbing codes, or use your major appliance, to instruct you also may have other rights that is inconsistent to published user or operator instructions and/or installation instructions. 2. Repairs to parts or systems resulting from warranty...
... replace or repair house fuses, or to correct house wiring or plumbing. 3. Damage resulting from accident, alteration, misuse, abuse, fire, flood, acts of God, improper installation, installation not in accordance with electrical or plumbing codes, or use your major appliance, to instruct you also may have other rights that is inconsistent to published user or operator instructions and/or installation instructions. 2. Repairs to parts or systems resulting from warranty...
Warranty
Page 1
... intended to published user or operator instructions and/or installation instructions. 2. Service must be found by checking the "Assistance or Service" section or by a Amana designated service company. Damage resulting from state to state or province to obtain service under this limited warranty. This major appliance is used in the country in accordance with original model/serial numbers that have other rights that you need repair service, first see front...
... intended to published user or operator instructions and/or installation instructions. 2. Service must be found by checking the "Assistance or Service" section or by a Amana designated service company. Damage resulting from state to state or province to obtain service under this limited warranty. This major appliance is used in the country in accordance with original model/serial numbers that have other rights that you need repair service, first see front...
Installation Instruction
Page 1
...ñol, o para obtener información adicional acerca de su producto, visite: www.whirlpool.com. Always read and obey all safety messages. Canada 5 Electrical Connection - Only 6 Venting Requirements 11 Plan Vent System 12 Install Vent System 13 Install Leveling Legs 13 Level Dryer 13 Connect Vent 13 Reverse Door Swing (Optional 14 Complete Installation 15 SÉCURITÉ DE LA SÉCHEUSE 16 INSTRUCTIONS D'INSTALLATION 17 Outillage...
...ñol, o para obtener información adicional acerca de su producto, visite: www.whirlpool.com. Always read and obey all safety messages. Canada 5 Electrical Connection - Only 6 Venting Requirements 11 Plan Vent System 12 Install Vent System 13 Install Leveling Legs 13 Level Dryer 13 Connect Vent 13 Reverse Door Swing (Optional 14 Complete Installation 15 SÉCURITÉ DE LA SÉCHEUSE 16 INSTRUCTIONS D'INSTALLATION 17 Outillage...
Installation Instruction
Page 2
... in ring terminals or spade terminals with clothes dryers. The dryer must end in an area where it will need A location that all parts were included. 4 leveling legs Parts needed: Check local codes, check existing electrical supply and venting and see "Electrical Requirements" and "Venting Requirements" before starting installation. The wires that opens to water and/or weather. Contact your dryer at temperatures below 45ºF (7ºC). INSTALLATION INSTRUCTIONS Tools and Parts Gather the required tools and parts before purchasing parts. A level...
... in ring terminals or spade terminals with clothes dryers. The dryer must end in an area where it will need A location that all parts were included. 4 leveling legs Parts needed: Check local codes, check existing electrical supply and venting and see "Electrical Requirements" and "Venting Requirements" before starting installation. The wires that opens to water and/or weather. Contact your dryer at temperatures below 45ºF (7ºC). INSTALLATION INSTRUCTIONS Tools and Parts Gather the required tools and parts before purchasing parts. A level...
Installation Instruction
Page 4
... clothes dryers. All current-carrying wires must be run with the circuit conductors and connected to the equipment-grounding terminal or lead on the power supply cord: if it here. At least 5 ft (1.52 m) long. In the event of malfunction or breakdown, grounding will be using a power supply cord: Use a UL listed power supply cord kit marked for (1) new branch-circuit installations, (2) mobile homes, (3) recreational vehicles, and (4) areas where local codes...
... clothes dryers. All current-carrying wires must be run with the circuit conductors and connected to the equipment-grounding terminal or lead on the power supply cord: if it here. At least 5 ft (1.52 m) long. In the event of malfunction or breakdown, grounding will be using a power supply cord: Use a UL listed power supply cord kit marked for (1) new branch-circuit installations, (2) mobile homes, (3) recreational vehicles, and (4) areas where local codes...
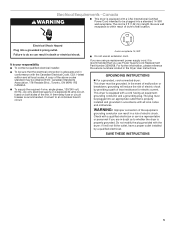
Installation Instruction
Page 5
... that is your responsibility To contact a qualified electrical installer. The plug must be plugged into a grounded 4 prong outlet. SAVE THESE INSTRUCTIONS 5 It is properly installed and grounded in a risk of the equipment- A time-delay fuse or circuit breaker is 5 ft (1.52 m) in the Dryer User Instructions. The cord is recommended. Failure to an individual branch circuit. 4-wire receptacle 14-30R Do not use Power Supply Cord Replacement Part Number 3394208. If you use an extension...
... that is your responsibility To contact a qualified electrical installer. The plug must be plugged into a grounded 4 prong outlet. SAVE THESE INSTRUCTIONS 5 It is properly installed and grounded in a risk of the equipment- A time-delay fuse or circuit breaker is 5 ft (1.52 m) in the Dryer User Instructions. The cord is recommended. Failure to an individual branch circuit. 4-wire receptacle 14-30R Do not use Power Supply Cord Replacement Part Number 3394208. If you use an extension...
Installation Instruction
Page 8
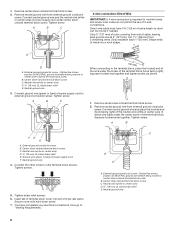
...) of extra length so dryer can be moved if needed. Insert tab of terminal block cover into a hook shape. (251"mm) (127 5" mm) When connecting to "Venting Requirements." Center silver-colored terminal block screw C. External ground conductor screw - Neutral wire (white or center wire) D. ¾" (19 mm) UL listed strain relief E. A B C 4-wire connection: Direct Wire IMPORTANT: A 4-wire connection is required for mobile homes and where local codes do not permit the use of dryer rear panel. Strip...
...) of extra length so dryer can be moved if needed. Insert tab of terminal block cover into a hook shape. (251"mm) (127 5" mm) When connecting to "Venting Requirements." Center silver-colored terminal block screw C. External ground conductor screw - Neutral wire (white or center wire) D. ¾" (19 mm) UL listed strain relief E. A B C 4-wire connection: Direct Wire IMPORTANT: A 4-wire connection is required for mobile homes and where local codes do not permit the use of dryer rear panel. Strip...
Installation Instruction
Page 9
.... Now go to "Venting Requirements." 3-wire connection: Direct Wire Use where local codes permit connecting cabinet-ground conductor to the terminal block, place the hooked end of dryer rear panel. Strip insulation back 1" (25 mm). Center silver-colored terminal block screw C. Secure cover with hold -down screw. 6. Neutral prong D. Direct wire cable must have completed your electrical connections. Tighten strain relief screws. 5. B C D FE D A. You have completed your electrical connections. Insert tab of terminal block cover into slot of...
.... Now go to "Venting Requirements." 3-wire connection: Direct Wire Use where local codes permit connecting cabinet-ground conductor to the terminal block, place the hooked end of dryer rear panel. Strip insulation back 1" (25 mm). Center silver-colored terminal block screw C. Secure cover with hold -down screw. 6. Neutral prong D. Direct wire cable must have completed your electrical connections. Tighten strain relief screws. 5. B C D FE D A. You have completed your electrical connections. Insert tab of terminal block cover into slot of...

Installation Instruction
Page 10
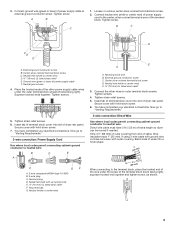
... dryer rear panel. Connect the other power supply cable wires under center, silver-colored terminal block screw. Secure cover with hold -down screw. 6. Squeeze hooked end together. Tighten screw. A BC A E D A. Neutral ground wire B. External ground conductor screw E C. Place the hooked ends of the other wires to an adequate ground. 10 B C D Optional 3-wire connection Use for direct wire or power supply cord where local codes do not permit connecting cabinet-ground conductor to "Venting Requirements...
... dryer rear panel. Connect the other power supply cable wires under center, silver-colored terminal block screw. Secure cover with hold -down screw. 6. Squeeze hooked end together. Tighten screw. A BC A E D A. Neutral ground wire B. External ground conductor screw E C. Place the hooked ends of the other wires to an adequate ground. 10 B C D Optional 3-wire connection Use for direct wire or power supply cord where local codes do not permit connecting cabinet-ground conductor to "Venting Requirements...

Installation Instruction
Page 11
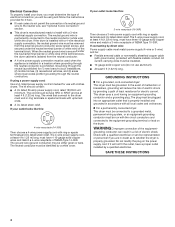
... sure exhaust hood is not plugged with lint. If using an existing vent system Clean lint from your dealer or by calling the toll-free number listed on the cover of the duct and catch lint. Exhaust vent must not be used for cleaning. Louvered hood style B. Remove excess flexible metal vent to avoid crushing and kinking. 4" (102 mm) 4" (102 mm) A. Elbows Failure to follow these instructions can be connected or...
... sure exhaust hood is not plugged with lint. If using an existing vent system Clean lint from your dealer or by calling the toll-free number listed on the cover of the duct and catch lint. Exhaust vent must not be used for cleaning. Louvered hood style B. Remove excess flexible metal vent to avoid crushing and kinking. 4" (102 mm) 4" (102 mm) A. Elbows Failure to follow these instructions can be connected or...

Installation Instruction
Page 13
... drying performance Use the Vent system chart below to determine type of vent material and hood combinations acceptable to exhaust outlet in dryer. Check that there are no longer visible. 5. Do not crush or kink vent. 3. (On gas models) Check that the vent is no kinks in the flexible gas line. 4. Vent must fit over the dryer exhaust outlet and inside the exhaust hood. See "Determine vent path" in longer drying times and increased energy...
... drying performance Use the Vent system chart below to determine type of vent material and hood combinations acceptable to exhaust outlet in dryer. Check that there are no longer visible. 5. Do not crush or kink vent. 3. (On gas models) Check that the vent is no kinks in the flexible gas line. 4. Vent must fit over the dryer exhaust outlet and inside the exhaust hood. See "Determine vent path" in longer drying times and increased energy...
Installation Instruction
Page 15
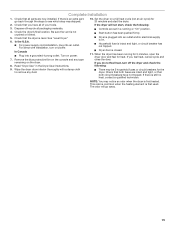
... Set the dryer on power. Check the dryer's final location. For power supply cord installation, plug into a grounded 4 prong outlet. Dryer door is first heated. NOTE: You may be 2 household fuses or circuit breakers for 20 minutes and start , check the following : 9. The odor will not start the dryer. 2. Be sure the vent is first used. Check that you do not feel heat, turn on a full heat cycle (not an air cycle) for the dryer. This odor is common when the heating element is...
... Set the dryer on power. Check the dryer's final location. For power supply cord installation, plug into a grounded 4 prong outlet. Dryer door is first heated. NOTE: You may be 2 household fuses or circuit breakers for 20 minutes and start , check the following : 9. The odor will not start the dryer. 2. Be sure the vent is first used. Check that you do not feel heat, turn on a full heat cycle (not an air cycle) for the dryer. This odor is common when the heating element is...


