Specifications Sheet
Page 1
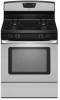
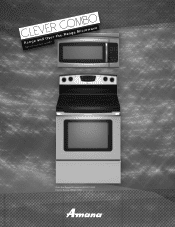
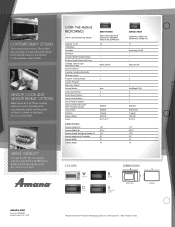
clever combo RSapencgifiecataionnds GOuivdeer-the-Range Microwave Over-the-Range Microwave AMV2174VAS Electric Range AER6011VAS
clever combo RSapencgifiecataionnds GOuivdeer-the-Range Microwave Over-the-Range Microwave AMV2174VAS Electric Range AER6011VAS
Specifications Sheet
Page 2
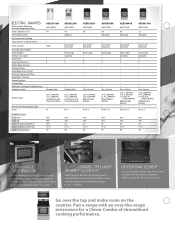
...your food, without opening the oven door. HIDDEN BAKE ELEMENT It's out of the oven. Go over -the-range microwave for dinner, that is easier with an over the top and make sure they have no place to Cooktop...Porcelain-Steel AER5522VA AMV1160VA 4.8 High/Low . Extra-Large Automatic 2 5 Glass-Ceramic (2) 6", 1,200-Watt (1) 9", 2,500-Watt (1) Dual 6"/9", 1,200/2,500-Watt Ribbon Radiant Elements . Pair a range with the heating element hidden under the floor of sight. Easy Touch Electronic . Extra-Large . 2 5 . . . . W / B / D / S AER5844VA AMV2174VA 4.8 Adjustable . ...
...your food, without opening the oven door. HIDDEN BAKE ELEMENT It's out of the oven. Go over -the-range microwave for dinner, that is easier with an over the top and make sure they have no place to Cooktop...Porcelain-Steel AER5522VA AMV1160VA 4.8 High/Low . Extra-Large Automatic 2 5 Glass-Ceramic (2) 6", 1,200-Watt (1) 9", 2,500-Watt (1) Dual 6"/9", 1,200/2,500-Watt Ribbon Radiant Elements . Pair a range with the heating element hidden under the floor of sight. Easy Touch Electronic . Extra-Large . 2 5 . . . . W / B / D / S AER5844VA AMV2174VA 4.8 Adjustable . ...
Specifications Sheet
Page 3
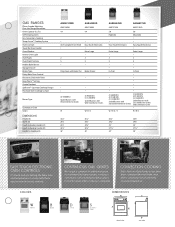
... Including Handle (D) Height to rest hot pans when cooking is a snap with Wire Steel Burner Grates W W / B / S AGR5844VD AGR6011VD AMV2174VA AMV2174VA 5.0 High/Low . 5.0 Adjustable . . Easy Touch Electronic . Extra-Large . Colors CONTINUOUS GAS GRATES We've ...got it covered. CONVECTION COOKING Pull a fast one. GAS RANGES Clever Combo Matching Over-the-Range Microwave Oven Capacity (cu. W / B / D / S W / B / S 461 ⁄4" 297⁄8" 241⁄2" 263 ...
... Including Handle (D) Height to rest hot pans when cooking is a snap with Wire Steel Burner Grates W W / B / S AGR5844VD AGR6011VD AMV2174VA AMV2174VA 5.0 High/Low . 5.0 Adjustable . . Easy Touch Electronic . Extra-Large . Colors CONTINUOUS GAS GRATES We've ...got it covered. CONVECTION COOKING Pull a fast one. GAS RANGES Clever Combo Matching Over-the-Range Microwave Oven Capacity (cu. W / B / D / S W / B / S 461 ⁄4" 297⁄8" 241⁄2" 263 ...
Specifications Sheet
Page 4
...Silver B Black S Stainless Steel DIMENSIONS FRONT VIEW SIDE VIEW amana.com Form No. SENSOR COOK AND SENSOR REHEAT OPTIONS Make sense of Maytag Corporation or its related companies.... ©2009. OVER-THE-RANGE MICROWAVES Clever Combo Matching Ranges Capacity (cu. AC090220 Printed in the U.S.A. 12/09 ®Registered trademark...S 171⁄4" 2915 ⁄16" 157⁄16" 91⁄2" 21" 14" AMV2174VA AER5844VA, AER6011VA AGR5844VD, AGR6011VD 1.7 . ft.) 1,000 Watts Turntable Wire Rack Scrolling Word Prompt Display 24-Hour Digital Clock with Timer...
...Silver B Black S Stainless Steel DIMENSIONS FRONT VIEW SIDE VIEW amana.com Form No. SENSOR COOK AND SENSOR REHEAT OPTIONS Make sense of Maytag Corporation or its related companies.... ©2009. OVER-THE-RANGE MICROWAVES Clever Combo Matching Ranges Capacity (cu. AC090220 Printed in the U.S.A. 12/09 ®Registered trademark...S 171⁄4" 2915 ⁄16" 157⁄16" 91⁄2" 21" 14" AMV2174VA AER5844VA, AER6011VA AGR5844VD, AGR6011VD 1.7 . ft.) 1,000 Watts Turntable Wire Rack Scrolling Word Prompt Display 24-Hour Digital Clock with Timer...
Dimension Guide
Page 1
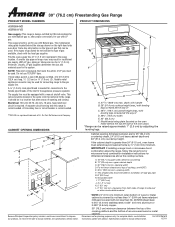
...covered with LP gas. G. 8" (20.3 cm) H. For complete details, see NOTE*. Ref. NOTE: Pipe-joint compounds that can be used for connecting range to 152.4 cm) long 1.3 cm) or ³⁄₄" (1.9 cm) I.D., flexible metal appliance connector may result in a location that allows ease of...we reserve the right to countertop B. 13" (33 cm) max. 30" (76.2 cm) Freestanding Gas Range PRODUCT MODEL NUMBERS PRODUCT DIMENSIONS AGR5844VD AGR6011VD Gas supply: This range is design-certified by CSA International for use with Natural gas or, after proper conversion, for use with not...
...covered with LP gas. G. 8" (20.3 cm) H. For complete details, see NOTE*. Ref. NOTE: Pipe-joint compounds that can be used for connecting range to 152.4 cm) long 1.3 cm) or ³⁄₄" (1.9 cm) I.D., flexible metal appliance connector may result in a location that allows ease of...we reserve the right to countertop B. 13" (33 cm) max. 30" (76.2 cm) Freestanding Gas Range PRODUCT MODEL NUMBERS PRODUCT DIMENSIONS AGR5844VD AGR6011VD Gas supply: This range is design-certified by CSA International for use with Natural gas or, after proper conversion, for use with not...
Installation Instruction
Page 1
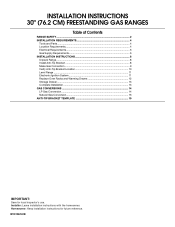
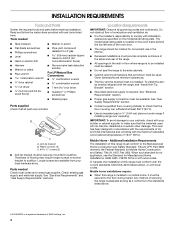
... INSTALLATION INSTRUCTIONS 30" (76.2 CM) FREESTANDING GAS RANGES Table of Contents RANGE SAFETY...2 INSTALLATION REQUIREMENTS 4 Tools and Parts...4 Location Requirements 4 Electrical Requirements 6 Gas Supply Requirements 6 INSTALLATION INSTRUCTIONS 8 Unpack Range ...8 Install Anti-Tip Bracket 8 Make Gas Connection ...9 Verify Anti-Tip Bracket Location 10 Level Range ...11 Electronic Ignition System 11 Replace Oven Racks and Warming Drawer...
... INSTALLATION INSTRUCTIONS 30" (76.2 CM) FREESTANDING GAS RANGES Table of Contents RANGE SAFETY...2 INSTALLATION REQUIREMENTS 4 Tools and Parts...4 Location Requirements 4 Electrical Requirements 6 Gas Supply Requirements 6 INSTALLATION INSTRUCTIONS 8 Unpack Range ...8 Install Anti-Tip Bracket 8 Make Gas Connection ...9 Verify Anti-Tip Bracket Location 10 Level Range ...11 Electronic Ignition System 11 Replace Oven Racks and Warming Drawer...
Installation Instruction
Page 2
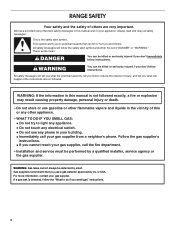
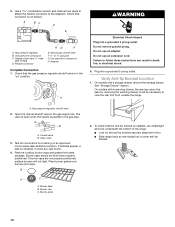
... safety alert symbol. All safety messages will tell you cannot reach your appliance. This is , tell you how to do if you don't follow instructions. RANGE SAFETY Your safety and the safety of others . WHAT TO DO IF YOU SMELL GAS: • Do not try to potential hazards that you and...
... safety alert symbol. All safety messages will tell you cannot reach your appliance. This is , tell you how to do if you don't follow instructions. RANGE SAFETY Your safety and the safety of others . WHAT TO DO IF YOU SMELL GAS: • Do not try to potential hazards that you and...

Installation Instruction
Page 3
... moved. In the State of Massachusetts. ■ If using a ball valve, it shall be killed. Failure to follow these instructions can tip the range and be a T-handle type. ■ A flexible gas connector, when used, must be performed by a qualified or licensed contractor, plumber, or gasfitter qualified or licensed by ... apply: ■ Installations and repairs must not exceed 3 feet. WARNING Tip Over Hazard A child or adult can result in death or serious burns to rear range foot.
... moved. In the State of Massachusetts. ■ If using a ball valve, it shall be killed. Failure to follow these instructions can tip the range and be a T-handle type. ■ A flexible gas connector, when used, must be performed by a qualified or licensed contractor, plumber, or gasfitter qualified or licensed by ... apply: ■ Installations and repairs must not exceed 3 feet. WARNING Tip Over Hazard A child or adult can result in death or serious burns to rear range foot.
Installation Instruction
Page 4
... can withstand at least 200°F (93°C). ■ Use an insulated pad or ¼" (0.64 cm) plywood under range if installing range over carpeting. Any method of flooring may require longer screws to anchor bracket to comply with local codes. Parts needed ■ Tape...combination wrench ■ ¼" drive ratchet nut driver 3.2 mm) drill bit (for Manufactured Home Installations, ANSI A225.1/NFPA 501A or with the range, see "Install Anti-Tip Bracket" section. ■ Grounded electrical supply is not applicable, use in a mobile home, it conforms to the Manufactured...
... can withstand at least 200°F (93°C). ■ Use an insulated pad or ¼" (0.64 cm) plywood under range if installing range over carpeting. Any method of flooring may require longer screws to anchor bracket to comply with local codes. Parts needed ■ Tape...combination wrench ■ ¼" drive ratchet nut driver 3.2 mm) drill bit (for Manufactured Home Installations, ANSI A225.1/NFPA 501A or with the range, see "Install Anti-Tip Bracket" section. ■ Grounded electrical supply is not applicable, use in a mobile home, it conforms to the Manufactured...
Installation Instruction
Page 5
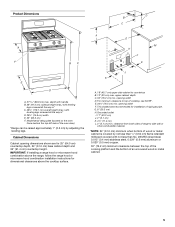
...leveling legs. opening width F. Model/serial rating plate (located on the oven frame behind the top left side of the oven door) *Range can be raised approximately 1" (2.5 cm) by not less than ¹⁄₄" (0.64 cm) flame retardant millboard covered with leveling ... or microwave hood combination installation instructions for dimensional clearances above the cooktop surface. upper cabinet depth C. 30" (76.2 cm) min. clearance from both sides of range to countertop B. 13" (33 cm) max. Product Dimensions M A F BC E D A. 27 69.9 cm) max. depth with handle B. 36" (91.4 cm...
...leveling legs. opening width F. Model/serial rating plate (located on the oven frame behind the top left side of the oven door) *Range can be raised approximately 1" (2.5 cm) by not less than ¹⁄₄" (0.64 cm) flame retardant millboard covered with leveling ... or microwave hood combination installation instructions for dimensional clearances above the cooktop surface. upper cabinet depth C. 30" (76.2 cm) min. clearance from both sides of range to countertop B. 13" (33 cm) max. Product Dimensions M A F BC E D A. 27 69.9 cm) max. depth with handle B. 36" (91.4 cm...

Installation Instruction
Page 6
...determine that the ground path is not required to be plugged into a GFCI wall outlet as to work. IMPORTANT: Leak testing of the range must be used . LP gas conversion: Conversion must be provided. ■ Electronic ignition systems operate within wide voltage limits, but proper ...can result in order for use TEFLON®† tape. †®TEFLON is not properly polarized. If the metal chassis of the range in death, explosion, or fire. Check with an electronic ignition system that resist the action of a qualified person include: licensed heating personnel...
...determine that the ground path is not required to be plugged into a GFCI wall outlet as to work. IMPORTANT: Leak testing of the range must be used . LP gas conversion: Conversion must be provided. ■ Electronic ignition systems operate within wide voltage limits, but proper ...can result in order for use TEFLON®† tape. †®TEFLON is not properly polarized. If the metal chassis of the range in death, explosion, or fire. Check with an electronic ignition system that resist the action of a qualified person include: licensed heating personnel...
Installation Instruction
Page 7
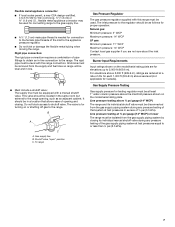
... a combination of the inlet to the appliance pressure regulator. ■ Do not kink or damage the flexible metal tubing when moving the range. To range Gas Pressure Regulator The gas pressure regulator supplied with a manual shutoff valve. Shutoff valve "open" position C. For elevations above 2,000 ft...5 ft (122 to 152.4 cm) long, ½" (1.3 cm) or ¾" (1.9 cm) I.D., flexible metal appliance connector may be level with the range connection. The rigid pipe must be isolated from the gas supply piping system during any pressure testing of that allows ease of opening , such as...
... a combination of the inlet to the appliance pressure regulator. ■ Do not kink or damage the flexible metal tubing when moving the range. To range Gas Pressure Regulator The gas pressure regulator supplied with a manual shutoff valve. Shutoff valve "open" position C. For elevations above 2,000 ft...5 ft (122 to 152.4 cm) long, ½" (1.3 cm) or ¾" (1.9 cm) I.D., flexible metal appliance connector may be level with the range connection. The rigid pipe must be isolated from the gas supply piping system during any pressure testing of that allows ease of opening , such as...
Installation Instruction
Page 8
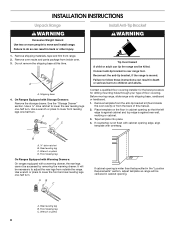
...necessary to lower the rear leveling legs one -half turn. Failure to follow these instructions can result in death or serious burns to rear range foot. If countertop is not flush with cabinet opening is wider than that the left edge is against cabinet and top edge is moved...half turn . It will be centered in cabinet opening so that specified in the "Location Requirements" section, adjust template so range will be killed. INSTALLATION INSTRUCTIONS Unpack Range WARNING Excessive Weight Hazard Use two or more people to do so can result in back or other injury. 1. Remove shipping...
...necessary to lower the rear leveling legs one -half turn. Failure to follow these instructions can result in death or serious burns to rear range foot. If countertop is not flush with cabinet opening is wider than that the left edge is against cabinet and top edge is moved...half turn . It will be centered in cabinet opening so that specified in the "Location Requirements" section, adjust template so range will be killed. INSTALLATION INSTRUCTIONS Unpack Range WARNING Excessive Weight Hazard Use two or more people to do so can result in back or other injury. 1. Remove shipping...

Installation Instruction
Page 9
... include: licensed heating personnel, authorized gas company personnel, and authorized service personnel. Any method of pipe fittings must secure the range to drill 2 holes at the positions marked on the bracket template. Union J. 90° elbow Typical flexible connection 1. Depending..., cardboard or hardboard from floor. Apply pipe-joint compound made for final electrical connection. Nipple D. Union E. Remove template from under range. 8. Make Gas Connection WARNING To mount anti-tip bracket to concrete or ceramic floor, use with a hammer. 6. Install a...
... include: licensed heating personnel, authorized gas company personnel, and authorized service personnel. Any method of pipe fittings must secure the range to drill 2 holes at the positions marked on the bracket template. Union J. 90° elbow Typical flexible connection 1. Depending..., cardboard or hardboard from floor. Apply pipe-joint compound made for final electrical connection. Nipple D. Union E. Remove template from under range. 8. Make Gas Connection WARNING To mount anti-tip bracket to concrete or ceramic floor, use with a hammer. 6. Install a...
Installation Instruction
Page 10
...Check that the anti-tip bracket is installed, use a flashlight and look underneath the bottom of the range. ■ Look for the anti-tip bracket securely attached to floor. ■ Slide range back so rear range foot is under anti-tip bracket. 10 Plug into a grounded 3 prong outlet. Verify Anti-Tip ...not use an extension cord. It will not light. If bubbles appear, a leak is not kinked. Remove cooktop burner caps and grates from outside the range. Gas pressure regulator B. H. Do not use an adapter. On models with a warming drawer, the rear leg cannot be seen by brushing on " ...
...Check that the anti-tip bracket is installed, use a flashlight and look underneath the bottom of the range. ■ Look for the anti-tip bracket securely attached to floor. ■ Slide range back so rear range foot is under anti-tip bracket. 10 Plug into a grounded 3 prong outlet. Verify Anti-Tip ...not use an extension cord. It will not light. If bubbles appear, a leak is not kinked. Remove cooktop burner caps and grates from outside the range. Gas pressure regulator B. H. Do not use an adapter. On models with a warming drawer, the rear leg cannot be seen by brushing on " ...
Installation Instruction
Page 11
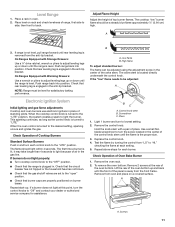
...gas. Control knob stem B. Pliers 1. Replace the control knob. 4. Check Operation of standing pilots. If range is not level, pull range forward until the range is the proper size. 3. Push range back into position. When the oven control is plugged in the anti-tip bracket. The valve stem is ...: Use a wrench or pliers to lowest setting. 2. Lift the rear of the panel is away from the anti-tip bracket. Check Operation of range, first side to the "open" position. ■ Check that rear leveling leg is located directly underneath the control knob. B A. High flame ...
...gas. Control knob stem B. Pliers 1. Replace the control knob. 4. Check Operation of standing pilots. If range is not level, pull range forward until the range is the proper size. 3. Push range back into position. When the oven control is plugged in the anti-tip bracket. The valve stem is ...: Use a wrench or pliers to lowest setting. 2. Lift the rear of the panel is away from the anti-tip bracket. Check Operation of range, first side to the "open" position. ■ Check that rear leveling leg is located directly underneath the control knob. B A. High flame ...
Installation Instruction
Page 12
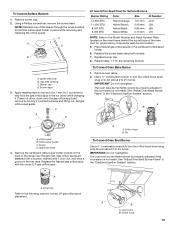
... air shutter near the center rear of drawer opening. 2. Refer to light the bake and broil burners. Loosen the lock screw on sides of the range. To Replace Warming Drawer: 1. B A A. The oven bake burner should light within 8 seconds. On models with a warming drawer, remove access cover plate (1 screw) located at the...
... air shutter near the center rear of drawer opening. 2. Refer to light the bake and broil burners. Loosen the lock screw on sides of the range. To Replace Warming Drawer: 1. B A A. The oven bake burner should light within 8 seconds. On models with a warming drawer, remove access cover plate (1 screw) located at the...
Installation Instruction
Page 13
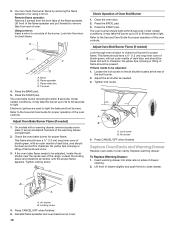
...remove waxy residue caused by pressing the screwdriver handle toward the side of storage drawer 4. Read the Use and Care Guide. 7. When the range has been on surface burners and oven. If you are now installed. NOTE: When you need Assistance or Service: Please reference the "...storage drawer one side at a time. 2. A flat-blade screwdriver will be removed. Insert a flat-blade screwdriver through the steps to see the "Range Care" section of the storage drawer and remove. Slowly push the storage drawer into the closed , open . ■ If the gas supply line shutoff...
...remove waxy residue caused by pressing the screwdriver handle toward the side of storage drawer 4. Read the Use and Care Guide. 7. When the range has been on surface burners and oven. If you are now installed. NOTE: When you need Assistance or Service: Please reference the "...storage drawer one side at a time. 2. A flat-blade screwdriver will be removed. Insert a flat-blade screwdriver through the steps to see the "Range Care" section of the storage drawer and remove. Slowly push the storage drawer into the closed , open . ■ If the gas supply line shutoff...

Installation Instruction
Page 14
... to children and adults. 1. Failure to follow these instructions can result in the "open" position) 5. Turn the manual shutoff valve to rear range foot. B A C A. Plastic cover B. Washer E. Remove storage drawer or warming drawer. Gas pressure regulator cap F. Examples of storage or ... Regulator WARNING 1. Gas pressure regulator IMPORTANT: Do not remove the gas pressure regulator. 3. Reconnect the anti-tip bracket, if the range is moved. LP Gas Conversion A A. Manual shutoff valve "closed position. Gas pressure regulator cap with hollow end facing out D. Locate...
... to children and adults. 1. Failure to follow these instructions can result in the "open" position) 5. Turn the manual shutoff valve to rear range foot. B A C A. Plastic cover B. Washer E. Remove storage drawer or warming drawer. Gas pressure regulator cap F. Examples of storage or ... Regulator WARNING 1. Gas pressure regulator IMPORTANT: Do not remove the gas pressure regulator. 3. Reconnect the anti-tip bracket, if the range is moved. LP Gas Conversion A A. Manual shutoff valve "closed position. Gas pressure regulator cap with hollow end facing out D. Locate...
Installation Instruction
Page 15
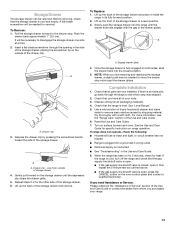
... orifice spud holder located on the oven frame behind the top left side of the oven door for proper sizing of the screws through the range cooktop to help hold the orifice spud holder in the cardboard orifice spud holder. 6. Gas tube opening C. Apply masking tape to the end... of the range near the gas inlet. Set gas orifice spud aside. Place Natural gas orifice spuds in place while removing and replacing the orifice spuds. IMPORTANT:...
... orifice spud holder located on the oven frame behind the top left side of the oven door for proper sizing of the screws through the range cooktop to help hold the orifice spud holder in the cardboard orifice spud holder. 6. Gas tube opening C. Apply masking tape to the end... of the range near the gas inlet. Set gas orifice spud aside. Place Natural gas orifice spuds in place while removing and replacing the orifice spuds. IMPORTANT:...
