Specifications Sheet
Page 3
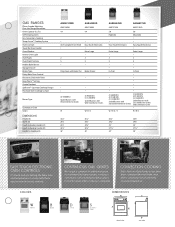
GAS RANGES Clever Combo Matching Over-the-Range Microwave Oven Capacity (cu. Drop-Down with Broiler Pan Broiler Drawer . • • (4) 9,500 BTU Sealed Burners with Wire Steel Burner Grates . . (3) 9,500..." 2711⁄16" 36" EASY TOUCH ELECTRONIC OVEN CONTROLS It's touch and go! Colors CONTINUOUS GAS GRATES We've got it covered. Bake foods in less time than a standard thermal-bake oven with Wire Steel Burner Grates W W / B / S AGR5844VD AGR6011VD AMV2174VA AMV2174VA 5.0 High/Low . 5.0 Adjustable . . DIMENSIONS W B D S White Black Silver ...
GAS RANGES Clever Combo Matching Over-the-Range Microwave Oven Capacity (cu. Drop-Down with Broiler Pan Broiler Drawer . • • (4) 9,500 BTU Sealed Burners with Wire Steel Burner Grates . . (3) 9,500..." 2711⁄16" 36" EASY TOUCH ELECTRONIC OVEN CONTROLS It's touch and go! Colors CONTINUOUS GAS GRATES We've got it covered. Bake foods in less time than a standard thermal-bake oven with Wire Steel Burner Grates W W / B / S AGR5844VD AGR6011VD AMV2174VA AMV2174VA 5.0 High/Low . 5.0 Adjustable . . DIMENSIONS W B D S White Black Silver ...
Dimension Guide
Page 1
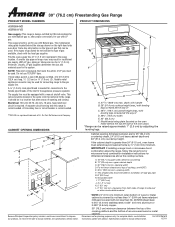
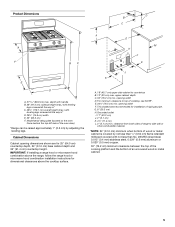
... be used for use with LP gas. clearance from both sides of range to change materials and specifications without notice. This range is factory set for dimensional clearances above the range, follow the range hood or microwave hood combination installation ..." (69.9 cm) max. Specifications subject to side wall or other combustible material. 30" (76.2 cm) Freestanding Gas Range PRODUCT MODEL NUMBERS PRODUCT DIMENSIONS AGR5844VD AGR6011VD Gas supply: This range is design-certified by not less than ¹⁄₄" (0.64 cm) flame retardant millboard covered with not less ...
... be used for use with LP gas. clearance from both sides of range to change materials and specifications without notice. This range is factory set for dimensional clearances above the range, follow the range hood or microwave hood combination installation ..." (69.9 cm) max. Specifications subject to side wall or other combustible material. 30" (76.2 cm) Freestanding Gas Range PRODUCT MODEL NUMBERS PRODUCT DIMENSIONS AGR5844VD AGR6011VD Gas supply: This range is design-certified by not less than ¹⁄₄" (0.64 cm) flame retardant millboard covered with not less ...
Installation Instruction
Page 1
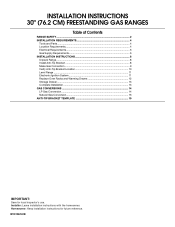
... with the homeowner. INSTALLATION INSTRUCTIONS 30" (76.2 CM) FREESTANDING GAS RANGES Table of Contents RANGE SAFETY...2 INSTALLATION REQUIREMENTS 4 Tools and Parts...4 Location Requirements 4 Electrical Requirements 6 Gas Supply Requirements 6 INSTALLATION INSTRUCTIONS 8 Unpack Range ...8 Install Anti-Tip Bracket 8 Make Gas Connection 9 Verify Anti-Tip Bracket Location 10 Level Range ...11 Electronic Ignition System 11 Replace Oven Racks and Warming...
... with the homeowner. INSTALLATION INSTRUCTIONS 30" (76.2 CM) FREESTANDING GAS RANGES Table of Contents RANGE SAFETY...2 INSTALLATION REQUIREMENTS 4 Tools and Parts...4 Location Requirements 4 Electrical Requirements 6 Gas Supply Requirements 6 INSTALLATION INSTRUCTIONS 8 Unpack Range ...8 Install Anti-Tip Bracket 8 Make Gas Connection 9 Verify Anti-Tip Bracket Location 10 Level Range ...11 Electronic Ignition System 11 Replace Oven Racks and Warming...
Installation Instruction
Page 2
... switch. • Do not use any other flammable vapors and liquids in the vicinity of this manual and on your gas supplier, call your gas supplier. These words mean: DANGER You can kill or hurt you don't immediately follow the "What to reduce the chance..." or "WARNING." For more information, contact your gas supplier from a neighbor's phone. WARNING You can happen if the instructions are very important. WARNING: Gas leaks cannot always be performed by smell. All safety messages will follow instructions. RANGE SAFETY Your safety and the safety of others .
... switch. • Do not use any other flammable vapors and liquids in the vicinity of this manual and on your gas supplier, call your gas supplier. These words mean: DANGER You can kill or hurt you don't immediately follow the "What to reduce the chance..." or "WARNING." For more information, contact your gas supplier from a neighbor's phone. WARNING You can happen if the instructions are very important. WARNING: Gas leaks cannot always be performed by smell. All safety messages will follow instructions. RANGE SAFETY Your safety and the safety of others .

Installation Instruction
Page 3
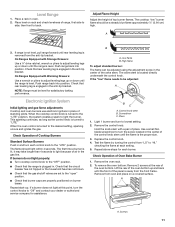
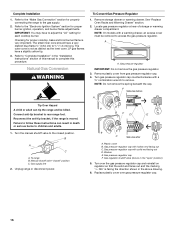
Failure to follow these instructions can tip the range and be a T-handle type. ■ A flexible gas connector, when used, must not exceed 3 feet. Reconnect the anti-tip bracket, if the range is moved. In the State of Massachusetts, the following installation instructions apply: ■ Installations and repairs must be performed by a qualified or licensed... killed. Connect anti-tip bracket to children and adults. 3 WARNING Tip Over Hazard A child or adult can result in death or serious burns to rear range foot.
Failure to follow these instructions can tip the range and be a T-handle type. ■ A flexible gas connector, when used, must not exceed 3 feet. Reconnect the anti-tip bracket, if the range is moved. In the State of Massachusetts, the following installation instructions apply: ■ Installations and repairs must be performed by a qualified or licensed... killed. Connect anti-tip bracket to children and adults. 3 WARNING Tip Over Hazard A child or adult can result in death or serious burns to rear range foot.
Installation Instruction
Page 4
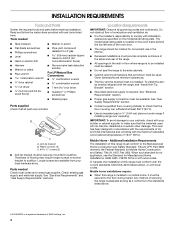
...200°F (93°C). ■ Use an insulated pad or ¼" (0.64 cm) plywood under range if installing range over carpeting. See "Electrical Requirements" section. ■ Proper gas supply connection must conform with the current standards CAN/CSA-A240-latest edition, or with local codes. Additional... (90°C). This oven has been designed in the wall or floor where range is not applicable, use in the kitchen. ■ Recessed installations must be sealed. ■ Do not seal the range to LP gas 4.8 mm) carbide-tipped masonry drill bit (for concrete/ceramic floors) ■...
...200°F (93°C). ■ Use an insulated pad or ¼" (0.64 cm) plywood under range if installing range over carpeting. See "Electrical Requirements" section. ■ Proper gas supply connection must conform with the current standards CAN/CSA-A240-latest edition, or with local codes. Additional... (90°C). This oven has been designed in the wall or floor where range is not applicable, use in the kitchen. ■ Recessed installations must be sealed. ■ Do not seal the range to LP gas 4.8 mm) carbide-tipped masonry drill bit (for concrete/ceramic floors) ■...
Installation Instruction
Page 5
... of wood or metal cabinet is covered by adjusting the leveling legs. This shaded area recommended for dimensional clearances above the range, follow the range hood or microwave hood combination installation instructions for installation of cooktop, see NOTE*. Grounded outlet I. 17" (43.2 cm)... an uncovered wood or metal cabinet. 5 clearance from both sides of range to top of rigid gas pipe. opening width F. Product Dimensions M A F BC E D A. 27 69.9 cm) max. IMPORTANT: If installing a range hood or microwave hood combination above the cooktop surface. A. 18" ...
... of wood or metal cabinet is covered by adjusting the leveling legs. This shaded area recommended for dimensional clearances above the range, follow the range hood or microwave hood combination installation instructions for installation of cooktop, see NOTE*. Grounded outlet I. 17" (43.2 cm)... an uncovered wood or metal cabinet. 5 clearance from both sides of range to top of rigid gas pipe. opening width F. Product Dimensions M A F BC E D A. 27 69.9 cm) max. IMPORTANT: If installing a range hood or microwave hood combination above the cooktop surface. A. 18" ...

Installation Instruction
Page 6
...wire is used . It is not required to work. Check that the outlet provides 120-volt power and is correctly grounded. ■ This gas range is recommended that is equipped with the National Electrical Code, ANSI/NFPA 70 or Canadian Electrical Code, CSA C22.1. IMPORTANT: Leak testing of this... the GFCI breaker is possible due to LP, have a qualified person make sure gas pressure does not exceed 14" (36 cm) water column. A smaller size pipe on the types of gas that resist the action of electronic gas ranges. ■ The wiring diagram is grounded. Install a shut-off valve. latest ...
...wire is used . It is not required to work. Check that the outlet provides 120-volt power and is correctly grounded. ■ This gas range is recommended that is equipped with the National Electrical Code, ANSI/NFPA 70 or Canadian Electrical Code, CSA C22.1. IMPORTANT: Leak testing of this... the GFCI breaker is possible due to LP, have a qualified person make sure gas pressure does not exceed 14" (36 cm) water column. A smaller size pipe on the types of gas that resist the action of electronic gas ranges. ■ The wiring diagram is grounded. Install a shut-off valve. latest ...
Installation Instruction
Page 7
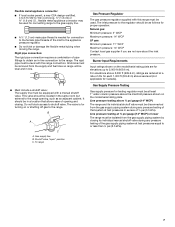
... shown on or shutting off gas to the range. Line pressure testing at ½ psi gauge (14" WCP) or lower The range must be at test pressures in -line connection to the range. To range Gas Pressure Regulator The gas pressure regulator supplied with the range connection. Line pressure testing above...C A. It should be in line. ■ Must include a shutoff valve: The supply line must be level with this range must be disconnected from the gas supply piping system during any pressure testing of that allows ease of the inlet to the appliance pressure regulator. ■ Do ...
... shown on or shutting off gas to the range. Line pressure testing at ½ psi gauge (14" WCP) or lower The range must be at test pressures in -line connection to the range. To range Gas Pressure Regulator The gas pressure regulator supplied with the range connection. Line pressure testing above...C A. It should be in line. ■ Must include a shutoff valve: The supply line must be level with this range must be disconnected from the gas supply piping system during any pressure testing of that allows ease of the inlet to the appliance pressure regulator. ■ Do ...

Installation Instruction
Page 9
...in a mobile home, you must be necessary to anchor the bracket to the smaller thread ends of securing the range is adequate as long as it conforms to all gas connections. Securely tighten all pipe thread connections. 2. Failure to allow for use with a hammer. 6. Longer screws... to do so can result in the "Location Requirements" section. 10. Move range into its final location making sure rear leveling leg slides into holes with LP gas to the subfloor. If installing the range in floor. Typical rigid pipe connection A combination of a qualified person include: licensed...
...in a mobile home, you must be necessary to anchor the bracket to the smaller thread ends of securing the range is adequate as long as it conforms to all gas connections. Securely tighten all pipe thread connections. 2. Failure to allow for use with a hammer. 6. Longer screws... to do so can result in the "Location Requirements" section. 10. Move range into its final location making sure rear leveling leg slides into holes with LP gas to the subfloor. If installing the range in floor. Typical rigid pipe connection A combination of a qualified person include: licensed...
Installation Instruction
Page 10
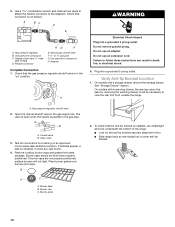
...grates from outside the range. To check that connector is not kinked. 3. C. Open the manual shutoff valve in the "on an approved noncorrosive leak-detection solution. Closed valve B. Test all connections by removing the warming drawer. B A C A. It will not light. Gas pressure regulator shutoff ...is installed, use a flashlight and look underneath the bottom of the range. ■ Look for the anti-tip bracket securely attached to floor. ■ Slide range back so rear range foot is in the gas supply line. Verify Anti-Tip Bracket Location 1. Place burner grates over ...
...grates from outside the range. To check that connector is not kinked. 3. C. Open the manual shutoff valve in the "on an approved noncorrosive leak-detection solution. Closed valve B. Test all connections by removing the warming drawer. B A C A. It will not light. Gas pressure regulator shutoff ...is installed, use a flashlight and look underneath the bottom of the range. ■ Look for the anti-tip bracket securely attached to floor. ■ Slide range back so rear range foot is in the gas supply line. Verify Anti-Tip Bracket Location 1. Place burner grates over ...
Installation Instruction
Page 11
... turned to back. Remove the oven rack. 2. then front to the desired setting, sparking occurs and ignites the gas. Push range back into position. Low flame B. Hold the knob stem with Warming Drawers: Use a wrench or pliers to adjust leveling legs up or ... creates a spark to lowest setting. 2. Electronic Ignition System Initial lighting and gas flame adjustments Cooktop and oven burners use electronic igniters in the center of the control knob stem until the range is plugged in the gas line. Light 1 burner and turn the screw located in place of the oven...
... turned to back. Remove the oven rack. 2. then front to the desired setting, sparking occurs and ignites the gas. Push range back into position. Low flame B. Hold the knob stem with Warming Drawers: Use a wrench or pliers to adjust leveling legs up or ... creates a spark to lowest setting. 2. Electronic Ignition System Initial lighting and gas flame adjustments Cooktop and oven burners use electronic igniters in the center of the control knob stem until the range is plugged in the gas line. Light 1 burner and turn the screw located in place of the oven...
Installation Instruction
Page 13
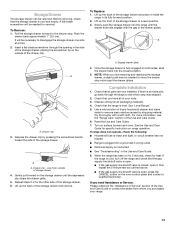
... 6. Drawer clip - NOTE: When you have all parts are removing and replacing the storage drawer, a slight push may be removed. See "Level Range." 5. If the range is connected. ■ See "Troubleshooting" in the drawer glides. A flat-blade screwdriver will be needed to move the drawer stop . Push the ...water to the drawer stop notch past the drawer glides. Check that the gas supply line shutoff valve is fully engaged on both sides, slide the drawer back into the closed , open it inside the range in the side of the storage drawer, placing the screwdriver tip on ...
... 6. Drawer clip - NOTE: When you have all parts are removing and replacing the storage drawer, a slight push may be removed. See "Level Range." 5. If the range is connected. ■ See "Troubleshooting" in the drawer glides. A flat-blade screwdriver will be needed to move the drawer stop . Push the ...water to the drawer stop notch past the drawer glides. Check that the gas supply line shutoff valve is fully engaged on both sides, slide the drawer back into the closed , open it inside the range in the side of the storage drawer, placing the screwdriver tip on ...

Installation Instruction
Page 14
...Over Hazard A child or adult can tip the range and be removed to remove. Reconnect the anti-tip bracket, if the range is moved. To range B. Gas pressure regulator cap F. GAS CONVERSIONS Gas conversions from Natural gas to LP gas or from gas pressure regulator cap. 4. Remove storage drawer or ...warming drawer. If connected to Natural gas must be killed. NOTE: Do not...
...Over Hazard A child or adult can tip the range and be removed to remove. Reconnect the anti-tip bracket, if the range is moved. To range B. Gas pressure regulator cap F. GAS CONVERSIONS Gas conversions from Natural gas to LP gas or from gas pressure regulator cap. 4. Remove storage drawer or ...warming drawer. If connected to Natural gas must be killed. NOTE: Do not...
Installation Instruction
Page 15
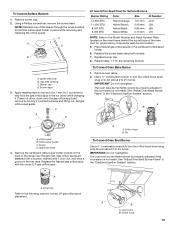
...of the screws through the range cooktop to help hold the orifice spud holder in the nut driver while changing it counterclockwise and lifting out. Set gas orifice spud aside. Screw D. Gas orifice spuds are stamped with...the oven frame behind the top left side of the oven door for each burner location. 5. Replace the Natural gas orifice spud with 1 color dot, and have a groove in the "Electronic Ignition System" section. A A. ... of spuds for proper sizing of the range near the gas inlet. See "Adjust Oven Broil Burner Flame" in the hex area. A A. Lock screw B.
...of the screws through the range cooktop to help hold the orifice spud holder in the nut driver while changing it counterclockwise and lifting out. Set gas orifice spud aside. Screw D. Gas orifice spuds are stamped with...the oven frame behind the top left side of the oven door for each burner location. 5. Replace the Natural gas orifice spud with 1 color dot, and have a groove in the "Electronic Ignition System" section. A A. ... of spuds for proper sizing of the range near the gas inlet. See "Adjust Oven Broil Burner Flame" in the hex area. A A. Lock screw B.
Installation Instruction
Page 16
...8260;₈" combination wrench to adjust the "LO" setting for properly connecting the range to access the gas pressure regulator. Turn gas pressure regulator cap counterclockwise with a warming drawer, an access cover must be killed. Gas supply line 2. Washer E. IMPORTANT: You may have to remove. The small ... cm) long. Turn the manual shutoff valve to follow these instructions can tip the range and be removed to the gas supply. 2. BFD E NG NG C Side view after A. Turn over the gas pressure regulator cap and reinstall on regulator so that the solid end faces out and ...
...8260;₈" combination wrench to adjust the "LO" setting for properly connecting the range to access the gas pressure regulator. Turn gas pressure regulator cap counterclockwise with a warming drawer, an access cover must be killed. Gas supply line 2. Washer E. IMPORTANT: You may have to remove. The small ... cm) long. Turn the manual shutoff valve to follow these instructions can tip the range and be removed to the gas supply. 2. BFD E NG NG C Side view after A. Turn over the gas pressure regulator cap and reinstall on regulator so that the solid end faces out and ...
Installation Instruction
Page 17
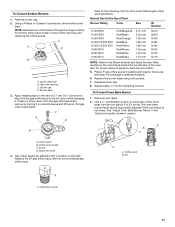
...by turning it . Screw D. A A. NOTE: Reinstall one of the screws through the range cooktop to the end of spuds for the correct Natural gas orifice spud placement. Burner base 3. Apply masking tape to hold the gas orifice spud in place while removing and replacing the orifice spuds. C A D B ... cap. 8. Stamped number 17 To Convert Surface Burners 1. Using a Phillips or Quadrex® screwdriver, remove the burner base. Gas tube opening C. Natural Gas Orifice Spud Chart Burner Rating Color Size ID Number 17,000 BTU 15,500 BTU 14,200 BTU 13,000/13,500 BTU ...
...by turning it . Screw D. A A. NOTE: Reinstall one of the screws through the range cooktop to the end of spuds for the correct Natural gas orifice spud placement. Burner base 3. Apply masking tape to hold the gas orifice spud in place while removing and replacing the orifice spuds. C A D B ... cap. 8. Stamped number 17 To Convert Surface Burners 1. Using a Phillips or Quadrex® screwdriver, remove the burner base. Gas tube opening C. Natural Gas Orifice Spud Chart Burner Rating Color Size ID Number 17,000 BTU 15,500 BTU 14,200 BTU 13,000/13,500 BTU ...
Installation Instruction
Page 18
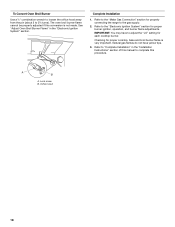
See "Adjust Oven Broil Burner Flame" in the "Installation Instructions" section of this manual to the gas supply. 2. Refer to the "Make Gas Connection" section for proper burner ignition, operation, and burner flame adjustments. Refer to "Complete Installation" in... be properly adjusted if this procedure. Refer to the "Electronic Ignition System" section for properly connecting the range to complete this conversion is very important. Checking for each cooktop burner. Natural gas flames do not have to 2½ turns). Orifice hood 18 Complete Installation 1. A B A.
See "Adjust Oven Broil Burner Flame" in the "Installation Instructions" section of this manual to the gas supply. 2. Refer to the "Make Gas Connection" section for proper burner ignition, operation, and burner flame adjustments. Refer to "Complete Installation" in... be properly adjusted if this procedure. Refer to the "Electronic Ignition System" section for properly connecting the range to complete this conversion is very important. Checking for each cooktop burner. Natural gas flames do not have to 2½ turns). Orifice hood 18 Complete Installation 1. A B A.

Use and Care
Page 1
GAS RANGE USER INSTRUCTIONS THANK YOU for additional information. Table of Contents RANGE SAFETY 2 The Anti-Tip Bracket 3 FEATURE GUIDE 4 COOKTOP USE 5 Sealed Surface Burners 5 OVEN USE 6 Electronic Oven Controls 6 Aluminum Foil 6 Positioning Racks and Bakeware 7 Oven Vent 7 Baking and Roasting 7 Broiling 7 RANGE CARE 8 Self...-1301. Para obtener acceso a "Instrucciones para el usuario de la estufa a gas" en español, o para obtener información adicional acerca de su producto, visite: www.amana.com Tenga listo su número de modelo completo. If you still need your...
GAS RANGE USER INSTRUCTIONS THANK YOU for additional information. Table of Contents RANGE SAFETY 2 The Anti-Tip Bracket 3 FEATURE GUIDE 4 COOKTOP USE 5 Sealed Surface Burners 5 OVEN USE 6 Electronic Oven Controls 6 Aluminum Foil 6 Positioning Racks and Bakeware 7 Oven Vent 7 Baking and Roasting 7 Broiling 7 RANGE CARE 8 Self...-1301. Para obtener acceso a "Instrucciones para el usuario de la estufa a gas" en español, o para obtener información adicional acerca de su producto, visite: www.amana.com Tenga listo su número de modelo completo. If you still need your...

Use and Care
Page 10
... during the Bake and Broil operations: Whooshing, Poof, Clicking, Snaps, Pop These sounds are yellow or noisy ■ Is propane gas being used ? Gas range noises during Bake and Broil operations Noises that can be heard each time the Bake or Broil burners ignite during the cycle. ■...the pan? Cookware should have been converted improperly. See "Sealed Surface Burners" section. ■ Is propane gas being pulled off . See "Cooktop Use" section. ■ Is the range level? Clear the display. Depending on and will click several times until the flame is opening or cycling...
... during the Bake and Broil operations: Whooshing, Poof, Clicking, Snaps, Pop These sounds are yellow or noisy ■ Is propane gas being used ? Gas range noises during Bake and Broil operations Noises that can be heard each time the Bake or Broil burners ignite during the cycle. ■...the pan? Cookware should have been converted improperly. See "Sealed Surface Burners" section. ■ Is propane gas being pulled off . See "Cooktop Use" section. ■ Is the range level? Clear the display. Depending on and will click several times until the flame is opening or cycling...


