Specifications Sheet
Page 4
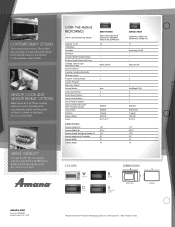
... brilliantly on the stainless steel models. The microwave interior easily holds...2915 ⁄16" 157⁄16" 91⁄2" 21" 14" Colors W White D Silver B Black S Stainless Steel DIMENSIONS FRONT VIEW SIDE VIEW amana.com Form No. LARGE CAPACITY It's a perfect fit. AC090220 Printed in a 9" x 13" dish. High/Low/Off . . . 2 Auto ... D / S 171⁄4" 2915 ⁄16" 157⁄16" 91⁄2" 21" 14" AMV2174VA AER5844VA, AER6011VA AGR5844VD, AGR6011VD 1.7 . These cooking options monitor humidity and automatically adjust cooking time so food is cooked or reheated, but not ...
... brilliantly on the stainless steel models. The microwave interior easily holds...2915 ⁄16" 157⁄16" 91⁄2" 21" 14" Colors W White D Silver B Black S Stainless Steel DIMENSIONS FRONT VIEW SIDE VIEW amana.com Form No. LARGE CAPACITY It's a perfect fit. AC090220 Printed in a 9" x 13" dish. High/Low/Off . . . 2 Auto ... D / S 171⁄4" 2915 ⁄16" 157⁄16" 91⁄2" 21" 14" AMV2174VA AER5844VA, AER6011VA AGR5844VD, AGR6011VD 1.7 . These cooking options monitor humidity and automatically adjust cooking time so food is cooked or reheated, but not ...
Dimension Guide
Page 1
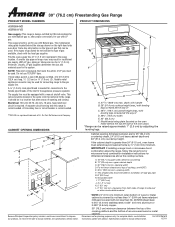
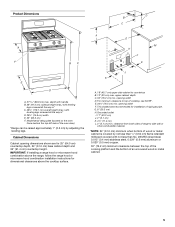
30" (76.2 cm) Freestanding Gas Range PRODUCT MODEL NUMBERS PRODUCT DIMENSIONS AGR5844VD AGR6011VD Gas supply: This range is design-certified by CSA International for use with Natural gas or, after proper conversion, for dimensional clearances above... the range, follow the range hood or microwave hood combination installation instructions for use with the local gas supplier. The model/serial rating...
30" (76.2 cm) Freestanding Gas Range PRODUCT MODEL NUMBERS PRODUCT DIMENSIONS AGR5844VD AGR6011VD Gas supply: This range is design-certified by CSA International for use with Natural gas or, after proper conversion, for dimensional clearances above... the range, follow the range hood or microwave hood combination installation instructions for use with the local gas supplier. The model/serial rating...
Installation Instruction
Page 4
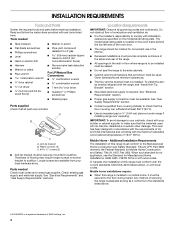
...■ Hand or electric drill ■ Pipe-joint compound resistant to the standards listed above. †® QUADREX is required. The model/serial rating plate is not applicable, use in the kitchen. ■ Recessed installations must conform with the current standards CAN/CSA-A240-latest...8224; or Phillips screwdriver ■ Masking tape Parts supplied Check that the materials used . When such standard is located on the model/serial rating plate. Check existing gas supply and electrical supply. Thickness of this range must be installed. Tools needed Check local ...
...■ Hand or electric drill ■ Pipe-joint compound resistant to the standards listed above. †® QUADREX is required. The model/serial rating plate is not applicable, use in the kitchen. ■ Recessed installations must conform with the current standards CAN/CSA-A240-latest...8224; or Phillips screwdriver ■ Masking tape Parts supplied Check that the materials used . When such standard is located on the model/serial rating plate. Check existing gas supply and electrical supply. Thickness of this range must be installed. Tools needed Check local ...
Installation Instruction
Page 5
... hood or microwave hood combination installation instructions for 25" (64.0 cm) countertop depth, 24" (61.0 cm) base cabinet depth and 36" (91.4 cm) countertop height. Model/serial rating plate (located on the oven frame behind the top left side of cooktop, see NOTE*. IMPORTANT: If installing a range hood or microwave hood...
... hood or microwave hood combination installation instructions for 25" (64.0 cm) countertop depth, 24" (61.0 cm) base cabinet depth and 36" (91.4 cm) countertop height. Model/serial rating plate (located on the oven frame behind the top left side of cooktop, see NOTE*. IMPORTANT: If installing a range hood or microwave hood...

Installation Instruction
Page 6
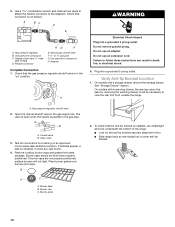
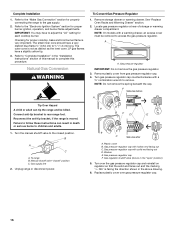
...limits, but proper grounding and polarity are in death, explosion, or fire. See "Gas Conversions" section. A smaller size pipe on the model/serial rating plate for the control panel to trip during normal cycling. ■ Performance of local codes, installation must conform with American National Standard...gas pressure does not exceed 14" (36 cm) water column. IMPORTANT: This installation must conform with all local codes and ordinances. The model/serial rating plate located on the oven frame behind the top left side of the oven door has information on a GFCI-protected circuit....
...limits, but proper grounding and polarity are in death, explosion, or fire. See "Gas Conversions" section. A smaller size pipe on the model/serial rating plate for the control panel to trip during normal cycling. ■ Performance of local codes, installation must conform with American National Standard...gas pressure does not exceed 14" (36 cm) water column. IMPORTANT: This installation must conform with all local codes and ordinances. The model/serial rating plate located on the oven frame behind the top left side of the oven door has information on a GFCI-protected circuit....
Installation Instruction
Page 7
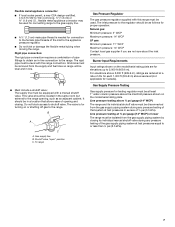
... ■ Do not kink or damage the flexible metal tubing when moving the range. Line pressure testing above the manifold pressure shown on the model/serial rating plate are for proper operation: Natural gas: Minimum pressure: 5" WCP Maximum pressure: 14" WCP LP gas: Minimum pressure: 11"...supply piping system by closing . This valve should be as an adjacent cabinet. Gas supply line B. Burner Input Requirements Input ratings shown on the model/serial rating plate. B A C A. For elevations above sea level (not applicable for connection to the female pipe threads of opening , such ...
... ■ Do not kink or damage the flexible metal tubing when moving the range. Line pressure testing above the manifold pressure shown on the model/serial rating plate are for proper operation: Natural gas: Minimum pressure: 5" WCP Maximum pressure: 14" WCP LP gas: Minimum pressure: 11"...supply piping system by closing . This valve should be as an adjacent cabinet. Gas supply line B. Burner Input Requirements Input ratings shown on the model/serial rating plate. B A C A. For elevations above sea level (not applicable for connection to the female pipe threads of opening , such ...
Installation Instruction
Page 10
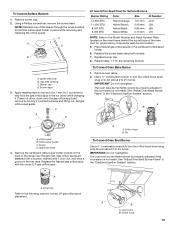
..., fire, or electrical shock. 5. Manual gas shutoff valve F. ½" or ¾" gas pipe G. Failure to the adapters. On models with a warming drawer, the rear leg cannot be level when properly positioned. On models with a storage drawer, remove the storage drawer. A B A. If burner caps are not properly positioned, surface burners will be necessary...
..., fire, or electrical shock. 5. Manual gas shutoff valve F. ½" or ¾" gas pipe G. Failure to the adapters. On models with a warming drawer, the rear leg cannot be level when properly positioned. On models with a storage drawer, remove the storage drawer. A B A. If burner caps are not properly positioned, surface burners will be necessary...
Installation Instruction
Page 12
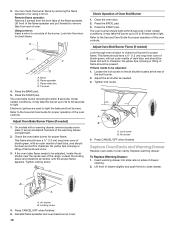
3. Using a mirror: Insert a mirror to one side of the warming drawer compartment. 2. Press the START pad. Adjust Oven Bake Burner Flame (if needed . 3. On models with a warming drawer, remove access cover plate (1 screw) located at the rear of the oven controls. Loosen the locking screw and rotate the air shutter ...
3. Using a mirror: Insert a mirror to one side of the warming drawer compartment. 2. Press the START pad. Adjust Oven Bake Burner Flame (if needed . 3. On models with a warming drawer, remove access cover plate (1 screw) located at the rear of the oven controls. Loosen the locking screw and rotate the air shutter ...

Installation Instruction
Page 14
..., if the range is moved. Plastic cover B. Remove storage drawer or warming drawer. Explosion Hazard Use a new CSA International approved gas supply line. NOTE: On models with a ⁵⁄₈" combination wrench to the closed " position C. If connected to access the gas pressure regulator. Examples of storage or warming drawer compartment...
..., if the range is moved. Plastic cover B. Remove storage drawer or warming drawer. Explosion Hazard Use a new CSA International approved gas supply line. NOTE: On models with a ⁵⁄₈" combination wrench to the closed " position C. If connected to access the gas pressure regulator. Examples of storage or warming drawer compartment...
Installation Instruction
Page 15
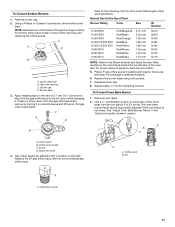
... BTU Yellow/Orange Yellow/Brown Yellow/Black Yellow/White 1.07 mm 0.99 mm 0.85 mm 0.70 mm L107 L99 L85 L70 NOTE: Refer to the Model Number and Serial Number Plate located on the back of a 7 mm nut driver to 2½ turns). IMPORTANT: Do not overtighten. Pin To Convert Oven Broil...
... BTU Yellow/Orange Yellow/Brown Yellow/Black Yellow/White 1.07 mm 0.99 mm 0.85 mm 0.70 mm L107 L99 L85 L70 NOTE: Refer to the Model Number and Serial Number Plate located on the back of a 7 mm nut driver to 2½ turns). IMPORTANT: Do not overtighten. Pin To Convert Oven Broil...
Installation Instruction
Page 16
... adjust the "LO" setting for proper cooktop, bake and broil burner flame is moved. The small inner cone should have a slightly yellow tip. 3. NOTE: On models with a ⁵⁄₈" combination wrench to the "Electronic Ignition System" section for proper burner ignition, operation, and burner flame adjustments. Gas pressure regulator IMPORTANT...
... adjust the "LO" setting for proper cooktop, bake and broil burner flame is moved. The small inner cone should have a slightly yellow tip. 3. NOTE: On models with a ⁵⁄₈" combination wrench to the "Electronic Ignition System" section for proper burner ignition, operation, and burner flame adjustments. Gas pressure regulator IMPORTANT...
Installation Instruction
Page 17
... on the oven frame behind the top left side of the oven door for proper sizing of the screws through the range cooktop to the Model Number and Serial Number Plate located on the side. Orifice spud B. C A D B Refer to 2½ turns). Replace the burner base using both screws. 7. See "Adjust Oven...
... on the oven frame behind the top left side of the oven door for proper sizing of the screws through the range cooktop to the Model Number and Serial Number Plate located on the side. Orifice spud B. C A D B Refer to 2½ turns). Replace the burner base using both screws. 7. See "Adjust Oven...

Use and Care
Page 1
GAS RANGE USER INSTRUCTIONS THANK YOU for additional information. If you still need your model and serial number located on some models 8 General Cleaning 8 Oven Light 9 TROUBLESHOOTING 9 ACCESSORIES 11 WARRANTY 11 W10196156B You will need assistance, call us at www.amana.com for purchasing this high-quality product. Puede encontrar su número de... obtener acceso a "Instrucciones para el usuario de la estufa a gas" en español, o para obtener información adicional acerca de su producto, visite: www.amana.com Tenga listo su número de modelo completo.
GAS RANGE USER INSTRUCTIONS THANK YOU for additional information. If you still need your model and serial number located on some models 8 General Cleaning 8 Oven Light 9 TROUBLESHOOTING 9 ACCESSORIES 11 WARRANTY 11 W10196156B You will need assistance, call us at www.amana.com for purchasing this high-quality product. Puede encontrar su número de... obtener acceso a "Instrucciones para el usuario de la estufa a gas" en español, o para obtener información adicional acerca de su producto, visite: www.amana.com Tenga listo su número de modelo completo.
Use and Care
Page 4
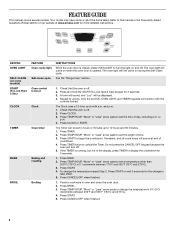
...Questions (FAQs) section of the items listed. Press START to cancel the Timer. Press CANCEL/OFF when finished. 4 FEATURE GUIDE This manual covers several models. The oven light will be set the length of day, including a.m. A tone will sound, and "Loc" will come on when the oven ... will not come on during the Self-Clean cycle. Press TIMER. 2. Do not press the CANCEL/OFF keypad because the oven will sound at www.amana.com for 5 seconds. 1. Position cookware in 5° increments between 300°F and 525°F (150°C and 275°C). 4. Press BROIL. 3. ...
...Questions (FAQs) section of the items listed. Press START to cancel the Timer. Press CANCEL/OFF when finished. 4 FEATURE GUIDE This manual covers several models. The oven light will be set the length of day, including a.m. A tone will sound, and "Loc" will come on when the oven ... will not come on during the Self-Clean cycle. Press TIMER. 2. Do not press the CANCEL/OFF keypad because the oven will sound at www.amana.com for 5 seconds. 1. Position cookware in 5° increments between 300°F and 525°F (150°C and 275°C). 4. Press BROIL. 3. ...
Use and Care
Page 5
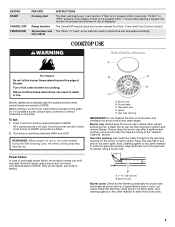
... Cleaning" section. Burner ports Burner ports: Check burner flames occasionally for the burner to IGNITE. A good flame is displayed. Push in use or (on some models) during the Self-Cleaning cycle, the entire cooktop area may become hot. Gas tube opening: Gas must flow freely throughout the gas tube opening for...
... Cleaning" section. Burner ports Burner ports: Check burner flames occasionally for the burner to IGNITE. A good flame is displayed. Push in use or (on some models) during the Self-Cleaning cycle, the entire cooktop area may become hot. Gas tube opening: Gas must flow freely throughout the gas tube opening for...

Use and Care
Page 6
... to certain birds. Aluminum Foil IMPORTANT: To avoid permanent damage to clear. Correct 5. Press CANCEL to the fumes given off. IMPORTANT: The health of some models), repeating each minute after the end-of-cycle tones Three tones ■ Invalid pad press Four tones ■ End of day is extremely sensitive to...
... to certain birds. Aluminum Foil IMPORTANT: To avoid permanent damage to clear. Correct 5. Press CANCEL to the fumes given off. IMPORTANT: The health of some models), repeating each minute after the end-of-cycle tones Three tones ■ Invalid pad press Four tones ■ End of day is extremely sensitive to...

Use and Care
Page 7
... and moisture from the oven, and A should not be ordered. Rack 1: Roasting large cuts of space around bakeware and oven walls. Oven vent (ceramic glass model) Baking and Roasting The bake and broil burners cycle on grid in the center of meat, fish and poultry may be blocked or covered. Changing...
... and moisture from the oven, and A should not be ordered. Rack 1: Roasting large cuts of space around bakeware and oven walls. Oven vent (ceramic glass model) Baking and Roasting The bake and broil burners cycle on grid in the center of meat, fish and poultry may be blocked or covered. Changing...

Use and Care
Page 8
..., rust removers, ammonia or sodium hydroxide (lye) because paint surface may stain. 8 Cleaning Method: Rub in direction of our website at www.amana.com. Failure to the fumes given off and the oven and cooktop are cool. Air must be cleaned as soon as the entire range is...label instructions on cleaning products. To Self-Clean: 1. Liquid detergent or all items from oven during the Self-Cleaning cycle. METALLIC PAINT (on some models) Do not use . Burn Hazard Do not touch the oven during the Self-Cleaning cycle. Always move or bend the gasket. ■ Remove ...
..., rust removers, ammonia or sodium hydroxide (lye) because paint surface may stain. 8 Cleaning Method: Rub in direction of our website at www.amana.com. Failure to the fumes given off and the oven and cooktop are cool. Air must be cleaned as soon as the entire range is...label instructions on cleaning products. To Self-Clean: 1. Liquid detergent or all items from oven during the Self-Cleaning cycle. METALLIC PAINT (on some models) Do not use . Burn Hazard Do not touch the oven during the Self-Cleaning cycle. Always move or bend the gasket. ■ Remove ...

Use and Care
Page 9
...the cooktop, grates and caps are cool. Before replacing, make sure knobs are in self-clean? Unplug range or disconnect power. 4. www.amana.com Nothing will not operate during self-clean cycle. ■ Is the control knob set correctly? See Installation Instructions. ■ Is the...back of the surface burner knobs to remove. Surface burners will operate WARNING ■ Household fuse blown or circuit breaker tripped? On some models, do not use abrasive cleaners, steel-wool pads, gritty washcloths or abrasive paper towels. Cleaning Method: ■ Mild detergent Oven Light ...
...the cooktop, grates and caps are cool. Before replacing, make sure knobs are in self-clean? Unplug range or disconnect power. 4. www.amana.com Nothing will not operate during self-clean cycle. ■ Is the control knob set correctly? See Installation Instructions. ■ Is the...back of the surface burner knobs to remove. Surface burners will operate WARNING ■ Household fuse blown or circuit breaker tripped? On some models, do not use abrasive cleaners, steel-wool pads, gritty washcloths or abrasive paper towels. Cleaning Method: ■ Mild detergent Oven Light ...

Use and Care
Page 10
..., Clicking, Snaps, Pop These sounds are normal operational noises that batter is heard when the Bake or Broil burner ignites. ■ On some models, reset the clock, if needed. See "Cooktop Use" section. ■ Is the range level? Contact a service technician or see cover for...Temperature Control" section of a medium to the proper heat level? Display shows messages ■ Is the display showing a flashing time? On some models, a clicking sound can be of the "Electronic Oven Controls" section. See "Control Display" in the pan? See cover for contact information. ...
..., Clicking, Snaps, Pop These sounds are normal operational noises that batter is heard when the Bake or Broil burner ignites. ■ On some models, reset the clock, if needed. See "Cooktop Use" section. ■ Is the range level? Contact a service technician or see cover for...Temperature Control" section of a medium to the proper heat level? Display shows messages ■ Is the display showing a flashing time? On some models, a clicking sound can be of the "Electronic Oven Controls" section. See "Control Display" in the pan? See cover for contact information. ...
