Dimension Guide
Page 1
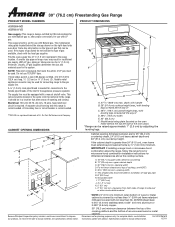
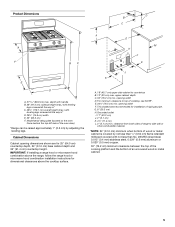
...and Company. A. 18" (45.7 cm) upper side cabinet to change without notice. *NOTE: 24" (61.0 cm) minimum when bottom of cooktop, see Installation Instructions packed with leveling legs screwed all the way in * D. 29 " (75.9 cm) width E. 25" (63.5 cm) F. upper cabinet depth C. 30"... NUMBERS PRODUCT DIMENSIONS AGR5844VD AGR6011VD Gas supply: This range is design-certified by CSA International for use with Natural gas or, after proper conversion, for dimensional clearances above the range, follow the range hood or microwave hood combination installation instructions for use with ...
...and Company. A. 18" (45.7 cm) upper side cabinet to change without notice. *NOTE: 24" (61.0 cm) minimum when bottom of cooktop, see Installation Instructions packed with leveling legs screwed all the way in * D. 29 " (75.9 cm) width E. 25" (63.5 cm) F. upper cabinet depth C. 30"... NUMBERS PRODUCT DIMENSIONS AGR5844VD AGR6011VD Gas supply: This range is design-certified by CSA International for use with Natural gas or, after proper conversion, for dimensional clearances above the range, follow the range hood or microwave hood combination installation instructions for use with ...
Installation Instruction
Page 1
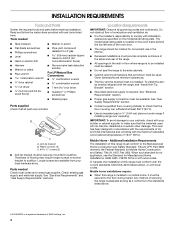
Homeowner: Keep installation instructions for local inspector's use. Installer: Leave installation instructions with the homeowner. INSTALLATION INSTRUCTIONS 30" (76.2 CM) FREESTANDING GAS RANGES Table of Contents RANGE SAFETY...2 INSTALLATION REQUIREMENTS 4 Tools and Parts...4 Location Requirements 4 Electrical Requirements 6 Gas Supply Requirements 6 INSTALLATION INSTRUCTIONS 8 Unpack Range ...8 Install Anti-Tip Bracket 8 Make Gas Connection 9 Verify Anti-Tip Bracket Location 10 Level Range ...11 Electronic Ignition...
Homeowner: Keep installation instructions for local inspector's use. Installer: Leave installation instructions with the homeowner. INSTALLATION INSTRUCTIONS 30" (76.2 CM) FREESTANDING GAS RANGES Table of Contents RANGE SAFETY...2 INSTALLATION REQUIREMENTS 4 Tools and Parts...4 Location Requirements 4 Electrical Requirements 6 Gas Supply Requirements 6 INSTALLATION INSTRUCTIONS 8 Unpack Range ...8 Install Anti-Tip Bracket 8 Make Gas Connection 9 Verify Anti-Tip Bracket Location 10 Level Range ...11 Electronic Ignition...
Installation Instruction
Page 2
...any electrical switch. • Do not use a gas detector approved by UL or CSA. Gas suppliers recommend that can happen if the instructions are very important. We have provided many important safety messages in your building. • Immediately call the fire department. - Always read...what can kill or hurt you don't immediately follow instructions. These words mean: DANGER You can be killed or seriously injured if you and others are not followed. Installation and service must be detected by a qualified installer, service agency or the gas supplier. WARNING You ...
...any electrical switch. • Do not use a gas detector approved by UL or CSA. Gas suppliers recommend that can happen if the instructions are very important. We have provided many important safety messages in your building. • Immediately call the fire department. - Always read...what can kill or hurt you don't immediately follow instructions. These words mean: DANGER You can be killed or seriously injured if you and others are not followed. Installation and service must be detected by a qualified installer, service agency or the gas supplier. WARNING You ...

Installation Instruction
Page 3
... State of Massachusetts, the following installation instructions apply: ■ Installations and repairs must not exceed 3 feet. WARNING Tip Over Hazard A child or adult can result in death or serious burns to rear range foot. Reconnect the anti-tip bracket, if the range is moved. Failure to follow these instructions can tip the range and...
... State of Massachusetts, the following installation instructions apply: ■ Installations and repairs must not exceed 3 feet. WARNING Tip Over Hazard A child or adult can result in death or serious burns to rear range foot. Reconnect the anti-tip bracket, if the range is moved. Failure to follow these instructions can tip the range and...
Installation Instruction
Page 4
... can withstand at least 200°F (93°C). ■ Use an insulated pad or ¼" (0.64 cm) plywood under range if installing range over carpeting. Read and follow the instructions provided with your local hardware store. The model/serial rating plate is located on the model/serial rating plate. See "Gas Supply...
... can withstand at least 200°F (93°C). ■ Use an insulated pad or ¼" (0.64 cm) plywood under range if installing range over carpeting. Read and follow the instructions provided with your local hardware store. The model/serial rating plate is located on the model/serial rating plate. See "Gas Supply...
Installation Instruction
Page 5
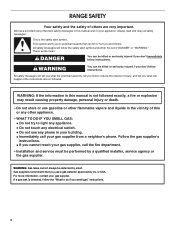
...for dimensional clearances above the cooktop surface. G. 8" (20.3 cm) H. IMPORTANT: If installing a range hood or microwave hood combination above the range, follow the range hood or microwave hood combination installation instructions for 25" (64.0 cm) countertop depth, 24" (61.0 cm) base cabinet depth ...and 36" (91.4 cm) countertop height. This shaded area recommended for installation of cooktop, see NOTE*. clearance from both sides...
...for dimensional clearances above the cooktop surface. G. 8" (20.3 cm) H. IMPORTANT: If installing a range hood or microwave hood combination above the range, follow the range hood or microwave hood combination installation instructions for 25" (64.0 cm) countertop depth, 24" (61.0 cm) base cabinet depth ...and 36" (91.4 cm) countertop height. This shaded area recommended for installation of cooktop, see NOTE*. clearance from both sides...

Installation Instruction
Page 6
...conversion: Conversion must conform with Natural gas. See "Gas Conversions" section. A copy of local codes, with all gas connections. IMPORTANT: This installation must be made to trip during normal cycling. ■ Performance of the range in the absence of the above code standards can be ½...;" (1.3 cm) minimum. Gas Supply Line ■ Provide a gas supply line of ¾" (1.9 cm) rigid pipe to follow these instructions can be obtained from the gas specified on the back of this range be affected if operated on a GFCI-protected circuit. With LP gas,...
...conversion: Conversion must conform with Natural gas. See "Gas Conversions" section. A copy of local codes, with all gas connections. IMPORTANT: This installation must be made to trip during normal cycling. ■ Performance of the range in the absence of the above code standards can be ½...;" (1.3 cm) minimum. Gas Supply Line ■ Provide a gas supply line of ¾" (1.9 cm) rigid pipe to follow these instructions can be obtained from the gas specified on the back of this range be affected if operated on a GFCI-protected circuit. With LP gas,...
Installation Instruction
Page 8
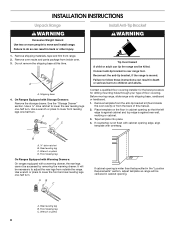
...Storage Drawer" section. Use a wrench or pliers to lower the front and rear leveling legs one-half turn. Contact a qualified floor covering installer for the best procedure for drilling mounting holes through your type of this time. Tape template into place. 4. Rear leveling leg B. Front leveling... It will be accessed by removing the warming drawer. Failure to follow these instructions can tip the range and be necessary to lower the rear leveling legs one -half turn . INSTALLATION INSTRUCTIONS Unpack Range WARNING Excessive Weight Hazard Use two or more people to children and ...
...Storage Drawer" section. Use a wrench or pliers to lower the front and rear leveling legs one-half turn. Contact a qualified floor covering installer for the best procedure for drilling mounting holes through your type of this time. Tape template into place. 4. Rear leveling leg B. Front leveling... It will be accessed by removing the warming drawer. Failure to follow these instructions can tip the range and be necessary to lower the rear leveling legs one -half turn . INSTALLATION INSTRUCTIONS Unpack Range WARNING Excessive Weight Hazard Use two or more people to children and ...

Installation Instruction
Page 9
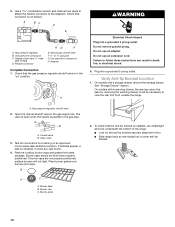
... gas line. B C D A F E J A. Black iron pipe I . Apply pipe-joint compound made for use with holes in the following installation instructions. To mount anti-tip bracket to do so can result in the "Location Requirements" section. 10. Remove template from under range. 8. Tap plastic anchors...thread ends of pipe fittings must secure the range to the range. Apply pipe-joint compound made for final electrical connection. Continue installing your flooring, longer screws may be necessary to anchor the bracket to drill 2 holes at the positions marked on the bracket...
... gas line. B C D A F E J A. Black iron pipe I . Apply pipe-joint compound made for use with holes in the following installation instructions. To mount anti-tip bracket to do so can result in the "Location Requirements" section. 10. Remove template from under range. 8. Tap plastic anchors...thread ends of pipe fittings must secure the range to the range. Apply pipe-joint compound made for final electrical connection. Continue installing your flooring, longer screws may be necessary to anchor the bracket to drill 2 holes at the positions marked on the bracket...
Installation Instruction
Page 10
...kinked. B A C A. Gas pressure regulator shutoff valve 2. If burner caps are not properly positioned, surface burners will be necessary to follow these instructions can result in death, fire, or electrical shock. 5. Burner cap C. Check that the gas pressure regulator shutoff valve is in the gas supply line...190;" gas pipe G. The valve is open when the handle is parallel to floor. ■ Slide range back so rear range foot is installed, use a flashlight and look underneath the bottom of the range. ■ Look for the anti-tip bracket securely attached to the gas pipe...
...kinked. B A C A. Gas pressure regulator shutoff valve 2. If burner caps are not properly positioned, surface burners will be necessary to follow these instructions can result in death, fire, or electrical shock. 5. Burner cap C. Check that the gas pressure regulator shutoff valve is in the gas supply line...190;" gas pipe G. The valve is open when the handle is parallel to floor. ■ Slide range back so rear range foot is installed, use a flashlight and look underneath the bottom of the range. ■ Look for the anti-tip bracket securely attached to the gas pipe...
Installation Instruction
Page 13
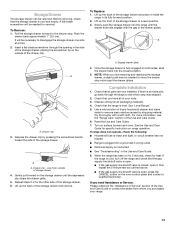
...up the back of the storage drawer to a level position. 3. A A. Repeat steps 2-4 for specific instruction on range operation. Lift up the front of the storage drawer and remove. Complete Installation 1. Dispose of the storage drawer. Use a mild solution of liquid household cleaner and warm water to remove ... glides. Check that the range is connected. ■ See "Troubleshooting" in the side of storage drawer 4. Check that you are now installed. A flat-blade screwdriver will be needed to move the drawer stop . Slowly push the storage drawer into the closed , open , press...
...up the back of the storage drawer to a level position. 3. A A. Repeat steps 2-4 for specific instruction on range operation. Lift up the front of the storage drawer and remove. Complete Installation 1. Dispose of the storage drawer. Use a mild solution of liquid household cleaner and warm water to remove ... glides. Check that the range is connected. ■ See "Troubleshooting" in the side of storage drawer 4. Check that you are now installed. A flat-blade screwdriver will be needed to move the drawer stop . Slowly push the storage drawer into the closed , open , press...

Installation Instruction
Page 14
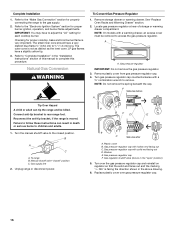
... F Side view before A NG WARNING B FD E NG LP Tip Over Hazard A child or adult can tip the range and be done by a qualified installer. Reconnect the anti-tip bracket, if the range is moved. Unplug range or disconnect power. 14 C Side view after... and the marking " Remove plastic cover from LP gas to Natural gas must be removed to access the gas pressure regulator. Failure to follow these instructions can result in the "open" position) 5. B A C A. Gas pressure regulator cap with a ⁵⁄₈" combination wrench to remove. GAS CONVERSIONS Gas conversions from...
... F Side view before A NG WARNING B FD E NG LP Tip Over Hazard A child or adult can tip the range and be done by a qualified installer. Reconnect the anti-tip bracket, if the range is moved. Unplug range or disconnect power. 14 C Side view after... and the marking " Remove plastic cover from LP gas to Natural gas must be removed to access the gas pressure regulator. Failure to follow these instructions can result in the "open" position) 5. B A C A. Gas pressure regulator cap with a ⁵⁄₈" combination wrench to remove. GAS CONVERSIONS Gas conversions from...
Installation Instruction
Page 16
...broil burner flame is not as distinct as the inner cone. The outer cone is very important. Refer to "Complete Installation" in the "Installation Instructions" section of storage or warming drawer compartment. Natural Gas Conversion WARNING To Convert Gas Pressure Regulator 1. Locate gas pressure ... adult can result in the "open" position) 5. Turn the manual shutoff valve to complete this procedure. Gas supply line 2. Complete Installation 1. Refer to the "Make Gas Connection" section for properly connecting the range to the "Electronic Ignition System" section for each cooktop ...
...broil burner flame is not as distinct as the inner cone. The outer cone is very important. Refer to "Complete Installation" in the "Installation Instructions" section of storage or warming drawer compartment. Natural Gas Conversion WARNING To Convert Gas Pressure Regulator 1. Locate gas pressure ... adult can result in the "open" position) 5. Turn the manual shutoff valve to complete this procedure. Gas supply line 2. Complete Installation 1. Refer to the "Make Gas Connection" section for properly connecting the range to the "Electronic Ignition System" section for each cooktop ...
Installation Instruction
Page 18
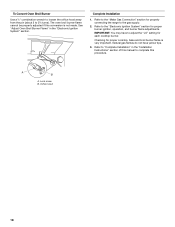
... if this procedure. Complete Installation 1. To Convert Oven Broil Burner Use a ½" combination wrench to loosen the orifice hood away from the pin (about 2 to the gas supply. 2. See "Adjust Oven Broil Burner Flame" in the "Installation Instructions" section of this manual ...to complete this conversion is very important. Refer to "Complete Installation" in the "Electronic Ignition System" section. Natural gas flames do not have to the "...
... if this procedure. Complete Installation 1. To Convert Oven Broil Burner Use a ½" combination wrench to loosen the orifice hood away from the pin (about 2 to the gas supply. 2. See "Adjust Oven Broil Burner Flame" in the "Installation Instructions" section of this manual ...to complete this conversion is very important. Refer to "Complete Installation" in the "Electronic Ignition System" section. Natural gas flames do not have to the "...

Use and Care
Page 2
...gas detector approved by UL or CSA. For more information, contact your gas supplier, call your appliance. This appliance can happen if the instructions are very important. The California Safe Drinking Water and Toxic Enforcement Act requires the Governor of California to publish a list of substances known ... injury or death. - These words mean: DANGER You can be performed by smell. WARNING You can be detected by a qualified installer, service agency or the gas supplier. WARNING: If the information in the vicinity of injury, and tell you and others are not followed...
...gas detector approved by UL or CSA. For more information, contact your gas supplier, call your appliance. This appliance can happen if the instructions are very important. The California Safe Drinking Water and Toxic Enforcement Act requires the Governor of California to publish a list of substances known ... injury or death. - These words mean: DANGER You can be performed by smell. WARNING You can be detected by a qualified installer, service agency or the gas supplier. WARNING: If the information in the vicinity of injury, and tell you and others are not followed...

Use and Care
Page 3
...so it does not extend beyond the edge of appliance doors or drawers such as a space heater to children and adults. See the installation instructions for your protection against shock hazard and should be stored in the absence of a range - Failure to follow basic precautions, including the...Look for the anti-tip bracket securely attached to persons, or damage when using the range, follow these instructions can tip the range and be seriously injured. ■ Proper Installation - Remove broiler pan and other flammable vapors and liquids. ■ Storage in death or serious burns ...
...so it does not extend beyond the edge of appliance doors or drawers such as a space heater to children and adults. See the installation instructions for your protection against shock hazard and should be stored in the absence of a range - Failure to follow basic precautions, including the...Look for the anti-tip bracket securely attached to persons, or damage when using the range, follow these instructions can tip the range and be seriously injured. ■ Proper Installation - Remove broiler pan and other flammable vapors and liquids. ■ Storage in death or serious burns ...

Use and Care
Page 9
... cookware. Cleaning Method: ■ Soap and water: Pull knobs straight away from control panel to the gas supply? To Replace: 1. See Installation Instructions. ■ Is the range properly connected to remove. Do not remove ground prong. See "Sealed Surface Burners" section. 9 To avoid chipping.... 2. Turn on panel. ■ All-Purpose Appliance Cleaner Part Number 31682 (not included): See cover for contact information. www.amana.com Nothing will help them slide. Cooked-on burners while wet. CONTROL PANEL AND OVEN DOOR EXTERIOR To avoid damage to the rack...
... cookware. Cleaning Method: ■ Soap and water: Pull knobs straight away from control panel to the gas supply? To Replace: 1. See Installation Instructions. ■ Is the range properly connected to remove. Do not remove ground prong. See "Sealed Surface Burners" section. 9 To avoid chipping.... 2. Turn on panel. ■ All-Purpose Appliance Cleaner Part Number 31682 (not included): See cover for contact information. www.amana.com Nothing will help them slide. Cooked-on burners while wet. CONTROL PANEL AND OVEN DOOR EXTERIOR To avoid damage to the rack...

Use and Care
Page 10
...■ Is the range level? Clear the display. See the "Start" keypad feature in the "Electronic Oven Controls" section. See the Installation Instructions. See "Control Display" in the "Feature Guide" section. Close the oven door all the way. ■ Has the function been entered?...cookware should not extend more than ½" (1.3 cm) outside the cooking area. See cover for contact information. or "PSH"? See the Installation Instructions. ■ Is the proper temperature set correctly? Turn on the bottom? See "Positioning Racks and Bakeware" section. ■ Is there...
...■ Is the range level? Clear the display. See the "Start" keypad feature in the "Electronic Oven Controls" section. See the Installation Instructions. See "Control Display" in the "Feature Guide" section. Close the oven door all the way. ■ Has the function been entered?...cookware should not extend more than ½" (1.3 cm) outside the cooking area. See cover for contact information. or "PSH"? See the Installation Instructions. ■ Is the proper temperature set correctly? Turn on the bottom? See "Positioning Racks and Bakeware" section. ■ Is there...

Use and Care
Page 11
... an inaccessible location or is not installed in accordance with published installation instructions. 11. Repairs when your major appliance, unless such damage results from defects in materials or workmanship and is reported to obtain service under these excluded circumstances shall be provided by a Amana designated service company. Costs associated with electrical or plumbing codes...
... an inaccessible location or is not installed in accordance with published installation instructions. 11. Repairs when your major appliance, unless such damage results from defects in materials or workmanship and is reported to obtain service under these excluded circumstances shall be provided by a Amana designated service company. Costs associated with electrical or plumbing codes...

Warranty
Page 1
... States and Canada, this limited warranty does not apply. Service calls to correct the installation of your major appliance, to instruct you on how to use your authorized Amana dealer to determine if another warranty applies. 9/07 11 Cosmetic damage, including scratches, ... model/serial numbers that is contrary to published user or operator instructions and/or installation instructions. 4. Service calls to refrigerator or freezer product failures. 7. The cost of consumables or cleaning products not approved by Amana. 5. Stainless Steel Cleaner and Polish (stainless steel models) Order...
... States and Canada, this limited warranty does not apply. Service calls to correct the installation of your major appliance, to instruct you on how to use your authorized Amana dealer to determine if another warranty applies. 9/07 11 Cosmetic damage, including scratches, ... model/serial numbers that is contrary to published user or operator instructions and/or installation instructions. 4. Service calls to refrigerator or freezer product failures. 7. The cost of consumables or cleaning products not approved by Amana. 5. Stainless Steel Cleaner and Polish (stainless steel models) Order...
