Specifications Sheet
Page 4
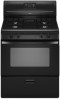
... Capacity (cu. Extra-Large On/Off . . . The hidden vent provides a sleek silhouette. Metal finish handles match up brilliantly on the stainless steel models. The microwave interior easily holds and effectively heats your favorite recipe, even if it all. Auto/Rapid (1 lb) 4 4 1 3 8206230 W10181505 ...;16" 157⁄16" 91⁄2" 21" 14" Colors W White D Silver B Black S Stainless Steel DIMENSIONS FRONT VIEW SIDE VIEW amana.com Form No. LARGE CAPACITY It's a perfect fit. These cooking options monitor humidity and automatically adjust cooking time so food is cooked or reheated...
... Capacity (cu. Extra-Large On/Off . . . The hidden vent provides a sleek silhouette. Metal finish handles match up brilliantly on the stainless steel models. The microwave interior easily holds and effectively heats your favorite recipe, even if it all. Auto/Rapid (1 lb) 4 4 1 3 8206230 W10181505 ...;16" 157⁄16" 91⁄2" 21" 14" Colors W White D Silver B Black S Stainless Steel DIMENSIONS FRONT VIEW SIDE VIEW amana.com Form No. LARGE CAPACITY It's a perfect fit. These cooking options monitor humidity and automatically adjust cooking time so food is cooked or reheated...
Use and Care
Page 5
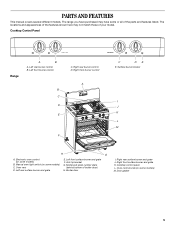
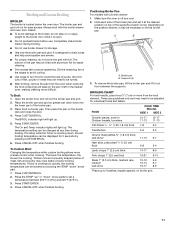
Left front surface burner and grate F. The range you have some models) M. Cooktop Control Panel Off Off Off Off Low Low Low Low Light High Light High Light High Light High Range Push to Turn C DE E. Right ... rear burner control B. Left front burner control C. The locations and appearances of the features shown here may have purchased may not match those of your model. Model and serial number plate (behind bottom of the parts and features listed. PARTS AND FEATURES This manual covers several different...
Left front surface burner and grate F. The range you have some models) M. Cooktop Control Panel Off Off Off Off Low Low Low Low Light High Light High Light High Light High Range Push to Turn C DE E. Right ... rear burner control B. Left front burner control C. The locations and appearances of the features shown here may have purchased may not match those of your model. Model and serial number plate (behind bottom of the parts and features listed. PARTS AND FEATURES This manual covers several different...
Use and Care
Page 9
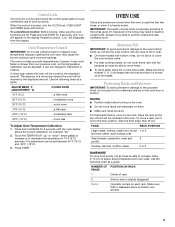
... set between 30°F (15°C) and -30°F (-15°C). 3. Oven Temperature Control IMPORTANT: Do not use of foil or liner. ■ On those models with bakeware on each rack. Aluminum Foil IMPORTANT: To avoid permanent damage to the oven bottom finish, do not line the oven bottom with any...
... set between 30°F (15°C) and -30°F (-15°C). 3. Oven Temperature Control IMPORTANT: Do not use of foil or liner. ■ On those models with bakeware on each rack. Aluminum Foil IMPORTANT: To avoid permanent damage to the oven bottom finish, do not line the oven bottom with any...
Use and Care
Page 11
... CANCEL/OFF when finished broiling. Slit the remaining fat on top of juices. The lower the temperature, the slower the cooking. Positioning Broiler Pan For models with foil. Hold each corner. A B A. BROILING CHART For best results, place food 3" (7 cm) or more from the broil element. Times are guidelines only and may...
... CANCEL/OFF when finished broiling. Slit the remaining fat on top of juices. The lower the temperature, the slower the cooking. Positioning Broiler Pan For models with foil. Hold each corner. A B A. BROILING CHART For best results, place food 3" (7 cm) or more from the broil element. Times are guidelines only and may...
Use and Care
Page 12
... should be cleaned as soon as cast iron cookware. SURFACE BURNERS See "Surface Burners" section. 12 EXTERIOR PORCELAIN ENAMEL SURFACES (on some models, do not use steel wool, abrasive cleansers or oven cleaner. Cleaning Method: ■ Soap and water: Pull knobs straight away from control...the front frame of the oven. Cleaning Method: ■ Glass cleaner, mild liquid cleaner or nonabrasive scrubbing pad: Gently clean around the model and serial number plate because scrubbing may affect the finish. To avoid chipping, do not soak knobs. Cooked-on cleaning products. To Remove:...
... should be cleaned as soon as cast iron cookware. SURFACE BURNERS See "Surface Burners" section. 12 EXTERIOR PORCELAIN ENAMEL SURFACES (on some models, do not use steel wool, abrasive cleansers or oven cleaner. Cleaning Method: ■ Soap and water: Pull knobs straight away from control...the front frame of the oven. Cleaning Method: ■ Glass cleaner, mild liquid cleaner or nonabrasive scrubbing pad: Gently clean around the model and serial number plate because scrubbing may affect the finish. To avoid chipping, do not soak knobs. Cooked-on cleaning products. To Remove:...
Use and Care
Page 13
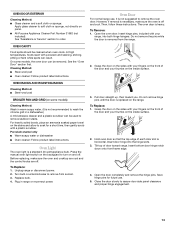
..., included with your fingers on and off . Do not remove hinge pins until the door is horizontal. Close the door slowly to order. On some models) Cleaning Method: Wash in warm soapy water. (It is removed from socket. 3. However, if removal is necessary, make sure the oven and cooktop...on the backguard to remove stubborn stains. See the "Oven Door" section first. For heavily soiled bowls, place an ammonia soaked paper towel on some models, the oven door can result. Before replacing, make sure the oven is heavy. Save hinge pins for a short time, then gently scrub with ...
..., included with your fingers on and off . Do not remove hinge pins until the door is horizontal. Close the door slowly to order. On some models) Cleaning Method: Wash in warm soapy water. (It is removed from socket. 3. However, if removal is necessary, make sure the oven and cooktop...on the backguard to remove stubborn stains. See the "Oven Door" section first. For heavily soiled bowls, place an ammonia soaked paper towel on some models, the oven door can result. Before replacing, make sure the oven is heavy. Save hinge pins for a short time, then gently scrub with ...
Use and Care
Page 14
... set correctly? Turn on any one of glass. ■ A whooshing or poof sound is heard when the Bake or Broil burner ignites. ■ On some models, a clicking sound can be heard each time the Bake or Broil burners ignite during Bake and Broil operations Electrical Shock Hazard Plug into a grounded 3 prong...
... set correctly? Turn on any one of glass. ■ A whooshing or poof sound is heard when the Bake or Broil burner ignites. ■ On some models, a clicking sound can be heard each time the Bake or Broil burners ignite during Bake and Broil operations Electrical Shock Hazard Plug into a grounded 3 prong...
Use and Care
Page 15
... Before calling for oven to preheat before placing food in your telephone directory Yellow Pages. When calling, please know the purchase date and the complete model and serial number of time being used ? Call the Customer eXperience Center toll free: 1-800-253-1301. To locate the authorized service company in oven...
... Before calling for oven to preheat before placing food in your telephone directory Yellow Pages. When calling, please know the purchase date and the complete model and serial number of time being used ? Call the Customer eXperience Center toll free: 1-800-253-1301. To locate the authorized service company in oven...
Use and Care
Page 16
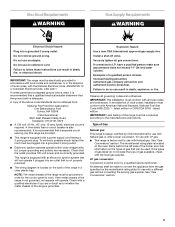
...transportation for other damage to the finish of your major appliance is located in a remote area where service by calling Amana. Dealer name Address Phone number Model number Serial number Purchase date 16 Outside the 50 United States and Canada, this limited warranty does not apply. ... LIMITATIONS MAY NOT APPLY TO YOU. In the U.S.A., call 1-800-807-6777. 9/07 Keep this book and your complete model number and serial number. AMANA® MAJOR APPLIANCE WARRANTY LIMITED WARRANTY For one year from the date of purchase, when this major appliance is used in the...
...transportation for other damage to the finish of your major appliance is located in a remote area where service by calling Amana. Dealer name Address Phone number Model number Serial number Purchase date 16 Outside the 50 United States and Canada, this limited warranty does not apply. ... LIMITATIONS MAY NOT APPLY TO YOU. In the U.S.A., call 1-800-807-6777. 9/07 Keep this book and your complete model number and serial number. AMANA® MAJOR APPLIANCE WARRANTY LIMITED WARRANTY For one year from the date of purchase, when this major appliance is used in the...

Warranty
Page 1
... and repair labor to correct defects in materials or workmanship and is reported to Amana within 30 days from the date of God, improper installation, installation not in accordance with original model/serial numbers that is contrary to know your sales slip together for repairs. Proof... The removal and reinstallation of consumables or cleaning products not approved by calling Amana. If you may find this information on the model and serial number label located on how to use of your authorized Amana dealer to better help by checking the "Assistance or Service" section or ...
... and repair labor to correct defects in materials or workmanship and is reported to Amana within 30 days from the date of God, improper installation, installation not in accordance with original model/serial numbers that is contrary to know your sales slip together for repairs. Proof... The removal and reinstallation of consumables or cleaning products not approved by calling Amana. If you may find this information on the model and serial number label located on how to use of your authorized Amana dealer to better help by checking the "Assistance or Service" section or ...
Dimension Guide
Page 1
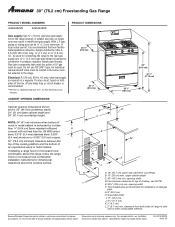
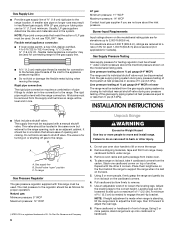
... connector, design-certified by not less than ¹⁄₄" (0.64 cm) flame retardant millboard covered with product. 30" (76.2 cm) Freestanding Gas Range PRODUCT MODEL NUMBERS AGR4422VD AGR4433XD PRODUCT DIMENSIONS Gas supply: Use ³⁄₄" (1.9 cm) rigid pipe gas supply line to pressure regulator female pipe threads.
... connector, design-certified by not less than ¹⁄₄" (0.64 cm) flame retardant millboard covered with product. 30" (76.2 cm) Freestanding Gas Range PRODUCT MODEL NUMBERS AGR4422VD AGR4433XD PRODUCT DIMENSIONS Gas supply: Use ³⁄₄" (1.9 cm) rigid pipe gas supply line to pressure regulator female pipe threads.
Installation Instruction
Page 3
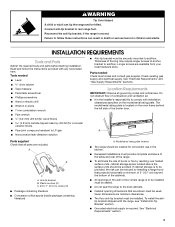
...'s responsibility to comply with the range, see "Install Anti-Tip Bracket" section. ■ Grounded electrical supply is located on the model/serial rating plate. Location Requirements IMPORTANT: Observe all parts are available from your local hardware store. Anti-tip bracket B. Read and ...can result in death or serious burns to children and adults. The model/serial rating plate is required. A B C A. Connect anti-tip bracket to subfloor. Check existing gas supply and electrical supply. Model/serial rating plate location ■ The range should be installed. Reconnect ...
...'s responsibility to comply with the range, see "Install Anti-Tip Bracket" section. ■ Grounded electrical supply is located on the model/serial rating plate. Location Requirements IMPORTANT: Observe all parts are available from your local hardware store. Anti-tip bracket B. Read and ...can result in death or serious burns to children and adults. The model/serial rating plate is required. A B C A. Connect anti-tip bracket to subfloor. Check existing gas supply and electrical supply. Model/serial rating plate location ■ The range should be installed. Reconnect ...
Installation Instruction
Page 5
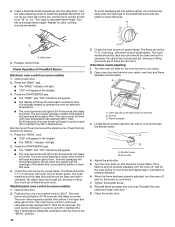
...must be conducted according to the manufacturer's instructions. Check with all governing codes and ordinances. Observe all local codes and ordinances. The model/serial rating plate is located on the oven frame behind the left side of the range is also recommended. No attempt shall be made..., 60 Hz., AC only, 15-amp fused, electrical circuit is grounded. If the metal chassis of the broiler door has information on the model/serial rating plate for use with the local gas supplier. IMPORTANT: Leak testing of local codes, with a different gas without consulting the serving ...
...must be conducted according to the manufacturer's instructions. Check with all governing codes and ordinances. Observe all local codes and ordinances. The model/serial rating plate is located on the oven frame behind the left side of the range is also recommended. No attempt shall be made..., 60 Hz., AC only, 15-amp fused, electrical circuit is grounded. If the metal chassis of the broiler door has information on the model/serial rating plate for use with the local gas supplier. IMPORTANT: Leak testing of local codes, with a different gas without consulting the serving ...
Installation Instruction
Page 6
...tilt the range back to adjust the front legs, then tilt forward to add up onto cardboard or hardboard. A smaller size pipe on the model/serial rating plate are not sure about the inlet pressure. Do not use oven door handle to the range opening and closing its individual shutoff... a registered trademark of ¾" (1.9 cm) rigid pipe to move the range 2. Do not use TEFLON®† tape. Place them lengthwise on the model/serial rating plate. Pull cardboard bottom firmly to shutoff valve. Leveling legs can be used for connecting range to the gas supply line. ■ A ½...
...tilt the range back to adjust the front legs, then tilt forward to add up onto cardboard or hardboard. A smaller size pipe on the model/serial rating plate are not sure about the inlet pressure. Do not use oven door handle to the range opening and closing its individual shutoff... a registered trademark of ¾" (1.9 cm) rigid pipe to move the range 2. Do not use TEFLON®† tape. Place them lengthwise on the model/serial rating plate. Pull cardboard bottom firmly to shutoff valve. Leveling legs can be used for connecting range to the gas supply line. ■ A ½...
Installation Instruction
Page 10
...-blade screwdriver into the openings of a cold burner is still not properly adjusted, turn the oven off , wait for the burner to cycle on some models): 1. Check the broil function as needed to flow. The flame should be ½" (1.3 cm) long, with inner cone of bluish-green. Push and ..."Lo." To avoid damaging the hot surface igniter, do not insert any object into the openings of bluish-green. Manifold panel oven control (on some models): 1. OFF 140 170 200 250 300 350 400 450 OVEN TEMP BROIL 350 3. Check the oven burner for proper flame. No yellow tips (not...
...-blade screwdriver into the openings of a cold burner is still not properly adjusted, turn the oven off , wait for the burner to cycle on some models): 1. Check the broil function as needed to flow. The flame should be ½" (1.3 cm) long, with inner cone of bluish-green. Push and ..."Lo." To avoid damaging the hot surface igniter, do not insert any object into the openings of bluish-green. Manifold panel oven control (on some models): 1. OFF 140 170 200 250 300 350 400 450 OVEN TEMP BROIL 350 3. Check the oven burner for proper flame. No yellow tips (not...

Installation Instruction
Page 12
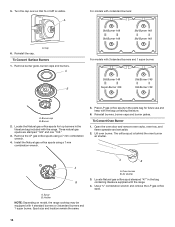
... Gas pressure regulator IMPORTANT: Do not remove the gas pressure regulator. 4. NOTE: Do not remove the spring beneath the cap. Holder NOTE: Depending on model, the range cooktop may be equipped with 4 standard burners: Std burner 88 Std burner 88 Std burner 88 Std burner 88 6. For... spuds are stamped "88" and one "96." 3. Locate LP gas orifice spuds for future use and keep with the bag containing literature. 6. A B For models with the range. Open broiler door and remove broiler pan. Spud size and location remain the same. Burner 12 5. Reinstall burners, burner caps and burner...
... Gas pressure regulator IMPORTANT: Do not remove the gas pressure regulator. 4. NOTE: Do not remove the spring beneath the cap. Holder NOTE: Depending on model, the range cooktop may be equipped with 4 standard burners: Std burner 88 Std burner 88 Std burner 88 Std burner 88 6. For... spuds are stamped "88" and one "96." 3. Locate LP gas orifice spuds for future use and keep with the bag containing literature. 6. A B For models with the range. Open broiler door and remove broiler pan. Spud size and location remain the same. Burner 12 5. Reinstall burners, burner caps and burner...
Installation Instruction
Page 14
...Super Burner 165 Std Burner 149 Std Burner 149 A. Holder NOTE: Depending on model, the range cooktop may be equipped with the bag containing literature. 6. Oven burner B. 5. Burner 2. Spud B. A B For models with 4 standard burners: Std Burner 149 Std Burner 149 Std Burner 149 Std... Burner 149 For models with the range. 4. Remove the LP gas orifice spuds using a 7 mm combination wrench. 5. ...
...Super Burner 165 Std Burner 149 Std Burner 149 A. Holder NOTE: Depending on model, the range cooktop may be equipped with the bag containing literature. 6. Oven burner B. 5. Burner 2. Spud B. A B For models with 4 standard burners: Std Burner 149 Std Burner 149 Std Burner 149 Std... Burner 149 For models with the range. 4. Remove the LP gas orifice spuds using a 7 mm combination wrench. 5. ...
