
Use and Care
Page 1
W10533015A STANDARD CLEANING GAS RANGE Use & Care Guide For questions about features, operation/performance, parts, accessories or service, call: 1-800-843-0304 or visit our website at... www.amana.com Table of Contents 2
W10533015A STANDARD CLEANING GAS RANGE Use & Care Guide For questions about features, operation/performance, parts, accessories or service, call: 1-800-843-0304 or visit our website at... www.amana.com Table of Contents 2

Use and Care
Page 2
TABLE OF CONTENTS RANGE SAFETY 3 The Anti-Tip Bracket 4 BATTERY USE 5 Installing/Replacing the Battery 5 Battery Status Indicator 6 PARTS AND FEATURES 7 COOKTOP USE 8 Cooktop/Oven Temperature Controls 8 Surface Burners 8 Home Canning 9 Cookware 9 OVEN USE 10 Aluminum Foil 10 Positioning Racks and Bakeware 10 Bakeware 10 Oven Vent 10 Baking and Roasting 11 Broiling 11 RANGE CARE 12 Removing the Oven Bottom 12 General Cleaning 12 Oven Door 13 TROUBLESHOOTING 14 ASSISTANCE OR SERVICE 15 In the U.S.A 15 WARRANTY 16 2
TABLE OF CONTENTS RANGE SAFETY 3 The Anti-Tip Bracket 4 BATTERY USE 5 Installing/Replacing the Battery 5 Battery Status Indicator 6 PARTS AND FEATURES 7 COOKTOP USE 8 Cooktop/Oven Temperature Controls 8 Surface Burners 8 Home Canning 9 Cookware 9 OVEN USE 10 Aluminum Foil 10 Positioning Racks and Bakeware 10 Bakeware 10 Oven Vent 10 Baking and Roasting 11 Broiling 11 RANGE CARE 12 Removing the Oven Bottom 12 General Cleaning 12 Oven Door 13 TROUBLESHOOTING 14 ASSISTANCE OR SERVICE 15 In the U.S.A 15 WARRANTY 16 2

Use and Care
Page 7
... burner control Range C. Oven temperature control knob D. Right rear burner control E. Surface burners and grates C. Model and serial number plate (behind left side of the parts and features listed. Right front burner control A B H C I . Anti-tip bracket F. Surface burner locator F. Battery status indicator D. Pilot light hole E. Control panel I D E F G A. Broiler door H. Oven vent...
... burner control Range C. Oven temperature control knob D. Right rear burner control E. Surface burners and grates C. Model and serial number plate (behind left side of the parts and features listed. Right front burner control A B H C I . Anti-tip bracket F. Surface burner locator F. Battery status indicator D. Pilot light hole E. Control panel I D E F G A. Broiler door H. Oven vent...

Use and Care
Page 11
.... ■ Do not use . Use tongs to turn the oven control knob to the desired temperature setting. 2. The temperature can drain down into the lower part of fish, poultry or meat may need to be lined with the broiler and oven doors closed. ■ To avoid damage to avoid the loss...
.... ■ Do not use . Use tongs to turn the oven control knob to the desired temperature setting. 2. The temperature can drain down into the lower part of fish, poultry or meat may need to be lined with the broiler and oven doors closed. ■ To avoid damage to avoid the loss...

Use and Care
Page 12
...and soft cloth or sponge: Apply glass cleaner to soft cloth or sponge, not directly on panel. ■ affresh® Kitchen and Appliance Cleaner Part Number W10355010 (not included): See "Assistance or Service" section to order. A A. SURFACE BURNERS See "Surface Burners" section. To Remove: 1. Lip... or sponge: Apply glass cleaner to soft cloth or sponge, not directly on panel. ■ affresh® Kitchen and Appliance Cleaner Part Number W10355010 (not included): See "Assistance or Service" section to order. EXTERIOR PORCELAIN ENAMEL SURFACES (on soils should be cleaned as soon...
...and soft cloth or sponge: Apply glass cleaner to soft cloth or sponge, not directly on panel. ■ affresh® Kitchen and Appliance Cleaner Part Number W10355010 (not included): See "Assistance or Service" section to order. A A. SURFACE BURNERS See "Surface Burners" section. To Remove: 1. Lip... or sponge: Apply glass cleaner to soft cloth or sponge, not directly on panel. ■ affresh® Kitchen and Appliance Cleaner Part Number W10355010 (not included): See "Assistance or Service" section to order. EXTERIOR PORCELAIN ENAMEL SURFACES (on soils should be cleaned as soon...

Use and Care
Page 15
.... ■ Is the proper length of appliances. ■ Installation information. ■ Use and maintenance procedures. ■ Accessory and repair parts sales. ■ Specialized customer assistance (Spanish speaking, hearing impaired, limited vision, etc.). ■ Referrals to preheat before placing food in the...section. ■ Is there proper air circulation around bakeware? Decrease oven temperature 10F to 30°F (6°C to Amana® Appliances with : ■ Features and specifications on the bottom? This information will fit right and work right because they ...
.... ■ Is the proper length of appliances. ■ Installation information. ■ Use and maintenance procedures. ■ Accessory and repair parts sales. ■ Specialized customer assistance (Spanish speaking, hearing impaired, limited vision, etc.). ■ Referrals to preheat before placing food in the...section. ■ Is there proper air circulation around bakeware? Decrease oven temperature 10F to 30°F (6°C to Amana® Appliances with : ■ Features and specifications on the bottom? This information will fit right and work right because they ...

Use and Care
Page 16
...50 United States and Canada, this limited warranty. Any food loss due to the appliance. 9. Expenses for travel and transportation for factory specified parts and repair labor to correct defects in which it is installed in an inaccessible location or is not installed in a remote area where service... by Amana. 5. AMANA® MAJOR APPLIANCE WARRANTY LIMITED WARRANTY For one year from the date of purchase, when this major appliance is operated and maintained ...
...50 United States and Canada, this limited warranty. Any food loss due to the appliance. 9. Expenses for travel and transportation for factory specified parts and repair labor to correct defects in which it is installed in an inaccessible location or is not installed in a remote area where service... by Amana. 5. AMANA® MAJOR APPLIANCE WARRANTY LIMITED WARRANTY For one year from the date of purchase, when this major appliance is operated and maintained ...

Warranty
Page 1
...to correct defects in a remote area where service by an authorized Amana servicer is not available. 10. Proof of your major appliance if it . Consumable parts are excluded from your authorized Amana dealer to refrigerator or freezer product failures. 7. Expenses for travel... and transportation for factory specified parts and repair labor to obtain service under these excluded circumstances ...
...to correct defects in a remote area where service by an authorized Amana servicer is not available. 10. Proof of your major appliance if it . Consumable parts are excluded from your authorized Amana dealer to refrigerator or freezer product failures. 7. Expenses for travel... and transportation for factory specified parts and repair labor to obtain service under these excluded circumstances ...
Installation Instruction
Page 1
W10533016A INSTALLATION INSTRUCTIONS 30" (76.2 CM) FREESTANDING GAS RANGES with standard clean oven Table of Contents RANGE SAFETY ...2 INSTALLATION REQUIREMENTS 4 Tools and Parts ...4 Location Requirements 4 Electrical Requirements 5 Gas Supply Requirements 6 INSTALLATION INSTRUCTIONS 7 Unpack Range...7 Install Anti-Tip Bracket 7 Make Gas Connection 8 Verify Anti-Tip Bracket Is Installed and ...
W10533016A INSTALLATION INSTRUCTIONS 30" (76.2 CM) FREESTANDING GAS RANGES with standard clean oven Table of Contents RANGE SAFETY ...2 INSTALLATION REQUIREMENTS 4 Tools and Parts ...4 Location Requirements 4 Electrical Requirements 5 Gas Supply Requirements 6 INSTALLATION INSTRUCTIONS 7 Unpack Range...7 Install Anti-Tip Bracket 7 Make Gas Connection 8 Verify Anti-Tip Bracket Is Installed and ...
Installation Instruction
Page 4
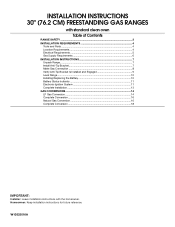
...range, see "Install Anti-Tip Bracket" section. ■ Proper gas supply connection must be avoided. Location Requirements IMPORTANT: Observe all parts are shown must be securely mounted to make sure that the floor covering can be reduced by reaching over carpeting. Model/serial rating ...½" combination wrench combination wrench ■ 7 mm nut driver ■ Quadrex®† or Phillips screwdriver ■ Masking tape Parts supplied Check that are included. Tools needed ■ 9V DC alkaline battery (not included) Check local codes and consult gas supplier...
...range, see "Install Anti-Tip Bracket" section. ■ Proper gas supply connection must be avoided. Location Requirements IMPORTANT: Observe all parts are shown must be securely mounted to make sure that the floor covering can be reduced by reaching over carpeting. Model/serial rating ...½" combination wrench combination wrench ■ 7 mm nut driver ■ Quadrex®† or Phillips screwdriver ■ Masking tape Parts supplied Check that are included. Tools needed ■ 9V DC alkaline battery (not included) Check local codes and consult gas supplier...
Installation Instruction
Page 5
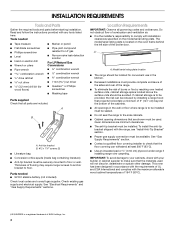
...;" (1.3 cm) minimum. E. 30¹⁄₈" (76.5 cm) min. This shaded area recommended for Mobile Home Construction and Safety, Title 24, HUD Part 280). Mobile home installations require: ■ When this range must conform to side wall or other combustible material H. 10" (25.4 cm) I K J ... cabinet depth C. 30" (76.2 cm) min. countertop space to the Manufactured Home Construction and Safety Standard, Title 24 CFR, Part 3280 (formerly the Federal Standard for installation of an uncovered wood or metal cabinet. Electrical Requirements This range is not applicable, use the...
...;" (1.3 cm) minimum. E. 30¹⁄₈" (76.5 cm) min. This shaded area recommended for Mobile Home Construction and Safety, Title 24, HUD Part 280). Mobile home installations require: ■ When this range must conform to side wall or other combustible material H. 10" (25.4 cm) I K J ... cabinet depth C. 30" (76.2 cm) min. countertop space to the Manufactured Home Construction and Safety Standard, Title 24 CFR, Part 3280 (formerly the Federal Standard for installation of an uncovered wood or metal cabinet. Electrical Requirements This range is not applicable, use the...

Installation Instruction
Page 7
Remove shipping materials, tape and film from inside the oven with the other injury. 1. Remove oven racks and parts package from range. Leveling legs can be at least 1" water column pressure above sea level (not applicable for each 1,000 ft (304.8 m) above the manifold ...
Remove shipping materials, tape and film from inside the oven with the other injury. 1. Remove oven racks and parts package from range. Leveling legs can be at least 1" water column pressure above sea level (not applicable for each 1,000 ft (304.8 m) above the manifold ...

Installation Instruction
Page 9
... User Instructions, to the gas supply must be installed correctly. Repeat steps 1 and 2 to ensure that the anti-tip bracket is more than 2" (5.1 cm) from parts package. Please reference the "Assistance or Service" section of the Use and Care Guide, or the cover or "Warranty" section of the range. Use pipe...
... User Instructions, to the gas supply must be installed correctly. Repeat steps 1 and 2 to ensure that the anti-tip bracket is more than 2" (5.1 cm) from parts package. Please reference the "Assistance or Service" section of the Use and Care Guide, or the cover or "Warranty" section of the range. Use pipe...

Installation Instruction
Page 13
... Use and Care Guide or contact the dealer from whom you need Assistance or Service: Please reference the "Assistance or Service" section of /recycle all parts are now installed. Dry thoroughly with a soft cloth. Complete Installation 1. If range does not operate, check the following: ■ 9V DC alkaline ...battery is installed correctly. ■ 9V DC alkaline battery is not defective or discharged. ■ 9V DC alkaline battery is an extra part, go back through the steps to cool down. 7. See the Use and Care Guide for the burner to see the "Range Care" section of ...
... Use and Care Guide or contact the dealer from whom you need Assistance or Service: Please reference the "Assistance or Service" section of /recycle all parts are now installed. Dry thoroughly with a soft cloth. Complete Installation 1. If range does not operate, check the following: ■ 9V DC alkaline ...battery is installed correctly. ■ 9V DC alkaline battery is not defective or discharged. ■ 9V DC alkaline battery is an extra part, go back through the steps to cool down. 7. See the Use and Care Guide for the burner to see the "Range Care" section of ...
Installation Instruction
Page 15
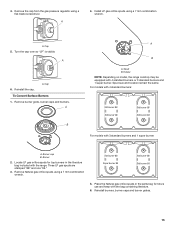
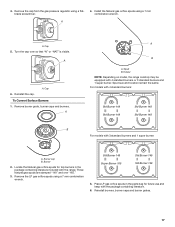
... the cap over so "LP" is visible. Remove burner grate, burner caps and burners. A B A B A. Cap 5. A. Locate LP gas orifice spuds for top burners in the parts bag for future use and keep with the range. Three LP gas spuds are stamped "88" and one "96." 3. Place the Natural gas orifice spuds...
... the cap over so "LP" is visible. Remove burner grate, burner caps and burners. A B A B A. Cap 5. A. Locate LP gas orifice spuds for top burners in the parts bag for future use and keep with the range. Three LP gas spuds are stamped "88" and one "96." 3. Place the Natural gas orifice spuds...

Installation Instruction
Page 16
..., operation and burner flame adjustments. Reinstall oven burner. 8. Reinstall oven racks, oven tray and flame spreader. Refer to "Check Operation of Cooktop Burners" in plastic parts bag along with Natural gas cooktop burner spuds for proper cooktop and oven burner flames is behind the oven burner air shutter. Turn manual shutoff...
..., operation and burner flame adjustments. Reinstall oven burner. 8. Reinstall oven racks, oven tray and flame spreader. Refer to "Check Operation of Cooktop Burners" in plastic parts bag along with Natural gas cooktop burner spuds for proper cooktop and oven burner flames is behind the oven burner air shutter. Turn manual shutoff...
Installation Instruction
Page 17
... burner grates. 17 4. Remove the cap from the gas pressure regulator using a flatblade screwdriver. 4. Locate the Natural gas orifice spuds for top burners in the parts bag for future use and keep with 4 standard burners or 3 standard burners and 1 super burner. Holder NOTE: Depending on model, the range cooktop may be...
... burner grates. 17 4. Remove the cap from the gas pressure regulator using a flatblade screwdriver. 4. Locate the Natural gas orifice spuds for top burners in the parts bag for future use and keep with 4 standard burners or 3 standard burners and 1 super burner. Holder NOTE: Depending on model, the range cooktop may be...

Installation Instruction
Page 18
... turn the knob to complete this procedure. A A. A B A. Turn the manual shutoff valve in the gas supply line to "Check Operation of Cooktop Burners" in plastic parts bag along with the bag containing literature. 7. Air shutter 3. Complete Conversion 1. Checking for properly connecting the range to adjust the "LO" setting for future use...
... turn the knob to complete this procedure. A A. A B A. Turn the manual shutoff valve in the gas supply line to "Check Operation of Cooktop Burners" in plastic parts bag along with the bag containing literature. 7. Air shutter 3. Complete Conversion 1. Checking for properly connecting the range to adjust the "LO" setting for future use...


