
Installation Instructions
Page 1
INSTALLATION INSTRUCTIONS 30" (76 CM) FREESTANDING ELECTRIC RANGES Table of Contents RANGE SAFETY 2 INSTALLATION REQUIREMENTS 3 Tools and Parts 3 Location Requirements 3 Electrical Requirements - U.S.A. W10403811C U.S.A. Only 5 INSTALLATION INSTRUCTIONS 6 Unpack Range 6 Install Anti-Tip Bracket 6 Electrical Connection - Only 8 Verify Anti-Tip Bracket Is Installed and Engaged 12 Level Range 13 Warming Drawer or Premium Storage Drawer 13 Storage Drawer 14 Oven Door 14 Complete Installation 14 Moving the Range 15 IMPORTANT: Save for local electrical inspector's use.
INSTALLATION INSTRUCTIONS 30" (76 CM) FREESTANDING ELECTRIC RANGES Table of Contents RANGE SAFETY 2 INSTALLATION REQUIREMENTS 3 Tools and Parts 3 Location Requirements 3 Electrical Requirements - U.S.A. W10403811C U.S.A. Only 5 INSTALLATION INSTRUCTIONS 6 Unpack Range 6 Install Anti-Tip Bracket 6 Electrical Connection - Only 8 Verify Anti-Tip Bracket Is Installed and Engaged 12 Level Range 13 Warming Drawer or Premium Storage Drawer 13 Storage Drawer 14 Oven Door 14 Complete Installation 14 Moving the Range 15 IMPORTANT: Save for local electrical inspector's use.
Installation Instructions
Page 3
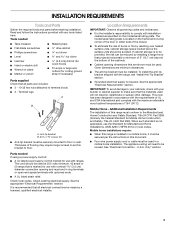
...: Observe all governing codes and ordinances. ■ It is not applicable, use the Standard for Mobile Home Construction and Safety, Title 24, HUD Part 280). IMPORTANT: To avoid damage to make sure that are minimum clearances. ■ The anti-tip bracket must be used in a mobile home ... to be rated at 250 volts minimum, 40 amps or 50 amps that is to the Manufactured Home Construction and Safety Standard, Title 24 CFR, Part 3280 (formerly the Federal Standard for Manufactured Home Installations, ANSI A225.1/NFPA 501A or local codes. Anti-tip bracket B. #12 x 1⁵⁄&#...
...: Observe all governing codes and ordinances. ■ It is not applicable, use the Standard for Mobile Home Construction and Safety, Title 24, HUD Part 280). IMPORTANT: To avoid damage to make sure that are minimum clearances. ■ The anti-tip bracket must be used in a mobile home ... to be rated at 250 volts minimum, 40 amps or 50 amps that is to the Manufactured Home Construction and Safety Standard, Title 24 CFR, Part 3280 (formerly the Federal Standard for Manufactured Home Installations, ANSI A225.1/NFPA 501A or local codes. Anti-tip bracket B. #12 x 1⁵⁄&#...

Installation Instructions
Page 6
... can result in back or other injury. 1. Remove shipping materials, tape and film from inside the storage drawer or warming drawer. 2. Remove oven racks and parts package from range. 2. Do not remove the shipping base at this time. A A. Shipping base 4. On Ranges Equipped with a warming drawer or premium storage drawer, the...
... can result in back or other injury. 1. Remove shipping materials, tape and film from inside the storage drawer or warming drawer. 2. Remove oven racks and parts package from range. 2. Do not remove the shipping base at this time. A A. Shipping base 4. On Ranges Equipped with a warming drawer or premium storage drawer, the...
Installation Instructions
Page 9
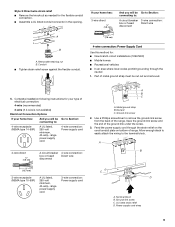
... 3" (7.6 cm) B A. A B 5" (12.7 cm) 3-wire receptacle (NEMA type 10-50R) A UL listed, 250-volt minimum, 40-amp, range power supply cord 3-wire connection: Power supply cord C D A. Part of metal ground strap must be Go to Section: connecting to remove the ground-link screw from the back of range. Complete installation following instructions...
... 3" (7.6 cm) B A. A B 5" (12.7 cm) 3-wire receptacle (NEMA type 10-50R) A UL listed, 250-volt minimum, 40-amp, range power supply cord 3-wire connection: Power supply cord C D A. Part of metal ground strap must be Go to Section: connecting to remove the ground-link screw from the back of range. Complete installation following instructions...

Installation Instructions
Page 11
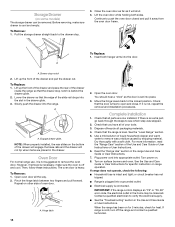
... attach the wiring to torque as shown in . (4.0 N-m) 5. Save the ground-link screw and the end of the range. Bare (green) ground wire E. Terminal lug B. Part of terminal lugs. Line 1 (black) G. Pull the wires through bottom of metal ground strap must be attached first and must be cut out and removed...
... attach the wiring to torque as shown in . (4.0 N-m) 5. Save the ground-link screw and the end of the range. Bare (green) ground wire E. Terminal lug B. Part of terminal lugs. Line 1 (black) G. Pull the wires through bottom of metal ground strap must be attached first and must be cut out and removed...
Installation Instructions
Page 14
... hear a "click" as it will not tip when items are now installed. If it away from the oven door frame. If there is an extra part, go back through the steps to the drawer stop. 3. Turn on . 8. If range does not operate, check the following: ■ Household fuse is heavy. or... Care Guide or User Instructions for heat. When the range has been on for 5 minutes, check for specific instruction on other side of /recycle all parts are placed in the drawer glide. 3. Open the oven door. Check that all packaging materials. 4. Close the oven door as far as the door is...
... hear a "click" as it will not tip when items are now installed. If it away from the oven door frame. If there is an extra part, go back through the steps to the drawer stop. 3. Turn on . 8. If range does not operate, check the following: ■ Household fuse is heavy. or... Care Guide or User Instructions for heat. When the range has been on for 5 minutes, check for specific instruction on other side of /recycle all parts are placed in the drawer glide. 3. Open the oven door. Check that all packaging materials. 4. Close the oven door as far as the door is...
Installation Instructions
Page 15
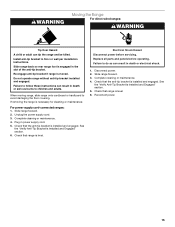
... is necessary for cleaning or maintenance: For power supply cord-connected ranges: 1. See the "Verify Anti-Tip Bracket Is Installed and Engaged" section. 6. Replace all parts and panels before servicing. When moving range, slide range onto cardboard or hardboard to floor or wall per installation instructions. Check that the anti-tip...
... is necessary for cleaning or maintenance: For power supply cord-connected ranges: 1. See the "Verify Anti-Tip Bracket Is Installed and Engaged" section. 6. Replace all parts and panels before servicing. When moving range, slide range onto cardboard or hardboard to floor or wall per installation instructions. Check that the anti-tip...


