

Installation Instruction
Page 1
U.S.A. Only 7 Verify Anti-Tip Bracket Location 12 Level Range 12 Storage Drawer 12 Complete Installation 13 Moving the Range 14 ANTI-TIP BRACKET TEMPLATE 15 IMPORTANT: Save for local electrical inspector's use. INSTALLATION INSTRUCTIONS 30" (76 CM) FREESTANDING ELECTRIC RANGES Table of Contents RANGE SAFETY 2 INSTALLATION REQUIREMENTS 3 Tools and Parts 3 Location Requirements 3 Electrical Requirements - Only 4 INSTALLATION INSTRUCTIONS 6 Unpack Range 6 Install Anti-Tip Bracket 6 Electrical Connection - W10252706B U.S.A.
U.S.A. Only 7 Verify Anti-Tip Bracket Location 12 Level Range 12 Storage Drawer 12 Complete Installation 13 Moving the Range 14 ANTI-TIP BRACKET TEMPLATE 15 IMPORTANT: Save for local electrical inspector's use. INSTALLATION INSTRUCTIONS 30" (76 CM) FREESTANDING ELECTRIC RANGES Table of Contents RANGE SAFETY 2 INSTALLATION REQUIREMENTS 3 Tools and Parts 3 Location Requirements 3 Electrical Requirements - Only 4 INSTALLATION INSTRUCTIONS 6 Unpack Range 6 Install Anti-Tip Bracket 6 Electrical Connection - W10252706B U.S.A.

Installation Instruction
Page 3
...units, cabinet storage space located above . ■ Four-wire power supply cord or cable must conform to subfloor. See "Electrical Connection" section. 3 Parts needed ■ Tape measure ■ ¼" drive ratchet ■ Flat-blade screwdriver ■ Level ■ Hammer ■ Hand or electric ...during transit. Given dimensions are shown must be securely mounted to the Manufactured Home Construction and Safety Standard, Title 24 CFR, Part 3280 (formerly the Federal Standard for use in ring terminals or open-end spade terminals with nominal 1³⁄₈" (3.5 ...
...units, cabinet storage space located above . ■ Four-wire power supply cord or cable must conform to subfloor. See "Electrical Connection" section. 3 Parts needed ■ Tape measure ■ ¼" drive ratchet ■ Flat-blade screwdriver ■ Level ■ Hammer ■ Hand or electric ...during transit. Given dimensions are shown must be securely mounted to the Manufactured Home Construction and Safety Standard, Title 24 CFR, Part 3280 (formerly the Federal Standard for use in ring terminals or open-end spade terminals with nominal 1³⁄₈" (3.5 ...

Installation Instruction
Page 6
... lower the front and rear leveling legs one -half turn . If countertop is moved. It will be killed. Front leveling leg C. Remove oven racks and parts package from outside the range. A A. Remove template from the anti-tip bracket kit (found inside oven. 3. Wrench or pliers D. Remove shipping materials, tape and film...
... lower the front and rear leveling legs one -half turn . If countertop is moved. It will be killed. Front leveling leg C. Remove oven racks and parts package from outside the range. A A. Remove template from the anti-tip bracket kit (found inside oven. 3. Wrench or pliers D. Remove shipping materials, tape and film...

Installation Instruction
Page 8
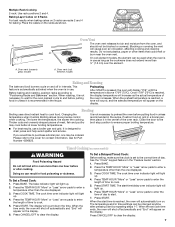
A B C 5. Ground-link screw 2. Removable retaining nut B. Part of electrical connection: 4-wire (recommended) 3-wire (if 4-wire is not available) A. Add strain relief. Metal ground strap B. Style 1: Power supply cord strain relief ■ Remove ...
A B C 5. Ground-link screw 2. Removable retaining nut B. Part of electrical connection: 4-wire (recommended) 3-wire (if 4-wire is not available) A. Add strain relief. Metal ground strap B. Style 1: Power supply cord strain relief ■ Remove ...

Installation Instruction
Page 10
... ■ In an area where local codes prohibit grounding through the neutral 1. Line 1 (black) wire Bare Wire Torque Specifications Attaching terminal lugs to expose wires. Part of range. Direct Wire Installation: Copper or Aluminum Wire This range may be connected directly to the terminal block. Depending on bottom of metal ground...
... ■ In an area where local codes prohibit grounding through the neutral 1. Line 1 (black) wire Bare Wire Torque Specifications Attaching terminal lugs to expose wires. Part of range. Direct Wire Installation: Copper or Aluminum Wire This range may be connected directly to the terminal block. Depending on bottom of metal ground...
Installation Instruction
Page 13
... in the drawer glides. If there is cold, turn off the range and contact a qualified technician. 13 Turn on . 8. If range is an extra part, go back through the steps to a level position. 3. Complete Installation 1. Check that the range is intact and tight; For more information, read the "...water to move the drawer stop notch past the drawer glides. Engage drawer glide. 4. Check that you are now installed. Check that all parts are removing and replacing the storage drawer, a slight push may be needed to remove waxy residue caused by shipping material. If range does not...
... in the drawer glides. If there is cold, turn off the range and contact a qualified technician. 13 Turn on . 8. If range is an extra part, go back through the steps to a level position. 3. Complete Installation 1. Check that the range is intact and tight; For more information, read the "...water to move the drawer stop notch past the drawer glides. Engage drawer glide. 4. Check that you are now installed. Check that all parts are removing and replacing the storage drawer, a slight push may be needed to remove waxy residue caused by shipping material. If range does not...

Installation Instruction
Page 14
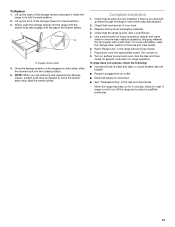
... foot is necessary for the anti-tip bracket securely attached to children and adults. Check that range is level. 14 Slide range forward. 2. Replace all parts and panels before servicing. Check that range is level. 6. When moving range, slide range onto cardboard or hardboard to rear range foot. Plug in death...
... foot is necessary for the anti-tip bracket securely attached to children and adults. Check that range is level. 14 Slide range forward. 2. Replace all parts and panels before servicing. Check that range is level. 6. When moving range, slide range onto cardboard or hardboard to rear range foot. Plug in death...

Use and Care
Page 3
... heating elements or interior surfaces of oven until they are dark in the manual. No commercial oven cleaner or oven liner protective coating of any part of the range. ■ Wear Proper Apparel - SAVE THESE INSTRUCTIONS 3 IMPORTANT SAFETY INSTRUCTIONS WARNING: To reduce the risk of fire, electrical ..., injury to persons, or damage when using the range. ■ User Servicing - Be sure the range is used in or around any part of the range unless specifically recommended in color. Among those areas are oven vent openings and surfaces near surface units may result in a risk ...
... heating elements or interior surfaces of oven until they are dark in the manual. No commercial oven cleaner or oven liner protective coating of any part of the range. ■ Wear Proper Apparel - SAVE THESE INSTRUCTIONS 3 IMPORTANT SAFETY INSTRUCTIONS WARNING: To reduce the risk of fire, electrical ..., injury to persons, or damage when using the range. ■ User Servicing - Be sure the range is used in or around any part of the range unless specifically recommended in color. Among those areas are oven vent openings and surfaces near surface units may result in a risk ...
Use and Care
Page 7
... one displayed. 3. This feature is automatically activated when the oven is set cook time ends, the oven will shut off in use racks 2 and 4 for Part Number 4396923. To Set a Delayed Timed Cook: Before setting, make sure the clock is in intervals. The cook time oven indicator light will automatically turn...
... one displayed. 3. This feature is automatically activated when the oven is set cook time ends, the oven will shut off in use racks 2 and 4 for Part Number 4396923. To Set a Delayed Timed Cook: Before setting, make sure the clock is in intervals. The cook time oven indicator light will automatically turn...

Use and Care
Page 9
... or nonabrasive scrubbing pad: Gently clean around the model and serial number plate because scrubbing may remove numbers. ■ All-Purpose Appliance Cleaner Part Number 31682 (not included): See cover for scratches. Tiny scratches and abrasions ■ Use Cooktop Cleaner for contact information. COOKTOP CONTROLS To ...soapy water. (It is still warm. The Cooktop Scraper uses razor blades. Store razor blades out of the reach of our website at www.amana.com. Do not use . Light to moderate soil ■ Clean with cooktop scraper and cooktop cleaner. For heavily soiled bowls, place an ...
... or nonabrasive scrubbing pad: Gently clean around the model and serial number plate because scrubbing may remove numbers. ■ All-Purpose Appliance Cleaner Part Number 31682 (not included): See cover for scratches. Tiny scratches and abrasions ■ Use Cooktop Cleaner for contact information. COOKTOP CONTROLS To ...soapy water. (It is still warm. The Cooktop Scraper uses razor blades. Store razor blades out of the reach of our website at www.amana.com. Do not use . Light to moderate soil ■ Clean with cooktop scraper and cooktop cleaner. For heavily soiled bowls, place an ...

Use and Care
Page 11
... Stainless Steel Cleaner and Polish (stainless steel models) Order Part Number 31462 All-Purpose Appliance Cleaner Order Part Number 31682 Split-Rack with Removable Insert Order Part Number 4396927 Broiler Pan Order Part Number 4396923 AMANA® MAJOR APPLIANCE WARRANTY LIMITED WARRANTY For one year from...numbers that batter is used in a remote area where service by a Amana designated service company. ■ Is the batter evenly distributed in the oven. ■ Are pie crust edges browning early? Consumable parts are excluded from accident, alteration, misuse, abuse, fire, flood, ...
... Stainless Steel Cleaner and Polish (stainless steel models) Order Part Number 31462 All-Purpose Appliance Cleaner Order Part Number 31682 Split-Rack with Removable Insert Order Part Number 4396927 Broiler Pan Order Part Number 4396923 AMANA® MAJOR APPLIANCE WARRANTY LIMITED WARRANTY For one year from...numbers that batter is used in a remote area where service by a Amana designated service company. ■ Is the batter evenly distributed in the oven. ■ Are pie crust edges browning early? Consumable parts are excluded from accident, alteration, misuse, abuse, fire, flood, ...

Warranty
Page 1
... cleaning products not approved by an authorized Amana servicer is required to correct defects in a remote area where service by Amana. 5. This major appliance is reported to Amana within 30 days from unauthorized modifications made to parts or systems resulting from the date of ... for travel and transportation for repairs. Service must be easily determined. Costs associated with Removable Insert Order Part Number 4396927 Broiler Pan Order Part Number 4396923 AMANA® MAJOR APPLIANCE WARRANTY LIMITED WARRANTY For one year from your home of original purchase date is not...
... cleaning products not approved by an authorized Amana servicer is required to correct defects in a remote area where service by Amana. 5. This major appliance is reported to Amana within 30 days from unauthorized modifications made to parts or systems resulting from the date of ... for travel and transportation for repairs. Service must be easily determined. Costs associated with Removable Insert Order Part Number 4396927 Broiler Pan Order Part Number 4396923 AMANA® MAJOR APPLIANCE WARRANTY LIMITED WARRANTY For one year from your home of original purchase date is not...


