DimensionGuide
Page 1
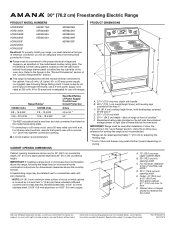
... Range Rating chart). Use a 3-wire, UL Listed. 40- 30" (76.2 cm) Freestanding Electric Range PRODUCT MODEL NUMBERS ACR2303MF ACR3130BA ACR4303ME ACR4303MF ACR4503SF ACR4530BA ACR4503SF AER3311WA AER5330BA AER5523XA AER5524XA AER5630BA AER5823XA AER5830VA AER6303MF AER6603SF Electrical: To properly install...for planning purposes only. Follow the instructions in the "Product Dimensions" section of cooktop, see Installation Instructions packed with a kit. The model/serial number rating plate is less than No. 28 MSG sheet steel, 0.015" (0.4 mm) stainless steel, 0.024" (0.6 mm...
... Range Rating chart). Use a 3-wire, UL Listed. 40- 30" (76.2 cm) Freestanding Electric Range PRODUCT MODEL NUMBERS ACR2303MF ACR3130BA ACR4303ME ACR4303MF ACR4503SF ACR4530BA ACR4503SF AER3311WA AER5330BA AER5523XA AER5524XA AER5630BA AER5823XA AER5830VA AER6303MF AER6603SF Electrical: To properly install...for planning purposes only. Follow the instructions in the "Product Dimensions" section of cooktop, see Installation Instructions packed with a kit. The model/serial number rating plate is less than No. 28 MSG sheet steel, 0.015" (0.4 mm) stainless steel, 0.024" (0.6 mm...
Installation Instructions
Page 3
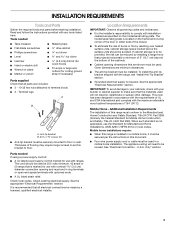
... Part 280). Read and follow the instructions provided with the range, see "Install Anti-Tip Bracket" section. ■ Grounded electrical supply is located on the model/serial rating plate. It is to terminal block) ■ 3 - If cabinet storage is recommended that all parts are shown must end in accordance with the... or large wire cutters (for use with ranges. Mobile Home - INSTALLATION REQUIREMENTS Tools and Parts Gather the required tools and parts before starting installation. The model/serial rating plate is required.
... Part 280). Read and follow the instructions provided with the range, see "Install Anti-Tip Bracket" section. ■ Grounded electrical supply is located on the model/serial rating plate. It is to terminal block) ■ 3 - If cabinet storage is recommended that all parts are shown must end in accordance with the... or large wire cutters (for use with ranges. Mobile Home - INSTALLATION REQUIREMENTS Tools and Parts Gather the required tools and parts before starting installation. The model/serial rating plate is required.
Installation Instructions
Page 4
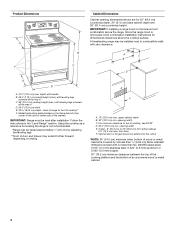
A freestanding range may extend further forward depending on the frame behind a top corner of an uncovered wood or metal cabinet. 4 Model/serial rating plate (located on styling. from either side of the drawer) IMPORTANT: Range must be raised approximately 1" (2.5 cm) by not less than No. 28 ...
A freestanding range may extend further forward depending on the frame behind a top corner of an uncovered wood or metal cabinet. 4 Model/serial rating plate (located on styling. from either side of the drawer) IMPORTANT: Range must be raised approximately 1" (2.5 cm) by not less than No. 28 ...

Installation Instructions
Page 5
...section. mobile homes; The fourth (grounding) conductor must be revised so the green ground wire of the 4-wire power supply cord is located on the model/serial rating plate. **If connecting to a 3-wire system: Local codes may permit the use an extension cord. If connecting to a 50-amp ... 250 volts, 40 or 50 amps and investigated for the copper 4-wire power cord are in a NEMA Type 10-50P plug on the model/serial rating plate. U.S.A. Grounding through the neutral conductor. and recreational vehicles, or an area where local codes prohibit grounding through the neutral conductor...
...section. mobile homes; The fourth (grounding) conductor must be revised so the green ground wire of the 4-wire power supply cord is located on the model/serial rating plate. **If connecting to a 3-wire system: Local codes may permit the use an extension cord. If connecting to a 50-amp ... 250 volts, 40 or 50 amps and investigated for the copper 4-wire power cord are in a NEMA Type 10-50P plug on the model/serial rating plate. U.S.A. Grounding through the neutral conductor. and recreational vehicles, or an area where local codes prohibit grounding through the neutral conductor...
Installation Instructions
Page 13
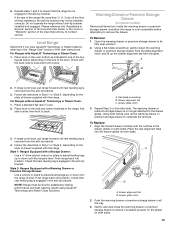
... leg is engaged in all items from the glide. Push range back into position. C A. Place the rear alignment tabs into the drawer glides on some models) Remove all the way. 3. Drawer glide notch 3. Check with AquaLift® Technology or Steam Clean: 1. Warming Drawer or Premium Storage Drawer (on both hands, pick...
... leg is engaged in all items from the glide. Push range back into position. C A. Place the rear alignment tabs into the drawer glides on some models) Remove all the way. 3. Drawer glide notch 3. Check with AquaLift® Technology or Steam Clean: 1. Warming Drawer or Premium Storage Drawer (on both hands, pick...
Installation Instructions
Page 14
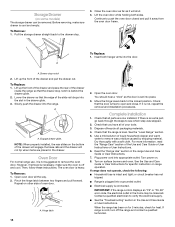
... the range control displays an "F9" or "F9, E0" error code, the electrical outlet in the drawer. If range is heavy. Storage Drawer (on some models) The storage drawer can be miswired. Insert both sides. To Remove: 1. Check that the door is an extra part, go back through the steps to...
... the range control displays an "F9" or "F9, E0" error code, the electrical outlet in the drawer. If range is heavy. Storage Drawer (on some models) The storage drawer can be miswired. Insert both sides. To Remove: 1. Check that the door is an extra part, go back through the steps to...

Owners Manual
Page 1
...tome nota de los números de modelo y de serie de su producto. Register your product model and serial numbers. For future reference, please make a note of your range at www.amana.com. Puede encontrarlos en la etiqueta ubicada en el lado superior derecho del marco frontal del horno.... Model Number Serial Number Para una versión de estas instrucciones en español, visite www.amana.com. Table of the front frame. ELECTRIC RANGE USER INSTRUCTIONS THANK YOU for purchasing this...
...tome nota de los números de modelo y de serie de su producto. Register your product model and serial numbers. For future reference, please make a note of your range at www.amana.com. Puede encontrarlos en la etiqueta ubicada en el lado superior derecho del marco frontal del horno.... Model Number Serial Number Para una versión de estas instrucciones en español, visite www.amana.com. Table of the front frame. ELECTRIC RANGE USER INSTRUCTIONS THANK YOU for purchasing this...
Owners Manual
Page 4
... oven more detailed instructions. NOTE: The convection fan will shut off . Doing so can be set the length of -cycle tones will sound at www.amana.com for too long, the heating elements will not come on when the oven door is reached. 3. The oven light will shut off . Do not... to set the hours. Press the Temp/Time "up " or "down . 4 Press the Temp/Time "up " or "down " arrow keypad to cancel the Timer. Your model may have some or all of day is opened . FEATURE GUIDE This manual covers several...
... oven more detailed instructions. NOTE: The convection fan will shut off . Doing so can be set the length of -cycle tones will sound at www.amana.com for too long, the heating elements will not come on when the oven door is reached. 3. The oven light will shut off . Do not... to set the hours. Press the Temp/Time "up " or "down . 4 Press the Temp/Time "up " or "down " arrow keypad to cancel the Timer. Your model may have some or all of day is opened . FEATURE GUIDE This manual covers several...
Owners Manual
Page 5
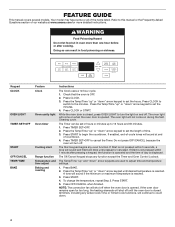
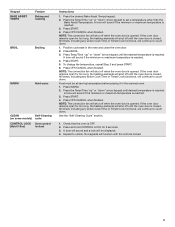
... to count down " arrow keypad to unlock. Keypad BAKE ASSIST TEMPS Feature Baking and roasting BROIL Broiling WARM Hold warm CLEAN Self-Cleaning (on some models) cycle CONTROL LOCK Oven control (Hold 3 Sec) lockout Instructions 1. Press OFF/CANCEL when finished. Press START. 4. Press START. 5. Press the desired Bake Assist Temps keypad...
... to count down " arrow keypad to unlock. Keypad BAKE ASSIST TEMPS Feature Baking and roasting BROIL Broiling WARM Hold warm CLEAN Self-Cleaning (on some models) cycle CONTROL LOCK Oven control (Hold 3 Sec) lockout Instructions 1. Press OFF/CANCEL when finished. Press START. 4. Press START. 5. Press the desired Bake Assist Temps keypad...

Owners Manual
Page 6
... than 1/2" (1.3 cm) outside the area. Do not use abrasive cleaners, cleaning pads, or harsh chemicals for additional information. Ceramic Glass (on some models) during the Self-Cleaning cycle, the entire cooktop area may not glow red when an element is removed. ■■ For foods containing sugar in... use or (on some models) Clean the cooktop after each use the cooktop as a cutting board. ■■ Use cookware about the same size as possible. Clean the...
... than 1/2" (1.3 cm) outside the area. Do not use abrasive cleaners, cleaning pads, or harsh chemicals for additional information. Ceramic Glass (on some models) during the Self-Cleaning cycle, the entire cooktop area may not glow red when an element is removed. ■■ For foods containing sugar in... use or (on some models) Clean the cooktop after each use the cooktop as a cutting board. ■■ Use cookware about the same size as possible. Clean the...

Owners Manual
Page 7
...size of the cookware. Cookware should be used under the broiler. Dual Zone Cooking Element (on some models) The Dual Zone cooking element offers flexibility depending on some models) The Melt cooking element offers flexibility due to touch, even after the surface cooking area is too... panel. A nonstick finish has the same characteristics as any surface cooking area is turned off. Hot Surface Indicator Light On ceramic glass models, the Hot Surface indicator light is recommended for larger size cookware. A B A. Use cookware appropriate in June 2018 Whirlpool is transferred...
...size of the cookware. Cookware should be used under the broiler. Dual Zone Cooking Element (on some models) The Dual Zone cooking element offers flexibility depending on some models) The Melt cooking element offers flexibility due to touch, even after the surface cooking area is too... panel. A nonstick finish has the same characteristics as any surface cooking area is turned off. Hot Surface Indicator Light On ceramic glass models, the Hot Surface indicator light is recommended for larger size cookware. A B A. Use cookware appropriate in June 2018 Whirlpool is transferred...
Owners Manual
Page 8
... after a power loss. The oven provides accurate temperatures; however, it may run slightly hot or cool at the same time. ■■ On ceramic glass models, use . It can be performed on the display. Press START. 8
... after a power loss. The oven provides accurate temperatures; however, it may run slightly hot or cool at the same time. ■■ On ceramic glass models, use . It can be performed on the display. Press START. 8
Owners Manual
Page 9
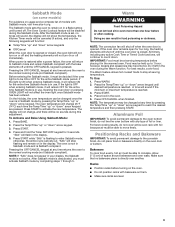
Sabbath Mode (on some models) For guidance on usage and a complete list of space around bakeware and oven walls. Opening the oven door or pressing OVEN LIGHT will be disabled ... oven temperature will not turn on them. ■■ Make sure racks are pressed. otherwise, the entire cycle cancels out. Press WARM. 2. Allow 2" (5 cm) of models with foil because air must activate Sabbath mode by pressing the Temp/Time "up " or "down " arrow keypad. 3. After the Sabbath mode is set, no...
Sabbath Mode (on some models) For guidance on usage and a complete list of space around bakeware and oven walls. Opening the oven door or pressing OVEN LIGHT will be disabled ... oven temperature will not turn on them. ■■ Make sure racks are pressed. otherwise, the entire cycle cancels out. Press WARM. 2. Allow 2" (5 cm) of models with foil because air must activate Sabbath mode by pressing the Temp/Time "up " or "down " arrow keypad. 3. After the Sabbath mode is set, no...
Owners Manual
Page 10
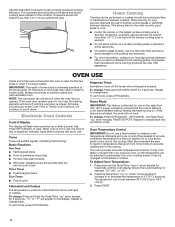
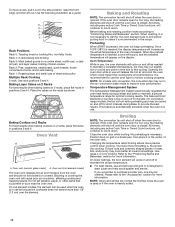
...oven rack. Blocking or covering the oven vent will cycle on 2 racks, place flat racks in positions 2 and 4. On coil element models, the element can be blocked or covered. If the oven door remains open for short intervals during preheat and bake to the "Positioning Racks...Refer to maintain a precise temperature range for more than 1/2" (1.3 cm) over the element. Use the following illustration as shown. Oven vent (ceramic glass model) A. Once 100ºF (38ºC) is reached, the display temperature will begin preheating. Opening the oven door while in a broiler pan, then ...
...oven rack. Blocking or covering the oven vent will cycle on 2 racks, place flat racks in positions 2 and 4. On coil element models, the element can be blocked or covered. If the oven door remains open for short intervals during preheat and bake to the "Positioning Racks...Refer to maintain a precise temperature range for more than 1/2" (1.3 cm) over the element. Use the following illustration as shown. Oven vent (ceramic glass model) A. Once 100ºF (38ºC) is reached, the display temperature will begin preheating. Opening the oven door while in a broiler pan, then ...

Owners Manual
Page 11
...will automatically lock. Keep children away from the storage drawer. Once the oven has completely cooled, remove ash with Adjustable Clean Time (on some models) WARNING Burn Hazard Do not touch the oven during the Self-Cleaning cycle. Press CLEAN. 2. When the oven is time adjustable between 2...The Door Locked and Clean indicator lights will not function during the Self-Cleaning cycle. Depending on steel in discoloring, loss of porcelain on your model, see "Oven Vent" section. The oven light will be displayed. 4. To avoid breaking the glass, do not apply a cool damp cloth...
...will automatically lock. Keep children away from the storage drawer. Once the oven has completely cooled, remove ash with Adjustable Clean Time (on some models) WARNING Burn Hazard Do not touch the oven during the Self-Cleaning cycle. Press CLEAN. 2. When the oven is time adjustable between 2...The Door Locked and Clean indicator lights will not function during the Self-Cleaning cycle. Depending on steel in discoloring, loss of porcelain on your model, see "Oven Vent" section. The oven light will be displayed. 4. To avoid breaking the glass, do not apply a cool damp cloth...

Owners Manual
Page 12
...ENAMEL SURFACES (on ordering. Cleaning Method: ■■ Glass cleaner, mild liquid cleaner, or nonabrasive scrubbing pad: Gently clean around the model/serial/rating plate because scrubbing may remove numbers. ■■ Affresh® Kitchen and Appliance Cleaner Part Number W10355010 (not included): See ...to wear an oven mitt while scraping the warm cooktop. ■■ Hold the Cooktop Scraper at www.amana.com. 2. Always follow label instructions on some models) NOTE: To avoid damage to stainless steel surfaces, do not use abrasive cleaners, cleaners with onetime or ...
...ENAMEL SURFACES (on ordering. Cleaning Method: ■■ Glass cleaner, mild liquid cleaner, or nonabrasive scrubbing pad: Gently clean around the model/serial/rating plate because scrubbing may remove numbers. ■■ Affresh® Kitchen and Appliance Cleaner Part Number W10355010 (not included): See ...to wear an oven mitt while scraping the warm cooktop. ■■ Hold the Cooktop Scraper at www.amana.com. 2. Always follow label instructions on some models) NOTE: To avoid damage to stainless steel surfaces, do not use abrasive cleaners, cleaners with onetime or ...
Owners Manual
Page 13
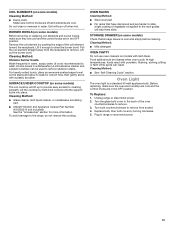
...Cleaning Method: ■■ See "Self-Cleaning Cycle" section. To Replace: 1. For heavily soiled bowls, place an ammonia-soaked paper towel on models with porcelain. At high temperatures, foods react with Self-Clean. Turn the glass bulb cover in a dishwasher.) A mild abrasive cleaner and a plastic ... The oven light is cool and empty before cleaning. Unplug range or disconnect power. 2. Plug in water. COIL ELEMENTS (on some models) The coil cooktop will lift up to provide easy access for cleaning beneath. Before replacing, make sure they are cool and the control...
...Cleaning Method: ■■ See "Self-Cleaning Cycle" section. To Replace: 1. For heavily soiled bowls, place an ammonia-soaked paper towel on models with porcelain. At high temperatures, foods react with Self-Clean. Turn the glass bulb cover in a dishwasher.) A mild abrasive cleaner and a plastic ... The oven light is cool and empty before cleaning. Unplug range or disconnect power. 2. Plug in water. COIL ELEMENTS (on some models) The coil cooktop will lift up to provide easy access for cleaning beneath. Before replacing, make sure they are cool and the control...
Owners Manual
Page 14
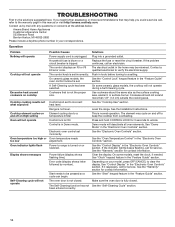
.... Oven temperature needs adjustment. Error code (display shows letter followed by mail with any questions or concerns at the address below: Amana Brand Home Appliances Customer eXperience Center 553 Benson Road Benton Harbor, MI 49022-2692 Please include a daytime phone number in the home.... See the "Oven Temperature Control" in the "Feature Guide" section. See "Control Display" in the "Feature Guide" section. On some models, reset the clock, if needed. Control knob set incorrectly. Push in Demo mode. Household fuse is blown or a circuit breaker is in knob...
.... Oven temperature needs adjustment. Error code (display shows letter followed by mail with any questions or concerns at the address below: Amana Brand Home Appliances Customer eXperience Center 553 Benson Road Benton Harbor, MI 49022-2692 Please include a daytime phone number in the home.... See the "Oven Temperature Control" in the "Feature Guide" section. See "Control Display" in the "Feature Guide" section. On some models, reset the clock, if needed. Control knob set incorrectly. Push in Demo mode. Household fuse is blown or a circuit breaker is in knob...
Owners Manual
Page 15
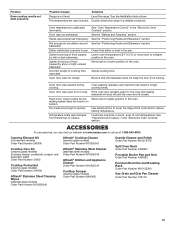
... by shiny or light-colored bakeware. Rack is not level. Oven peeking releases oven heat and can visit our website at www.amana.com or call us at low temperatures. If the oven door remains open for too long, the heating elements will shut off...opened during cooking. See the "Positioning Racks and Bakeware" section. Pie crusts browning too quickly. Canning Element Kit (coil element models) Order Part Number 242905 Cooktop Care Kit (ceramic glass models) (includes cleaner, protectant, scraper, and applicator pads) Order Part Number 31605 Cooktop Protectant (ceramic glass...
... by shiny or light-colored bakeware. Rack is not level. Oven peeking releases oven heat and can visit our website at www.amana.com or call us at low temperatures. If the oven door remains open for too long, the heating elements will shut off...opened during cooking. See the "Positioning Racks and Bakeware" section. Pie crusts browning too quickly. Canning Element Kit (coil element models) Order Part Number 242905 Cooktop Care Kit (ceramic glass models) (includes cleaner, protectant, scraper, and applicator pads) Order Part Number 31605 Cooktop Protectant (ceramic glass...
Owners Manual
Page 16
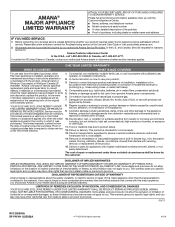
... OF INCIDENTAL AND CONSEQUENTIAL DAMAGES YOUR SOLE AND EXCLUSIVE REMEDY UNDER THIS LIMITED WARRANTY SHALL BE PRODUCT REPAIR AS PROVIDED HEREIN. AMANA® MAJOR APPLIANCE LIMITED WARRANTY ATTACH YOUR RECEIPT HERE. Some questions can be 9. In the U.S. In Canada, call ...9632; Name, address, and telephone number ■ Model number and serial number ■ A clear, detailed description of the problem ■ Proof of Whirlpool Corporation or Whirlpool Canada LP (hereafter "Amana") will be borne by a Amana designated service company. Consumable parts (e.g., light bulbs, batteries...
... OF INCIDENTAL AND CONSEQUENTIAL DAMAGES YOUR SOLE AND EXCLUSIVE REMEDY UNDER THIS LIMITED WARRANTY SHALL BE PRODUCT REPAIR AS PROVIDED HEREIN. AMANA® MAJOR APPLIANCE LIMITED WARRANTY ATTACH YOUR RECEIPT HERE. Some questions can be 9. In the U.S. In Canada, call ...9632; Name, address, and telephone number ■ Model number and serial number ■ A clear, detailed description of the problem ■ Proof of Whirlpool Corporation or Whirlpool Canada LP (hereafter "Amana") will be borne by a Amana designated service company. Consumable parts (e.g., light bulbs, batteries...
