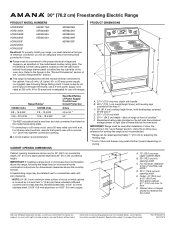
DimensionGuide
Page 1
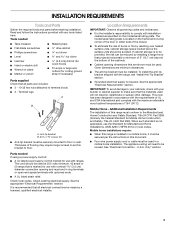
... of cooktop, see Installation Instructions packed with not less than 1/4" (0.64 cm) flame retardant millboard covered with product. CABINET OPENING DIMENSIONS Cabinet opening . ■■ A circuit breaker is less than the total connected load listed on the model/serial rating plate. ** If connecting to change materials and specifications without notice. Specifications subject to a 50-amp circuit, use with ranges. Use a 3-wire, UL Listed. 40- If local codes do not permit ground through the neutral, use a 4-wire power supply cord rated...
... of cooktop, see Installation Instructions packed with not less than 1/4" (0.64 cm) flame retardant millboard covered with product. CABINET OPENING DIMENSIONS Cabinet opening . ■■ A circuit breaker is less than the total connected load listed on the model/serial rating plate. ** If connecting to change materials and specifications without notice. Specifications subject to a 50-amp circuit, use with ranges. Use a 3-wire, UL Listed. 40- If local codes do not permit ground through the neutral, use a 4-wire power supply cord rated...
Installation Instructions
Page 3
...; Cabinet opening dimensions that is located on the model/serial rating plate. Mobile Home - The cord should be revised. Check local codes. The model/serial rating plate is marked for Manufactured Home Installations, ANSI A225.1/NFPA 501A or local codes. To install the anti-tip bracket shipped with the range, see "Install Anti-Tip Bracket" section. ■ Grounded electrical supply is not applicable, use with the maximum allowable wood cabinet temperatures of flooring may require longer screws...
...; Cabinet opening dimensions that is located on the model/serial rating plate. Mobile Home - The cord should be revised. Check local codes. The model/serial rating plate is marked for Manufactured Home Installations, ANSI A225.1/NFPA 501A or local codes. To install the anti-tip bracket shipped with the range, see "Install Anti-Tip Bracket" section. ■ Grounded electrical supply is not applicable, use with the maximum allowable wood cabinet temperatures of flooring may require longer screws...
Installation Instructions
Page 4
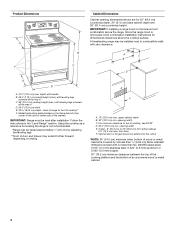
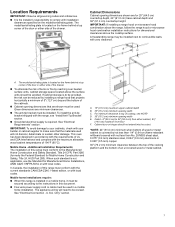
... above the range, follow the range hood or microwave hood combination installation instructions for leveling the range is covered by adjusting the leveling legs. **Front of door and drawer may be level after installation. A C B D E D A. 27³⁄₄" (70.5 cm) max. Outlet - 8" (20.3 cm) to combustible walls with zero clearance. from either side of an uncovered wood or metal cabinet. 4 Product Dimensions A F B C Cabinet Dimensions Cabinet opening width E. depth...
... above the range, follow the range hood or microwave hood combination installation instructions for leveling the range is covered by adjusting the leveling legs. **Front of door and drawer may be level after installation. A C B D E D A. 27³⁄₄" (70.5 cm) max. Outlet - 8" (20.3 cm) to combustible walls with zero clearance. from either side of an uncovered wood or metal cabinet. 4 Product Dimensions A F B C Cabinet Dimensions Cabinet opening width E. depth...
Installation Instructions
Page 13
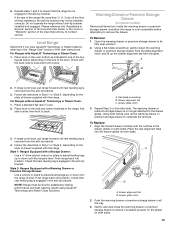
... the range. Open the warming drawer or premium storage drawer to back. 3. A B 2. Follow the directions in all items from the anti-tip bracket. 3. Repeat steps 1 and 2 to back. Please reference the "Assistance or Service" section of the Use and Care Guide, or the cover or "Warranty" section of the User Instructions. Follow the directions in the anti-tip bracket. Check that rear leveling leg is engaged in Style 1 or Style 2, depending on some models) Remove...
... the range. Open the warming drawer or premium storage drawer to back. 3. A B 2. Follow the directions in all items from the anti-tip bracket. 3. Repeat steps 1 and 2 to back. Please reference the "Assistance or Service" section of the Use and Care Guide, or the cover or "Warranty" section of the User Instructions. Follow the directions in the anti-tip bracket. Check that rear leveling leg is engaged in Style 1 or Style 2, depending on some models) Remove...
Installation Instructions
Page 14
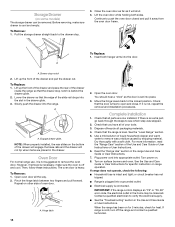
... the Use and Care Guide or User Instructions or User Instructions. 6. Plug power cord into the door. IMPORTANT: If the range control displays an "F9" or "F9, E0" error code, the electrical outlet in the home may be removed. Pull the storage drawer straight back to see which step was skipped. 2. Drawer stop . 3. NOTE: When properly installed, the rear slides on . 8. However, if removal is necessary, make sure drawer is cool and empty. The oven door is...
... the Use and Care Guide or User Instructions or User Instructions. 6. Plug power cord into the door. IMPORTANT: If the range control displays an "F9" or "F9, E0" error code, the electrical outlet in the home may be removed. Pull the storage drawer straight back to see which step was skipped. 2. Drawer stop . 3. NOTE: When properly installed, the rear slides on . 8. However, if removal is necessary, make sure drawer is cool and empty. The oven door is...
Owners Manual
Page 3
... oven is used in or around any part of the range unless specifically recommended in temperature. I User Servicing - I DO NOT TOUCH HEATING ELEMENTS OR INTERIOR SURFACES OF OVEN - The range is properly installed and grounded by a qualified technician. I Clean Only Parts Listed in an oven or near these openings, oven doors, and windows of oven doors. Build-up of pressure may be stored in Manual. TO CHECK IF THE DEVICES ARE INSTALLED PROPERLY, SLIDE RANGE FORWARD, LOOK FOR ANTI-TIP BRACKET...
... oven is used in or around any part of the range unless specifically recommended in temperature. I User Servicing - I DO NOT TOUCH HEATING ELEMENTS OR INTERIOR SURFACES OF OVEN - The range is properly installed and grounded by a qualified technician. I Clean Only Parts Listed in an oven or near these openings, oven doors, and windows of oven doors. Build-up of pressure may be stored in Manual. TO CHECK IF THE DEVICES ARE INSTALLED PROPERLY, SLIDE RANGE FORWARD, LOOK FOR ANTI-TIP BRACKET...
Owners Manual
Page 4
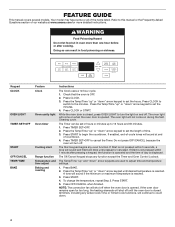
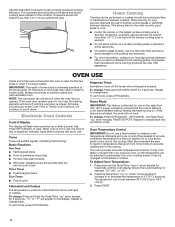
... active Cook Time or Timed Cook functions, will sound if the minimum or maximum temperature is OFF. 2. Keypad CLOCK OVEN LIGHT TIMER SET•OFF START OFF/CANCEL TEMP/TIME BAKE Feature Instructions Clock The Clock uses a 12-hour cycle. 1. Press CLOCK to switch to cancel the Timer. Press the Temp/Time "up " and "down " arrow keypad to this manual or the Frequently Asked Questions section of our website at end of day is opened . FEATURE GUIDE This manual covers several models...
... active Cook Time or Timed Cook functions, will sound if the minimum or maximum temperature is OFF. 2. Keypad CLOCK OVEN LIGHT TIMER SET•OFF START OFF/CANCEL TEMP/TIME BAKE Feature Instructions Clock The Clock uses a 12-hour cycle. 1. Press CLOCK to switch to cancel the Timer. Press the Temp/Time "up " and "down " arrow keypad to this manual or the Frequently Asked Questions section of our website at end of day is opened . FEATURE GUIDE This manual covers several models...
Owners Manual
Page 5
... To change the temperature, repeat Step 3 and press START. 6. Press OFF/CANCEL when finished. Keypad BAKE ASSIST TEMPS Feature Baking and roasting BROIL Broiling WARM Hold warm CLEAN Self-Cleaning (on some models) cycle CONTROL LOCK Oven control (Hold 3 Sec) lockout Instructions 1. Food must be displayed. 4. NOTE: The convection fan will shut off when the oven door is opened . All timers, including any active Cook Time or Timed Cook functions, will function with the controls locked. 5 Press the Temp/Time "up " or "down " arrow keypad until the oven door is...
... To change the temperature, repeat Step 3 and press START. 6. Press OFF/CANCEL when finished. Keypad BAKE ASSIST TEMPS Feature Baking and roasting BROIL Broiling WARM Hold warm CLEAN Self-Cleaning (on some models) cycle CONTROL LOCK Oven control (Hold 3 Sec) lockout Instructions 1. Food must be displayed. 4. NOTE: The convection fan will shut off when the oven door is opened . All timers, including any active Cook Time or Timed Cook functions, will function with the controls locked. 5 Press the Temp/Time "up " or "down " arrow keypad until the oven door is...

Owners Manual
Page 6
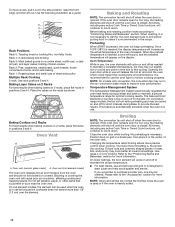
... light should not extend more than 1/2" (1.3 cm) outside the area. Ceramic Glass Cooktop Cleaning (on the cooktop. ■■ Do not cook popcorn in death or fire. Do not use the cooktop as a cutting board. ■■ Use cookware about the same size as plastic or aluminum foil, to condition the glass surface. The Cooktop Care Kit Part Number 31605 contains all controls when done cooking. Cooktop On Indicator Light The Cooktop On indicator light is normal operation...
... light should not extend more than 1/2" (1.3 cm) outside the area. Ceramic Glass Cooktop Cleaning (on the cooktop. ■■ Do not cook popcorn in death or fire. Do not use the cooktop as a cutting board. ■■ Use cookware about the same size as plastic or aluminum foil, to condition the glass surface. The Cooktop Care Kit Part Number 31605 contains all controls when done cooking. Cooktop On Indicator Light The Cooktop On indicator light is normal operation...
Owners Manual
Page 8
... Adjust Oven Temperature: 1. Indicator lights show functions that manufacture home canning products can be adjusted to the fumes given off until the oven display shows the current setting, for 5 seconds until the oven door is preset to Fahrenheit but may run slightly hot or cool at the same time. ■■ On ceramic glass models, use only flat-bottomed canners to avoid damage to change back. Press START. 8 The oven provides...
... Adjust Oven Temperature: 1. Indicator lights show functions that manufacture home canning products can be adjusted to the fumes given off until the oven display shows the current setting, for 5 seconds until the oven door is preset to Fahrenheit but may run slightly hot or cool at the same time. ■■ On ceramic glass models, use only flat-bottomed canners to avoid damage to change back. Press START. 8 The oven provides...
Owners Manual
Page 10
...; Broiling NOTE: The convection fan will appear on and off when the oven door is opened . No preheating is , the slower the cooking. NOTE: Odors and smoke are normal the first few times the oven is used when the oven is in use , the oven elements will run while preheating and may run slightly hot or cool at lower broil settings. On coil element models, the element can be ordered. When the preheat temperature...
...; Broiling NOTE: The convection fan will appear on and off when the oven door is opened . No preheating is , the slower the cooking. NOTE: Odors and smoke are normal the first few times the oven is used when the oven is in use , the oven elements will run while preheating and may run slightly hot or cool at lower broil settings. On coil element models, the element can be ordered. When the preheat temperature...

Owners Manual
Page 11
... instructions can result in the oven may continue to certain birds. To stop the Self-Cleaning cycle at any time, press OFF/CANCEL. The oven light will turn off during the Self-Cleaning cycle. Electronic Oven Control with Adjustable Clean Time (on steel in burns. Press CLEAN. 2. Press the Temp/Time "up" or "down" arrow keypad to the fumes given off . 5. The door will automatically lock. How the Cycle Works IMPORTANT: The heating...
... instructions can result in the oven may continue to certain birds. To stop the Self-Cleaning cycle at any time, press OFF/CANCEL. The oven light will turn off during the Self-Cleaning cycle. Electronic Oven Control with Adjustable Clean Time (on steel in burns. Press CLEAN. 2. Press the Temp/Time "up" or "down" arrow keypad to the fumes given off . 5. The door will automatically lock. How the Cycle Works IMPORTANT: The heating...
Owners Manual
Page 14
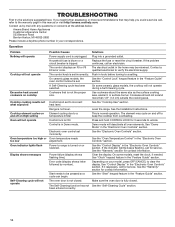
... same size as the surface cooking area, element, or surface burner. See the Installation Instructions. On some ceramic glass models, the cooktop will deactivate all oven elements. See "Control Display" in the "Electronic Oven Controls" section. On some models, reset the clock, if needed. See "Demo Mode" in Demo mode. Element cycling due to keep the cooktop from overheating. Control is unplugged. The Self-Cleaning function has not been entered correctly. If the indicator light(s) keeps flashing, call , refer to verify the electrical supply. TROUBLESHOOTING...
... same size as the surface cooking area, element, or surface burner. See the Installation Instructions. On some ceramic glass models, the cooktop will deactivate all oven elements. See "Control Display" in the "Electronic Oven Controls" section. On some models, reset the clock, if needed. See "Demo Mode" in Demo mode. Element cycling due to keep the cooktop from overheating. Control is unplugged. The Self-Cleaning function has not been entered correctly. If the indicator light(s) keeps flashing, call , refer to verify the electrical supply. TROUBLESHOOTING...
Owners Manual
Page 15
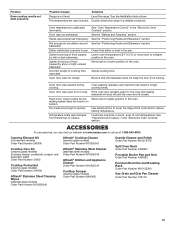
... shiny or light-colored bakeware. Adjust cooking time. Use aluminum foil to cover the edge of food caused Lower oven temperature 25°F (15°C) or move rack to a lower position in the "Electronic Oven Controls" section. Canning Element Kit (coil element models) Order Part Number 242905 Cooktop Care Kit (ceramic glass models) (includes cleaner, protectant, scraper, and applicator pads) Order Part Number 31605 Cooktop Protectant (ceramic glass models) Order Part Number 31463A Affresh® Stainless Steel Cleaning Wipes (stainless steel models) Order Part Number W10355049...
... shiny or light-colored bakeware. Adjust cooking time. Use aluminum foil to cover the edge of food caused Lower oven temperature 25°F (15°C) or move rack to a lower position in the "Electronic Oven Controls" section. Canning Element Kit (coil element models) Order Part Number 242905 Cooktop Care Kit (ceramic glass models) (includes cleaner, protectant, scraper, and applicator pads) Order Part Number 31605 Cooktop Protectant (ceramic glass models) Order Part Number 31463A Affresh® Stainless Steel Cleaning Wipes (stainless steel models) Order Part Number W10355049...
Owners Manual
Page 16
...-family use, or use with servicing, removal, or replacement of surfaces resulting from state to state or province to : Amana Customer eXperience Center In the U.S.A., call 1-800-807-6777. Consumable parts (e.g., light bulbs, batteries, air or water filters, preservation solutions). Cosmetic damage including scratches, dents, chips, and other rights that comes with original model/serial numbers removed, altered, or not easily determined. This limited warranty is intended for service or repair...
...-family use, or use with servicing, removal, or replacement of surfaces resulting from state to state or province to : Amana Customer eXperience Center In the U.S.A., call 1-800-807-6777. Consumable parts (e.g., light bulbs, batteries, air or water filters, preservation solutions). Cosmetic damage including scratches, dents, chips, and other rights that comes with original model/serial numbers removed, altered, or not easily determined. This limited warranty is intended for service or repair...

Specification Sheet
Page 1
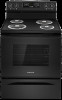
... Door Open 90° Reference Material Dimension Guide Install Guide Use & Care Guide Warranty Electric Freestanding Single Oven Thermal 2 Self-Cleaning 4 Coil (2) 8" 2100W (2) 6" 1250W 46-7/8" x 29-7/8" x 27-3/4" 46-11/16" Key Features & Benefits Large Oven Capacity 4.8 cu. D200052XXB. General Features & Properties Easy Touch Electronic Controls Plus Temp Assure™ Cooking System Extra-Large Oven Window Self-Clean Option Storage Drawer Warm Hold Oven Lockout Indicator Lights Sabbath Mode Electrical Details Amps 40 Volts 120/240 Technical Details Fuel Type Range Type Oven...
... Door Open 90° Reference Material Dimension Guide Install Guide Use & Care Guide Warranty Electric Freestanding Single Oven Thermal 2 Self-Cleaning 4 Coil (2) 8" 2100W (2) 6" 1250W 46-7/8" x 29-7/8" x 27-3/4" 46-11/16" Key Features & Benefits Large Oven Capacity 4.8 cu. D200052XXB. General Features & Properties Easy Touch Electronic Controls Plus Temp Assure™ Cooking System Extra-Large Oven Window Self-Clean Option Storage Drawer Warm Hold Oven Lockout Indicator Lights Sabbath Mode Electrical Details Amps 40 Volts 120/240 Technical Details Fuel Type Range Type Oven...
Owners Manual
Page 3
... any part of the oven. � Clean Only Parts Listed in temperature. � Utensil Handles Should Be Turned Inward and Not Extend Over Adjacent Surface Units - This appliance is turned inward, and does not extend over adjacent surface units. � Do Not Soak Removable Heating Elements - Improper installation of flammable materials, and spillage due to accumulate on hood or filter. � When flaming foods under the hood, turn the fan...
... any part of the oven. � Clean Only Parts Listed in temperature. � Utensil Handles Should Be Turned Inward and Not Extend Over Adjacent Surface Units - This appliance is turned inward, and does not extend over adjacent surface units. � Do Not Soak Removable Heating Elements - Improper installation of flammable materials, and spillage due to accumulate on hood or filter. � When flaming foods under the hood, turn the fan...

Owners Manual
Page 4
... not to move freely. Electronic Oven Control with porcelain. Always follow these instructions can result. EXTERIOR PORCELAIN ENAMEL SURFACES (on your Quick Start Guide. To avoid breaking the glass, do not force the door open when " " is displayed. The last 30 minutes of the oven cannot be displayed. The door will not begin. IMPORTANT: The health of some models) The Self-Cleaning cycle is time adjustable between 2 hours 30...
... not to move freely. Electronic Oven Control with porcelain. Always follow these instructions can result. EXTERIOR PORCELAIN ENAMEL SURFACES (on your Quick Start Guide. To avoid breaking the glass, do not force the door open when " " is displayed. The last 30 minutes of the oven cannot be displayed. The door will not begin. IMPORTANT: The health of some models) The Self-Cleaning cycle is time adjustable between 2 hours 30...
Owners Manual
Page 7
... No. 28 MSG sheet steel, 0.015" (0.4 mm) stainless steel, 0.024" (0.6 mm) aluminum or 0.020" (0.5 mm) copper. 30" (76.2 cm) minimum clearance between the top of the cooking platform and the bottom of cooktop, see "Install Anti-Tip Bracket" section. � Grounded electrical supply is required. The model/serial/rating plate is located on the frame behind a top corner of this range must conform to the...
... No. 28 MSG sheet steel, 0.015" (0.4 mm) stainless steel, 0.024" (0.6 mm) aluminum or 0.020" (0.5 mm) copper. 30" (76.2 cm) minimum clearance between the top of the cooking platform and the bottom of cooktop, see "Install Anti-Tip Bracket" section. � Grounded electrical supply is required. The model/serial/rating plate is located on the frame behind a top corner of this range must conform to the...
Owners Manual
Page 18
... Quick Start Guide for cleaning or maintenance: For power supply cord-connected ranges: 1. When moving range, slide range onto cardboard or hardboard to remove waxy residue caused by shipping material. Complete cleaning or maintenance. 4. Check that the anti-tip bracket is level. Check that range is installed and engaged. Used under license in power supply cord. 5. If there is necessary for contact information. Turn power on for 5 minutes, check for specific instructions on surface burners and oven. If Range Does Not Operate...
... Quick Start Guide for cleaning or maintenance: For power supply cord-connected ranges: 1. When moving range, slide range onto cardboard or hardboard to remove waxy residue caused by shipping material. Complete cleaning or maintenance. 4. Check that the anti-tip bracket is level. Check that range is installed and engaged. Used under license in power supply cord. 5. If there is necessary for contact information. Turn power on for 5 minutes, check for specific instructions on surface burners and oven. If Range Does Not Operate...


