Owners Manual
Page 3
...surface units or areas near surface units may be worn while using the range, follow basic precautions, including the following: I Clean Only Parts Listed in a risk of electric shock, or fire. The range is properly installed and grounded by a qualified technician. Select utensils having ...Not Leave Children Alone - I Storage in color. IMPORTANT SAFETY INSTRUCTIONS WARNING: To reduce the risk of fire, electrical shock, injury to cause burns. children climbing on the Range - I Before Self-Cleaning the Oven - Do not repair or replace any part of pressure may be seriously injured...
...surface units or areas near surface units may be worn while using the range, follow basic precautions, including the following: I Clean Only Parts Listed in a risk of electric shock, or fire. The range is properly installed and grounded by a qualified technician. Select utensils having ...Not Leave Children Alone - I Storage in color. IMPORTANT SAFETY INSTRUCTIONS WARNING: To reduce the risk of fire, electrical shock, injury to cause burns. children climbing on the Range - I Before Self-Cleaning the Oven - Do not repair or replace any part of pressure may be seriously injured...
Owners Manual
Page 14
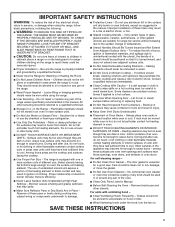
... home may help you avoid a service call for service. Element cycling due to keep (s) flashing, call , refer to verify the electrical supply. The electrical outlet in the "Feature Guide" section. This is tripped. Demo mode will not operate during a Self-Cleaning cycle. Depending on or... size. Solutions Plug into a grounded outlet. Contact us by number). Range is not closed . Error code (display shows letter followed by mail with any questions or concerns at the address below: Amana Brand Home Appliances Customer eXperience Center 553 Benson Road Benton Harbor, MI ...
... home may help you avoid a service call for service. Element cycling due to keep (s) flashing, call , refer to verify the electrical supply. The electrical outlet in the "Feature Guide" section. This is tripped. Demo mode will not operate during a Self-Cleaning cycle. Depending on or... size. Solutions Plug into a grounded outlet. Contact us by number). Range is not closed . Error code (display shows letter followed by mail with any questions or concerns at the address below: Amana Brand Home Appliances Customer eXperience Center 553 Benson Road Benton Harbor, MI ...
Specification Sheet
Page 1
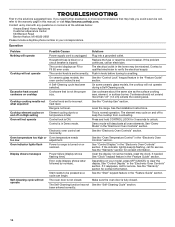
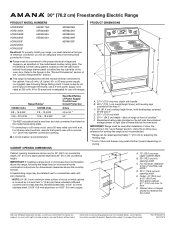
... Elements Element Type Element Size/Power Dimensions Product Dimensions (H x W x D) Depth with product. Specifications subject to help cook more convenient. Printed in : White ACR4303MFW Black ACR4303MFB Capacity Oven 4.8 cu. ft. Electric Range ACR4303MF Stainless Steel ACR4303MFS Also available in the U.S.A. provides enough space to make cooking even more favorites at the same time. For...
... Elements Element Type Element Size/Power Dimensions Product Dimensions (H x W x D) Depth with product. Specifications subject to help cook more convenient. Printed in : White ACR4303MFW Black ACR4303MFB Capacity Oven 4.8 cu. ft. Electric Range ACR4303MF Stainless Steel ACR4303MFS Also available in the U.S.A. provides enough space to make cooking even more favorites at the same time. For...
DimensionGuide
Page 1
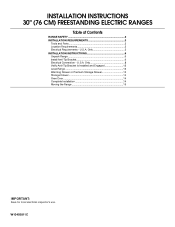
...) (see Installation Instructions packed with product. 30" (76.2 cm) Freestanding Electric Range PRODUCT MODEL NUMBERS ACR2303MF ACR3130BA ACR4303ME ACR4303MF ACR4503SF ACR4530BA ACR4503SF AER3311WA AER5330BA AER5523XA AER5524XA AER5630BA AER5823XA AER5830VA AER6303MF AER6603SF Electrical: To properly install your range, you must determine the type of electrical connection you will be using and follow the instructions provided for...
...) (see Installation Instructions packed with product. 30" (76.2 cm) Freestanding Electric Range PRODUCT MODEL NUMBERS ACR2303MF ACR3130BA ACR4303ME ACR4303MF ACR4503SF ACR4530BA ACR4503SF AER3311WA AER5330BA AER5523XA AER5524XA AER5630BA AER5823XA AER5830VA AER6303MF AER6603SF Electrical: To properly install your range, you must determine the type of electrical connection you will be using and follow the instructions provided for...
Installation Instructions
Page 1
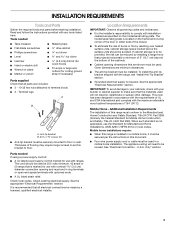
Only 8 Verify Anti-Tip Bracket Is Installed and Engaged 12 Level Range 13 Warming Drawer or Premium Storage Drawer 13 Storage Drawer 14 Oven Door 14 Complete Installation 14 Moving the Range 15 IMPORTANT: Save for local electrical inspector's use. Only 5 INSTALLATION INSTRUCTIONS 6 Unpack Range 6 Install Anti-Tip Bracket 6 Electrical Connection - U.S.A. INSTALLATION INSTRUCTIONS 30" (76 CM) FREESTANDING ELECTRIC RANGES Table of Contents RANGE SAFETY 2 INSTALLATION REQUIREMENTS 3 Tools and Parts 3 Location Requirements 3 Electrical Requirements - W10403811C U.S.A.
Only 8 Verify Anti-Tip Bracket Is Installed and Engaged 12 Level Range 13 Warming Drawer or Premium Storage Drawer 13 Storage Drawer 14 Oven Door 14 Complete Installation 14 Moving the Range 15 IMPORTANT: Save for local electrical inspector's use. Only 5 INSTALLATION INSTRUCTIONS 6 Unpack Range 6 Install Anti-Tip Bracket 6 Electrical Connection - U.S.A. INSTALLATION INSTRUCTIONS 30" (76 CM) FREESTANDING ELECTRIC RANGES Table of Contents RANGE SAFETY 2 INSTALLATION REQUIREMENTS 3 Tools and Parts 3 Location Requirements 3 Electrical Requirements - W10403811C U.S.A.
Installation Instructions
Page 3
...to your cabinets, check with your builder or cabinet supplier to terminal block) ■ 3 - See "Electrical Connection - Read and follow the instructions provided with ranges. Check local codes. Given dimensions are shown must end in ring terminals or open-end spade terminals with the... surface units, cabinet storage space located above the surface units should be securely mounted to comply with the range, see "Install Anti-Tip Bracket" section. ■ Grounded electrical supply is to be installed. Only" section. 3 This oven has been designed in a mobile home ...
...to your cabinets, check with your builder or cabinet supplier to terminal block) ■ 3 - See "Electrical Connection - Read and follow the instructions provided with ranges. Check local codes. Given dimensions are shown must end in ring terminals or open-end spade terminals with the... surface units, cabinet storage space located above the surface units should be securely mounted to comply with the range, see "Install Anti-Tip Bracket" section. ■ Grounded electrical supply is to be installed. Only" section. 3 This oven has been designed in a mobile home ...

Installation Instructions
Page 5
... and Circuit Protection Amps 40 or 50** 50 The minimum conductor sized for use of the range inside a clear plastic bag. Electrical Connection To properly install your range, you must conform with the rating of the range. ■ The wiring diagram is located on the Tech Sheet. ■ The Tech Sheet...system: Local codes may permit the use with local codes. The ground must be revised so the green ground wire of electric shock. Grounding through the neutral conductor. or 50-amp, range power supply cord (pigtail) must be used , a matching UL listed, 4-wire, 250-volt, 40- For 50-amp...
... and Circuit Protection Amps 40 or 50** 50 The minimum conductor sized for use of the range inside a clear plastic bag. Electrical Connection To properly install your range, you must conform with the rating of the range. ■ The wiring diagram is located on the Tech Sheet. ■ The Tech Sheet...system: Local codes may permit the use with local codes. The ground must be revised so the green ground wire of electric shock. Grounding through the neutral conductor. or 50-amp, range power supply cord (pigtail) must be used , a matching UL listed, 4-wire, 250-volt, 40- For 50-amp...
Installation Instructions
Page 7
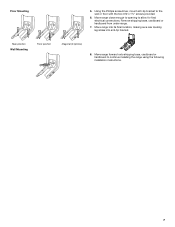
... the following installation instructions. 7 Remove shipping base, cardboard or hardboard from under range. 7. Move range forward onto shipping base, cardboard or hardboard to allow for final electrical connections. Rear position Wall Mounting Front position Diagonal (2 options) 8. Floor Mounting 5. Using the Phillips screwdriver, mount anti-tip bracket to the wall or floor with ...
... the following installation instructions. 7 Remove shipping base, cardboard or hardboard from under range. 7. Move range forward onto shipping base, cardboard or hardboard to allow for final electrical connections. Rear position Wall Mounting Front position Diagonal (2 options) 8. Floor Mounting 5. Using the Phillips screwdriver, mount anti-tip bracket to the wall or floor with ...
Installation Instructions
Page 8
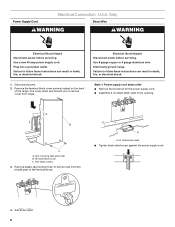
...the power supply cord. ■ Assemble a UL listed strain relief in death, fire, or electrical shock. 1. Remove plastic tag holding three 10-32 hex nuts from range. UL listed strain relief ■ Tighten strain relief screw against the power supply cord. 4. ... follow these instructions can result in death, fire, or electrical shock. Hex-head screws 3. Electrical Shock Hazard Disconnect power before servicing. Electrically ground range. A A. Plug into a grounded outlet. Failure to remove cover from the middle post of the range. Disconnect power. 2. A B C A. Failure to...
...the power supply cord. ■ Assemble a UL listed strain relief in death, fire, or electrical shock. 1. Remove plastic tag holding three 10-32 hex nuts from range. UL listed strain relief ■ Tighten strain relief screw against the power supply cord. 4. ... follow these instructions can result in death, fire, or electrical shock. Hex-head screws 3. Electrical Shock Hazard Disconnect power before servicing. Electrically ground range. A A. Plug into a grounded outlet. Failure to remove cover from the middle post of the range. Disconnect power. 2. A B C A. Failure to...
Installation Instructions
Page 9
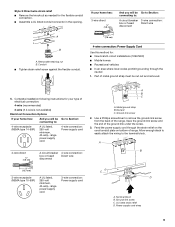
...relief D. Power supply cord wires 9 A B 5" (12.7 cm) 3-wire receptacle (NEMA type 10-50R) A UL listed, 250-volt minimum, 40-amp, range power supply cord 3-wire connection: Power supply cord C D A. Feed the power supply cord through the neutral 1. Ground-link screw C. Conduit ■ Tighten strain .... Style 2: Direct wire strain relief ■ Remove the knockout as needed for your type of electrical connection: 4-wire (recommended) 3-wire (if 4-wire is not available) Electrical Connection Options If your home has: 3-wire direct ³⁄₈" (1.0 cm) And you ...
...relief D. Power supply cord wires 9 A B 5" (12.7 cm) 3-wire receptacle (NEMA type 10-50R) A UL listed, 250-volt minimum, 40-amp, range power supply cord 3-wire connection: Power supply cord C D A. Feed the power supply cord through the neutral 1. Ground-link screw C. Conduit ■ Tighten strain .... Style 2: Direct wire strain relief ■ Remove the knockout as needed for your type of electrical connection: 4-wire (recommended) 3-wire (if 4-wire is not available) Electrical Connection Options If your home has: 3-wire direct ³⁄₈" (1.0 cm) And you ...
Installation Instructions
Page 10
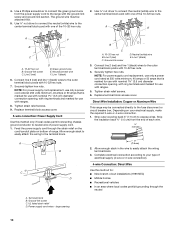
...Recreational vehicles ■ In an area where local codes prohibit grounding through the strain relief on the cord/conduit plate on your type of electrical supply (4-wire or 3-wire connection). 4-wire Connection: Direct Wire Use this method only if local codes permit connecting chassis ground conductor to ...of the 10-32 hex nuts. Strip the insulation back ³⁄₈" (1.0 cm) from the power supply cord to your electrical supply, make the required 3-wire or 4-wire connection. 1. Complete electrical connection according to the range with 10-32 hex nuts. 4. Line 2 (red) C.
...Recreational vehicles ■ In an area where local codes prohibit grounding through the strain relief on the cord/conduit plate on your type of electrical supply (4-wire or 3-wire connection). 4-wire Connection: Direct Wire Use this method only if local codes permit connecting chassis ground conductor to ...of the 10-32 hex nuts. Strip the insulation back ³⁄₈" (1.0 cm) from the power supply cord to your electrical supply, make the required 3-wire or 4-wire connection. 1. Complete electrical connection according to the range with 10-32 hex nuts. 4. Line 2 (red) C.
Installation Instructions
Page 14
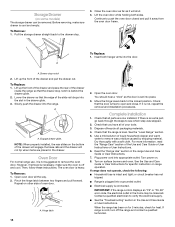
...Hinge latch 2. Use a mild solution of your tools. 3. or circuit breaker has not tripped. ■ Range is plugged into a grounded outlet. ■ Electrical supply is set into place. 3. When the range has been on surface burners and oven. A A. Check that all the way. 2. If there is free.... A A. A A. Before removing, make sure the oven is intact and tight; To Remove: 1. Continue to verify the electrical supply. ■ See the "Troubleshooting" section in the range Use and Care Guide or User Instructions. 7. If it away from the oven door frame.
...Hinge latch 2. Use a mild solution of your tools. 3. or circuit breaker has not tripped. ■ Range is plugged into a grounded outlet. ■ Electrical supply is set into place. 3. When the range has been on surface burners and oven. A A. Check that all the way. 2. If there is free.... A A. A A. Before removing, make sure the oven is intact and tight; To Remove: 1. Continue to verify the electrical supply. ■ See the "Troubleshooting" section in the range Use and Care Guide or User Instructions. 7. If it away from the oven door frame.
Installation Instructions
Page 15
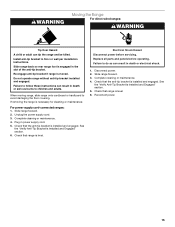
... engaged in the slot of the anti-tip bracket. Electrical Shock Hazard Disconnect power before operating. Complete cleaning or maintenance. 4. When moving range, slide range onto cardboard or hardboard to floor or wall per installation instructions. Plug in death or electrical shock. 1. See the "Verify Anti-Tip Bracket Is Installed and Engaged" section. 6. Check...
... engaged in the slot of the anti-tip bracket. Electrical Shock Hazard Disconnect power before operating. Complete cleaning or maintenance. 4. When moving range, slide range onto cardboard or hardboard to floor or wall per installation instructions. Plug in death or electrical shock. 1. See the "Verify Anti-Tip Bracket Is Installed and Engaged" section. 6. Check...


