

Installation Manual
Page 1
...Tacoma iLX-F309TCM 9" Restyle In-Dash System Installation Manual ˜ Model: Tacoma ˜ Model Year: 2016-Up iLX-F309TCM Toyota Tacoma ˜ 1/19 Toyota Model Tacoma Year 2016 - These symbols and their meanings are subject to do so can use the product correctly. Ignoring the content marked by an Alpine...terminal of testing. Introduction ˜ Congratulations on purchasing the iLX-F309TCM. To Ensure Safe Use, Always Follow These Precautions ˜ The installation of iLX-F309TCM into a 2016-Up Toyota Tacoma Please familiarize yourself with the owners manual and if you ...
...Tacoma iLX-F309TCM 9" Restyle In-Dash System Installation Manual ˜ Model: Tacoma ˜ Model Year: 2016-Up iLX-F309TCM Toyota Tacoma ˜ 1/19 Toyota Model Tacoma Year 2016 - These symbols and their meanings are subject to do so can use the product correctly. Ignoring the content marked by an Alpine...terminal of testing. Introduction ˜ Congratulations on purchasing the iLX-F309TCM. To Ensure Safe Use, Always Follow These Precautions ˜ The installation of iLX-F309TCM into a 2016-Up Toyota Tacoma Please familiarize yourself with the owners manual and if you ...
Installation Manual
Page 2
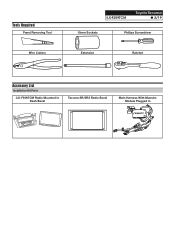
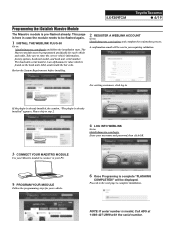
Tools Required Panel Removing Tool Wire Cutters iLX-F309TCM Toyota Tacoma ˜ 2/19 10mm Sockets Phillips Screwdriver Extension Ratchet Accessory List Installation Kit Parts iLX-F309TCM Radio Mounted In Dash Bezel Tacoma SR/SR5 Radio Bezel Main Harness With Maestro Module Plugged In
Tools Required Panel Removing Tool Wire Cutters iLX-F309TCM Toyota Tacoma ˜ 2/19 10mm Sockets Phillips Screwdriver Extension Ratchet Accessory List Installation Kit Parts iLX-F309TCM Radio Mounted In Dash Bezel Tacoma SR/SR5 Radio Bezel Main Harness With Maestro Module Plugged In
Installation Manual
Page 4
... with the serial number. Proceed to the next page to enter the correct vehicle information, factory options, head unit model, and head unit serial number. iLX-F309TCM Toyota Tacoma ˜ 4/19 Programming the iDatalink Maestro Module The Maestro module is found on the head units label, underneath the bar code. The head units...
... with the serial number. Proceed to the next page to enter the correct vehicle information, factory options, head unit model, and head unit serial number. iLX-F309TCM Toyota Tacoma ˜ 4/19 Programming the iDatalink Maestro Module The Maestro module is found on the head units label, underneath the bar code. The head units...
Installation Manual
Page 5
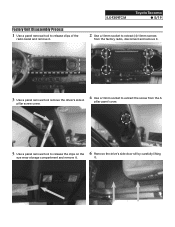
Factory Unit Disassembly Process 1 Use a panel removal tool to release the clips on the eye wear storage compartment and remove it. 6 Remove the drive's side door sill by carefully lifting it . iLX-F309TCM Toyota Tacoma ˜ 5/19 2 Use a 10mm socket to extract (4) 10mm screws from the factory radio, disconnect and remove it. 3 Use a panel removal tool remove the driver's side A pillar screw cover. 4 Use a 10mm socket to extract the screw from the A pillar panel cover. 5 Use a panel removal tool to release clips of the radio bezel and remove it .
Factory Unit Disassembly Process 1 Use a panel removal tool to release the clips on the eye wear storage compartment and remove it. 6 Remove the drive's side door sill by carefully lifting it . iLX-F309TCM Toyota Tacoma ˜ 5/19 2 Use a 10mm socket to extract (4) 10mm screws from the factory radio, disconnect and remove it. 3 Use a panel removal tool remove the driver's side A pillar screw cover. 4 Use a 10mm socket to extract the screw from the A pillar panel cover. 5 Use a panel removal tool to release clips of the radio bezel and remove it .
Installation Manual
Page 6
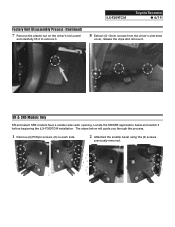
iLX-F309TCM Toyota Tacoma ˜ 6/19 Factory Unit Disassembly Process (Continued) 7 Remove the plastic nut on each side. 2 Attached the smaller bezel using the (4) screws previously removed. SR & SR5 ... and carefully lift it to remove it. 8 Extract (3) 10mm screws from the driver's side knee cover, release the clips and remove it before beginning the iLX-F309TCM installation. Locate the SR/SR5 application bezel and switch it .
iLX-F309TCM Toyota Tacoma ˜ 6/19 Factory Unit Disassembly Process (Continued) 7 Remove the plastic nut on each side. 2 Attached the smaller bezel using the (4) screws previously removed. SR & SR5 ... and carefully lift it to remove it. 8 Extract (3) 10mm screws from the driver's side knee cover, release the clips and remove it before beginning the iLX-F309TCM installation. Locate the SR/SR5 application bezel and switch it .
Installation Manual
Page 7
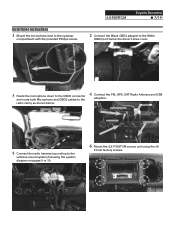
Installation Instructions 1 Mount the microphone next to the vehicles sound system) following the system diagram on pages 9 or 10. 6 Mount the iLX-F309TCM source unit using the (4) 10mm factory screws. iLX-F309TCM Toyota Tacoma ˜ 7/19 2 Connect the Black OBD2 adapter to the White OBD2 port below the driver's knee cover. 3 Route the microphone down to...
Installation Instructions 1 Mount the microphone next to the vehicles sound system) following the system diagram on pages 9 or 10. 6 Mount the iLX-F309TCM source unit using the (4) 10mm factory screws. iLX-F309TCM Toyota Tacoma ˜ 7/19 2 Connect the Black OBD2 adapter to the White OBD2 port below the driver's knee cover. 3 Route the microphone down to...
Installation Manual
Page 8
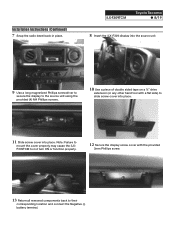
Note: Failure to their corresponding location and connect the Negative (-) battery terminal. iLX-F309TCM Toyota Tacoma ˜ 8/19 8 Insert the iLX-F309 display into place. F309TCM to not turn ON or function properly. 12 Secure the display screw cover with a flat side) to slide screw cover into place. 11 Slide screw ... (or any other hand tool with the provided 2mm Phillips screw. 13 Return all removed components back to mount the cover properly may cause the iLX- Installation Instructions (Continued) 7 Snap the radio bezel back in place.
Note: Failure to their corresponding location and connect the Negative (-) battery terminal. iLX-F309TCM Toyota Tacoma ˜ 8/19 8 Insert the iLX-F309 display into place. F309TCM to not turn ON or function properly. 12 Secure the display screw cover with a flat side) to slide screw cover into place. 11 Slide screw ... (or any other hand tool with the provided 2mm Phillips screw. 13 Return all removed components back to mount the cover properly may cause the iLX- Installation Instructions (Continued) 7 Snap the radio bezel back in place.

Installation Manual
Page 9
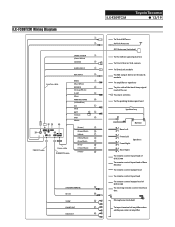
iLX-F309TCM iLX-F309TCM Wiring Diagram W/O Factory Amplifier To Vehicle Connectors To OBDII Connector 24-pin Connector 28-pin Power/Speaker Rear Speaker Connector 10-pin Connector 6-pin Connector Toyota Tacoma ˜ 9/19 Rear Front Rear Front Black Not Not Used Used 10-Pin Chime Red Not Used Reset Button 18-Pin ...page 16 FM Antenna Adapter USB Adapter Main Harness Camera Adapter GPS Antenna Adapter See page 12 for HDMI connection info Microphone iLX-F309 Source Unit CAN I/F GPS USB HDMI IN SXM/DAB PRE OUT W.REMOTE POWER ANTENNA Power Harness Blue Power Antenna
iLX-F309TCM iLX-F309TCM Wiring Diagram W/O Factory Amplifier To Vehicle Connectors To OBDII Connector 24-pin Connector 28-pin Power/Speaker Rear Speaker Connector 10-pin Connector 6-pin Connector Toyota Tacoma ˜ 9/19 Rear Front Rear Front Black Not Not Used Used 10-Pin Chime Red Not Used Reset Button 18-Pin ...page 16 FM Antenna Adapter USB Adapter Main Harness Camera Adapter GPS Antenna Adapter See page 12 for HDMI connection info Microphone iLX-F309 Source Unit CAN I/F GPS USB HDMI IN SXM/DAB PRE OUT W.REMOTE POWER ANTENNA Power Harness Blue Power Antenna

Installation Manual
Page 10
iLX-F309TCM iLX-F309TCM Wiring Diagram With Factory Amplifier To Vehicle Connectors To OBDII Connector 24-pin Connector 28-pin Power/Speaker Rear Speaker Connector 10-pin Connector 6-pin Connector Toyota Tacoma ˜ 10/19 Rear Front Rear Front Black Not Not Used Used 10-Pin Chime Red Not Used Reset ...001 see page 16 FM Antenna Adapter USB Adapter Main Harness Camera Adapter GPS Antenna Adapter See page 12 for HDMI connection info Microphone iLX-F309 Source Unit CAN I/F GPS USB HDMI IN SXM/DAB PRE OUT W.REMOTE POWER Power Harness ANTENNA USE LOW LEVEL FOR JBL&#...
iLX-F309TCM iLX-F309TCM Wiring Diagram With Factory Amplifier To Vehicle Connectors To OBDII Connector 24-pin Connector 28-pin Power/Speaker Rear Speaker Connector 10-pin Connector 6-pin Connector Toyota Tacoma ˜ 10/19 Rear Front Rear Front Black Not Not Used Used 10-Pin Chime Red Not Used Reset ...001 see page 16 FM Antenna Adapter USB Adapter Main Harness Camera Adapter GPS Antenna Adapter See page 12 for HDMI connection info Microphone iLX-F309 Source Unit CAN I/F GPS USB HDMI IN SXM/DAB PRE OUT W.REMOTE POWER Power Harness ANTENNA USE LOW LEVEL FOR JBL&#...
Installation Manual
Page 11
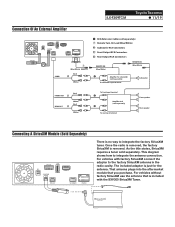
... the title states, SiriusXM requires a tuner sold separately. That antenna plugs into the aftermarket module that is no way to integrate the factory SiriusXM tuner. iLX-F309TCM Toyota Tacoma ˜ 11/19 Connection Of An External Amplifier ANTENNA CAN I/F GPS SXM/DAB USB HDMI IN PRE OUT W.REMOTE POWER SUBW (Blue/White) REMOTE...
... the title states, SiriusXM requires a tuner sold separately. That antenna plugs into the aftermarket module that is no way to integrate the factory SiriusXM tuner. iLX-F309TCM Toyota Tacoma ˜ 11/19 Connection Of An External Amplifier ANTENNA CAN I/F GPS SXM/DAB USB HDMI IN PRE OUT W.REMOTE POWER SUBW (Blue/White) REMOTE...
Installation Manual
Page 12
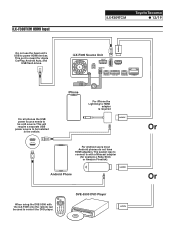
For all phones the USB power source needs to be used to control the DVD player. iLX-F309 Source Unit CAN I/F GPS SXM/DAB USB HDMI IN ANTENNA PRE OUT EXT. KEY W.REMOTE POWER iPhone For iPhone the Lightning to power HDMI ... DVE-5300 with a Miracast adapter (for Apple CarPlay, Android Auto, and USB ash drives. The easiest way to be installed in the vehicle. iLX-F309TCM HDMI Input iLX-F309TCM Toyota Tacoma ˜ 12/19 Do not use the head unit's USB to HDMI adapter is required Or For Android users most Android phones do not...
For all phones the USB power source needs to be used to control the DVD player. iLX-F309 Source Unit CAN I/F GPS SXM/DAB USB HDMI IN ANTENNA PRE OUT EXT. KEY W.REMOTE POWER iPhone For iPhone the Lightning to power HDMI ... DVE-5300 with a Miracast adapter (for Apple CarPlay, Android Auto, and USB ash drives. The easiest way to be installed in the vehicle. iLX-F309TCM HDMI Input iLX-F309TCM Toyota Tacoma ˜ 12/19 Do not use the head unit's USB to HDMI adapter is required Or For Android users most Android phones do not...
Installation Manual
Page 13
... (Green) (Green/Black) (White) (White/Black) (Gray/Black) (Gray) (Violet/Black) (Violet) STEERING REMOTE MIC IN SUBW FRONT OUT REAR OUT iLX-F309TCM Toyota Tacoma ˜ 13/19 To SiriusXM Tuner Vehicle Antenna GPS Antenna (Included) To the vehicle speed pulse line To Front, Rear or Side camera To iDataLink...DVE-5300 To steering remote control interface box Microphone (Included) To input terminal of ampli er when adding an external ampli er iLX-F309TCM Wiring Diagram Interface cable SPEED SENSOR (Green/White) CAMERA IDATALINK I/F AUX INPUT REMO (Blue/White) REVERSE (Orange/White) P.
... (Green) (Green/Black) (White) (White/Black) (Gray/Black) (Gray) (Violet/Black) (Violet) STEERING REMOTE MIC IN SUBW FRONT OUT REAR OUT iLX-F309TCM Toyota Tacoma ˜ 13/19 To SiriusXM Tuner Vehicle Antenna GPS Antenna (Included) To the vehicle speed pulse line To Front, Rear or Side camera To iDataLink...DVE-5300 To steering remote control interface box Microphone (Included) To input terminal of ampli er when adding an external ampli er iLX-F309TCM Wiring Diagram Interface cable SPEED SENSOR (Green/White) CAMERA IDATALINK I/F AUX INPUT REMO (Blue/White) REVERSE (Orange/White) P.
Installation Manual
Page 15
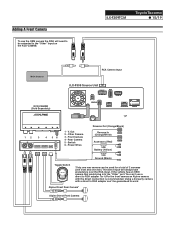
... need to be extended to the "Other" input on the KCX-C2600B. Alpine Direct Rear Camera* Alpine Direct Front Camera Adding A Front Camera To use a direct to RCA adapter for a total of 2 cameras (one front and one rear). V. Rear Camera 5 - iLX-F309TCM Toyota Tacoma ˜ 15/19 Main Harness KCX-C2600B (Sold Separately) RCA Camera...
... need to be extended to the "Other" input on the KCX-C2600B. Alpine Direct Rear Camera* Alpine Direct Front Camera Adding A Front Camera To use a direct to RCA adapter for a total of 2 cameras (one front and one rear). V. Rear Camera 5 - iLX-F309TCM Toyota Tacoma ˜ 15/19 Main Harness KCX-C2600B (Sold Separately) RCA Camera...
Installation Manual
Page 16
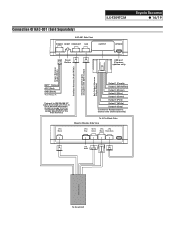
iLX-F309TCM Connection Of KAC-001 (Sold Separately) KAC-001 Side View POWER RESET HEADUNIT CAN OUTPUT UPDATE Toyota Tacoma ˜ 16/19 Reset Button USB port (Firmware updates only) Power Harness (3-pin White) Interface Harness (4-pin White) Interface Cable (4-pin) (included with ADS module) ...
iLX-F309TCM Connection Of KAC-001 (Sold Separately) KAC-001 Side View POWER RESET HEADUNIT CAN OUTPUT UPDATE Toyota Tacoma ˜ 16/19 Reset Button USB port (Firmware updates only) Power Harness (3-pin White) Interface Harness (4-pin White) Interface Cable (4-pin) (included with ADS module) ...
Installation Manual
Page 17
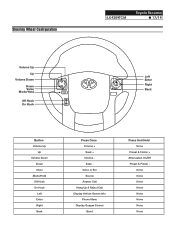
None None None None None None None None Voice or Siri Source Answer Call Hang Up & Reject Call Display Vehicle Screen Info Phone Menu Display Guages Screen Band Press And Hold None Preset & Folder + Attenuation On/Off Preset & Folder - Steering Wheel Configuration iLX-F309TCM Toyota Tacoma ˜ 17/19 Volume Up Up Volume Down Down Voice Mode/Hold MODE HOLD Off Hook On Hook Left Enter Right Back Button Volume Up Up Volume Down Down Voice Mode/Hold Off Hook On Hook Left Enter Right Back Press Once Volume + Seek + Volume Seek -
None None None None None None None None Voice or Siri Source Answer Call Hang Up & Reject Call Display Vehicle Screen Info Phone Menu Display Guages Screen Band Press And Hold None Preset & Folder + Attenuation On/Off Preset & Folder - Steering Wheel Configuration iLX-F309TCM Toyota Tacoma ˜ 17/19 Volume Up Up Volume Down Down Voice Mode/Hold MODE HOLD Off Hook On Hook Left Enter Right Back Button Volume Up Up Volume Down Down Voice Mode/Hold Off Hook On Hook Left Enter Right Back Press Once Volume + Seek + Volume Seek -
Installation Manual
Page 18
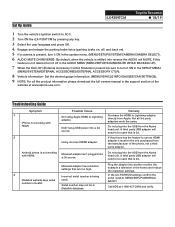
... If the phone has the feature to use an HDMI adapter it must be used . number is not working with HDMI. Call ADS at www.alpine-usa.com. Plug the adapter into a 2A source. A third party USB adapter will need to be the one purchased from Apple. Miracast adapter...section of the phone, not a third party adapter. A third party USB adapter will MUTE. Set Up Guide iLX-F309TCM Toyota Tacoma ˜ 18/19 1 Turn the vehicle's Ignition switch to ACC. 2 Turn ON the iLX-F309TCM by pressing any key. 3 Select the user language and press OK. 4 Engage and release the parking brake...
... If the phone has the feature to use an HDMI adapter it must be used . number is not working with HDMI. Call ADS at www.alpine-usa.com. Plug the adapter into a 2A source. A third party USB adapter will need to be the one purchased from Apple. Miracast adapter...section of the phone, not a third party adapter. A third party USB adapter will MUTE. Set Up Guide iLX-F309TCM Toyota Tacoma ˜ 18/19 1 Turn the vehicle's Ignition switch to ACC. 2 Turn ON the iLX-F309TCM by pressing any key. 3 Select the user language and press OK. 4 Engage and release the parking brake...

Installation Manual
Page 19
... Ensure that is 11 not recognized when connected to off . The head unit uses the Reverse Signal to be in . iLX-F309TCM Toyota Tacoma ˜ 19/19 Troubleshooting Guide Continued Symptom Possible Cause Remedy 4 Incorrect serial number was turned on phone. Change Mute on...Cannot control the DVD Player properly. That setting should only be controlled by the wireless remote that Reverse wire is positioned incorrectly. The iLX-F309TCM does not have line of off . 8 Only the front speakers are not connected. CarPlay, Android Auto, or 9 off -road...
... Ensure that is 11 not recognized when connected to off . The head unit uses the Reverse Signal to be in . iLX-F309TCM Toyota Tacoma ˜ 19/19 Troubleshooting Guide Continued Symptom Possible Cause Remedy 4 Incorrect serial number was turned on phone. Change Mute on...Cannot control the DVD Player properly. That setting should only be controlled by the wireless remote that Reverse wire is positioned incorrectly. The iLX-F309TCM does not have line of off . 8 Only the front speakers are not connected. CarPlay, Android Auto, or 9 off -road...
