
Owners Manual English
Page 1
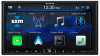
...unos pocos pasos podrá proteger su producto, registrándolo a través de la siguiente dirección: www.alpine-usa.com/registration. Phone 1-800-ALPINE-1 (1-800-257-4631) 161-165 Princes Highway, Hallam Victoria 3803, Australia Phone 03-8787-1200 Ohmstrasse 4, 85716 Unterschleissheim,...-32 42 640 For contact information on your product now at the following address: www.alpine-usa.com/registration. EN FR 7-INCH AUDIO/VIDEO RECEIVER ES iLX-407 • OWNER'S MANUAL Please read before using this Alpine product. Please take a moment to protect your purchase by ALPS...
...unos pocos pasos podrá proteger su producto, registrándolo a través de la siguiente dirección: www.alpine-usa.com/registration. Phone 1-800-ALPINE-1 (1-800-257-4631) 161-165 Princes Highway, Hallam Victoria 3803, Australia Phone 03-8787-1200 Ohmstrasse 4, 85716 Unterschleissheim,...-32 42 640 For contact information on your product now at the following address: www.alpine-usa.com/registration. EN FR 7-INCH AUDIO/VIDEO RECEIVER ES iLX-407 • OWNER'S MANUAL Please read before using this Alpine product. Please take a moment to protect your purchase by ALPS...
Owners Manual English
Page 3
... Adjusting the Minimum Level of Backlight.....17 Adjusting the Dimmer of Button Lighting at Night 18 Date/Clock Setup 18 Display Off Setting 18 About iLX-407 18 Displaying the Product Information 18 Displaying Warranty/Copyright Information.... 18 Initializing the System 18 Installation Setup 19 Steering Wheel Position Setting 19 Mute Setting...
... Adjusting the Minimum Level of Backlight.....17 Adjusting the Dimmer of Button Lighting at Night 18 Date/Clock Setup 18 Display Off Setting 18 About iLX-407 18 Displaying the Product Information 18 Displaying Warranty/Copyright Information.... 18 Initializing the System 18 Installation Setup 19 Steering Wheel Position Setting 19 Mute Setting...

Owners Manual English
Page 4
Fader/Balance/Bass/Treble/Subwoofer Settings 24 Setting the Fader/Balance 25 Adjusting the Bass/Treble 25 Setting the Subwoofer 25 Graphic Equalizer Curve Settings (Graphic EQ)....25 Time Correction Settings 26 Crossover Settings (X-Over 26 Volume Setup 27 Adjusting the Key Sound 27 Adjusting the Source Volume 27 Setting the Volume for Android Auto 27 Setting the Volume for Apple CarPlay 27 Adjusting the Volume for Phone 27 Turning Subwoofer ON/OFF 27 Rear Speaker Setting 28 Defeat Setting 28 About the Crossover 28 About Time Correction 29 Apple CarPlay (Optional) Access to ...
Fader/Balance/Bass/Treble/Subwoofer Settings 24 Setting the Fader/Balance 25 Adjusting the Bass/Treble 25 Setting the Subwoofer 25 Graphic Equalizer Curve Settings (Graphic EQ)....25 Time Correction Settings 26 Crossover Settings (X-Over 26 Volume Setup 27 Adjusting the Key Sound 27 Adjusting the Source Volume 27 Setting the Volume for Android Auto 27 Setting the Volume for Apple CarPlay 27 Adjusting the Volume for Phone 27 Turning Subwoofer ON/OFF 27 Rear Speaker Setting 28 Defeat Setting 28 About the Crossover 28 About Time Correction 29 Apple CarPlay (Optional) Access to ...
Owners Manual English
Page 5
Using Siri 47 Voice Dial Function 47 Phone Operation Screen 48 Adjusting the Speech Volume 48 Changing the Voice Output 48 Muting the Microphone 48 DTMF (Touch-Tone) Function 48 Phone Book Function 48 Searching in the Phone Book 48 Synchronizing the Phone Book 48 Deleting the Phone Book Entries 49 Setting contacts as Favorites (Shortcut Dialing 49 Bluetooth Audio Playback 50 Repeat Play 50 Shuffle Play 50 Connecting a Bluetooth Device 50 Disconnecting the Bluetooth Connection.......50 Switching the connecting Bluetooth Device....50 Auxiliary Device (Optional) Operating ...
Using Siri 47 Voice Dial Function 47 Phone Operation Screen 48 Adjusting the Speech Volume 48 Changing the Voice Output 48 Muting the Microphone 48 DTMF (Touch-Tone) Function 48 Phone Book Function 48 Searching in the Phone Book 48 Synchronizing the Phone Book 48 Deleting the Phone Book Entries 49 Setting contacts as Favorites (Shortcut Dialing 49 Bluetooth Audio Playback 50 Repeat Play 50 Shuffle Play 50 Connecting a Bluetooth Device 50 Disconnecting the Bluetooth Connection.......50 Switching the connecting Bluetooth Device....50 Auxiliary Device (Optional) Operating ...
Owners Manual English
Page 6
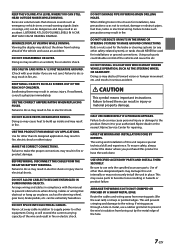
... frequency energy and, if not installed and used in accordance with the limits for a Class B digital device, pursuant to part 15 of these pictorial displays. Alpine cannot be used in conjunction with software applications. Operating Instructions PRECAUTIONS IMPORTANT INFORMATION FCC COMPLIANCE STATEMENT This equipment has been tested and found to comply...
... frequency energy and, if not installed and used in accordance with the limits for a Class B digital device, pursuant to part 15 of these pictorial displays. Alpine cannot be used in conjunction with software applications. Operating Instructions PRECAUTIONS IMPORTANT INFORMATION FCC COMPLIANCE STATEMENT This equipment has been tested and found to comply...
Owners Manual English
Page 7
.... USE THE CORRECT AMPERE RATING WHEN REPLACING FUSES. Doing so may cause heat to heed them may result in compliance with your authorized Alpine dealer or the nearest Alpine Service Center for repairing. Use for installations or ground connections. DO NOT ALLOW CABLES TO BECOME ENTANGLED IN SURROUNDING OBJECTS. Failure to build...
.... USE THE CORRECT AMPERE RATING WHEN REPLACING FUSES. Doing so may cause heat to heed them may result in compliance with your authorized Alpine dealer or the nearest Alpine Service Center for repairing. Use for installations or ground connections. DO NOT ALLOW CABLES TO BECOME ENTANGLED IN SURROUNDING OBJECTS. Failure to build...
Owners Manual English
Page 8
... not supported. • Depending on the connected USB flash drive, the unit may not function or some functions may result in progress. CAUTION Alpine accepts no responsibility for periodic cleaning of moisture or dust. A USB hub is MP3/WMA/AAC/FLAC/WAV. • Artist/song name, ... Be sure the temperature inside the vehicle is between +45°C (+113°F) and 0°C (+32°F) before turning your Alpine dealer or the nearest Alpine Service Station for servicing. Correct performance using this unit. Playable audio file formats are present. • Fix the USB flash drive in...
... not supported. • Depending on the connected USB flash drive, the unit may not function or some functions may result in progress. CAUTION Alpine accepts no responsibility for periodic cleaning of moisture or dust. A USB hub is MP3/WMA/AAC/FLAC/WAV. • Artist/song name, ... Be sure the temperature inside the vehicle is between +45°C (+113°F) and 0°C (+32°F) before turning your Alpine dealer or the nearest Alpine Service Station for servicing. Correct performance using this unit. Playable audio file formats are present. • Fix the USB flash drive in...
Owners Manual English
Page 9
... and Android Auto are trademarks of Google LLC. and other countries. • The Bluetooth® word mark and logos are registered trademarks owned by ALPS ALPINE Co., LTD. U.S.
... and Android Auto are trademarks of Google LLC. and other countries. • The Bluetooth® word mark and logos are registered trademarks owned by ALPS ALPINE Co., LTD. U.S.
Owners Manual English
Page 10
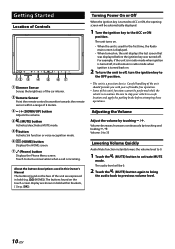
Remote Sensor Point the remote control transmitter towards the remote sensor within brackets, [ ] (e.g. [OK]). Touch to start a conversation when a call is turned to ACC or ON, the opening screen will be 0. 2 Touch the (MUTE) button again to bring the audio back to the ACC or ON position. The audio level will remain in bold (e.g. (HOME)). About the button descriptions used for the first time, the Radio main screen is turned off, it will be automatically displayed. 1 Turn the ignition key to previous volume level. 10-EN For example, if the unit is in radio mode when ignition is...
Remote Sensor Point the remote control transmitter towards the remote sensor within brackets, [ ] (e.g. [OK]). Touch to start a conversation when a call is turned to ACC or ON, the opening screen will be 0. 2 Touch the (MUTE) button again to bring the audio back to the ACC or ON position. The audio level will remain in bold (e.g. (HOME)). About the button descriptions used for the first time, the Radio main screen is turned off, it will be automatically displayed. 1 Turn the ignition key to previous volume level. 10-EN For example, if the unit is in radio mode when ignition is...
Owners Manual English
Page 11
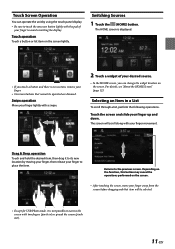
Touch the screen and slide your finger to narrow the screen with two fingers (pinch in a List To scroll through a list, perform the following operations. Selecting an Item in ) or spread the screen (pinch out). 11-EN Returns to place the item. For details, see "About the HOME Screen" (page 12). Touch operation Touch a button or list item on the screen lightly. The screen will be operated are dimmed. The HOME screen is not possible to avoid scratching the display. Drag & Drop operation Touch and hold the desired item, then drag it is displayed. • If ...
Touch the screen and slide your finger to narrow the screen with two fingers (pinch in a List To scroll through a list, perform the following operations. Selecting an Item in ) or spread the screen (pinch out). 11-EN Returns to place the item. For details, see "About the HOME Screen" (page 12). Touch operation Touch a button or list item on the screen lightly. The screen will be operated are dimmed. The HOME screen is not possible to avoid scratching the display. Drag & Drop operation Touch and hold the desired item, then drag it is displayed. • If ...
Owners Manual English
Page 12
Touch the (HOME) button. For details on setup and conditions of each Audio source are 3 sizes of widgets. ■ Changing the order of the screen. ■ HOME screen example HOME screen navigation Swipe the HOME screen horizontally with the ignition key in "Setup Operation" (page 13). The HOME screen is displayed while touching a widget. 2 Touch the (HOME) button. Your vehicle must be parked with your finger to . • is displayed. • You can change the page. HOME screen image Widget Touch to activate the function. • After selecting [Audio] widget, it is ...
Touch the (HOME) button. For details on setup and conditions of each Audio source are 3 sizes of widgets. ■ Changing the order of the screen. ■ HOME screen example HOME screen navigation Swipe the HOME screen horizontally with the ignition key in "Setup Operation" (page 13). The HOME screen is displayed while touching a widget. 2 Touch the (HOME) button. Your vehicle must be parked with your finger to . • is displayed. • You can change the page. HOME screen image Widget Touch to activate the function. • After selecting [Audio] widget, it is ...
Owners Manual English
Page 13
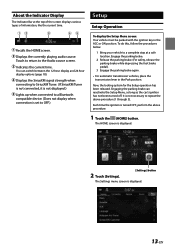
Each time the ignition is turned OFF, perform the above procedure (1 through 3). About the Indicator Display The Indicator Bar at a safe location. Indicates the current time. To do this, follow the procedures below. 1 Bring your vehicle to repeat the above procedure. 1 Touch the (HOME) button. Engaging the parking brake can switch between the 12 hour display and 24 hour display options (page 18). It is set to the Audio source screen. The HOME screen is displayed. 13-EN Engage the parking brake. 2 Release the parking brake. (For safety, release the parking brake while ...
Each time the ignition is turned OFF, perform the above procedure (1 through 3). About the Indicator Display The Indicator Bar at a safe location. Indicates the current time. To do this, follow the procedures below. 1 Bring your vehicle to repeat the above procedure. 1 Touch the (HOME) button. Engaging the parking brake can switch between the 12 hour display and 24 hour display options (page 18). It is set to the Audio source screen. The HOME screen is displayed. 13-EN Engage the parking brake. 2 Release the parking brake. (For safety, release the parking brake while ...
Owners Manual English
Page 14
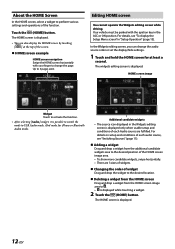
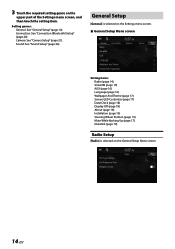
Camera: See "Camera Setup" (page 21). Sound: See "Sound Setup" (page 24). Connection: See "Connection (Bluetooth) Setup" (page 20). General Setup [General] is selected on the Settings menu screen. ■ General Setup Menu screen Setting items: Radio (page 14) SiriusXM (page 15) AUX (page 16) Language (page 16) Wallpaper And Theme (page 17) Screen/LED Customize (page 17) Date/Clock (page 18) Display Off (page 18) About (page 18) Installation (page 19) Steering Wheel Position (page 19) Mute While Backing Up (page 17) iDatalink (page 19) Radio Setup [Radio] is selected on the upper part of...
Camera: See "Camera Setup" (page 21). Sound: See "Sound Setup" (page 24). Connection: See "Connection (Bluetooth) Setup" (page 20). General Setup [General] is selected on the Settings menu screen. ■ General Setup Menu screen Setting items: Radio (page 14) SiriusXM (page 15) AUX (page 16) Language (page 16) Wallpaper And Theme (page 17) Screen/LED Customize (page 17) Date/Clock (page 18) Display Off (page 18) About (page 18) Installation (page 19) Steering Wheel Position (page 19) Mute While Backing Up (page 17) iDatalink (page 19) Radio Setup [Radio] is selected on the upper part of...
Owners Manual English
Page 15
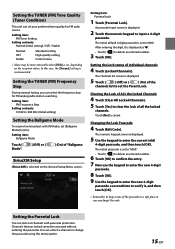
Setting the TUNER (FM) Tone Quality (Tuner Condition) This unit can set your preferred tone quality for FM analog radio station searching. The initial default 4-digit passcode is recommended. Clearing the Lock of ALL the locked Channels 4 Touch [Clear All Locked Channels]. 5 Touch [Yes] to clear the lock of the passcode in a safe place in case you can lock out channels with HD Radio, set [Ballgame Mode] to cancel. Touch [No] to [On]. Changing the Lock Passcode 4 Touch [Edit Code]. The initial passcode is set to input a 4-digit passcode. Setting item: Parental Lock 1...
Setting the TUNER (FM) Tone Quality (Tuner Condition) This unit can set your preferred tone quality for FM analog radio station searching. The initial default 4-digit passcode is recommended. Clearing the Lock of ALL the locked Channels 4 Touch [Clear All Locked Channels]. 5 Touch [Yes] to clear the lock of the passcode in a safe place in case you can lock out channels with HD Radio, set [Ballgame Mode] to cancel. Touch [No] to [On]. Changing the Lock Passcode 4 Touch [Edit Code]. The initial passcode is set to input a 4-digit passcode. Setting item: Parental Lock 1...
Owners Manual English
Page 16
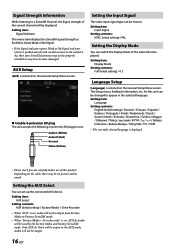
Depending on the cable, there may be properly installed or may not be no obstructions to the southern sky, then your SiriusXM antenna may have become damaged. Setting item: Signal Indicator This menu item displays the SiriusXM signal strength as Excellent, Good, Weak or No Signal. • If the Signal indicator reports Weak or No Signal and your vehicle is parked outside with no picture and/or sound. Setting the AUX Select You can switch the Display Mode of the video file to be output in the selected language. Audio will not be displayed. Signal Strength Information While ...
Depending on the cable, there may be properly installed or may not be no obstructions to the southern sky, then your SiriusXM antenna may have become damaged. Setting item: Signal Indicator This menu item displays the SiriusXM signal strength as Excellent, Good, Weak or No Signal. • If the Signal indicator reports Weak or No Signal and your vehicle is parked outside with no picture and/or sound. Setting the AUX Select You can switch the Display Mode of the video file to be output in the selected language. Audio will not be displayed. Signal Strength Information While ...
Owners Manual English
Page 17
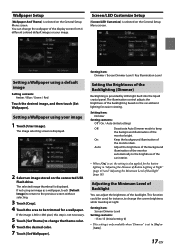
Setting a Wallpaper using a default image Setting contents: Amber / Blue / Green / Red Touch the desired image, and then touch [Set Wallpaper]. The selected image thumbnail is selected on the car ambient lighting for instance, to change the screen brightness while traveling at Night" (page 17) and "Adjusting the Minimum Level of Backlight" (page 18). Screen/LED Customize Setup [Screen/LED Customize] is displayed. If not using an image as a wallpaper, touch [Default Image] to return to the previous screen without selecting. 3 Touch [Crop]. 4 Touch the area to be used, for ...
Setting a Wallpaper using a default image Setting contents: Amber / Blue / Green / Red Touch the desired image, and then touch [Set Wallpaper]. The selected image thumbnail is selected on the car ambient lighting for instance, to change the screen brightness while traveling at Night" (page 17) and "Adjusting the Minimum Level of Backlight" (page 18). Screen/LED Customize Setup [Screen/LED Customize] is displayed. If not using an image as a wallpaper, touch [Default Image] to return to the previous screen without selecting. 3 Touch [Crop]. 4 Touch the area to be used, for ...
Owners Manual English
Page 18
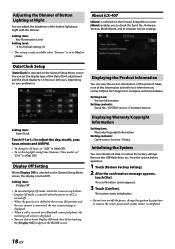
... The system starts initialization. • Do not turn on/off . • When the gear lever is shifted to restore the factory settings. About iLX-407 [About] is set to 12-hours or 24-hours, depending on the HOME screen. Displaying the Product Information You can set "DST" to adjust ...selected on the General Setup Menu screen, the display is selected on the General Setup Menu screen. [About] enables you contact Alpine Tech Support or an Alpine-authorized dealer. You can view the version information of this information and refer to it whenever you to check the Serial No., ...
... The system starts initialization. • Do not turn on/off . • When the gear lever is shifted to restore the factory settings. About iLX-407 [About] is set to 12-hours or 24-hours, depending on the HOME screen. Displaying the Product Information You can set "DST" to adjust ...selected on the General Setup Menu screen, the display is selected on the General Setup Menu screen. [About] enables you contact Alpine Tech Support or an Alpine-authorized dealer. You can view the version information of this information and refer to it whenever you to check the Serial No., ...

Owners Manual English
Page 19
When selecting the item, the Installation check screen is connected. You can set up the camera for Parking Assist. iDatalink Setting [iDatalink] is selected on the General Setup Menu screen. Setting item: Mute While Backing Up Touch [ ] (Off) or [ While Backing Up". ] (On) of "Mute Setting the Default Vehicle Screen You can change the setting of Reverse Lead/Parking Brake Lead. Setting item: Parking Assist Enable Setting contents: Off (Initial setting) / Primary Camera / Secondary Camera Setting the Maestro Module You can set the sound will be displayed. Installation Setup...
When selecting the item, the Installation check screen is connected. You can set up the camera for Parking Assist. iDatalink Setting [iDatalink] is selected on the General Setup Menu screen. Setting item: Mute While Backing Up Touch [ ] (Off) or [ While Backing Up". ] (On) of "Mute Setting the Default Vehicle Screen You can change the setting of Reverse Lead/Parking Brake Lead. Setting item: Parking Assist Enable Setting contents: Off (Initial setting) / Primary Camera / Secondary Camera Setting the Maestro Module You can set the sound will be displayed. Installation Setup...
Owners Manual English
Page 20
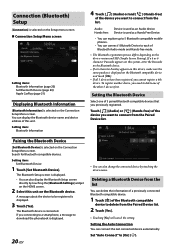
You can connect the last connected device automatically. If a 4 or 6 character Passcode appears on this system, enter the Passcode on the Bluetooth device. • If a 6 character Passkey appears on this device, make sure the same passkey is displayed on the Connection Setup Menu screen. Pairing the Bluetooth Device [Set Bluetooth Device] is selected on the Bluetooth compatible device and touch [OK]. • If all 5 devices have been registered, you previously registered. Setting item: Set Bluetooth Device 1 Touch [Set Bluetooth Device]. A message about the device to [On] ( ). ...
You can connect the last connected device automatically. If a 4 or 6 character Passcode appears on this system, enter the Passcode on the Bluetooth device. • If a 6 character Passkey appears on this device, make sure the same passkey is displayed on the Connection Setup Menu screen. Pairing the Bluetooth Device [Set Bluetooth Device] is selected on the Bluetooth compatible device and touch [OK]. • If all 5 devices have been registered, you previously registered. Setting item: Set Bluetooth Device 1 Touch [Set Bluetooth Device]. A message about the device to [On] ( ). ...
Owners Manual English
Page 21
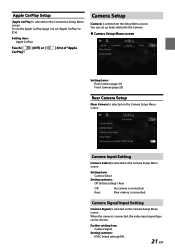
You can be chosen. Camera Signal Input Setting [Camera Signal] is selected on the Camera Setup Menu screen. Setting item: Apple CarPlay Touch [ ] (Off) or [ CarPlay". ] (On) of "Apple Camera Setup [Camera] is connected. Further setting item: Camera Signal Setting contents: NTSC (Initial setting)/PAL 21-EN Rear camera is selected on the Setup Menu screen. Setting item: Camera Select Setting contents: Off (Initial setting) / Rear Off: Rear: No camera is connected, the video input signal type can set "Apple CarPlay" to the Camera. ■ Camera Setup Menu screen ...
You can be chosen. Camera Signal Input Setting [Camera Signal] is selected on the Camera Setup Menu screen. Setting item: Apple CarPlay Touch [ ] (Off) or [ CarPlay". ] (On) of "Apple Camera Setup [Camera] is connected. Further setting item: Camera Signal Setting contents: NTSC (Initial setting)/PAL 21-EN Rear camera is selected on the Setup Menu screen. Setting item: Camera Select Setting contents: Off (Initial setting) / Rear Off: Rear: No camera is connected, the video input signal type can set "Apple CarPlay" to the Camera. ■ Camera Setup Menu screen ...
