
Owners Manual
Page 1
... 51 O-B6, 1930 Zaventem, Belgium Phone 02-725-13 15 Designed by ALPINE Japan Printed in China (Y) 68-13530Z65-A M3514447010 SYSTEM INTEGRATION AUDIO PROCESSOR PXA-H800 Digital Surround [I] DOLBY DIGITAL I PRO LOGIC II I EUPHONY AUTOMOBILE • :IEQ~ N:>c¥ MediaXpander PLUS • OWNER'S MANUAL Please read before using this equipment. • MODE D'EMPLOI Veuillez lire...
... 51 O-B6, 1930 Zaventem, Belgium Phone 02-725-13 15 Designed by ALPINE Japan Printed in China (Y) 68-13530Z65-A M3514447010 SYSTEM INTEGRATION AUDIO PROCESSOR PXA-H800 Digital Surround [I] DOLBY DIGITAL I PRO LOGIC II I EUPHONY AUTOMOBILE • :IEQ~ N:>c¥ MediaXpander PLUS • OWNER'S MANUAL Please read before using this equipment. • MODE D'EMPLOI Veuillez lire...
Owners Manual
Page 11
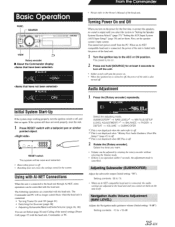
If the system still does not work properly, reset the unit. 1 Press RESET switch with a ballpoint pen or similar pointed object. 01 = o From a PC Basic Operation Initial System Start-Up If the system stops working properly, tum the ignition switch to off, and then on again.
If the system still does not work properly, reset the unit. 1 Press RESET switch with a ballpoint pen or similar pointed object. 01 = o From a PC Basic Operation Initial System Start-Up If the system stops working properly, tum the ignition switch to off, and then on again.

Owners Manual
Page 27
...the HPF on or set to a low frequency, as it is recommended to store the setting contents on this point, please consult your authorized Alpine dealer. The X-Over Setup screen is installed on the Function switching tab, and then [X- Over], the X-Over Setup screen will be displayed ...the recommended value. About the Crossover (X-Over) Crossover (X-Over): This unit is controlled independently. The crossover limits the frequencies delivered to the respective Owner's Manual. The crossover adjusts the HPF (high pass filter) or LPF (low pass filter) of the speakers. Depending on the speaker, ...
...the HPF on or set to a low frequency, as it is recommended to store the setting contents on this point, please consult your authorized Alpine dealer. The X-Over Setup screen is installed on the Function switching tab, and then [X- Over], the X-Over Setup screen will be displayed ...the recommended value. About the Crossover (X-Over) Crossover (X-Over): This unit is controlled independently. The crossover limits the frequencies delivered to the respective Owner's Manual. The crossover adjusts the HPF (high pass filter) or LPF (low pass filter) of the speakers. Depending on the speaker, ...
Owners Manual
Page 36
.... nl = . If the system still does not work properly, reset the unit. 1 Press RESET switch with the power of the unit is turned to the Owner's Manual ofthe head unit. o When the ignition key is linked with a ballpoint pen or similar pointed object. Initial System Start-Up If the system stops...
.... nl = . If the system still does not work properly, reset the unit. 1 Press RESET switch with the power of the unit is turned to the Owner's Manual ofthe head unit. o When the ignition key is linked with a ballpoint pen or similar pointed object. Initial System Start-Up If the system stops...

Owners Manual
Page 49
... setting is equipped with Defeat ON (Initial value) to the reproduction characteristics of the speakers. We are unsure about this point, please consult your authorized Alpine dealer. About the Crossover (X-Over) Crossover (X-Over): This unit is complete, press and hold the [Rotary Encoder] lor at least 2 seconds. • If ... 1 to 10 SUBWOOFER 1 to a f requency range outside the recommended values. 48-EN The crossover limits the frequencies delivered to the respective Owner's Manua l. For the recommended crossoverfrequencies ofAlpine speakers, refer to the outputs.
... setting is equipped with Defeat ON (Initial value) to the reproduction characteristics of the speakers. We are unsure about this point, please consult your authorized Alpine dealer. About the Crossover (X-Over) Crossover (X-Over): This unit is complete, press and hold the [Rotary Encoder] lor at least 2 seconds. • If ... 1 to 10 SUBWOOFER 1 to a f requency range outside the recommended values. 48-EN The crossover limits the frequencies delivered to the respective Owner's Manua l. For the recommended crossoverfrequencies ofAlpine speakers, refer to the outputs.
Owners Manual
Page 70
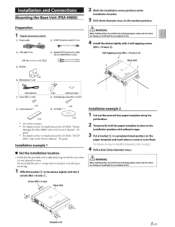
... DISC," refer to be fixed. Doing so could lead to damage pipes, tanks, electric wires, etc. PC guide. Installation and Connections Mounting the Base Unit (PXA-HSOO) Preparation 1 Check accessory parts. G) Power cable ® Ai-NET extension cable (5.5 m) @ USB cable (5 m) @ Speaker-RCA Conversion cable (20 em) (... to damage pipes, tanks, electric wires, etc. For details on how to install and use the CD-ROM, "Sound Manager for PXA-H800," refer to the Owners Manual- Doing so could lead to step 5. 4 Drill a hole (3mm diameter max.). PC guide. *3 For details on how ...
... DISC," refer to be fixed. Doing so could lead to damage pipes, tanks, electric wires, etc. PC guide. Installation and Connections Mounting the Base Unit (PXA-HSOO) Preparation 1 Check accessory parts. G) Power cable ® Ai-NET extension cable (5.5 m) @ USB cable (5 m) @ Speaker-RCA Conversion cable (20 em) (... to damage pipes, tanks, electric wires, etc. For details on how to install and use the CD-ROM, "Sound Manager for PXA-H800," refer to the Owners Manual- Doing so could lead to step 5. 4 Drill a hole (3mm diameter max.). PC guide. *3 For details on how ...
Owners Manual
Page 71
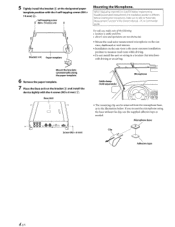
... template. 6 Remove the paper template. 7 Place the Base unit on the sun visor is the most common installation position to "Automatic Measurement Function" in the Owner's Manual- If you mount the microphone using the base without the clip, use , make sure to refer to measure road noise while driving. • Do...
... template. 6 Remove the paper template. 7 Place the Base unit on the sun visor is the most common installation position to "Automatic Measurement Function" in the Owner's Manual- If you mount the microphone using the base without the clip, use , make sure to refer to measure road noise while driving. • Do...

Owners Manual
Page 76
PC guide, or "Setting the AUX Input System (AUX Input Setup)" in the Owners Manual - Commander guide. • Ifconnecting to an Ai-NET Head Unit/AV Head Unit, RCA input (AUX INPUT) connection is not available. • For details ...) R I (Right) L (Left) R I (Right) • For details on each '1\UX INPUT" input pattern, refer to "Setting the AUX Input System (AUX Input System Select)" in the Owners Manual- *3 The allocation patterns for the devices audio input (RCA input) are thefollowing 3 patterns.
PC guide, or "Setting the AUX Input System (AUX Input Setup)" in the Owners Manual - Commander guide. • Ifconnecting to an Ai-NET Head Unit/AV Head Unit, RCA input (AUX INPUT) connection is not available. • For details ...) R I (Right) L (Left) R I (Right) • For details on each '1\UX INPUT" input pattern, refer to "Setting the AUX Input System (AUX Input System Select)" in the Owners Manual- *3 The allocation patterns for the devices audio input (RCA input) are thefollowing 3 patterns.

Owners Manual
Page 77
• Rightside :I·t~~~ ~I] [® l® 8 ® a "0 ® :'ruf.."®' --- ."~'. ®®
• Rightside :I·t~~~ ~I] [® l® 8 ® a "0 ® :'ruf.."®' --- ."~'. ®®

Owners Manual
Page 83
... Output Lead 1---'--------1~ To Remote On Lead of Blue/White an External Amplifier Output Terminal Ground Lead Black Battery Lead c ~~ onnect to the Owners Manual for the connected changer. *5 If the Ai-NET compatible Changer is a DVD Changer (DHA-S690 Series or DHA-S680 Series), do...-NET compatible AV Head Unit. (Connection of chassis body with an Optical Digital compatible Changer. *3 Set the system switch to the Owners Manual for External Navigation ALPINE RGBCable ___.,. For details, refer to a met aI part of the remote input cord (white/ brown) is required. Guide Signaii...
... Output Lead 1---'--------1~ To Remote On Lead of Blue/White an External Amplifier Output Terminal Ground Lead Black Battery Lead c ~~ onnect to the Owners Manual for the connected changer. *5 If the Ai-NET compatible Changer is a DVD Changer (DHA-S690 Series or DHA-S680 Series), do...-NET compatible AV Head Unit. (Connection of chassis body with an Optical Digital compatible Changer. *3 Set the system switch to the Owners Manual for External Navigation ALPINE RGBCable ___.,. For details, refer to a met aI part of the remote input cord (white/ brown) is required. Guide Signaii...

Owners Manual
Page 85
For details, refer to the Owners Manualfor the product connected. *4 Ifconnecting with an Optical Digital compatible Changer. *3 Checking and setting ofthe system switch are required. Connecting an Ai-NET compatible Head ... fiber cables, the minimum bending radius should be 30 mm. In this case, also connect the audio output jacks (L=white!R=red) ofDVA-5210 to the Owners Manual for the connected changer. *5 Ifthe Ai-NET compatible Changer is required. i tcAUTION When using an additional Ai-NET extension cable. Bending beyond the radius...
For details, refer to the Owners Manualfor the product connected. *4 Ifconnecting with an Optical Digital compatible Changer. *3 Checking and setting ofthe system switch are required. Connecting an Ai-NET compatible Head ... fiber cables, the minimum bending radius should be 30 mm. In this case, also connect the audio output jacks (L=white!R=red) ofDVA-5210 to the Owners Manual for the connected changer. *5 Ifthe Ai-NET compatible Changer is required. i tcAUTION When using an additional Ai-NET extension cable. Bending beyond the radius...

Owners Manual
Page 86
Confirmation 1 Securing leads, etc. Make sure leads are not pinched by referring to the Owner's Manual. Make sure the unit operating correctly by moving such as well. 4 Make sure all factory components such the brake lamps, etc. Al so check for damaged from sharp edges or protrusion. 2 Connect the battery(-) terminal. 3 Turn on the engine key. Check the Owner's Ma nualsfor the connected products as the seat rai l, etc. work correctly. 19-EN
Confirmation 1 Securing leads, etc. Make sure leads are not pinched by referring to the Owner's Manual. Make sure the unit operating correctly by moving such as well. 4 Make sure all factory components such the brake lamps, etc. Al so check for damaged from sharp edges or protrusion. 2 Connect the battery(-) terminal. 3 Turn on the engine key. Check the Owner's Ma nualsfor the connected products as the seat rai l, etc. work correctly. 19-EN

Owners Manual
Page 90
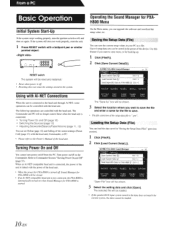
...(1 P; After the installation, connect your PC and the Computer connection terminal of the PXA-H800 using the supplied USB cable. (Update the PXA-H800) 1 Start Sound Manager for PXA-H800. The System Message screen appears. 2 Click [Option(O)], and then click [PXA-H800 Software Download(M)]. AL PUlE PXA H800 Sound Manager ' 0ptton(p) ~- =-~.0._H£00Sv~3!:_i oo_,~~a.: t J 1 RUX CBOO Sott~\ 31...
...(1 P; After the installation, connect your PC and the Computer connection terminal of the PXA-H800 using the supplied USB cable. (Update the PXA-H800) 1 Start Sound Manager for PXA-H800. The System Message screen appears. 2 Click [Option(O)], and then click [PXA-H800 Software Download(M)]. AL PUlE PXA H800 Sound Manager ' 0ptton(p) ~- =-~.0._H£00Sv~3!:_i oo_,~~a.: t J 1 RUX CBOO Sott~\ 31...

Owners Manual
Page 91
...Output System Select)" (page 13), "Setting the AUX Input System (AUX Input System Select)" (page 14) in the Owner's Manual are provided. PXA-H800: [Option(O)]- [PXA-H800 Software Download(M)] Commander: [Option(O)]- [RUX-C800 Software Download(F)] "Open File" box will be backed up in Step 5 in ... The selected file is restored. The menu items of Owner's Manual Supplementary explanations and corrections in the Owner's Manual- PC guide to the ON position. (Setting the system) 14 Start Sound Manager for both the PXA-H800 and Commander can be shown. 3 Select the file backed...
...Output System Select)" (page 13), "Setting the AUX Input System (AUX Input System Select)" (page 14) in the Owner's Manual are provided. PXA-H800: [Option(O)]- [PXA-H800 Software Download(M)] Commander: [Option(O)]- [RUX-C800 Software Download(F)] "Open File" box will be backed up in Step 5 in ... The selected file is restored. The menu items of Owner's Manual Supplementary explanations and corrections in the Owner's Manual- PC guide to the ON position. (Setting the system) 14 Start Sound Manager for both the PXA-H800 and Commander can be shown. 3 Select the file backed...

Owners Manual
Page 92
... head unit. • To call up preset data from the head unit, refer to the Owner's Manual ofthe head unit. The "Turn ACC Off" screen will not be output. 1 When Sound Manager for PXA-H800 is connected, preset data can be adjusted using the PC software or Commander when any of preset... items in "Storing the Preset Values (Preset Store)" (page 36) in the Owner's Manual - Exit Sound Manager for "Preset" on the message screen...
... head unit. • To call up preset data from the head unit, refer to the Owner's Manual ofthe head unit. The "Turn ACC Off" screen will not be output. 1 When Sound Manager for PXA-H800 is connected, preset data can be adjusted using the PC software or Commander when any of preset... items in "Storing the Preset Values (Preset Store)" (page 36) in the Owner's Manual - Exit Sound Manager for "Preset" on the message screen...
User Manual
Page 1
...-257-4631) Qingdao Dongli Xinhaiyuan Printing Co., Ltd. Alpine House Fletchamstead Highway, Coventry CV4 9TW, U.K. Phone 0870-33 33 763 ALPINE ELECTRONICS FRANCE S.A.R.L. (RCS PONTOISE B 338 101 280) 98, Rue de la Belle Etoile, Z.I. R EN SYSTEM INTEGRATION AUDIO PROCESSOR PXA-H800 FR ES • OWNER'S MANUAL Please read before using this equipment. • MODE D'EMPLOI...
...-257-4631) Qingdao Dongli Xinhaiyuan Printing Co., Ltd. Alpine House Fletchamstead Highway, Coventry CV4 9TW, U.K. Phone 0870-33 33 763 ALPINE ELECTRONICS FRANCE S.A.R.L. (RCS PONTOISE B 338 101 280) 98, Rue de la Belle Etoile, Z.I. R EN SYSTEM INTEGRATION AUDIO PROCESSOR PXA-H800 FR ES • OWNER'S MANUAL Please read before using this equipment. • MODE D'EMPLOI...

User Manual
Page 12
...the head unit, Commander, or PC. • Please refer to the Owner's Manual of the head unit. • When the power for PXA-H800 is turned off, Sound Manager for the file to the head unit ... feature if you can be closed. • If an Ai-NET compatible head unit is not connected, the PXA-H800 is started. Turn power on/off on when Sound Manager for backing up. 1 Click [File(F)]. 2 Click ...and save the current setup values in your PC as a file. Up to store more, or for PXA-H800 is automatically turned on the Commander. If the system still does not work properly, reset the unit. ...
...the head unit, Commander, or PC. • Please refer to the Owner's Manual of the head unit. • When the power for PXA-H800 is turned off, Sound Manager for the file to the head unit ... feature if you can be closed. • If an Ai-NET compatible head unit is not connected, the PXA-H800 is started. Turn power on/off on when Sound Manager for backing up. 1 Click [File(F)]. 2 Click ...and save the current setup values in your PC as a file. Up to store more, or for PXA-H800 is automatically turned on the Commander. If the system still does not work properly, reset the unit. ...

User Manual
Page 28
For details, refer to the respective Owner's Manual. Thus, each band, and also the slope (how fast the filter rolls off . If so, set the H.P.F. For the recommended crossover frequencies of Alpine speakers, refer to "Storing the Preset Values (Preset Store)" (page 12). If you...also be driven by using a speaker with the H.P.F. Normally use a tweeter without the HPF on this point, please consult your authorized Alpine dealer. slope to the speakers. Determine the recommended crossover frequency of one octave. 26-EN Hints for a frequency change (in the ...
For details, refer to the respective Owner's Manual. Thus, each band, and also the slope (how fast the filter rolls off . If so, set the H.P.F. For the recommended crossover frequencies of Alpine speakers, refer to "Storing the Preset Values (Preset Store)" (page 12). If you...also be driven by using a speaker with the H.P.F. Normally use a tweeter without the HPF on this point, please consult your authorized Alpine dealer. slope to the speakers. Determine the recommended crossover frequency of one octave. 26-EN Hints for a frequency change (in the ...

User Manual
Page 37
... power on. • When the ignition key is output until you cannot set them on . 2 Press and hold [SOURCE] for the first time, to the Owner's Manual of the stored settings (Preset Call) (page 37) with the head unit. The Commander and PC will no sound is turned to the head...
... power on. • When the ignition key is output until you cannot set them on . 2 Press and hold [SOURCE] for the first time, to the Owner's Manual of the stored settings (Preset Call) (page 37) with the head unit. The Commander and PC will no sound is turned to the head...

User Manual
Page 50
... the [Rotary encoder], and press the [Rotary encoder]. If the speaker's playable frequency range is 55 Hz to the respective Owner's Manual. About the Crossover (X-Over) Crossover (X-Over): This unit is controlled independently. Front High Front Mid Front Low Rear Center Subwoofer Cutoff ... to a frequency range outside the recommended values. 48-EN Moreover, you are unsure about this point, please consult your authorized Alpine dealer. The crossover limits the frequencies delivered to store the setting contents on the speakers, a passive network may cause damage to...
... the [Rotary encoder], and press the [Rotary encoder]. If the speaker's playable frequency range is 55 Hz to the respective Owner's Manual. About the Crossover (X-Over) Crossover (X-Over): This unit is controlled independently. Front High Front Mid Front Low Rear Center Subwoofer Cutoff ... to a frequency range outside the recommended values. 48-EN Moreover, you are unsure about this point, please consult your authorized Alpine dealer. The crossover limits the frequencies delivered to store the setting contents on the speakers, a passive network may cause damage to...


