
Owners Manual
Page 1
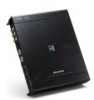
..., Toronto, Ontario M3J 2M9, Canada Phone 1-800-ALPINE-1 (1-800-257-4631) Qingdao Dongli Xinhaiyuan Printing Co., Ltd. Alpine House Fletchamstead Highway, Coventry CV4 9TW, U.K. Viale C. SYSTEM INTEGRATION AUDIO PROCESSOR PXA-H800 Digital Surround [I] DOLBY DIGITAL I PRO LOGIC II I EUPHONY AUTOMOBILE • :IEQ~ N:>c¥ MediaXpander PLUS • OWNER'S MANUAL Please read before using this equipment. •...
..., Toronto, Ontario M3J 2M9, Canada Phone 1-800-ALPINE-1 (1-800-257-4631) Qingdao Dongli Xinhaiyuan Printing Co., Ltd. Alpine House Fletchamstead Highway, Coventry CV4 9TW, U.K. Viale C. SYSTEM INTEGRATION AUDIO PROCESSOR PXA-H800 Digital Surround [I] DOLBY DIGITAL I PRO LOGIC II I EUPHONY AUTOMOBILE • :IEQ~ N:>c¥ MediaXpander PLUS • OWNER'S MANUAL Please read before using this equipment. •...

Owners Manual
Page 2
...4 NOTICE 4 Getting Started How to Read this Manual 5 Location of Controls 6 PXA-H800 6 Sound Manager for PXA-H800 6 RUX-C800 Commander (sold separately) .... 7 Features 8 About Operating 8 About the Audio Setting 8 Before You First Use the Unit 8 Installing Sound Manager for PXA-H800 ....... 9 From a PC Basic ,Operation Initial ...System Start-Up 10 Using with Ai-NET Connections 10 Turning Power On and Off 10 Operating tbe Sound Manager for PXA-H800 Menu 10 Saving the Setup Data (File 10 Loading th,e S~tup Data (File 10 Loading the Itp.priptEQ Measurement Data ...
...4 NOTICE 4 Getting Started How to Read this Manual 5 Location of Controls 6 PXA-H800 6 Sound Manager for PXA-H800 6 RUX-C800 Commander (sold separately) .... 7 Features 8 About Operating 8 About the Audio Setting 8 Before You First Use the Unit 8 Installing Sound Manager for PXA-H800 ....... 9 From a PC Basic ,Operation Initial ...System Start-Up 10 Using with Ai-NET Connections 10 Turning Power On and Off 10 Operating tbe Sound Manager for PXA-H800 Menu 10 Saving the Setup Data (File 10 Loading th,e S~tup Data (File 10 Loading the Itp.priptEQ Measurement Data ...

Owners Manual
Page 6
J_.._ __ 11'' = =~--· Automatic Measurement r--~~~ Function Function Other Useful Features *1 The method to Read this Manual The Commander (RUX-C800) for PXA-H800. Audio setup and adjustments are described in the "Adjusting the Time Correction (TCR)" operation. 5-EN Getting Started How to ... between these two methods, each are performed using the RUX-C800 or a PC running the Sound Manager software for PXA-H800 is labeled as shown below. • From a PC Basic Operation From the Commander ~~ ~~~ ~~~ ~~~ ~ ;~_; Each section is sold separately.
J_.._ __ 11'' = =~--· Automatic Measurement r--~~~ Function Function Other Useful Features *1 The method to Read this Manual The Commander (RUX-C800) for PXA-H800. Audio setup and adjustments are described in the "Adjusting the Time Correction (TCR)" operation. 5-EN Getting Started How to ... between these two methods, each are performed using the RUX-C800 or a PC running the Sound Manager software for PXA-H800 is labeled as shown below. • From a PC Basic Operation From the Commander ~~ ~~~ ~~~ ~~~ ~ ;~_; Each section is sold separately.

Owners Manual
Page 10
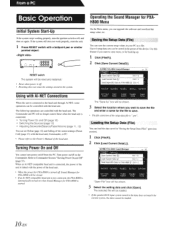
... on the screen. 2 Connect a PC to the Installation manual). If the connection is detected, it (refer to the Installation manual). Run the setup.exe file. Installing Sound Manager for PXA-H800 When you install Sound Manager for PXA-HBOO in the online mode. • Install the PXA -HBOO in your vehicle before you connect a PC to...
... on the screen. 2 Connect a PC to the Installation manual). If the connection is detected, it (refer to the Installation manual). Run the setup.exe file. Installing Sound Manager for PXA-H800 When you install Sound Manager for PXA-HBOO in the online mode. • Install the PXA -HBOO in your vehicle before you connect a PC to...
Owners Manual
Page 11
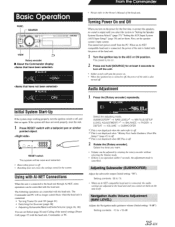
If the system still does not work properly, reset the unit. 1 Press RESET switch with a ballpoint pen or similar pointed object. 01 = o From a PC Basic Operation Initial System Start-Up If the system stops working properly, tum the ignition switch to off, and then on again.
If the system still does not work properly, reset the unit. 1 Press RESET switch with a ballpoint pen or similar pointed object. 01 = o From a PC Basic Operation Initial System Start-Up If the system stops working properly, tum the ignition switch to off, and then on again.

Owners Manual
Page 13
... the DVD Level (DVD Level) 34 1 Adjust the value you want to the selected one. Switching the Sources The unit accepts up to the installation manual. For the connection, refer to 6 sets of the following adjustment/setting values are displayed. ALt :. 1 i AI r-I II• J2'F Au rlr-:w-, Au...
... the DVD Level (DVD Level) 34 1 Adjust the value you want to the selected one. Switching the Sources The unit accepts up to the installation manual. For the connection, refer to 6 sets of the following adjustment/setting values are displayed. ALt :. 1 i AI r-I II• J2'F Au rlr-:w-, Au...

Owners Manual
Page 17
.... 16-EN Na\111\1IX • ' •II -· '.'FF ) ( .,. + 2 •JB ..._ If you c lick [ON], select the setting value. 2 Click ['t'] or L&] to the installation manual. Use ofany other than the one supplied is not recommended. • If the system is equipped with a power amplifier with measurement, resulting in the cabin...
.... 16-EN Na\111\1IX • ' •II -· '.'FF ) ( .,. + 2 •JB ..._ If you c lick [ON], select the setting value. 2 Click ['t'] or L&] to the installation manual. Use ofany other than the one supplied is not recommended. • If the system is equipped with a power amplifier with measurement, resulting in the cabin...
Owners Manual
Page 21
... be placed at shoulder height. • When you can easily load one ofthem as necessary. 3 Turn the Ignition switch of the vehicle to the installation manual. 3 Turn the ignition switch of the vehicle. 2 Preparing the microphone. rr"l t- Q - oTC ::etuu I Rc1u!IEO I ~ : i ( r&#... shquld not be performed ifair-conditioner or heater noise is recommended to measure the acoustic characteristics of the vehicle. 2 Preparing the microphone. ALPINE PXA-HSOO Sound Manager FlltoF : -X Shortcut t .u t(H I I ::: l:'tJ :. 6 When the confirmation message is displayed, check the...
... be placed at shoulder height. • When you can easily load one ofthem as necessary. 3 Turn the Ignition switch of the vehicle to the installation manual. 3 Turn the ignition switch of the vehicle. 2 Preparing the microphone. rr"l t- Q - oTC ::etuu I Rc1u!IEO I ~ : i ( r&#... shquld not be performed ifair-conditioner or heater noise is recommended to measure the acoustic characteristics of the vehicle. 2 Preparing the microphone. ALPINE PXA-HSOO Sound Manager FlltoF : -X Shortcut t .u t(H I I ::: l:'tJ :. 6 When the confirmation message is displayed, check the...

Owners Manual
Page 27
...damage to the speakers. Adjusting to a frequency range outside the recommended value. The crossover limits the frequencies delivered to the respective Owner's Manual. Adjustments should be made according to the recommended crossover frequency of the connected speakers. Before working on the rear deck, setting a ... use with an active crossover. Hint for adjusting the subwoofer If the subwoofer is installed on this point, please consult your authorized Alpine dealer. Hint for adjusting the low range When a subwoofer is connected and you click [Mobile Sound Manager] on the speaker, ...
...damage to the speakers. Adjusting to a frequency range outside the recommended value. The crossover limits the frequencies delivered to the respective Owner's Manual. Adjustments should be made according to the recommended crossover frequency of the connected speakers. Before working on the rear deck, setting a ... use with an active crossover. Hint for adjusting the subwoofer If the subwoofer is installed on this point, please consult your authorized Alpine dealer. Hint for adjusting the low range When a subwoofer is connected and you click [Mobile Sound Manager] on the speaker, ...
Owners Manual
Page 36
... still does not work properly, reset the unit. 1 Press RESET switch with the power of the head unit. 1 Turn the ignition key to the Owner's Manual ofthe head unit.
... still does not work properly, reset the unit. 1 Press RESET switch with the power of the head unit. 1 Turn the ignition key to the Owner's Manual ofthe head unit.

Owners Manual
Page 37
... is not connected: Setting item: Non Effect/Compressed 1/Compressed 2/ Compressed 3/Music 1/Music 2/Music 3/ Cinema/Action/Orama(Talk • For MX Plus, refer to the installation manual.
... is not connected: Setting item: Non Effect/Compressed 1/Compressed 2/ Compressed 3/Music 1/Music 2/Music 3/ Cinema/Action/Orama(Talk • For MX Plus, refer to the installation manual.

Owners Manual
Page 42
... AUX selection screen is pressed during setting, the unit returns to the previous item. • For the connection of a navigation system, refer to the installation manual. 41-EN Settings item: AUX 1/AUX 2/AUX 3/Ai-NET(HU)/Ai- For details, refer to "Storing the Preset Values (Preset Store)" (page 36). The NAVI...
... AUX selection screen is pressed during setting, the unit returns to the previous item. • For the connection of a navigation system, refer to the installation manual. 41-EN Settings item: AUX 1/AUX 2/AUX 3/Ai-NET(HU)/Ai- For details, refer to "Storing the Preset Values (Preset Store)" (page 36). The NAVI...
Owners Manual
Page 44
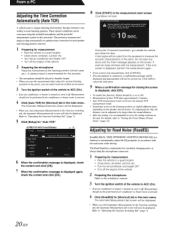
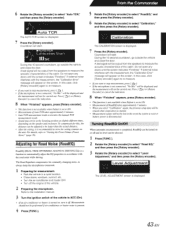
The AUTO TCR screen is displayed. 7 Press the [Rotary encoder]. Countdown will start. ,_ < ' 6 Rotate the [Rotary encoder] to select "Auto TCR," and then press the [Rotary encoder]. '· From the Commander 5 Rotate the [Rotary encoder] to select "RoadEQ;' and then press the [Rotary encoder]. 6 Rotate the [Rotary encoder] to select "Calibration," and then press the [Rotary encoder].
The AUTO TCR screen is displayed. 7 Press the [Rotary encoder]. Countdown will start. ,_ < ' 6 Rotate the [Rotary encoder] to select "Auto TCR," and then press the [Rotary encoder]. '· From the Commander 5 Rotate the [Rotary encoder] to select "RoadEQ;' and then press the [Rotary encoder]. 6 Rotate the [Rotary encoder] to select "Calibration," and then press the [Rotary encoder].
Owners Manual
Page 59
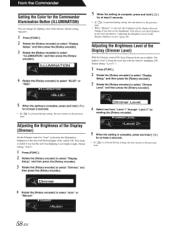
... This always sets the brightness at least 2 seconds. • If{ ~ 1is pressed during setting, the unit returns to the previous item. • When "Manual" is complete, press and hold [ ~ ] for at least 2 seconds. • If{ ~ 1is pressed during setting, the unit returns to the previous ...item. 4 Rotate the [Rotary encoder] to select "Auto" or "Manual." .DIMMER :' >Auto< 58-EN From the Commander Setting the Color for the Commander Illumination Button (ILLUMINATION) You can change ifyou turn on the head/amps...
... This always sets the brightness at least 2 seconds. • If{ ~ 1is pressed during setting, the unit returns to the previous item. • When "Manual" is complete, press and hold [ ~ ] for at least 2 seconds. • If{ ~ 1is pressed during setting, the unit returns to the previous ...item. 4 Rotate the [Rotary encoder] to select "Auto" or "Manual." .DIMMER :' >Auto< 58-EN From the Commander Setting the Color for the Commander Illumination Button (ILLUMINATION) You can change ifyou turn on the head/amps...
Owners Manual
Page 65
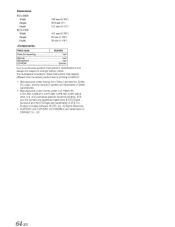
...974,380; 5,978,762; 6,487,535 & other U.S. All Rights Reserved. • EUPHONY and EUPHONY AUTOMOBILE are subject to change without notice. Dimensions PXA-H800 Width Height Depth RUX-C800 Width Height Depth 169 mm (6-3/4") 50.8 mm (2") 215 mm (8-112") 161 mm (6-3/8") 40 mm (1-5/8") 28 mm (1-1/8") ...Parts name I Quantity Parts for mounting 1set Manual 1set Microphone 1set CD-ROM 2pieces Due to continuous product improvement, specifications and design are trademarks of DiMAGIC Co., Ltd. 64-EN ...
...974,380; 5,978,762; 6,487,535 & other U.S. All Rights Reserved. • EUPHONY and EUPHONY AUTOMOBILE are subject to change without notice. Dimensions PXA-H800 Width Height Depth RUX-C800 Width Height Depth 169 mm (6-3/4") 50.8 mm (2") 215 mm (8-112") 161 mm (6-3/8") 40 mm (1-5/8") 28 mm (1-1/8") ...Parts name I Quantity Parts for mounting 1set Manual 1set Microphone 1set CD-ROM 2pieces Due to continuous product improvement, specifications and design are trademarks of DiMAGIC Co., Ltd. 64-EN ...

Owners Manual
Page 67
... FRANCE S.A.R.L. (RCS PONTOISE B 338 101 280) 98, Rue d e Ia Belle Etoile, Z.l. Viale C. l -3, 80807 MUnchen, Germ any Pho ne 089-32 4 2 640 ALPINE ELECTRONICS OF U.K. SYSTEM INTEGRATION AUDIO PROCESSOR PXA-HSOO • INSTALLATION MANUAL • GUIDE D'INSTALLATION • MANUAL DE INSTALACION ALPINE ELECTRONICS MARKETING, INC. 1-1 -8 Nishi Gotanda, S h i n a g a wa- Phone 1-800-ALPINE- No.17, jiushuidong road, Qingdao, China...
... FRANCE S.A.R.L. (RCS PONTOISE B 338 101 280) 98, Rue d e Ia Belle Etoile, Z.l. Viale C. l -3, 80807 MUnchen, Germ any Pho ne 089-32 4 2 640 ALPINE ELECTRONICS OF U.K. SYSTEM INTEGRATION AUDIO PROCESSOR PXA-HSOO • INSTALLATION MANUAL • GUIDE D'INSTALLATION • MANUAL DE INSTALACION ALPINE ELECTRONICS MARKETING, INC. 1-1 -8 Nishi Gotanda, S h i n a g a wa- Phone 1-800-ALPINE- No.17, jiushuidong road, Qingdao, China...

Owners Manual
Page 69
...could disable control of this unit requires special technical skill and experience. can result in case of the PXA-HBOOhas the appropriate amperage. Failure to the unit in injury or material property damage. Any function that penetrates...), or tanks should only be performed after coming to the diagram. When in doubt, consult your Alpine dealer. • The PXA-H800 uses female RCA-type jacks for the intended circuit of a short-circuit. • Be sure to... -board computer). Avoid installing the unit in locations with the manual to become loose resulting in serious injury.
...could disable control of this unit requires special technical skill and experience. can result in case of the PXA-HBOOhas the appropriate amperage. Failure to the unit in injury or material property damage. Any function that penetrates...), or tanks should only be performed after coming to the diagram. When in doubt, consult your Alpine dealer. • The PXA-H800 uses female RCA-type jacks for the intended circuit of a short-circuit. • Be sure to... -board computer). Avoid installing the unit in locations with the manual to become loose resulting in serious injury.
Owners Manual
Page 70
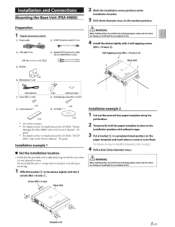
...Manual- Bracket (x4) 3-EN Installation example 2 1 Cut out the external box paper template along the perforation. 2 Temporarily hold the paper template in place at the installation location. 3 Drill (3mm diameter max.) in a predetermined position on how to install and use the CD-ROM, "Sound Manager for PXA-H800... to install the brackets, refer to damage pipes, tanks, electric wires, etc. Installation and Connections Mounting the Base Unit (PXA-HSOO) Preparation 1 Check accessory parts. Installation example 1 • Set the installation location. • Check that the provided...
...Manual- Bracket (x4) 3-EN Installation example 2 1 Cut out the external box paper template along the perforation. 2 Temporarily hold the paper template in place at the installation location. 3 Drill (3mm diameter max.) in a predetermined position on how to install and use the CD-ROM, "Sound Manager for PXA-H800... to install the brackets, refer to damage pipes, tanks, electric wires, etc. Installation and Connections Mounting the Base Unit (PXA-HSOO) Preparation 1 Check accessory parts. Installation example 1 • Set the installation location. • Check that the provided...
Owners Manual
Page 71
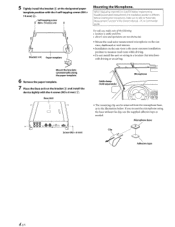
... JmprintEQ or AutoTCR before implement ing RoadEQ automated measurement, the installation position is the most common installation position to "Automatic Measurement Function" in the Owner's Manual- Base Unit .. 1 Screw (M3 x 6 mm) • The mounting clip can be removed from the microphone base, as needed. 5 Tightly install the bracket® at the...
... JmprintEQ or AutoTCR before implement ing RoadEQ automated measurement, the installation position is the most common installation position to "Automatic Measurement Function" in the Owner's Manual- Base Unit .. 1 Screw (M3 x 6 mm) • The mounting clip can be removed from the microphone base, as needed. 5 Tightly install the bracket® at the...

Owners Manual
Page 76
...) L (Left) R I (Right) • For details on each '1\UX INPUT" input pattern, refer to "Setting the AUX Input System (AUX Input System Select)" in the Owners Manual- *3 The allocation patterns for the devices audio input (RCA input) are thefollowing 3 patterns. PC guide, or "Setting the AUX Input System (AUX Input Setup)" in...
...) L (Left) R I (Right) • For details on each '1\UX INPUT" input pattern, refer to "Setting the AUX Input System (AUX Input System Select)" in the Owners Manual- *3 The allocation patterns for the devices audio input (RCA input) are thefollowing 3 patterns. PC guide, or "Setting the AUX Input System (AUX Input Setup)" in...


