
Owners Manual
Page 2
... DO NOT SPLICE INTO ELECTRICAL CABLES. Never cut away cable insulation to supply power to prevent obstructions when driving. Doing so may result in fire, electric shock...KTP-445U will exceed the current carrying capacity of the vehicle and cause fire etc. • KEEP SMALL OBJECTS SUCH AS BOLTS OR SCREWS OUT OF THE REACH OF CHILDREN. Failure to contact, damage or obstruct pipes, fuel lines, tanks or electrical wiring... DRIVING YOUR VEHICLE. can result in serious injury. Always stop . We at ALPINE hope that obstruct or hang up inside and may result in serious injury or death...
... DO NOT SPLICE INTO ELECTRICAL CABLES. Never cut away cable insulation to supply power to prevent obstructions when driving. Doing so may result in fire, electric shock...KTP-445U will exceed the current carrying capacity of the vehicle and cause fire etc. • KEEP SMALL OBJECTS SUCH AS BOLTS OR SCREWS OUT OF THE REACH OF CHILDREN. Failure to contact, damage or obstruct pipes, fuel lines, tanks or electrical wiring... DRIVING YOUR VEHICLE. can result in serious injury. Always stop . We at ALPINE hope that obstruct or hang up inside and may result in serious injury or death...
Owners Manual
Page 4
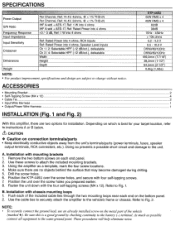
ACCESSORIES • Mounting Bracket ...2 • Self-Tapping Screw (M4 x 12) ...4 • Cable Tie ...2 • Input Wire Harness ...1 • Output/Power Wire Harness ...1 INSTALLATION (Fig. 1 and Fig. 2) With this is best for installation. Use these screws to Fig. 2. Position...to Fig. 1. NOTE: • To securely connect the ground lead, use an already installed screw on the bottom panel. 2. Position the KTP-445U over the screw holes you prepared earlier. 8. Drill the screw holes. 6. Refer to the vehicle's frame or chassis. SPECIFICATIONS Input Sensitivity ...
ACCESSORIES • Mounting Bracket ...2 • Self-Tapping Screw (M4 x 12) ...4 • Cable Tie ...2 • Input Wire Harness ...1 • Output/Power Wire Harness ...1 INSTALLATION (Fig. 1 and Fig. 2) With this is best for installation. Use these screws to Fig. 2. Position...to Fig. 1. NOTE: • To securely connect the ground lead, use an already installed screw on the bottom panel. 2. Position the KTP-445U over the screw holes you prepared earlier. 8. Drill the screw holes. 6. Refer to the vehicle's frame or chassis. SPECIFICATIONS Input Sensitivity ...
Owners Manual
Page 6
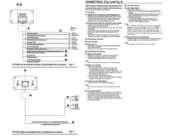
... battery power leads ...wires. REMOTE TURN-ON/ACTIVATION DE LA TELECOMMANDE/ENCENDIDO REMOlD • (Biue/While)/(bleu!blanc)/(Azul!blanco) KTP-445U...power supply wire (accessory power) in fire or electric shock. 8 Output/Power Wire Harness • Speaker Output Wires...wire on or power antenna (positive trigger, (+) 12V only) lead of the vehicle's battery. connect each speaker output wire... (Yellow)/(jaune)/(Amarollo) KTP-445U Left end panei/Le ...power off the RCA jacks, then connect the correct corresponding speaker outputs from the unit's terminals/parts (power... Output/Power Connector &#...
... battery power leads ...wires. REMOTE TURN-ON/ACTIVATION DE LA TELECOMMANDE/ENCENDIDO REMOlD • (Biue/While)/(bleu!blanc)/(Azul!blanco) KTP-445U...power supply wire (accessory power) in fire or electric shock. 8 Output/Power Wire Harness • Speaker Output Wires...wire on or power antenna (positive trigger, (+) 12V only) lead of the vehicle's battery. connect each speaker output wire... (Yellow)/(jaune)/(Amarollo) KTP-445U Left end panei/Le ...power off the RCA jacks, then connect the correct corresponding speaker outputs from the unit's terminals/parts (power... Output/Power Connector &#...


