Owners Manual
Page 6
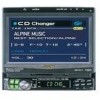
... dust • Excessive vibrations Handling the Detachable Front Panel • Do not expose to the CVA-1004, can be valid. When the car is parked, the selection is made while the car is moving. Alpine products equipped with the Ai-NET bus, connected to rain or water. • Do not drop... or apply shock. Installation Location Make sure the CVA-1004 will be made as when selecting sources using the remote control. This ensures the focus of these ...
... dust • Excessive vibrations Handling the Detachable Front Panel • Do not expose to the CVA-1004, can be valid. When the car is parked, the selection is made while the car is moving. Alpine products equipped with the Ai-NET bus, connected to rain or water. • Do not drop... or apply shock. Installation Location Make sure the CVA-1004 will be made as when selecting sources using the remote control. This ensures the focus of these ...
Owners Manual
Page 8
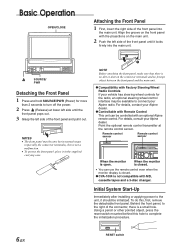
... MD, cassette tapes and a 3-disc changer. For details, contact your Alpine dealer. For details, consult your Alpine dealer. [Controllable with Remote Control This unit can use the remote control even when the monitor display is closed . • You can be initialized. Point the optional remote control transmitter at lower left side of the front panel into... RESET switch Basic Operation OPEN/CLOSE Attaching the Front Panel 1 First, insert the right side of the front panel and pull it out. When the monitor is closed . [CVA-1004 is a small hole.
... MD, cassette tapes and a 3-disc changer. For details, contact your Alpine dealer. For details, consult your Alpine dealer. [Controllable with Remote Control This unit can use the remote control even when the monitor display is closed . • You can be initialized. Point the optional remote control transmitter at lower left side of the front panel into... RESET switch Basic Operation OPEN/CLOSE Attaching the Front Panel 1 First, insert the right side of the front panel and pull it out. When the monitor is closed . [CVA-1004 is a small hole.
Owners Manual
Page 9
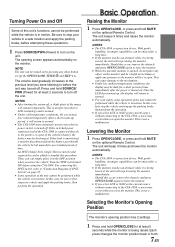
...Under cold temperature conditions, the screen may be enjoyed for a short period of the image will beep 3 times and lower the monitor automatically. Once the LCD has warmed up period, it will stop your vehicle and apply the parking brake, then perform the operation. An SPST (Single-...separately) can simply place it is being lowered, the unit will return to raise the monitor. • When the movable monitor is opened, do not place any object on the optional Remote Control. NOTES • The CVA-1004 is a precision device. This can be dark for a long time. • If ...
...Under cold temperature conditions, the screen may be enjoyed for a short period of the image will beep 3 times and lower the monitor automatically. Once the LCD has warmed up period, it will stop your vehicle and apply the parking brake, then perform the operation. An SPST (Single-...separately) can simply place it is being lowered, the unit will return to raise the monitor. • When the movable monitor is opened, do not place any object on the optional Remote Control. NOTES • The CVA-1004 is a precision device. This can be dark for a long time. • If ...
Owners Manual
Page 19
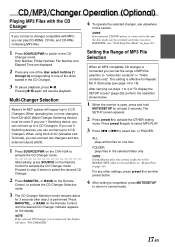
...appears. 2 Press preset 6 to select ALL or FOLDER. Proceed to step 3 below . 1 When the monitor is effective for 3 seconds after step 2 is selected (Refer to "Repeat Play" in the selected folder...switch to the CD Changer mode. Multi-Changer Selection Alpine's Ai-NET system will support up to 6 CD Changers. Alternatively, press SOURCE on the Remote Control to 3 of the discs loaded in this...you can connect two changers and two external outputs (AUX). 1 Press SOURCE/PWR on the CVA-1004 to activate the CD Changer mode. After carrying out steps 1 to activate the CD Changer mode...
...appears. 2 Press preset 6 to select ALL or FOLDER. Proceed to step 3 below . 1 When the monitor is effective for 3 seconds after step 2 is selected (Refer to "Repeat Play" in the selected folder...switch to the CD Changer mode. Multi-Changer Selection Alpine's Ai-NET system will support up to 6 CD Changers. Alternatively, press SOURCE on the Remote Control to 3 of the discs loaded in this...you can connect two changers and two external outputs (AUX). 1 Press SOURCE/PWR on the CVA-1004 to activate the CD Changer mode. After carrying out steps 1 to activate the CD Changer mode...
Owners Manual
Page 38
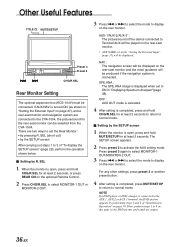
... the External Input" on the rear-seat monitor and the voice guidance will be selected from the CVA-1004. There are connected to the CVA-1004, the picture/sound for at least 2 seconds, or press REAR ON on the optional Remote Control. . 2 Press CHG/R.SEL to select MONITOR-1 OUT or MONITOR-2 OUT. 3 Press g or f to select the mode...
... the External Input" on the rear-seat monitor and the voice guidance will be selected from the CVA-1004. There are connected to the CVA-1004, the picture/sound for at least 2 seconds, or press REAR ON on the optional Remote Control. . 2 Press CHG/R.SEL to select MONITOR-1 OUT or MONITOR-2 OUT. 3 Press g or f to select the mode...

Owners Manual
Page 51
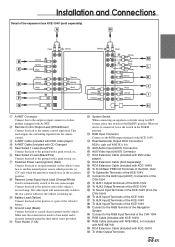
This will allow the backlighting of the CVA-1004 to dim whenever the vehicle's lights are turned on. 9 Remote Turn-On Lead (Blue/White) Connect this lead to the remote turn the power off to the unit before changing the switch position. 8 Illumination Lead (Orange) This lead may be connected to ... (White) ; Antenna Receptacle 49-EN NOTE Be sure turn -on lead of the parking brake switch to transmit the parking brake status signals to the CVA-1004. $ Switched Power Lead (Ignition) (Red) Connect this lead to the vehicle's foot brake lead or brake lamp lead. 4 RGB input Connector 5 Ai...
This will allow the backlighting of the CVA-1004 to dim whenever the vehicle's lights are turned on. 9 Remote Turn-On Lead (Blue/White) Connect this lead to the remote turn the power off to the unit before changing the switch position. 8 Illumination Lead (Orange) This lead may be connected to ... (White) ; Antenna Receptacle 49-EN NOTE Be sure turn -on lead of the parking brake switch to transmit the parking brake status signals to the CVA-1004. $ Switched Power Lead (Ignition) (Red) Connect this lead to the vehicle's foot brake lead or brake lamp lead. 4 RGB input Connector 5 Ai...
Owners Manual
Page 55
... AUX1 Output Terminals of the KCE-104V : To AUX2 Output Terminals of the KCE-104V . To Sound Input Terminals of the KCE-104V (from the remote control. 3 Ai-NET Cable (Included with DVD video player) 4 Ai-NET Cable (Included with CD Changer) 5 Rear Select 1 Lead (Grey/Pink) Connect this lead... KCE-150V) ^ To Video Output Terminals 53-EN Connect to the RGB Terminal of the Navigation System @ Connect to the RGB Input Terminal of the CVA-1004 [ RGB Cable (Included with KCE-104V) \ RGB Cable (Included with NVE-N852, not included with NVE-N871A) ] RCA Extension Cable (Included with KCE-104V) ,...
... AUX1 Output Terminals of the KCE-104V : To AUX2 Output Terminals of the KCE-104V . To Sound Input Terminals of the KCE-104V (from the remote control. 3 Ai-NET Cable (Included with DVD video player) 4 Ai-NET Cable (Included with CD Changer) 5 Rear Select 1 Lead (Grey/Pink) Connect this lead... KCE-150V) ^ To Video Output Terminals 53-EN Connect to the RGB Terminal of the Navigation System @ Connect to the RGB Input Terminal of the CVA-1004 [ RGB Cable (Included with KCE-104V) \ RGB Cable (Included with NVE-N852, not included with NVE-N871A) ] RCA Extension Cable (Included with KCE-104V) ,...


