Owners Manual
Page 8
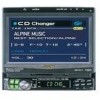
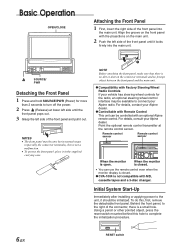
...panel until the front panel pops out. 3 Grasp the left side until it locks firmly into the main unit. For details, contact your Alpine dealer. Initial System Start-Up Immediately after installing or applying power to turn off the power. 2 Press (Release) at the remote control ... the front panel and the main unit. [Compatibility with MD, cassette tapes and a 3-disc changer. NOTE Before attaching the front panel, make sure that there is a small hole. When the monitor is closed . [CVA-1004 is open. Using a pencil or other pointed object, press the reset switch mounted behind this...
...panel until the front panel pops out. 3 Grasp the left side until it locks firmly into the main unit. For details, contact your Alpine dealer. Initial System Start-Up Immediately after installing or applying power to turn off the power. 2 Press (Release) at the remote control ... the front panel and the main unit. [Compatibility with MD, cassette tapes and a 3-disc changer. NOTE Before attaching the front panel, make sure that there is a small hole. When the monitor is closed . [CVA-1004 is open. Using a pencil or other pointed object, press the reset switch mounted behind this...
Owners Manual
Page 16
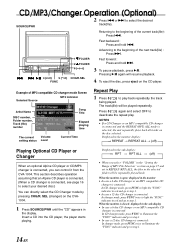
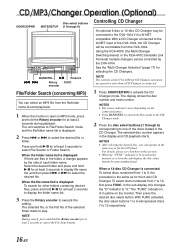
...page 16 to select your desired disc.) You can control it from the CVA-1004. Pressing :/J again will be repeatedly played back. This section describes operation assuming that an Alpine CD player is connected. (When a CD changer is selected, the unit repeatedly plays back all tracks on page 17 and ... to the beginning of MP3 File Selection" section on the disc selected. When the monitor is open: displayed in the monitor • In case a 6-disc CD changer or an MP3 compatible CD changer is connected: In CD changer mode, press FUNC to light the "FUNC" indicator in red and go to step...
...page 16 to select your desired disc.) You can control it from the CVA-1004. Pressing :/J again will be repeatedly played back. This section describes operation assuming that an Alpine CD player is connected. (When a CD changer is selected, the unit repeatedly plays back all tracks on page 17 and ... to the beginning of MP3 File Selection" section on the disc selected. When the monitor is open: displayed in the monitor • In case a 6-disc CD changer or an MP3 compatible CD changer is connected: In CD changer mode, press FUNC to light the "FUNC" indicator in red and go to step...
Owners Manual
Page 18
...disc number appears in the CD Changer. In the sub-display, this section. • When the "FUNC" indicator is lit in red in the monitor, or is lit in the folder, a triangle appears by the CVA-1004. Then press the desired disc select button. Controlling CD Changer An optional 6-disc or 12-...disc CD Changer may be controlled by the side of the CVA-1004, the CD Changer will represent discs 7 to execute ...
...disc number appears in the CD Changer. In the sub-display, this section. • When the "FUNC" indicator is lit in red in the monitor, or is lit in the folder, a triangle appears by the CVA-1004. Then press the desired disc select button. Controlling CD Changer An optional 6-disc or 12-...disc CD Changer may be controlled by the side of the CVA-1004, the CD Changer will represent discs 7 to execute ...
Owners Manual
Page 19
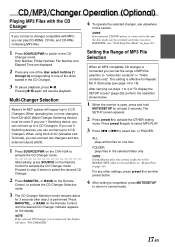
...(see "Switching Disc Mode" on the CVA-1004 to activate the CD Changer mode. Setting the Range of MP3 File Selection When an MP3 compatible CD changer is selected (Refer to "Repeat Play"... step 3 below . 1 When the monitor is effective for 3 seconds after step 2 is not connected, the display will resume playback. NOTE If the selected CD Changer is performed. Press BAND/TEL., or ...normal mode. 17-EN Multi-Changer Selection Alpine's Ai-NET system will support up to the CD Changer mode. If you use 1 Switching device, you can connect two changers and two external outputs (AUX)....
...(see "Switching Disc Mode" on the CVA-1004 to activate the CD Changer mode. Setting the Range of MP3 File Selection When an MP3 compatible CD changer is selected (Refer to "Repeat Play"... step 3 below . 1 When the monitor is effective for 3 seconds after step 2 is not connected, the display will resume playback. NOTE If the selected CD Changer is performed. Press BAND/TEL., or ...normal mode. 17-EN Multi-Changer Selection Alpine's Ai-NET system will support up to the CD Changer mode. If you use 1 Switching device, you can connect two changers and two external outputs (AUX)....
Owners Manual
Page 21
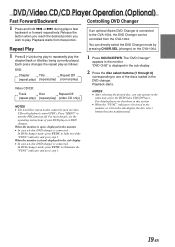
... in this section. • When the "FUNC" indicator is lit in red in the monitor, or is connected to the CVA-1004, the DVD Changer can be used on the CVA-1004. 1 Press SOURCE/PWR. Controlling DVD Changer If an optional Alpine DVD Changer is lit in the sub-display, the disc select buttons become nonfunctional. 19-EN Playback...
... in this section. • When the "FUNC" indicator is lit in red in the monitor, or is connected to the CVA-1004, the DVD Changer can be used on the CVA-1004. 1 Press SOURCE/PWR. Controlling DVD Changer If an optional Alpine DVD Changer is lit in the sub-display, the disc select buttons become nonfunctional. 19-EN Playback...
Owners Manual
Page 26
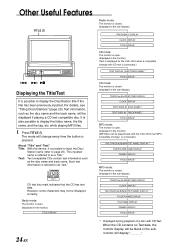
... DISPLAY ↓ CLOCK DISPLAY ↓ TITLE DISPLAY CD mode: The monitor is open. (displayed in the monitor) (Text is displayed for the CVA-1004 when a compatible changer with CD text is connected.) ↓ TEXT DISPLAY (DISC/TRACK NAME)∗1 ↓ TITLE DISPLAY CD mode: The monitor is closed (displayed in the sub-display). ↓ TRACK No...
... DISPLAY ↓ CLOCK DISPLAY ↓ TITLE DISPLAY CD mode: The monitor is open. (displayed in the monitor) (Text is displayed for the CVA-1004 when a compatible changer with CD text is connected.) ↓ TEXT DISPLAY (DISC/TRACK NAME)∗1 ↓ TITLE DISPLAY CD mode: The monitor is closed (displayed in the sub-display). ↓ TRACK No...
Owners Manual
Page 37
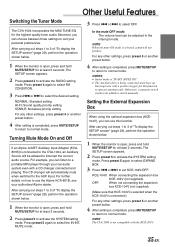
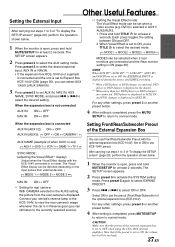
... Press g or f to 3 of "To display the SETUP screen" (page 29), perform the operation shown below . 1 When the monitor is connected to the CVA-1004, an Auxiliary Source will be adjusted in the interrupt mode. Setting the External Expansion Box When using the optional expansion box (KCE104V), you...an Alpine Ai-NET Auxiliary Input Adapter (KCA801B) is open , press and hold MUTE/SETUP for the highest quality tuner audio. For any other settings, press preset 4 or another preset button. 4 After setting is not compatible with a CD changer connected and playing. NOTE The CVA-1004 is ...
... Press g or f to 3 of "To display the SETUP screen" (page 29), perform the operation shown below . 1 When the monitor is connected to the CVA-1004, an Auxiliary Source will be adjusted in the interrupt mode. Setting the External Expansion Box When using the optional expansion box (KCE104V), you...an Alpine Ai-NET Auxiliary Input Adapter (KCA801B) is open , press and hold MUTE/SETUP for the highest quality tuner audio. For any other settings, press preset 4 or another preset button. 4 After setting is not compatible with a CD changer connected and playing. NOTE The CVA-1004 is ...
Owners Manual
Page 38
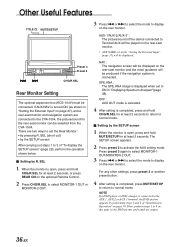
...the rear monitor. NOTE If a DVD player or DVD changer is open , press and hold CHG/R.SEL for at least 2 seconds. If AUX/NAV. There are connected to normal mode. SEL 1 When the monitor is completed, press and hold CHG/R.SEL for at least 2 seconds to return to the CVA-1004, the..., or press REAR ON on the rear-seat monitor. ∗ AUX NAME set the Rear Monitor: • by R. Other Useful Features TITLE MUTE/SETUP gf Preset 3 Preset 5 CHG/R.SEL Rear Monitor Setting The optional expansion box (KCE-104V) must be selected from the CVA-1004. SEL (short cut) • by the ...
...the rear monitor. NOTE If a DVD player or DVD changer is open , press and hold CHG/R.SEL for at least 2 seconds. If AUX/NAV. There are connected to normal mode. SEL 1 When the monitor is completed, press and hold CHG/R.SEL for at least 2 seconds to return to the CVA-1004, the..., or press REAR ON on the rear-seat monitor. ∗ AUX NAME set the Rear Monitor: • by R. Other Useful Features TITLE MUTE/SETUP gf Preset 3 Preset 5 CHG/R.SEL Rear Monitor Setting The optional expansion box (KCE-104V) must be selected from the CVA-1004. SEL (short cut) • by the ...
Owners Manual
Page 39
... IN, and DVD changer is displayed in AUX2 IN. When the expansion box is connected AUX IN (AUX1/2): ON ↔ OFF AUX IN (AUX3): → OFF ↔ ON ↔ CAMERA∗1 ← AUX NAME (example of when AUX1 is set to OFF when using the CVA-1004 internal amplifier. Set ...to ON to ON, the EXTERNAL INPUT is displayed during the source and SIMUL switching. ∗3 When a DVD player or DVD changer is connected, DVD player or DVD changer is displayed in the display. ∗4 When more than two DVD players or DVD changers are connected and the Rear monitor...
... IN, and DVD changer is displayed in AUX2 IN. When the expansion box is connected AUX IN (AUX1/2): ON ↔ OFF AUX IN (AUX3): → OFF ↔ ON ↔ CAMERA∗1 ← AUX NAME (example of when AUX1 is set to OFF when using the CVA-1004 internal amplifier. Set ...to ON to ON, the EXTERNAL INPUT is displayed during the source and SIMUL switching. ∗3 When a DVD player or DVD changer is connected, DVD player or DVD changer is displayed in the display. ∗4 When more than two DVD players or DVD changers are connected and the Rear monitor...
Owners Manual
Page 40
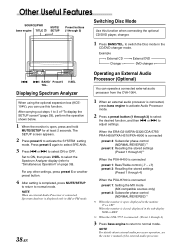
...changer ← g f BAND/ Preset 5 V.SEL TEL. NOTE For details about external audio processor operation, see the owner's manual of "To display the SETUP screen" (page 29), perform the operation shown below. 1 When the monitor is open : displayed in the monitor 0° ↔ 180° When the monitor... normal mode. Displaying Spectrum Analyzer When using the optional expansion box (KCE104V), you can operate a connected external audio processor from the CVA-1004. 1 When an external audio processor is connected: (Preset 1 through 3) to select the desired function, and then g or f...
...changer ← g f BAND/ Preset 5 V.SEL TEL. NOTE For details about external audio processor operation, see the owner's manual of "To display the SETUP screen" (page 29), perform the operation shown below. 1 When the monitor is open : displayed in the monitor 0° ↔ 180° When the monitor... normal mode. Displaying Spectrum Analyzer When using the optional expansion box (KCE104V), you can operate a connected external audio processor from the CVA-1004. 1 When an external audio processor is connected: (Preset 1 through 3) to select the desired function, and then g or f...
Owners Manual
Page 55
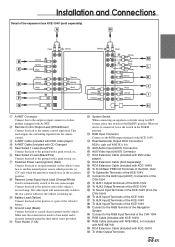
... automatically switch to the rear camera input. When no device is connected, leave the switch in the EQ/DIV position. To Subwoofer Terminals of the CVA-1004 [ RGB Cable (Included with KCE-104V) \ RGB Cable (Included with NVE-N852, not included with NVE-N871A) ] RCA Extension Cable (Included with KCE-... Sound Input Terminals of the KCE-104V (from the remote control. 3 Ai-NET Cable (Included with DVD video player) 4 Ai-NET Cable (Included with CD Changer) 5 Rear Select 1 Lead (Grey/Pink) Connect this lead to the ground with a push switch, etc. 6 Rear Select 2 Lead (Black/Pink) Connect this...
... automatically switch to the rear camera input. When no device is connected, leave the switch in the EQ/DIV position. To Subwoofer Terminals of the CVA-1004 [ RGB Cable (Included with KCE-104V) \ RGB Cable (Included with NVE-N852, not included with NVE-N871A) ] RCA Extension Cable (Included with KCE-... Sound Input Terminals of the KCE-104V (from the remote control. 3 Ai-NET Cable (Included with DVD video player) 4 Ai-NET Cable (Included with CD Changer) 5 Rear Select 1 Lead (Grey/Pink) Connect this lead to the ground with a push switch, etc. 6 Rear Select 2 Lead (Black/Pink) Connect this...

