Owners Manual
Page 47
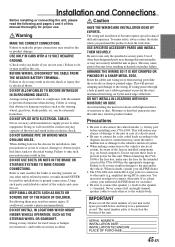
...as not to the diagram. When in doubt, consult your unit in product failure. IMPORTANT Please record the serial number of your ALPINE dealer. • The CVA-1004 uses female RCA-type jacks for the brake or steering systems (or any chance of a short-circuit. • Be sure... connections. Using such parts could disable control of this manual thoroughly for this product to provide power for proper use only the specified accessory parts. Doing so may result in place. SERIAL NUMBER: INSTALLATION DATE: INSTALLATION TECHNICIAN: PLACE OF PURCHASE: 45-EN Arrange wiring and...
...as not to the diagram. When in doubt, consult your unit in product failure. IMPORTANT Please record the serial number of your ALPINE dealer. • The CVA-1004 uses female RCA-type jacks for the brake or steering systems (or any chance of a short-circuit. • Be sure... connections. Using such parts could disable control of this manual thoroughly for this product to provide power for proper use only the specified accessory parts. Doing so may result in place. SERIAL NUMBER: INSTALLATION DATE: INSTALLATION TECHNICIAN: PLACE OF PURCHASE: 45-EN Arrange wiring and...

Owners Manual
Page 51
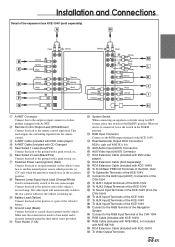
... control interface box. 2 Remote Control Output Lead (White/Brown) Connect this switch in the EQ/DIV position. This will allow the backlighting of the CVA-1004 to dim whenever the vehicle's lights are turned on. 9 Remote Turn-On Lead (Blue/White) Connect this lead to the remote turn the power... chassis ground on or in the NORM position. Make sure the connection is made to bare metal and is connected, leave the switch in the accessory position. % Battery Lead (Yellow) Connect this lead to the remote control input lead. When no device is securely fastened using AiNET feature, place...
... control interface box. 2 Remote Control Output Lead (White/Brown) Connect this switch in the EQ/DIV position. This will allow the backlighting of the CVA-1004 to dim whenever the vehicle's lights are turned on. 9 Remote Turn-On Lead (Blue/White) Connect this lead to the remote turn the power... chassis ground on or in the NORM position. Make sure the connection is made to bare metal and is connected, leave the switch in the accessory position. % Battery Lead (Yellow) Connect this lead to the remote control input lead. When no device is securely fastened using AiNET feature, place...
Owners Manual
Page 55
... switch to the rear camera whenever the vehicle is securely fastened using Ai-NET feature, place this lead to the RGB Input Terminal of the CVA-1004 [ RGB Cable (Included with KCE-104V) \ RGB Cable (Included with NVE-N852, not included with NVE-N871A) ] RCA Extension Cable (Included with... Lead (Black/Pink) Connect this lead to the ground with a push switch, etc. 7 Switched Power Lead (Ignition) (Red) Connect this switch in the accessory position. 8 Reverse Lamp Signal Input Lead (Orange/White) Used to automatically switch to the rear camera input. Make sure the connection is made to bare...
... switch to the rear camera whenever the vehicle is securely fastened using Ai-NET feature, place this lead to the RGB Input Terminal of the CVA-1004 [ RGB Cable (Included with KCE-104V) \ RGB Cable (Included with NVE-N852, not included with NVE-N871A) ] RCA Extension Cable (Included with... Lead (Black/Pink) Connect this lead to the ground with a push switch, etc. 7 Switched Power Lead (Ignition) (Red) Connect this switch in the accessory position. 8 Reverse Lamp Signal Input Lead (Orange/White) Used to automatically switch to the rear camera input. Make sure the connection is made to bare...
