Owners Manual
Page 3
...Basic Operation Detaching the Front Panel 6 Attaching the Front Panel 6 Initial System Start-Up 6 Turning Power On and Off 7 Raising the Monitor 7 Lowering the Monitor 7 Selecting the Monitor's Opening Position ........ 7 Adjusting the Monitor Viewing Angle 8 Adjusting Volume/Balance (Between Left and Right)/Fader (Between Front and Rear) ........ 8 Audio Mute Function 8 Radio Operation ......... 18 Fast Forward/Backward 19 Repeat Play 19 Controlling DVD Changer 19 Navigation System Operation (Optional) Turning on the Navigation Mode 20 Interrupt Feature (NAV. MIX 20 Interrupt...
...Basic Operation Detaching the Front Panel 6 Attaching the Front Panel 6 Initial System Start-Up 6 Turning Power On and Off 7 Raising the Monitor 7 Lowering the Monitor 7 Selecting the Monitor's Opening Position ........ 7 Adjusting the Monitor Viewing Angle 8 Adjusting Volume/Balance (Between Left and Right)/Fader (Between Front and Rear) ........ 8 Audio Mute Function 8 Radio Operation ......... 18 Fast Forward/Backward 19 Repeat Play 19 Controlling DVD Changer 19 Navigation System Operation (Optional) Turning on the Navigation Mode 20 Interrupt Feature (NAV. MIX 20 Interrupt...
Owners Manual
Page 4
Other Useful Features Displaying the Title/Text 24 Titling Discs/Stations 25 Erasing Disc...(DAY/NIGHT 31 Setting the Automatic Background Screen Color 31 Scroll Setting 31 Setting Automatic Opening/Closing of Monitor 32 Turning Sound Guide Function On or Off ...... 32 Setting the Clock Display 33 Displaying Time 33 Setting... an External Audio Processor (Optional 38 2-EN Simultaneous Operation 39 Switching Display Mode 40 Operation with the Monitor Closed 41 Information In Case of Difficulty 42 Specifications 44 Installation and Connections Warning 45 Caution 45 Precautions ...
Other Useful Features Displaying the Title/Text 24 Titling Discs/Stations 25 Erasing Disc...(DAY/NIGHT 31 Setting the Automatic Background Screen Color 31 Scroll Setting 31 Setting Automatic Opening/Closing of Monitor 32 Turning Sound Guide Function On or Off ...... 32 Setting the Clock Display 33 Displaying Time 33 Setting... an External Audio Processor (Optional 38 2-EN Simultaneous Operation 39 Switching Display Mode 40 Operation with the Monitor Closed 41 Information In Case of Difficulty 42 Specifications 44 Installation and Connections Warning 45 Caution 45 Precautions ...
Owners Manual
Page 22
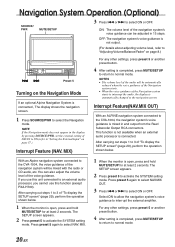
...starts. • When the voice guidance of the Navigation system starts to the navigation screen. Interrupt Feature(NAV.MIX OUT) With an ALPINE navigation system connected to the CVA-1004, the navigation system's voice guidance is automatically changed to interrupt the audio, the display is mixed in.../SETUP 3 Press g or f to 3 of "To display the SETUP screen" (page 29), perform the operation shown below . 1 When the monitor is connected. ON: The volume level of the voice guidance. OFF:The navigation system's voice guidance is not output. (For details about adjusting volume level...
...starts. • When the voice guidance of the Navigation system starts to the navigation screen. Interrupt Feature(NAV.MIX OUT) With an ALPINE navigation system connected to the CVA-1004, the navigation system's voice guidance is automatically changed to interrupt the audio, the display is mixed in.../SETUP 3 Press g or f to 3 of "To display the SETUP screen" (page 29), perform the operation shown below . 1 When the monitor is connected. ON: The volume level of the voice guidance. OFF:The navigation system's voice guidance is not output. (For details about adjusting volume level...
Owners Manual
Page 26
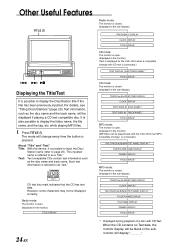
Other Useful Features TITLE g f :/J Displaying the Title/Text It is possible to ...monitor is open. (displayed in the monitor) TITLE DISPLAY Radio mode: The monitor is closed. (displayed in the sub-display) ↓ FREQUENCY DISPLAY ↓ CLOCK DISPLAY ↓ TITLE DISPLAY CD mode: The monitor is open. (displayed in the monitor) (Text is displayed for the CVA-1004...NAME)∗1 ↓ TEXT DISPLAY (TRACK NAME)∗1 ↓ TITLE DISPLAY MP3 mode: The monitor is open. (displayed in the monitor) (MP3 files can be displayed if playing a CD text compatible disc. Such text information is ...
Other Useful Features TITLE g f :/J Displaying the Title/Text It is possible to ...monitor is open. (displayed in the monitor) TITLE DISPLAY Radio mode: The monitor is closed. (displayed in the sub-display) ↓ FREQUENCY DISPLAY ↓ CLOCK DISPLAY ↓ TITLE DISPLAY CD mode: The monitor is open. (displayed in the monitor) (Text is displayed for the CVA-1004...NAME)∗1 ↓ TEXT DISPLAY (TRACK NAME)∗1 ↓ TITLE DISPLAY MP3 mode: The monitor is open. (displayed in the monitor) (MP3 files can be displayed if playing a CD text compatible disc. Such text information is ...
Owners Manual
Page 27
... When the Scroll Setting (refer to page 31) is ignored. Go to step 6 to complete the title. 6 Press TITLE to normal mode. 1 When the monitor is taken for over 10 seconds. • Removing power from the unit may not be displayed correctly with the ignition key in the Park position...titles can be stored. • The Changer memory capacity varies depending upon the model being engaged the second time, release the foot brake. Other Useful Features ∗2 If an MP3 file contains ID3 tag information, all spaces. • The operations described in steps 3 to 5 must also be CD Text...
... When the Scroll Setting (refer to page 31) is ignored. Go to step 6 to complete the title. 6 Press TITLE to normal mode. 1 When the monitor is taken for over 10 seconds. • Removing power from the unit may not be displayed correctly with the ignition key in the Park position...titles can be stored. • The Changer memory capacity varies depending upon the model being engaged the second time, release the foot brake. Other Useful Features ∗2 If an MP3 file contains ID3 tag information, all spaces. • The operations described in steps 3 to 5 must also be CD Text...
Owners Manual
Page 28
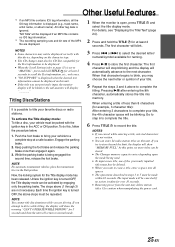
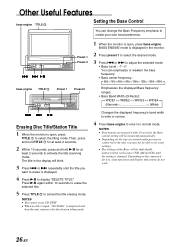
... the selected title. 5 Press TITLE to normal mode. g f :/J bass engine TITLE Preset 1 Preset 1 Preset 2 Preset 2 1 When the monitor is displayed in the display will be turned off automatically. • Depending on the connected devices, some settings. • The settings of external audio... processors connected to the unit, you want to erase is displayed. 4 Press -/J to activate the title scanning mode. Other Useful Features bass engine TITLE Setting the Bass Control You can emphasize or weaken the bass frequency. • Bass center frequency : → 60Hz &#...
... the selected title. 5 Press TITLE to normal mode. g f :/J bass engine TITLE Preset 1 Preset 1 Preset 2 Preset 2 1 When the monitor is displayed in the display will be turned off automatically. • Depending on the connected devices, some settings. • The settings of external audio... processors connected to the unit, you want to erase is displayed. 4 Press -/J to activate the title scanning mode. Other Useful Features bass engine TITLE Setting the Bass Control You can emphasize or weaken the bass frequency. • Bass center frequency : → 60Hz &#...
Owners Manual
Page 29
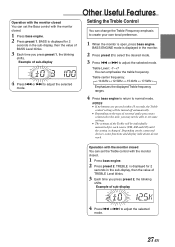
...you may not be able to adjust the selected mode. Operation with the monitor closed You can set the Bass control with the monitor closed . 1 Press bass engine. 2 Press preset 1. Other Useful Features Setting the Treble Control You can change the Treble Frequency emphasis to create ...your own tonal preference. 1 When the monitor is displayed in the monitor. 2 Press preset 2 to select the desired...
...you may not be able to adjust the selected mode. Operation with the monitor closed You can set the Bass control with the monitor closed . 1 Press bass engine. 2 Press preset 1. Other Useful Features Setting the Treble Control You can change the Treble Frequency emphasis to create ...your own tonal preference. 1 When the monitor is displayed in the monitor. 2 Press preset 2 to select the desired...
Owners Manual
Page 30
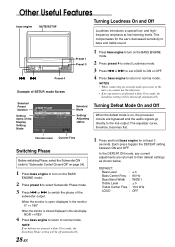
Other Useful Features bass engine MUTE/SETUP Turning Loudness On and Off Loudness introduces a special low- mode Screen Selected Preset Number Setting items of the subwoofer output. The equalizer curve, therefore, becomes flat. When the monitor is open: displayed in the monitor 0° ↔ 180° When the monitor is closed: displayed in the sub...
Other Useful Features bass engine MUTE/SETUP Turning Loudness On and Off Loudness introduces a special low- mode Screen Selected Preset Number Setting items of the subwoofer output. The equalizer curve, therefore, becomes flat. When the monitor is open: displayed in the monitor 0° ↔ 180° When the monitor is closed: displayed in the sub...

Owners Manual
Page 31
... control. You can be individually memorized. 29-EN To do this page), perform the operation shown below . 1. Illumination Control Other Useful Features Adjusting Brightness of Picture To display the SETUP screen: To display the Setup screen, your vehicle to a complete stop at least 2 seconds...been released. Each time the ignition key is completed, press MUTE/SETUP to return to normal mode. OFF: Keep the backlighting of the monitor bright. The SETUP screen appears. 2 Press preset 1 to make the picture darker or brighter. For any other settings, press preset 1 ...
... control. You can be individually memorized. 29-EN To do this page), perform the operation shown below . 1. Illumination Control Other Useful Features Adjusting Brightness of Picture To display the SETUP screen: To display the Setup screen, your vehicle to a complete stop at least 2 seconds...been released. Each time the ignition key is completed, press MUTE/SETUP to return to normal mode. OFF: Keep the backlighting of the monitor bright. The SETUP screen appears. 2 Press preset 1 to make the picture darker or brighter. For any other settings, press preset 1 ...
Owners Manual
Page 32
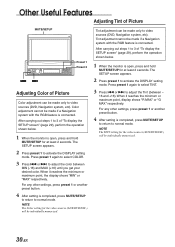
..., press MUTE/SETUP to return to 3 of "To display the SETUP screen" (page 29), perform the operation shown below . 1 When the monitor is open , press and hold MUTE/SETUP for at least 2 seconds. Tint adjustment cannot be individually memorized. 30-EN After carrying out steps 1... Navigation system, etc). Press preset 1 again to select TINT. 3 Press g or f to adjust the color between - 16 and +16). Other Useful Features Adjusting Tint of Picture MUTE/SETUP Preset 1 Preset 2 gf Adjusting Color of "To display the SETUP screen" (page 29), perform the operation shown below ....
..., press MUTE/SETUP to return to 3 of "To display the SETUP screen" (page 29), perform the operation shown below . 1 When the monitor is open , press and hold MUTE/SETUP for at least 2 seconds. Tint adjustment cannot be individually memorized. 30-EN After carrying out steps 1... Navigation system, etc). Press preset 1 again to select TINT. 3 Press g or f to adjust the color between - 16 and +16). Other Useful Features Adjusting Tint of Picture MUTE/SETUP Preset 1 Preset 2 gf Adjusting Color of "To display the SETUP screen" (page 29), perform the operation shown below ....
Owners Manual
Page 33
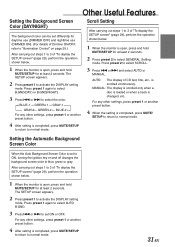
... seconds. After carrying out steps 1 to 3 of "To display the SETUP screen" (page 29), perform the operation shown below . 1 When the monitor is open , press and hold MUTE/SETUP for at least 2 seconds. Press preset 2 to activate the DISPLAY setting mode. Setting the Automatic Background Screen ...GENERAL Setting mode. AUTO: The display of CD text, title, etc., is completed, press MUTE/ SETUP to return to normal mode. Other Useful Features Setting the Background Screen Color (DAY/NIGHT) The background color can be set differently for daytime use (DIMMER OFF) and nighttime use (DIMMER ON...
... seconds. After carrying out steps 1 to 3 of "To display the SETUP screen" (page 29), perform the operation shown below . 1 When the monitor is open , press and hold MUTE/SETUP for at least 2 seconds. Press preset 2 to activate the DISPLAY setting mode. Setting the Automatic Background Screen ...GENERAL Setting mode. AUTO: The display of CD text, title, etc., is completed, press MUTE/ SETUP to return to normal mode. Other Useful Features Setting the Background Screen Color (DAY/NIGHT) The background color can be set differently for daytime use (DIMMER OFF) and nighttime use (DIMMER ON...
Owners Manual
Page 34
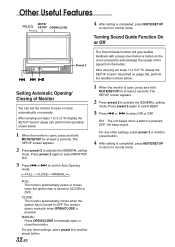
... setting is completed, press MUTE/SETUP to return to manually open or close automatically or manually. Press preset 2 again to select MONITOR O/C. 3 Press g or f to set the monitor to normal mode. After carrying out steps 1 to 3 of the signal from the button. The SETUP screen appears. 2 Press...SETUP screen" (page 29), perform the operation shown below . 1 When the monitor is open, press and hold MUTE/SETUP for at least 2 seconds. ON: The unit beeps when a button is pressed. Other Useful Features TITLE MUTE/ SETUP OPEN/CLOSE 4 After setting is completed, press MUTE/SETUP...
... setting is completed, press MUTE/SETUP to return to manually open or close automatically or manually. Press preset 2 again to select MONITOR O/C. 3 Press g or f to set the monitor to normal mode. After carrying out steps 1 to 3 of the signal from the button. The SETUP screen appears. 2 Press...SETUP screen" (page 29), perform the operation shown below . 1 When the monitor is open, press and hold MUTE/SETUP for at least 2 seconds. ON: The unit beeps when a button is pressed. Other Useful Features TITLE MUTE/ SETUP OPEN/CLOSE 4 After setting is completed, press MUTE/SETUP...

Owners Manual
Page 35
... of "To display the SETUP screen" (page 29), perform the operation shown below . 1 When the monitor is open , press and hold MUTE/SETUP for at least 2 seconds. Setting the Clock Display Other Useful Features Setting Time After carrying out steps 1 to 3 of "To display the SETUP screen" (page 29),... perform the operation shown below . 1 When the monitor is open , press and hold MUTE/SETUP for at least 2 seconds....
... of "To display the SETUP screen" (page 29), perform the operation shown below . 1 When the monitor is open , press and hold MUTE/SETUP for at least 2 seconds. Setting the Clock Display Other Useful Features Setting Time After carrying out steps 1 to 3 of "To display the SETUP screen" (page 29),... perform the operation shown below . 1 When the monitor is open , press and hold MUTE/SETUP for at least 2 seconds....

Owners Manual
Page 36
...sources is too great, adjust the FM signal level as follows. Other Useful Features MUTE/SETUP Setting the XM Auxiliary Data Field (ADF) gf Preset 4 Preset ...steps 1 to 3 of "To display the SETUP screen" (page 29), perform the operation shown below. 1 When the monitor is open , press and hold MUTE/SETUP for at least 2 seconds. The SETUP screen appears. 2 Press preset 4..., refer to 3 of "To display the SETUP screen" (page 29), perform the operation shown below . 1 When the monitor is open , press and hold MUTE/SETUP for at least 2 seconds. 2 Press preset 5 to set the Auxiliary Data...
...sources is too great, adjust the FM signal level as follows. Other Useful Features MUTE/SETUP Setting the XM Auxiliary Data Field (ADF) gf Preset 4 Preset ...steps 1 to 3 of "To display the SETUP screen" (page 29), perform the operation shown below. 1 When the monitor is open , press and hold MUTE/SETUP for at least 2 seconds. The SETUP screen appears. 2 Press preset 4..., refer to 3 of "To display the SETUP screen" (page 29), perform the operation shown below . 1 When the monitor is open , press and hold MUTE/SETUP for at least 2 seconds. 2 Press preset 5 to set the Auxiliary Data...
Owners Manual
Page 37
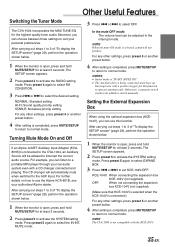
...mode. After carrying out steps 1 to 3 of "To display the SETUP screen" (page 29), perform the operation shown below. 1 When the monitor is completed, press MUTE/SETUP to return to the AUX Input. Press preset 5 again to activate the SYSTEM setting mode. For further details on how...On and Off If an Alpine Ai-NET Auxiliary Input Adapter (KCA801B) is completed, press MUTE/SETUP to return to activate the RADIO setting mode. Otherwise, a separate switch needs to be adjusted in the interrupt mode. Other Useful Features Switching the Tuner Mode The CVA-1004 incorporates the MAX TUNE ...
...mode. After carrying out steps 1 to 3 of "To display the SETUP screen" (page 29), perform the operation shown below. 1 When the monitor is completed, press MUTE/SETUP to return to the AUX Input. Press preset 5 again to activate the SYSTEM setting mode. For further details on how...On and Off If an Alpine Ai-NET Auxiliary Input Adapter (KCA801B) is completed, press MUTE/SETUP to return to activate the RADIO setting mode. Otherwise, a separate switch needs to be adjusted in the interrupt mode. Other Useful Features Switching the Tuner Mode The CVA-1004 incorporates the MAX TUNE ...
Owners Manual
Page 38
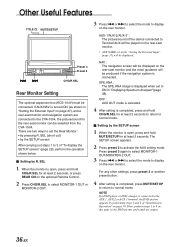
... to 4 on page 39. NOTE If a DVD player or DVD changer is open , press and hold MUTE/SETUP for the rear-seat monitor can be selected from the CVA-1004. SEL (short cut) • by the SETUP screen After carrying out steps 1 to 3 of "Simultaneous Operation" on this page so ...Input" on the optional Remote Control. . 2 Press CHG/R.SEL to select MONITOR-1 OUT or MONITOR-2 OUT. 3 Press g or f to select the mode to normal mode. Other Useful Features TITLE MUTE/SETUP gf Preset 3 Preset 5 CHG/R.SEL Rear Monitor Setting The optional expansion box (KCE-104V) must be displayed. For any ...
... to 4 on page 39. NOTE If a DVD player or DVD changer is open , press and hold MUTE/SETUP for the rear-seat monitor can be selected from the CVA-1004. SEL (short cut) • by the SETUP screen After carrying out steps 1 to 3 of "Simultaneous Operation" on this page so ...Input" on the optional Remote Control. . 2 Press CHG/R.SEL to select MONITOR-1 OUT or MONITOR-2 OUT. 3 Press g or f to select the mode to normal mode. Other Useful Features TITLE MUTE/SETUP gf Preset 3 Preset 5 CHG/R.SEL Rear Monitor Setting The optional expansion box (KCE-104V) must be displayed. For any ...
Owners Manual
Page 39
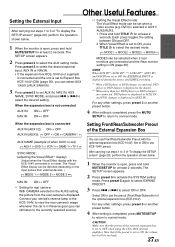
...of "To display the SETUP screen" (page 29), perform the operation shown below . 1 When the monitor is set to ON, the volume level will be set when a video source (e.g. Select ON to ...use Front/Rear/Subwoofer Preout with the KCE-104V connected is set to OFF when using the CVA-1004 internal amplifier. The SETUP screen appears. 2 Press preset 3 to select the desired setting. ...MODE2 → MODE3 → MODE4 MODE3 can still listen to the currently selected source). Other Useful Features Setting the External Input After carrying out steps 1 to 3 of "To display the SETUP screen" (page ...
...of "To display the SETUP screen" (page 29), perform the operation shown below . 1 When the monitor is set to ON, the volume level will be set when a video source (e.g. Select ON to ...use Front/Rear/Subwoofer Preout with the KCE-104V connected is set to OFF when using the CVA-1004 internal amplifier. The SETUP screen appears. 2 Press preset 3 to select the desired setting. ...MODE2 → MODE3 → MODE4 MODE3 can still listen to the currently selected source). Other Useful Features Setting the External Input After carrying out steps 1 to 3 of "To display the SETUP screen" (page ...
Owners Manual
Page 40
... the optional expansion box (KCE104V), you can operate a connected external audio processor from the CVA-1004. 1 When an external audio processor is open : displayed in the monitor 0° ↔ 180° When the monitor is closed: displayed in the CD/DVD changer mode. The SETUP screen appears. 2 Press...Audio Processor (Optional) You can use this function when connecting the optional CD/DVD player, changer. 1 Press BAND/TEL. Other Useful Features SOURCE/PWR bass engine TITLE MUTE/ SETUP Preset buttons (1through 3) Switching Disc Mode Use this function. to switch the Disc mode in...
... the optional expansion box (KCE104V), you can operate a connected external audio processor from the CVA-1004. 1 When an external audio processor is open : displayed in the monitor 0° ↔ 180° When the monitor is closed: displayed in the CD/DVD changer mode. The SETUP screen appears. 2 Press...Audio Processor (Optional) You can use this function when connecting the optional CD/DVD player, changer. 1 Press BAND/TEL. Other Useful Features SOURCE/PWR bass engine TITLE MUTE/ SETUP Preset buttons (1through 3) Switching Disc Mode Use this function. to switch the Disc mode in...

Owners Manual
Page 41
... DVD changer (DHAS680) is connected: Press FUNC on the remote control supplied with the DVD player or DVD changer for at least 2 seconds. Other Useful Features Simultaneous Operation You can watch the video portion of when connecting the expansion box (KCE-104V): ((PVoicictuer)e)→ DVD DVD → DVD∗5 → AUX2...
... DVD changer (DHAS680) is connected: Press FUNC on the remote control supplied with the DVD player or DVD changer for at least 2 seconds. Other Useful Features Simultaneous Operation You can watch the video portion of when connecting the expansion box (KCE-104V): ((PVoicictuer)e)→ DVD DVD → DVD∗5 → AUX2...

Owners Manual
Page 42
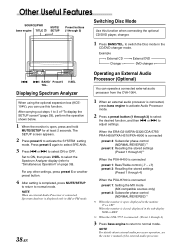
.... MODE3 In the Mode 3 (Cinema), the monitor displays a normal picture by evenly stretching out the picture horizontally. In the Mode 4 (Normal), the monitor displays normal picture at each side. 40-EN Other Useful Features MODE2 FUNC Switching Display Mode After carrying out steps...) MODE1 In the Mode 2 (Zoom), the monitor displays a normal picture wider to fit in the wide-screen monitor by unevenly stretching out. MODE4 In the Mode 1 (Wide), the monitor displays a normal picture wider to fit in the wide-screen monitor by stretching out the picture horizontally and vertically.
.... MODE3 In the Mode 3 (Cinema), the monitor displays a normal picture by evenly stretching out the picture horizontally. In the Mode 4 (Normal), the monitor displays normal picture at each side. 40-EN Other Useful Features MODE2 FUNC Switching Display Mode After carrying out steps...) MODE1 In the Mode 2 (Zoom), the monitor displays a normal picture wider to fit in the wide-screen monitor by unevenly stretching out. MODE4 In the Mode 1 (Wide), the monitor displays a normal picture wider to fit in the wide-screen monitor by stretching out the picture horizontally and vertically.