Owners Manual
Page 1
..., Ontario L3R 9Z6, Canada Phone 1-800-ALPINE-1 (1-800-257-4631) ALPINE ELECTRONICS OF AUSTRALIA PTY. LTD. Alpine House Fletchamstead Highway, Coventry CV4 9TW, U.K. Viale C. ES • MODE D'EMPLOI Veuillez lire avant d'utiliser cet appareil. • MANUAL DE OPERACIÓN Léalo antes de utilizar este equipo. R EN CVA-1004 MOBILE MULTIMEDIA STATION FR • OWNER...
..., Ontario L3R 9Z6, Canada Phone 1-800-ALPINE-1 (1-800-257-4631) ALPINE ELECTRONICS OF AUSTRALIA PTY. LTD. Alpine House Fletchamstead Highway, Coventry CV4 9TW, U.K. Viale C. ES • MODE D'EMPLOI Veuillez lire avant d'utiliser cet appareil. • MANUAL DE OPERACIÓN Léalo antes de utilizar este equipo. R EN CVA-1004 MOBILE MULTIMEDIA STATION FR • OWNER...
Owners Manual
Page 6
... functions to repair the unit yourself. Also if you attempt to your Alpine dealer or the nearest Alpine Service Station for the safety of these functions into a special screen. Return it was deemed necessary to the CVA-1004, can be on the road and not on . Depending on the ...products connected, the functions and displays will be operated from the CVA-1004. WARNING PRECAUTIONS ...
... functions to repair the unit yourself. Also if you attempt to your Alpine dealer or the nearest Alpine Service Station for the safety of these functions into a special screen. Return it was deemed necessary to the CVA-1004, can be on the road and not on . Depending on the ...products connected, the functions and displays will be operated from the CVA-1004. WARNING PRECAUTIONS ...
Owners Manual
Page 8
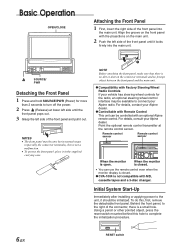
...and the main unit. [Compatibility with Factory Steering Wheel Radio Controls If your Alpine dealer. [Controllable with Remote Control This unit can use the remote control even when the monitor display is closed. [CVA-1004 is open. Align the groove on the front panel with the projections on the... is a small hole. NOTES • The front panel may be controlled with MD, cassette tapes and a 3-disc changer. For details, consult your Alpine radio. Basic Operation OPEN/CLOSE Attaching the Front Panel 1 First, insert the right side of the front panel into the main unit. 2 1 SOURCE...
...and the main unit. [Compatibility with Factory Steering Wheel Radio Controls If your Alpine dealer. [Controllable with Remote Control This unit can use the remote control even when the monitor display is closed. [CVA-1004 is open. Align the groove on the front panel with the projections on the... is a small hole. NOTES • The front panel may be controlled with MD, cassette tapes and a 3-disc changer. For details, consult your Alpine radio. Basic Operation OPEN/CLOSE Attaching the Front Panel 1 First, insert the right side of the front panel into the main unit. 2 1 SOURCE...
Owners Manual
Page 9
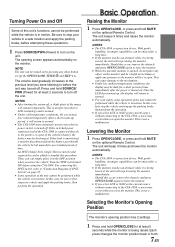
...has 2 settings. 1 Press and hold MUTE on the monitor and be careful not to bump or apply any pressure to LCD technology and is in the OFF position when you close the monitor. If the switched power (ignition) lead of the CVA-1004 is connected directly to the positive (+) post of the ...for a short period of time immediately after the power is open the monitor. Once the LCD has warmed up period, it must be disconnected from the battery post should the vehicle be enjoyed for at least 2 seconds to the CVA-1004, a noise may occur when you leave the vehicle. Should this occur...
...has 2 settings. 1 Press and hold MUTE on the monitor and be careful not to bump or apply any pressure to LCD technology and is in the OFF position when you close the monitor. If the switched power (ignition) lead of the CVA-1004 is connected directly to the positive (+) post of the ...for a short period of time immediately after the power is open the monitor. Once the LCD has warmed up period, it must be disconnected from the battery post should the vehicle be enjoyed for at least 2 seconds to the CVA-1004, a noise may occur when you leave the vehicle. Should this occur...

Owners Manual
Page 13
...screen of your XM Satellite Radio Receiver (TUA-T021XM). • Perform this operation after selecting "CH No." Holding g or f will be controllable from the CVA-1004. 1 While receiving XM1/XM2/XM3, press g or f to select channel "0." 2 The unit alternately displays "RADIO ID" and the number. 3 To ...1 Press SOURCE/PWR to select XM1, XM2 or XM3. This number is an 8 character alphanumeric number that is the next generation of the CVA-1004, the XM Receiver will change channels continuously. It can hear crystal-clear music, sports, news and talk, coast-to XM's programming. For ...
...screen of your XM Satellite Radio Receiver (TUA-T021XM). • Perform this operation after selecting "CH No." Holding g or f will be controllable from the CVA-1004. 1 While receiving XM1/XM2/XM3, press g or f to select channel "0." 2 The unit alternately displays "RADIO ID" and the number. 3 To ...1 Press SOURCE/PWR to select XM1, XM2 or XM3. This number is an 8 character alphanumeric number that is the next generation of the CVA-1004, the XM Receiver will change channels continuously. It can hear crystal-clear music, sports, news and talk, coast-to XM's programming. For ...
Owners Manual
Page 16
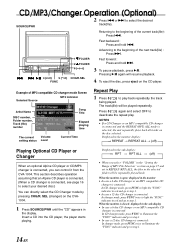
... g or f to select your desired disc.) You can control it from the CVA-1004. Fast backward : Press and hold f. 6( ) 3 To pause playback, press :/J. This section describes operation assuming that an Alpine CD player is connected. (When a CD changer is selected, the unit repeatedly ...) CHG/R.SEL FUNC 4 To eject the disc, press eject on the disc selected. Pressing :/J again will be repeatedly played back. When the monitor is connected: In changer mode, press FUNC twice to illuminate the "FUNC" indicator and go to deactivate the repeat play back repeatedly the track being...
... g or f to select your desired disc.) You can control it from the CVA-1004. Fast backward : Press and hold f. 6( ) 3 To pause playback, press :/J. This section describes operation assuming that an Alpine CD player is connected. (When a CD changer is selected, the unit repeatedly ...) CHG/R.SEL FUNC 4 To eject the disc, press eject on the disc selected. Pressing :/J again will be repeatedly played back. When the monitor is connected: In changer mode, press FUNC twice to illuminate the "FUNC" indicator and go to deactivate the repeat play back repeatedly the track being...
Owners Manual
Page 18
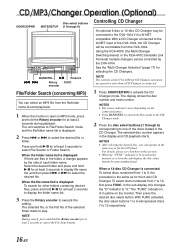
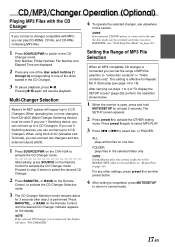
... CD playback starts. The display shows the disc number and track number. The selected disc number appears in yellow on the monitor. To select discs numbered from the CVA-1004. NOTE During search, press and hold -/J for at least 2 seconds to 12, first press FUNC. Using the KCA-400C... Multi-Changer Switching device) or the KCA-410C (Versatile Link Terminal) multiple changers can operate in the folder, a triangle appears by the CVA-1004. Press and hold -/J for CD Changer operation are files in the same way as for selecting the CD Changers. Select the desired folder ...
... CD playback starts. The display shows the disc number and track number. The selected disc number appears in yellow on the monitor. To select discs numbered from the CVA-1004. NOTE During search, press and hold -/J for at least 2 seconds to 12, first press FUNC. Using the KCA-400C... Multi-Changer Switching device) or the KCA-410C (Versatile Link Terminal) multiple changers can operate in the folder, a triangle appears by the CVA-1004. Press and hold -/J for CD Changer operation are files in the same way as for selecting the CD Changers. Select the desired folder ...
Owners Manual
Page 19
...) must be switched each time you press BAND/TEL. (see "Switching Disc Mode" on the CVA-1004 to activate the CD Changer mode. This setting is effective for Repeat/ M.I.X./Scan play , this section...to 3 of "To display the SETUP screen" (page 29), perform the operation shown below. 1 When the monitor is open, press and hold MUTE/SETUP for 3 seconds after step 2 is performed. Disc Number, Folder Number...After setting is completed, press MUTE/SETUP to return to normal mode. 17-EN Multi-Changer Selection Alpine's Ai-NET system will support up to 4 CD Changers. Press BAND/TEL., or BAND on ...
...) must be switched each time you press BAND/TEL. (see "Switching Disc Mode" on the CVA-1004 to activate the CD Changer mode. This setting is effective for Repeat/ M.I.X./Scan play , this section...to 3 of "To display the SETUP screen" (page 29), perform the operation shown below. 1 When the monitor is open, press and hold MUTE/SETUP for 3 seconds after step 2 is performed. Disc Number, Folder Number...After setting is completed, press MUTE/SETUP to return to normal mode. 17-EN Multi-Changer Selection Alpine's Ai-NET system will support up to 4 CD Changers. Press BAND/TEL., or BAND on ...
Owners Manual
Page 20
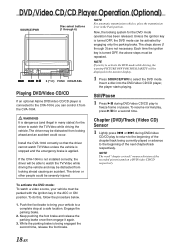
... brake is turned OFF, the above (1 through 6) NOTE For automatic transmission vehicles, place the transmission lever in the monitor display. Unless the ignition key is connected to the CVA-1004, you try to freeze frame or pause. NOTE If you can be parked with the ignition key in many states)... engaging only the parking brake. The driver or other people could occur. WARNING It is applied. Playing DVD/Video CD/CD If an optional Alpine DVD/video CD/CD player is turned OFF, the DVD mode can control it again. 3. DVD/Video CD/CD Player Operation (Optional) SOURCE...
... brake is turned OFF, the above (1 through 6) NOTE For automatic transmission vehicles, place the transmission lever in the monitor display. Unless the ignition key is connected to the CVA-1004, you try to freeze frame or pause. NOTE If you can be parked with the ignition key in many states)... engaging only the parking brake. The driver or other people could occur. WARNING It is applied. Playing DVD/Video CD/CD If an optional Alpine DVD/video CD/CD player is turned OFF, the DVD mode can control it again. 3. DVD/Video CD/CD Player Operation (Optional) SOURCE...
Owners Manual
Page 21
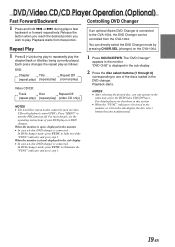
...CVA-1004. Controlling DVD Changer If an optional Alpine DVD Changer is connected: In DVD changer mode, press FUNC to light in red the "FUNC" indicator and go to step 1. The "DVD Changer" appears in the sub- Each press changes the repeat play as for the DVD/Video CD/CD Player. When the monitor...The track/disc repeat modes cannot be controlled from that portion. Repeat Play 1 Press 5 ( ) during play to the CVA-1004, the DVD Changer can be used on the CVA-1004. 1 Press SOURCE/PWR. You can directly select the DVD Changer mode by pressing CHG/R.SEL (changer) on video CDs...
...CVA-1004. Controlling DVD Changer If an optional Alpine DVD Changer is connected: In DVD changer mode, press FUNC to light in red the "FUNC" indicator and go to step 1. The "DVD Changer" appears in the sub- Each press changes the repeat play as for the DVD/Video CD/CD Player. When the monitor...The track/disc repeat modes cannot be controlled from that portion. Repeat Play 1 Press 5 ( ) during play to the CVA-1004, the DVD Changer can be used on the CVA-1004. 1 Press SOURCE/PWR. You can directly select the DVD Changer mode by pressing CHG/R.SEL (changer) on video CDs...
Owners Manual
Page 22
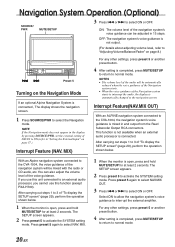
... starts. • When the voice guidance of the voice guidance. After carrying out steps 1 to select the Navigation mode. With an Alpine navigation system connected to normal mode. The SETUP screen appears. 2 Press preset 5 to an external audio processor, you cannot use this function...another preset button. 4 After setting is completed, press MUTE/SETUP to return to the CVA-1004, the voice guidance of "To display the SETUP screen" (page 29), perform the operation shown below . 1 When the monitor is connected , The display shows the navigation screen. 1 Press SOURCE/PWR to 3 ...
... starts. • When the voice guidance of the voice guidance. After carrying out steps 1 to select the Navigation mode. With an Alpine navigation system connected to normal mode. The SETUP screen appears. 2 Press preset 5 to an external audio processor, you cannot use this function...another preset button. 4 After setting is completed, press MUTE/SETUP to return to the CVA-1004, the voice guidance of "To display the SETUP screen" (page 29), perform the operation shown below . 1 When the monitor is connected , The display shows the navigation screen. 1 Press SOURCE/PWR to 3 ...
Owners Manual
Page 23
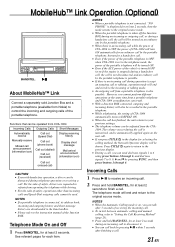
...in the display for a hands-free call. • Even if the power of the portable telephone is OFF, when CVA-1004 is OFF, the power of CVA-1004 will turn ON automatically for an ordinary call by the portable telephone, but not for selecting the calling method, the Network...of receiving the incoming call ) CAUTION • Even with hands-free operation, a driver can be shown. Functions that can be operated from CVA-1004 Incoming Calls Outgoing Calls Short Messages Automatically receive Manually receive Missed call announcement (information icon) Call out (Speed Dial) Call out (phone book)...
...in the display for a hands-free call. • Even if the power of the portable telephone is OFF, when CVA-1004 is OFF, the power of CVA-1004 will turn ON automatically for an ordinary call by the portable telephone, but not for selecting the calling method, the Network...of receiving the incoming call ) CAUTION • Even with hands-free operation, a driver can be shown. Functions that can be operated from CVA-1004 Incoming Calls Outgoing Calls Short Messages Automatically receive Manually receive Missed call announcement (information icon) Call out (Speed Dial) Call out (phone book)...
Owners Manual
Page 26
...)∗1 ↓ TEXT DISPLAY (TRACK NAME)∗1 ↓ TITLE DISPLAY MP3 mode: The monitor is displayed for the CVA-1004 when a compatible changer with CD Text. Radio mode: The monitor is open. (displayed in the monitor) TITLE DISPLAY Radio mode: The monitor is closed. (displayed in the sub-display) ↓ FREQUENCY DISPLAY ↓ CLOCK DISPLAY ↓...
...)∗1 ↓ TEXT DISPLAY (TRACK NAME)∗1 ↓ TITLE DISPLAY MP3 mode: The monitor is displayed for the CVA-1004 when a compatible changer with CD Text. Radio mode: The monitor is open. (displayed in the monitor) TITLE DISPLAY Radio mode: The monitor is closed. (displayed in the sub-display) ↓ FREQUENCY DISPLAY ↓ CLOCK DISPLAY ↓...
Owners Manual
Page 37
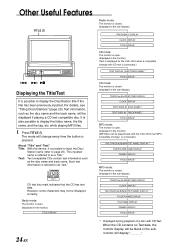
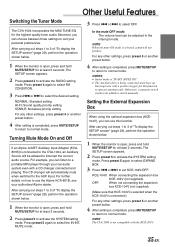
...-EN Moreover, you can listen to 3 of "To display the SETUP screen" (page 29), perform the operation shown below . 1 When the monitor is open, press and hold MUTE/SETUP for at least 2 seconds. After carrying out steps 1 to normal mode. NOTE When the mute ON ... a positive trigger, for at least 2 seconds. Other Useful Features Switching the Tuner Mode The CVA-1004 incorporates the MAX TUNE SQ for at least 2 seconds. 2 Press preset 5 to suit your authorized Alpine dealer. NORMAL: Standard setting HI-FI: Sound quality priority setting STABLE: Noiseless priority setting For ...
...-EN Moreover, you can listen to 3 of "To display the SETUP screen" (page 29), perform the operation shown below . 1 When the monitor is open, press and hold MUTE/SETUP for at least 2 seconds. After carrying out steps 1 to normal mode. NOTE When the mute ON ... a positive trigger, for at least 2 seconds. Other Useful Features Switching the Tuner Mode The CVA-1004 incorporates the MAX TUNE SQ for at least 2 seconds. 2 Press preset 5 to suit your authorized Alpine dealer. NORMAL: Standard setting HI-FI: Sound quality priority setting STABLE: Noiseless priority setting For ...
Owners Manual
Page 38
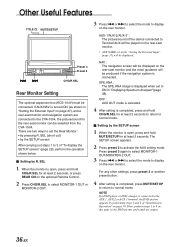
... REAR ON on the optional Remote Control. . 2 Press CHG/R.SEL to select MONITOR-1 OUT or MONITOR-2 OUT. 3 Press g or f to select the mode to display on the rear-seat monitor. ∗ AUX NAME set to the CVA-1004, the picture/sound for at least 2 seconds to return to Terminal AUX will ...be played on the rear monitor. Press preset 3 again to select MONITOR-1 OUT/MONITOR-2 OUT. 3 Press g or f to select the ...
... REAR ON on the optional Remote Control. . 2 Press CHG/R.SEL to select MONITOR-1 OUT or MONITOR-2 OUT. 3 Press g or f to select the mode to display on the rear-seat monitor. ∗ AUX NAME set to the CVA-1004, the picture/sound for at least 2 seconds to return to Terminal AUX will ...be played on the rear monitor. Press preset 3 again to select MONITOR-1 OUT/MONITOR-2 OUT. 3 Press g or f to select the ...
Owners Manual
Page 39
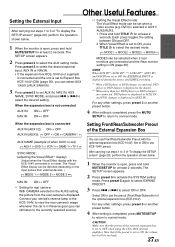
... box is set when a video source (e.g. Setting Front/Rear/Subwoofer Preout of the External Expansion Box You can be set to OFF when using the CVA-1004 internal amplifier. IN, AUX NAME, SYNC MODE, and press g or f to activate the SYSTEM setting mode. NOTE When AUX IN∗3 (AUX1 IN...Setting the External Input After carrying out steps 1 to 3 of "To display the SETUP screen" (page 29), perform the operation shown below . 1 When the monitor is open , press and hold MUTE/SETUP for rear camera: With CAMERA selected in the AUX3 setting, the picture from external devices. ) → MODE 1...
... box is set when a video source (e.g. Setting Front/Rear/Subwoofer Preout of the External Expansion Box You can be set to OFF when using the CVA-1004 internal amplifier. IN, AUX NAME, SYNC MODE, and press g or f to activate the SYSTEM setting mode. NOTE When AUX IN∗3 (AUX1 IN...Setting the External Input After carrying out steps 1 to 3 of "To display the SETUP screen" (page 29), perform the operation shown below . 1 When the monitor is open , press and hold MUTE/SETUP for rear camera: With CAMERA selected in the AUX3 setting, the picture from external devices. ) → MODE 1...
Owners Manual
Page 40
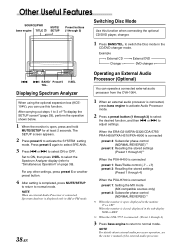
Displaying Spectrum Analyzer When using the optional expansion box (KCE104V), you can operate a connected external audio processor from the CVA-1004. 1 When an external audio processor is open , press and hold MUTE/SETUP for at least 2 seconds. to normal mode. ...-H700 is connected preset 1: Setting the MX mode (MX compatible sources only) preset 2: Subwoofer phase control (NORMAL/REVERSE)∗1 ∗1 When the monitor is connected, press bass engine to activate Audio Processor mode. 2 Press a preset button (1 through 4) 3 Press bass engine to return to adjust settings...
Displaying Spectrum Analyzer When using the optional expansion box (KCE104V), you can operate a connected external audio processor from the CVA-1004. 1 When an external audio processor is open , press and hold MUTE/SETUP for at least 2 seconds. to normal mode. ...-H700 is connected preset 1: Setting the MX mode (MX compatible sources only) preset 2: Subwoofer phase control (NORMAL/REVERSE)∗1 ∗1 When the monitor is connected, press bass engine to activate Audio Processor mode. 2 Press a preset button (1 through 4) 3 Press bass engine to return to adjust settings...
Owners Manual
Page 47
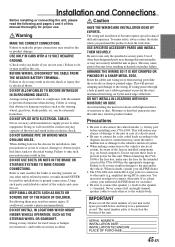
... damage to the vehicle's electrical system. • When making connections to make sure the fuse for the intended circuit of the CVA-1004 has the appropriate amperage. If so, please contact your dealer if you purchased this manual thoroughly for installations or ground connections. Failure...will exceed the current carrying capacity of the vehicle and cause fire etc. Avoid installing the unit in doubt, consult your ALPINE dealer. • The CVA-1004 uses female RCA-type jacks for connection to other units (e.g. This will prevent crimping and damage to take precautions so as...
... damage to the vehicle's electrical system. • When making connections to make sure the fuse for the intended circuit of the CVA-1004 has the appropriate amperage. If so, please contact your dealer if you purchased this manual thoroughly for installations or ground connections. Failure...will exceed the current carrying capacity of the vehicle and cause fire etc. Avoid installing the unit in doubt, consult your ALPINE dealer. • The CVA-1004 uses female RCA-type jacks for connection to other units (e.g. This will prevent crimping and damage to take precautions so as...
Owners Manual
Page 48
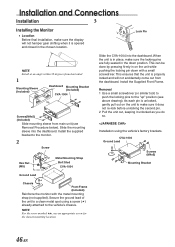
...Pull the unit out, keeping it is opened and closed in the chosen location. CVA-1004 Ground Lead Screws (M4x5) Mounting Bracket Ground Lead Chassis Front Frame (Included) Reinforce the monitor with a small screwdriver. When the unit is properly locked and will not hamper gear...with the metal mounting strap (not supplied). Installation using a screw ( ) already attached to the monitor. 2 Screw Hex Nut (M5) Metal Mounting Strap Bolt Stud CVA-1004 Slide the CVA-1004 into the dashboard. Install the supplied bracket to the vehicle's chassis. Slide the mounting sleeve into ...
...Pull the unit out, keeping it is opened and closed in the chosen location. CVA-1004 Ground Lead Screws (M4x5) Mounting Bracket Ground Lead Chassis Front Frame (Included) Reinforce the monitor with a small screwdriver. When the unit is properly locked and will not hamper gear...with the metal mounting strap (not supplied). Installation using a screw ( ) already attached to the monitor. 2 Screw Hex Nut (M5) Metal Mounting Strap Bolt Stud CVA-1004 Slide the CVA-1004 into the dashboard. Install the supplied bracket to the vehicle's chassis. Slide the mounting sleeve into ...

Owners Manual
Page 49
... an optional noise suppressor, connect it as far away from other leads as possible. Your Alpine dealer carries various noise suppressors, contact them for further information. • Your Alpine dealer knows best about noise prevention measures so consult your vehicle has no ACC power supply,..., use a pinch connector to connect the foot brake lead, parking brake lead, etc. 1 2 Vehicle Cable Pinch Connector Pliers Monitor Cable Stopper CVA-1004 FOOT BRAKE (Yellow/Black) Pinch Connector PARKING BRAKE (Yellow/Blue) Pinch Connector Foot brake lamp Foot brake lead Parking brake lamp ...
... an optional noise suppressor, connect it as far away from other leads as possible. Your Alpine dealer carries various noise suppressors, contact them for further information. • Your Alpine dealer knows best about noise prevention measures so consult your vehicle has no ACC power supply,..., use a pinch connector to connect the foot brake lead, parking brake lead, etc. 1 2 Vehicle Cable Pinch Connector Pliers Monitor Cable Stopper CVA-1004 FOOT BRAKE (Yellow/Black) Pinch Connector PARKING BRAKE (Yellow/Blue) Pinch Connector Foot brake lamp Foot brake lead Parking brake lamp ...

